DROPS Lima
DROPS Lima
65% Wool, 35% Alpaca
from 2.40 £ /50g
Get the yarn to make this pattern from 28.80£.

The yarn cost is calculated from the pattern’s smallest size and the yarn’s cheapest product type. Looking for an even better price? You might find it on the DROPS Deals!

DROPS SS24

Twilight

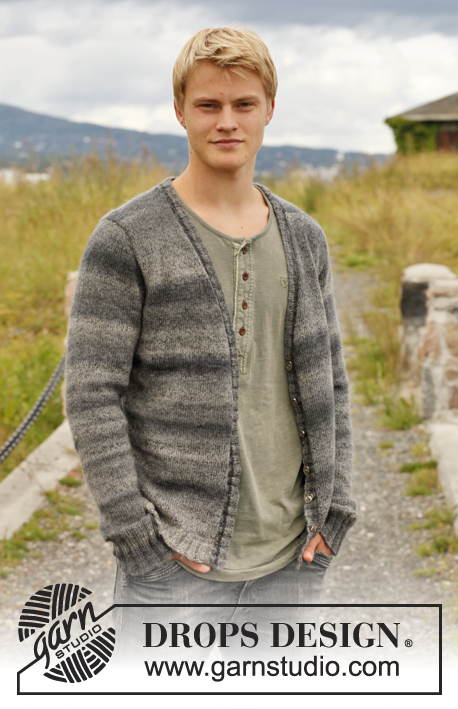
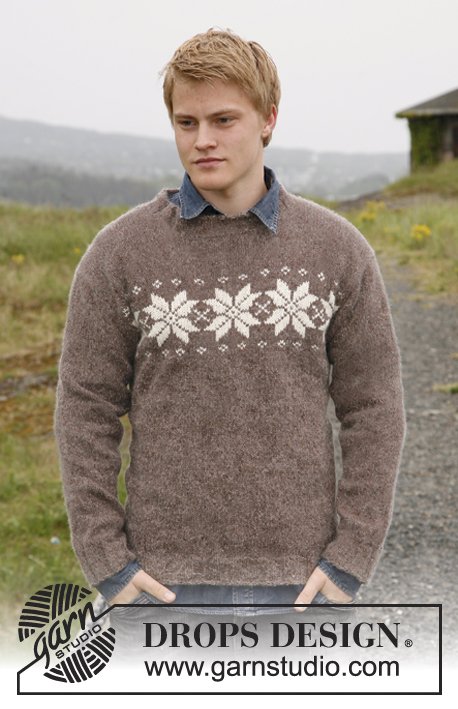
Men's knitted jumper with yoke in moss st and v-neck, in DROPS Lima. Size S-XXXL.

DROPS 135-39
DROPS design: Pattern no AC-019
Yarn group B
--------------------------------------------------------
Size: S - M - L - XL - XXL - XXXL

Materials: DROPS LIMA from Garnstudio
Colour no 0619, beige mix:
550-600-650-750-850-950 g
Or use:
DROPS ♥ You #3 from Garnstudio
No 03, brown
350-400-400-500-550-600 g

DROPS DOUBLE POINTED NEEDLES and CIRCULAR NEEDLE (80 cm) SIZE 4 mm - or size needed to get 21 sts x 28 rows in stocking st = 10 x 10 cm.
DROPS DOUBLE POINTED NEEDLES and CIRCULAR NEEDLE (80 cm) SIZE 3.5 mm - for rib.
--------------------------------------------------------

-------------------------------------------------------

Alternative Yarn – See how to change yarns here
Yarn Groups A to F – Use the same pattern and change the yarn here
Yarn usage using an alternative yarn – Use our yarn converter here

-------------------------------------------------------

DROPS Lima
DROPS Lima
65% Wool, 35% Alpaca
from 2.40 £ /50g
Get the yarn to make this pattern from 28.80£.

The yarn cost is calculated from the pattern’s smallest size and the yarn’s cheapest product type. Looking for an even better price? You might find it on the DROPS Deals!

Pattern instructions

NOTE: This pattern is written in British English. All measurements in charts are in cm. For conversion from cm to inches - click here. There are different terms for crocheting in British and American English. If this pattern includes crochet, click for "crochet terms" here. For this pattern in American English, please click here.
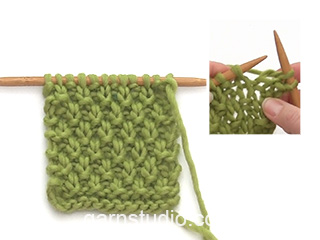
DOUBLE MOSS ST:
Row 1 (= from RS): * K 1, P 1 *, repeat from *-*.
Row 2 (= from WS): K over K and P over P.
Row 3 (= from RS): * P 1, K 1 *, repeat from *-*.
Row 4 (= from WS): P over P and K over K.
--------------------------------------------------------

BODY:
Worked in the round on circular needle. Cast on
213-234-255-288-318-351 sts on circular needle size 3.5 mm with Lima. Work rib K 1/P 2. When piece measures 4 cm, work 1 round in stocking st while AT THE SAME TIME dec
53-58-63-72-78-87 sts evenly (dec by K tog approx. every 3rd and 4th st) = 160-176-192-216-240-264 sts.
Insert 2 markers in the piece; at the beg of round and after 80-88-96-108-120-132 sts (marks the sides). Switch to circular needle size 4 mm. Then work stocking st in the round. REMEMBER THE KNITTING TENSION! When piece measures 15 cm, inc 1 st on each side of every marker by working 1 YO. On next round K YO twisted (i.e. work in back loop of st instead of front) to avoid holes. Repeat inc when piece measures 25 cm = 168-184-200-224-248-272 sts.
When piece measures 47-48-49-50-51-52 cm, work DOUBLE MOSS ST - see explanation above - while AT THE SAME TIME casting off 6 sts in each side for armholes (cast off 3 sts on each side of every marker). Finish each part separately.

BACK PIECE:
= 78-86-94-106-118-130 sts (1st row = WS). Continue DOUBLE MOSS ST while AT THE SAME TIME casting off for armholes at beg of row in each side as follows: 2 sts 0-1-2-4-6-8 times and 1 st 1-2-3-4-5-6 times = 76-78-80-82-84-86 sts. When piece measures 64-66-68-70-72-74 cm, cast off the middle 24-26-28-30-32-34 sts for neck and finish each shoulder separately. Then dec 1 st on next row from neck (dec by working the outermost 2 sts towards the neck tog) = 25 sts remain on shoulder in all sizes. Cast off when piece measures 66-68-70-72-74-76 cm.

FRONT PIECE:
= 78-86-94-106-118-130 sts (1st row = WS). Work double moss st and cast off for armholes as on back piece while AT THE SAME TIME when 5 cm in moss st vertically have been worked, cast off the middle 2 sts for neck on next row from RS and finish each shoulder separately. Then dec by working the outermost 2 sts towards the neck tog (work them tog so that they fit the pattern) at beg of every row from neck a total of 12-13-14-15-16-17 times. When all dec are done, 25 sts remain on shoulder in all sizes. Cast off when piece measures 66-68-70-72-74-76 cm.

SLEEVE:
Worked in the round on double pointed needles. Cast on 63-66-69-72-75-78 sts on double pointed needles size 3.5 mm with Lima. Work rib K 1/P 2. When piece measures 4 cm, K 1 round while AT THE SAME TIME dec 15-16-17-18-19-20 sts evenly (dec by K tog approx. every 3rd and 4th st) = 48-50-52-54-56-58 sts. Switch to double pointed needles size 4 mm. Insert a marker at the beg of the round. Then work in stocking st. When piece measures 8 cm, inc 1 st on each side of marker. Repeat inc every 5-4½-3½-3-2½-2½ cm a total of 10-11-13-15-17-18 times = 68-72-78-84-90-94 sts. When piece measures 57-57-56-56-54-53 cm (NOTE! Shorter measurements in the larger sizes because of longer sleeve cap and broader shoulder width) work double moss st over all sts while AT THE SAME TIME casting off 6 sts mid under sleeve (cast off 3 sts on each side of marker). Then work back and forth on circular needle. Continue to cast off for sleeve cap at beg of row in each side as follows: 2 sts 3-3-4-4-4-3 times and then 1 st 3-4-4-5-8-13 times. Then cast off 2 sts in each side until piece measures 64-65-65-66-66-67 cm. Then cast off 3 sts 1 time in each side. Cast off.
Piece measures 65-66-66-67-67-68 cm.

ASSEMBLY:
Sew the shoulder seams. Sew in the sleeves.

NECK EDGE:
Worked back and forth on circular needle from mid front of neck. Knit up 92-98-104-110-118-124 sts around the neck edge on circular needle size 3.5 mm, beg mid front. K 1 row from WS while AT THE SAME TIME inc 37-37-40-43-47-50 sts evenly (inc with 1 YO between approx. every 3rd and 4th st and sometimes closer). On next row work the YOs twisted. On next row from RS work rib as follows: 1 st in garter st, * K 1, P 2 *, repeat from *-* until 2 sts remain, finish with K 1 and 1 st in garter st. Continue like this and loosely cast off with K over K and P over P when rib measures 3.5 cm. Place right part of neck edge over the left part and fasten both edges with a couple of neat little sts at the bottom.

Diagram

diagram measurements
Do you have a question? See a list of frequently asked questions (FAQ)

Knitting tension is what determines the final measurements of your work, and is usually measured per 10 x 10 cm. It is provided like so: number of stitches in width x number of rows in height - eg: 19 stitches x 26 rows = 10 x 10 cm.

The knitting tension is very individual; some people knit/crochet loosely while others work tightly. You adjust the knitting tension with the needle size, which is why the suggested needle size is only meant as a guide! You need to adjust this (up or down) to ensure that YOUR knitting tension matches the knitting tension provided in the pattern. If you work with a different knitting tension than provided you will have a different yarn consumption, and your work will have different measurements than what the pattern suggests.

The knitting tension also determines which yarns can replace each other. As long as you achieve the same knitting tension you can replace one yarn with another.

See DROPS lesson: How to measure your tension/gauge

See DROPS video: How to make a gauge tension swatch

The required amount of yarn is provided in grams, eg: 450 g. To calculate how many balls you’ll need you first need to know how many grams are in 1 ball (25g, 50g or 100g). This information is available if you click on the individual yarn quality on our pages. Divide the amount required with the amount of each ball. For example, if each ball is 50g (the most common amount), the calculation will be as follows: 450 / 50 = 9 balls.

The important thing when changing from one yarn to another is that the knitting/crochet tension remains the same. This is so that the measurements of the finished piece will be the same as on the sketch provided. It is easier to achieve the same knitting tension using yarns from the same yarn group. It is also possible to work with multiple strands of a thinner yarn to achieve the knitting tension of a thicker one. Please try our yarn converter. We recommend you to always work a test swatch.

Please NOTE: when changing yarn the garment might have a different look and feel to the garment in the photo, due to individual properties and qualities of each yarn.

See DROPS lesson: Can I use a different yarn than the one mentioned in the pattern?

All our yarns are categorised into yarn groups (from A to F) according to thickness and knitting tension – group A contains the thinnest yarns and group F the thickest. This makes it easier for you to find alternative yarns to our patterns, should you wish to switch yarn. All yarns within the same group have a similar knitting tension and can easily replace each other. However, different yarn qualities have different structures and properties which will give the finished work a unique look and feel.

Click here for an overview of the yarns in each yarn group

At the top of all our patterns you’ll find a link to our yarn calculator, which is a helpful tool should you wish to use a different yarn than suggested. By filling in the yarn quality you wish to replace, the amount (in your size) and number of strands, the calculator will present good alternative yarns with the same knitting tension. Additionally it will tell you how much you’ll require in the new qualities and whether you’ll need to work with multiple strands. Most skeins are 50g (some are 25g or 100g).

If the pattern is worked with multiple colours, every colour will have to be calculated separately. Similarly, if the pattern is worked with several strands of different yarns (for example 1 strand Alpaca and 1 strand Kid-Silk) you will have to find alternatives for each, individually.

Click here to see our yarn calculator

Since different yarns have different qualities and textures we have chosen to keep the original yarn in our patterns. However, you can easily find options among our available qualities by using our yarn calculator, or simply pick a yarn from the same yarn group.

It is possible that some retailers still have discontinued yarns in stock, or that someone has a few skeins at home that they would like to find patterns for.

The yarn calculator will provide both alternative yarn as well as required amount in the new quality.

If you think it's hard to decide what size to make, it can be a good idea to measure a garment you own already and like the size of. Then you can pick the size by comparing those measures with the ones available in the pattern's size chart.

You'll find the size chart at the bottom of the pattern.

See DROPS lesson: How to read size chart

The needle size provided in the pattern serves only as a guide, the important thing is to follow the knitting tension. And since knitting tension is very individual, you will have to adjust the needle size to ensure that YOUR tension is the same as in the pattern – maybe you’ll have to adjust 1, or even 2 needle sizes, up or down to achieve the correct tension. For this, we recommend that you work test swatches.

Should you work with a different knitting tension than the one provided, the measurements of the finished garment might deviate from the measurement sketch.

See DROPS lesson: How to measure your tension/gauge

See DROPS video: How to make a tension/gauge swatch

Working a garment top-down provides more flexibility and room for personal adjustment. For example it is easier to try the garment on while working, as well as making adjustments to length of yoke and shoulder caps.

The instructions are carefully explaining every step, in the correct order. Diagrams are adjusted to the knitting direction and are worked as usual.

The diagram depicts all rows/rounds, and every stitch seen from the right side. It is read from bottom to top, from right to left. 1 square = 1 stitch.

When working back and forth, every other row is worked from the right side and every other row is worked from the wrong side. When working from the wrong side, the diagram will have to be worked reversed: from left to right, knit stitches are purled, purl stitches are knit etc.

When working in the round every round is worked from the right side and the diagram are worked from right to left on all rounds.

See DROPS lesson: How to read knitting diagrams

The diagram depicts all rows/rounds, and every stitch seen from the right side. It is worked from bottom to top, from right to left.

When working back and forth every other row is worked from the right side: from right to left and every other row is worked from the wrong side: from left to right.

When working in the round, every row in the diagram are worked from the right side, from right to left.

When working a circular diagram you start in the middle and work your way outwards, counter clockwise, row by row.

The rows usually start with a given number of chain stitches (equivalent to the height of the following stitch), this will either be depicted in the diagram or explained in the pattern.

See DROPS lesson: How to read crochet diagrams

Instructions for working several diagrams after each other on the same row/round, will often be written like so: “work A.1, A.2, A.3 a total of 0-0-2-3-4 times". This means you work A.1 once, then A.2 is worked once, and A.3 is repeated (in width) the number of times provided for your size – in this case like so: S = 0 times, M = 0 times, L=2 times, XL= 3 times and XXL = 4 times.

The diagrams are worked as usual: begin with the first row in A.1, then work the first row in A.2 etc.

See DROPS lesson: How to read knitting diagrams

See DROPS lesson: How to read crochet diagrams

The total width of the garment (from wrist-to-wrist) will be larger in the larger sizes, despite the actual sleeves being shorter. The larger sizes have longer sleeve caps and wider shoulders, so there will be a good fit in all sizes.

The measurement sketch/schematic drawing provides information regarding the full length of the garment. If it’s a jumper or a jacket the length is measured from the highest point on the shoulder closest to the neckline, and straight down to the bottom of the garment. It is NOT measured from the tip of shoulder. Similarly, the length of yoke is measured from the highest point on the shoulder and down to where yoke is split into body and sleeves.

On a jacket measures are never taken along bands, unless specifically stated. Always measure inside band stitches when measuring the length.

See DROPS lesson: How to read a schematic drawing

Diagrams are often repeated on the round or in height. 1 repeat is the diagram the way it appears in the pattern. If it says to work 5 repeats of A.1 in the round, then you work A.1 a total of 5 times after/next to each other in the round. If it says to work 2 repeats of A.1 vertically/in height you work the entire diagram once, then begin again at the start and work the entire diagram one more time.

Chain stitches are slightly narrower than other stitches and to avoid working the cast-on edge too tight, we simply chain more stitches to begin with. The stitch count will be adjusted on the following row to fit the pattern and measurement sketch.

The rib edge is more elastic and will contract slightly compared to, for example, stocking stitch. By increasing before the rib edge, you avoid a visible difference in width between the rib edge and the rest of the body.

It’s very easy to cast off too tightly, and by making yarn overs while casting off (and simultaneously casting these off) you avoid a too tight cast off edge.

See DROPS video: How to bind off with yarn overs (yo)

To achieve an even increase (or decrease) you can increase on, for example: every 3rd and 4th row alternately, like so: work 2 rows and increase on the 3rd row, work 3 rows and increase on the 4th. Repeat this until the increase is complete.

See DROPS lesson: Increase or decrease 1 st on every 3rd and 4th row alternately

Should you prefer to work in the round instead of back and forth, you may of course adjust the pattern. You’ll need to add steeks mid-front (usually 5 stitches), and follow the instructions. When you would normally turn and work from the wrong side, simply work across the steek and continue in the round. At the end you’ll cut the piece open, pick up stitches to work bands, and cover the cut edges.

See DROPS video: How to knit steeks and cut open

Should you prefer to work back and forth instead of in the round, you may of course adjust the pattern so you work the pieces separately and then assemble them at the end. Divide the stitches for the body in 2, add 1 edge stitch in each side (for sewing) and work the front and back pieces separately.

See DROPS lesson: Can I adapt a pattern for circular needles into straight needles?

Pattern repeats can vary slightly in the different sizes, in order to get the correct proportions. If you’re not working the exact same size as the garment in the photo, yours might deviate slightly. This has been carefully developed and adjusted so that the complete impression of the garment is the same in all sizes.

Make sure to follow instructions and diagrams for your size!

If you have found a pattern you like which is available in women’s size it’s not very difficult to convert it to men’s size. The biggest difference will be the length of sleeves and body. Start working on the women size that you think would fit across the chest. The additional length will be worked right before you cast off for the armhole/sleeve cap. If the pattern is worked top-down you can add the length right after the armhole or before the first decrease on sleeve.

Regarding additional yarn amount, this will depend on how much length you add, but it is better with a skein too many than too few.

All yarns will have excess fibres (from production) that might come off as lint or shedding. Brushed yarns (ie hairier yarns) have more of these loose, excess fibres, causing more shedding.

Shedding also depends on what is worn under or over the garment, and whether this pulls at the yarn fibres. It’s therefore not possible to guarantee that there will be no shedding

Below are some tips on how to get the best result when working with hairier yarns:

1. When the garment is finished (before you wash it) shake it vigorously so the looser hairs come off. NOTE: do NOT use a lint roller, brush or any method that pulls at the yarn.

2. Place the garment in a plastic bag and put it in your freezer - the temperature will cause the fibres to become less attached to each other, and excess fibres will come off easier.

3. Leave in the freezer for a few hours before taking it out and shaking it again.

4. Wash the garment according to the instructions on the yarn label.

Pilling is a natural process that happens to even the most exclusive of fibers. It's a natural sign of wear and tear that is hard to avoid, and that is most visible in high friction areas of your garment like a sweater's arms and cuffs.

You can make your garment look as new by removing the pilling, using a fabric comb or a pill/lint remover.

Still can't find the answer you need? Then scroll down and leave your question so one of our experts can try to help you. This will be done normally within 5 to 10 working days.
In the meantime, you can read the questions and answers that others have left to this pattern or join the DROPS Workshop on Facebook to get help from fellow knitters/crocheters!

You might also like...

Twilight

Heike Mitteregger, Germany

Twilight

Anna, Czech Republic

Post a comment to pattern DROPS 135-39

We would love to hear what you have to say about this pattern!

If you want to leave a question, please make sure you select the correct category in the form below, to speed up the answering process. Required fields are marked *.

Comments / Questions (64)

country flag Laura Rocha Martinez wrote:

Buenas tardes, me encanta ésta página. Vivo en Colombia, dónde puedo comprar las lanas?

07.01.2020 - 23:15

DROPS Design answered:

Hola Laura. Aquí tienes el línk de las tiendas Drops con envío internacional: https://www.garnstudio.com/findastore.php?s=w&cid=23

12.01.2020 - 23:48

country flag Hanne wrote:

Tak for virkelig hurtig og brugbar forklaring og svar på mit spørgsmål!👍

02.12.2019 - 09:59

country flag Hanne Rasmussen wrote:

Det undrer mig at der skal tages 78 m ind efter rubben i str xl Er det korrekt? Det er jo mere end 30 cm?

30.11.2019 - 12:18

DROPS Design answered:

Hei Hanne! Design har valgt å felle såpass mange masker etter vrangborden for å opprettholde fasongen på genseren. Etter fellingen vil bolen måle 102cm i bredden, dette utgjør rundt 16cm mindre enn vrangborden (husk at vrangborden trekker seg sammen). Klesstørrelser varierer fra land til land, og det kan derfor være lurt måle noen av ens egne plagg før en velger hvilken størrelse man vil strikke. Se gjerne " her . Lykke til!

02.12.2019 - 09:49

country flag Kristian wrote:

Der er står under rygstrik, at "Der fortsættes med dobbelt perlestrik. Samtidig med at der lukkes m af til ærmegab i beg af p i hver side således: 2 m 0-1-2-4-6-8 gange og 1 m 1-2-3-4-5-6 gange...." Hvornår skal man lukke af til ærmegab? Er det umiddelbart efter at have lukket 2x3=6 masker af, eller skal man strikke nogle omgange? Jeg strikker XL og er også i tvivl om, hvorvidt jeg først skal lukke 4x2 masker af i hver side og herefter 4x1 maske i hver side.

24.11.2019 - 12:47

DROPS Design answered:

Hei Kristian. På siste omgang du strikker rundt, felles det til ermhull (6 masker til hvert ermhull). Nå strikkes forstykket og bakstykket hver for seg OG NÅ begynner du med fellingen på begynnelsen av hver pinne. I str. XL skal du felle av 2 masker i hver side 4 ganger (du har da strikket 8 pinner og felt 16 masker), deretter feller du 1 maske i hver side 4 ganger (du har da strikket 8 nye pinner og felt 8 masker til). Til sammen har du strikket 16 pinner og har felt 12 masker i hver side, = 24 felte masker. God Fornøyelse!

25.11.2019 - 09:02

country flag Paulette Heppner wrote:

I would like to knit this for a young man whose chest measurement is 40.5 inches. He generally takes a size large, but it looks like he should be between an XL and XXL in this pattern. Is this right? I generally knit right on gauge.

20.07.2019 - 21:36

DROPS Design answered:

Dear Mrs Heppner, the best way to find the matching size is to measure one jumper he is liking the shape and compare these measurements to those in the chart. Read more about sizing here. Happy knitting!

06.08.2019 - 08:52

country flag Hilde wrote:

Voor het eerst dat een patroon van Drops zo tegenvalt. ik heb de boorden zonder extra steken gemaakt omdat het anders gaat uitlubberen maar dat is het probleem niet. De mouwen zijn te smal voor de mouwkoppen. ik heb alles tien keer nageteld, nagerekend, nagemeten maar het komt gewoon niet mooi uit. Jammer.

08.07.2019 - 10:54

country flag Britt-Mari Persson wrote:

Ok, tack.

28.05.2019 - 13:50

country flag Britt-Mari Persson wrote:

Hej! Om jag förstått beskrivningen rätt kan jag alltså välja att sticka med rundsticka eller sticka fram och tillbaka? tacksam för svar.

28.05.2019 - 13:22

DROPS Design answered:

Hei Britt-Mari. Bolen strikkes rundt på rundpinne opp til ermhullet. Etter at du har felt av masker til ermhull strikkes forstykket og bakstykket frem og tilbake, hver for seg. Ermene strikkes rundt på rundpinne. Du kan selvfølgelig tilpasse oppskriften til å strikke forstykket og bakstykket frem og tilbake hele veien, og så sy sammen i hver side tilslutt, om du heller ønsker det. God fornøyelse

28.05.2019 - 13:40

country flag Luminita wrote:

Si, sto facendo la taglia XXXL . Quando dice: e poi continuare a intrecciare le maglie all'inizio del ferro a ogni lato: 2 maglie per 3 volte (quindi 6 maglie) si riferisce ad un solo lato ? Uguale vale per le 13 m , vanno diminuite insieme alle 6 di un lato o si dovrebbe fare in un giro successivo le 13 ed in un altro ancora le 2m. da ogni lato fino ad arrivare a 67cm? forse lì che ho sbagliato! Molte grazie

17.04.2019 - 16:06

DROPS Design answered:

Buongiorno Luminita. Deve chiudere le maglie da entrambi i lati; all'inizio del ferro, sia nei ferri di andata che in quelli di ritorno. Quindi: intrecciare 2 m per 3 volte da ciascun lato, vuol dire che chiude 6 m sia sul lato destro della manica che sul lato sinistro (in tutto 12 maglie in meno). Poi intreccia 1 m 13 volte da ciascun lato (quindi in tutto 26 maglie in meno) e così via. Buon lavoro!

17.04.2019 - 16:54

country flag Luminita wrote:

Sto facendo le maniche di questo modello, e mi sto rendendo conto che non combacia la manica dallo scalfo in su (l'arrotondamento) con il maglione e non capisco dove ho sbagliato! ho diminuito le prime 6 (le 3 m. da ogni lato del segnapunti) dopo le 6 + 13 = 19 (da un lato) e ho ripetuto dall'altro lato. e poi ho continuato con 2 m ad ogni lato fino a quando il lavoro misura 67 cm. potrebbe cortesemente spiegarmi dove ho sbagliato?

16.04.2019 - 18:47

DROPS Design answered:

Buonasera Luminita, che taglia sta lavorando? Ad esempio per la taglia XXXL a 53 cm deve diminuire 3 maglie a ogni lato del segnapunti (6 maglie totali) e poi continuare a intrecciare le maglie all'inizio del ferro a ogni lato: 2 maglie per 3 volte (quindi 6 maglie) e poi 1 maglia per 13 volte (quindi 26 maglie), poi continuare a intrecciare 2 maglie per lato fino a quando il lavoro misura 67 cm. E poi intrecciare ancora 3 maglie ad ogni lato. Buon lavoro!

16.04.2019 - 19:09