DROPS Karisma
DROPS Karisma
100% Wool
from 2.30 £ /50g
Get the yarn to make this pattern from 32.20£.

The yarn cost is calculated from the pattern’s smallest size and the yarn’s cheapest product type. Looking for an even better price? You might find it on the DROPS Deals!

DROPS SS24

Sir Lancelot

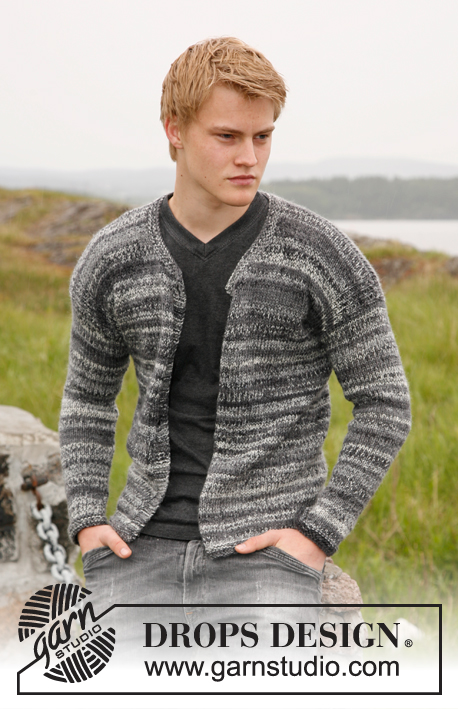
Men's knitted jumper with textured pattern and v-neck, in DROPS Karisma. Sizes S to XXXL

DROPS 135-36
DROPS design: Pattern no U-645
Yarn group B
--------------------------------------------------------
Size: S - M - L - XL - XXL - XXXL

Materials: DROPS KARISMA from Garnstudio
Colour no 64, greypurple:
650-700-750-850-900-1000 g

DROPS STRAIGHT NEEDLES SIZE 4 mm - or size needed to get 21 sts x 28 rows in stocking st = 10 x 10 cm.
DROPS STRAIGHT NEEDLES SIZE 3 mm - for rib.
--------------------------------------------------------

-------------------------------------------------------

Alternative Yarn – See how to change yarns here
Yarn Groups A to F – Use the same pattern and change the yarn here
Yarn usage using an alternative yarn – Use our yarn converter here

-------------------------------------------------------

DROPS Karisma
DROPS Karisma
100% Wool
from 2.30 £ /50g
Get the yarn to make this pattern from 32.20£.

The yarn cost is calculated from the pattern’s smallest size and the yarn’s cheapest product type. Looking for an even better price? You might find it on the DROPS Deals!

Pattern instructions

NOTE: This pattern is written in British English. All measurements in charts are in cm. For conversion from cm to inches - click here. There are different terms for crocheting in British and American English. If this pattern includes crochet, click for "crochet terms" here. For this pattern in American English, please click here.
GARTER ST (back and forth on needle): K all rows.

PATTERN:
See diagrams M.1 to M.3 – diagrams show pattern from RS. M.1 = 24 sts in width, M.2 = 12 sts in width and M.3 = 18 sts in width.
--------------------------------------------------------

BACK PIECE:
Worked back and forth on needle.
Cast on 110-122-134-146-158-170 sts (incl 1 edge st in each side) on needle size 3 mm with Karisma. Work rib as follows (seen from from RS): 1 edge st in GARTER ST - see explanation above, * K 1, P 3 *, repeat from *-*, finish with 1 edge st in garter st. When rib measures approx. 5 cm (adjust so that next row is worked from WS), switch to needle size 4 mm. P 1 row from WS while at the same time dec 12 sts evenly = 98-110-122-134-146-158 sts. Work next row as follows (from RS):
SIZE S:
1 edge st in garter st, diagram M.1, M.2, M.1, M.2, M.1 and 1 edge st in garter st.
SIZE M:
1 edge st in garter st, 6 sts in stocking st, diagram M.1, M.2, M.1, M.2, M.1, 6 sts in stocking st and 1 edge st in garter st.
SIZE L:
1 edge st in garter st, diagram M.2, M.1, M.2, M.1, M.2, M.1, M.2 and 1 edge st in garter st.
SIZE XL:
1 edge st in garter st, 6 sts in stocking st, diagram M.2, M.1, M.2, M.1, M.2, M.1, M.2, 6 sts in stocking st and 1 edge st in garter st.
SIZE XXL:
1 edge st in garter st, 12 sts of diagram M.1 – start in the 13th st from the right side in diagram, diagram M.2, M.1, M.2, M.1, M.2, M.1, M.2 and 12 sts of diagram M.1 – start in first st in diagram - and 1 edge st in garter st.
SIZE XXXL:
1 edge st in garter st, 18 sts of diagram M.1 – start in the 7th st from the right side in diagram, diagram M.2, M.1, M.2, M.1, M.2, M.1, M.2 and 18 sts of diagram M.1 – start in first st in diagram - and 1 edge st in garter st.
ALL SIZES:
Continue to work the same way until piece measures 48-49-50-51-52-53 cm. REMEMBER THE KNITTING TENSION! Now cast off 1-2-2-3-4-5 sts in each side for armholes (i.e. cast off at the beg of the next 2 rows) = 96-106-118-128-138-148 sts. Continue the pattern as before with 1 edge st in garter st in each side. When piece measures approx. 58-60-62-64-66-68 cm (adjust after 1 half repetition or 1 whole repetition of diagram M.1 and M.2 vertically), work 2 rows in stocking st, then continue with diagram M.3 over all sts (except edge st) – see arrow for your size; this marks where to beg in the diagram. AT THE SAME TIME when 4 rows remain of diagram M.3, cast off the middle 36-38-40-42-44-46 sts for neck and finish each shoulder separately. Continue to cast off 2 sts on next row from neck = 28-32-37-41-45-49 sts remain on the shoulder. When diagram M.3 has been worked, work approx. 1 cm in stocking st, then cast off. Piece measures approx. 68-70-72-74-76-78 cm.

FRONT PIECE:
Cast on and work as back piece. Cast off for armhole as on back piece and continue until piece measures approx. 58-60-62-64-66-68 cm. Then work 2 rows in stocking st - while at the same time on 1st row casting off the middle 4 sts for neck and finish each shoulder separately. Work pattern as on back piece (make sure that diagram M.3 is worked the same way on each side of neck) – AT THE SAME TIME cast off on every row from neck: 2 sts 5-6-7-8-9-10 times and then 1 st 8-7-6-5-4-3 times = 28-32-37-41-45-49 sts remain on shoulder. Cast off when same no of rows has been worked as on back piece.

SLEEVE:
Worked back and forth on needle.
Cast on 62 sts for all sizes (incl 1 edge st in each side) on needle size 3 mm with Karisma. Work rib as follows (seen from from RS): 1 edge st in garter st, * K 1, P 3 *, repeat from *-*, finish with 1 edge st in garter st. When piece measures approx. 5 cm (adjust so that next row is worked from WS), switch to needle size 4 mm. P 1 row from WS. Work next row as follows: 1 edge st in garter st, diagram M.1, M.2, M.1 and 1 edge st in garter st, continue like this. When piece measures 9 cm, inc 1 st in each side. Repeat inc every 9th-8th-6th-5th-4th-4th row a total of 12-14-16-18-20-21 times - work the inc sts in stocking st = 86-90-94-98-102-104 sts. When piece measures approx. 46-46-44-42-40-39 cm (adjust after 1 half or 1 whole repetition of diagram M.1 and M.2 vertically, inc should be finished), work 2 rows in stocking st, then continue with diagram M.3 – start in first st on right side of diagram (the pattern will not fit at the end of row). After diagram M.3 work (if there is room) in stocking st until piece measures 56-56-54-52-50-49 cm (shorter measurements in the larger sizes because of broader shoulder width), cast off.

ASSEMBLY:
Sew the shoulder seams.

NECK:
Knit up approx. 119 to 139 sts (divisible by 4 + 3) around the neck on circular needle size 3 mm with Karisma – beg mid front. Then the piece is worked back and forth from mid front. First row from WS is worked as follows: 1 edge st in garter st, * P 1, K 3 *, repeat from *-* and finish with P 1 and 1 edge st in garter st. Continue with K over K and P over P and edge st in garter st until neck edge measures approx. 6 cm. Cast off with K over K and P over P. Place the neck on top of each other mid front, left side over right, fasten with stitches from both WS and RS.

Sew the sleeves inside 1 edge st. Sew sleeve and side seams in one inside 1 edge st.

This pattern has been corrected.

Updated online: 21.11.2011
SIZE XL:
1 edge st in garter st, 6 sts in stocking st, diagram M.2, M.1, M.2, M.1, M.2, M.1, M.2, 6 sts in stocking st and 1 edge st in garter st.

Diagram

symbols = K from RS, P from WS
symbols = P from RS, K from WS
symbols = slip 4 sts on cable needle in front of piece, K 4, K 4 from cable needle
diagram

Each of our patterns has specific tutorial videos to help you.

Do you have a question? See a list of frequently asked questions (FAQ)

Knitting tension is what determines the final measurements of your work, and is usually measured per 10 x 10 cm. It is provided like so: number of stitches in width x number of rows in height - eg: 19 stitches x 26 rows = 10 x 10 cm.

The knitting tension is very individual; some people knit/crochet loosely while others work tightly. You adjust the knitting tension with the needle size, which is why the suggested needle size is only meant as a guide! You need to adjust this (up or down) to ensure that YOUR knitting tension matches the knitting tension provided in the pattern. If you work with a different knitting tension than provided you will have a different yarn consumption, and your work will have different measurements than what the pattern suggests.

The knitting tension also determines which yarns can replace each other. As long as you achieve the same knitting tension you can replace one yarn with another.

See DROPS lesson: How to measure your tension/gauge

See DROPS video: How to make a gauge tension swatch

The required amount of yarn is provided in grams, eg: 450 g. To calculate how many balls you’ll need you first need to know how many grams are in 1 ball (25g, 50g or 100g). This information is available if you click on the individual yarn quality on our pages. Divide the amount required with the amount of each ball. For example, if each ball is 50g (the most common amount), the calculation will be as follows: 450 / 50 = 9 balls.

The important thing when changing from one yarn to another is that the knitting/crochet tension remains the same. This is so that the measurements of the finished piece will be the same as on the sketch provided. It is easier to achieve the same knitting tension using yarns from the same yarn group. It is also possible to work with multiple strands of a thinner yarn to achieve the knitting tension of a thicker one. Please try our yarn converter. We recommend you to always work a test swatch.

Please NOTE: when changing yarn the garment might have a different look and feel to the garment in the photo, due to individual properties and qualities of each yarn.

See DROPS lesson: Can I use a different yarn than the one mentioned in the pattern?

All our yarns are categorised into yarn groups (from A to F) according to thickness and knitting tension – group A contains the thinnest yarns and group F the thickest. This makes it easier for you to find alternative yarns to our patterns, should you wish to switch yarn. All yarns within the same group have a similar knitting tension and can easily replace each other. However, different yarn qualities have different structures and properties which will give the finished work a unique look and feel.

Click here for an overview of the yarns in each yarn group

At the top of all our patterns you’ll find a link to our yarn calculator, which is a helpful tool should you wish to use a different yarn than suggested. By filling in the yarn quality you wish to replace, the amount (in your size) and number of strands, the calculator will present good alternative yarns with the same knitting tension. Additionally it will tell you how much you’ll require in the new qualities and whether you’ll need to work with multiple strands. Most skeins are 50g (some are 25g or 100g).

If the pattern is worked with multiple colours, every colour will have to be calculated separately. Similarly, if the pattern is worked with several strands of different yarns (for example 1 strand Alpaca and 1 strand Kid-Silk) you will have to find alternatives for each, individually.

Click here to see our yarn calculator

Since different yarns have different qualities and textures we have chosen to keep the original yarn in our patterns. However, you can easily find options among our available qualities by using our yarn calculator, or simply pick a yarn from the same yarn group.

It is possible that some retailers still have discontinued yarns in stock, or that someone has a few skeins at home that they would like to find patterns for.

The yarn calculator will provide both alternative yarn as well as required amount in the new quality.

If you think it's hard to decide what size to make, it can be a good idea to measure a garment you own already and like the size of. Then you can pick the size by comparing those measures with the ones available in the pattern's size chart.

You'll find the size chart at the bottom of the pattern.

See DROPS lesson: How to read size chart

The needle size provided in the pattern serves only as a guide, the important thing is to follow the knitting tension. And since knitting tension is very individual, you will have to adjust the needle size to ensure that YOUR tension is the same as in the pattern – maybe you’ll have to adjust 1, or even 2 needle sizes, up or down to achieve the correct tension. For this, we recommend that you work test swatches.

Should you work with a different knitting tension than the one provided, the measurements of the finished garment might deviate from the measurement sketch.

See DROPS lesson: How to measure your tension/gauge

See DROPS video: How to make a tension/gauge swatch

Working a garment top-down provides more flexibility and room for personal adjustment. For example it is easier to try the garment on while working, as well as making adjustments to length of yoke and shoulder caps.

The instructions are carefully explaining every step, in the correct order. Diagrams are adjusted to the knitting direction and are worked as usual.

The diagram depicts all rows/rounds, and every stitch seen from the right side. It is read from bottom to top, from right to left. 1 square = 1 stitch.

When working back and forth, every other row is worked from the right side and every other row is worked from the wrong side. When working from the wrong side, the diagram will have to be worked reversed: from left to right, knit stitches are purled, purl stitches are knit etc.

When working in the round every round is worked from the right side and the diagram are worked from right to left on all rounds.

See DROPS lesson: How to read knitting diagrams

The diagram depicts all rows/rounds, and every stitch seen from the right side. It is worked from bottom to top, from right to left.

When working back and forth every other row is worked from the right side: from right to left and every other row is worked from the wrong side: from left to right.

When working in the round, every row in the diagram are worked from the right side, from right to left.

When working a circular diagram you start in the middle and work your way outwards, counter clockwise, row by row.

The rows usually start with a given number of chain stitches (equivalent to the height of the following stitch), this will either be depicted in the diagram or explained in the pattern.

See DROPS lesson: How to read crochet diagrams

Instructions for working several diagrams after each other on the same row/round, will often be written like so: “work A.1, A.2, A.3 a total of 0-0-2-3-4 times". This means you work A.1 once, then A.2 is worked once, and A.3 is repeated (in width) the number of times provided for your size – in this case like so: S = 0 times, M = 0 times, L=2 times, XL= 3 times and XXL = 4 times.

The diagrams are worked as usual: begin with the first row in A.1, then work the first row in A.2 etc.

See DROPS lesson: How to read knitting diagrams

See DROPS lesson: How to read crochet diagrams

The total width of the garment (from wrist-to-wrist) will be larger in the larger sizes, despite the actual sleeves being shorter. The larger sizes have longer sleeve caps and wider shoulders, so there will be a good fit in all sizes.

The measurement sketch/schematic drawing provides information regarding the full length of the garment. If it’s a jumper or a jacket the length is measured from the highest point on the shoulder closest to the neckline, and straight down to the bottom of the garment. It is NOT measured from the tip of shoulder. Similarly, the length of yoke is measured from the highest point on the shoulder and down to where yoke is split into body and sleeves.

On a jacket measures are never taken along bands, unless specifically stated. Always measure inside band stitches when measuring the length.

See DROPS lesson: How to read a schematic drawing

Diagrams are often repeated on the round or in height. 1 repeat is the diagram the way it appears in the pattern. If it says to work 5 repeats of A.1 in the round, then you work A.1 a total of 5 times after/next to each other in the round. If it says to work 2 repeats of A.1 vertically/in height you work the entire diagram once, then begin again at the start and work the entire diagram one more time.

Chain stitches are slightly narrower than other stitches and to avoid working the cast-on edge too tight, we simply chain more stitches to begin with. The stitch count will be adjusted on the following row to fit the pattern and measurement sketch.

The rib edge is more elastic and will contract slightly compared to, for example, stocking stitch. By increasing before the rib edge, you avoid a visible difference in width between the rib edge and the rest of the body.

It’s very easy to cast off too tightly, and by making yarn overs while casting off (and simultaneously casting these off) you avoid a too tight cast off edge.

See DROPS video: How to bind off with yarn overs (yo)

To achieve an even increase (or decrease) you can increase on, for example: every 3rd and 4th row alternately, like so: work 2 rows and increase on the 3rd row, work 3 rows and increase on the 4th. Repeat this until the increase is complete.

See DROPS lesson: Increase or decrease 1 st on every 3rd and 4th row alternately

Should you prefer to work in the round instead of back and forth, you may of course adjust the pattern. You’ll need to add steeks mid-front (usually 5 stitches), and follow the instructions. When you would normally turn and work from the wrong side, simply work across the steek and continue in the round. At the end you’ll cut the piece open, pick up stitches to work bands, and cover the cut edges.

See DROPS video: How to knit steeks and cut open

Should you prefer to work back and forth instead of in the round, you may of course adjust the pattern so you work the pieces separately and then assemble them at the end. Divide the stitches for the body in 2, add 1 edge stitch in each side (for sewing) and work the front and back pieces separately.

See DROPS lesson: Can I adapt a pattern for circular needles into straight needles?

Pattern repeats can vary slightly in the different sizes, in order to get the correct proportions. If you’re not working the exact same size as the garment in the photo, yours might deviate slightly. This has been carefully developed and adjusted so that the complete impression of the garment is the same in all sizes.

Make sure to follow instructions and diagrams for your size!

If you have found a pattern you like which is available in women’s size it’s not very difficult to convert it to men’s size. The biggest difference will be the length of sleeves and body. Start working on the women size that you think would fit across the chest. The additional length will be worked right before you cast off for the armhole/sleeve cap. If the pattern is worked top-down you can add the length right after the armhole or before the first decrease on sleeve.

Regarding additional yarn amount, this will depend on how much length you add, but it is better with a skein too many than too few.

All yarns will have excess fibres (from production) that might come off as lint or shedding. Brushed yarns (ie hairier yarns) have more of these loose, excess fibres, causing more shedding.

Shedding also depends on what is worn under or over the garment, and whether this pulls at the yarn fibres. It’s therefore not possible to guarantee that there will be no shedding

Below are some tips on how to get the best result when working with hairier yarns:

1. When the garment is finished (before you wash it) shake it vigorously so the looser hairs come off. NOTE: do NOT use a lint roller, brush or any method that pulls at the yarn.

2. Place the garment in a plastic bag and put it in your freezer - the temperature will cause the fibres to become less attached to each other, and excess fibres will come off easier.

3. Leave in the freezer for a few hours before taking it out and shaking it again.

4. Wash the garment according to the instructions on the yarn label.

Pilling is a natural process that happens to even the most exclusive of fibers. It's a natural sign of wear and tear that is hard to avoid, and that is most visible in high friction areas of your garment like a sweater's arms and cuffs.

You can make your garment look as new by removing the pilling, using a fabric comb or a pill/lint remover.

Still can't find the answer you need? Then scroll down and leave your question so one of our experts can try to help you. This will be done normally within 5 to 10 working days.
In the meantime, you can read the questions and answers that others have left to this pattern or join the DROPS Workshop on Facebook to get help from fellow knitters/crocheters!

You might also like...

Post a comment to pattern DROPS 135-36

We would love to hear what you have to say about this pattern!

If you want to leave a question, please make sure you select the correct category in the form below, to speed up the answering process. Required fields are marked *.

Comments / Questions (120)

country flag Paola wrote:

Ho un'altra domanda: il motivo M2 dopo i primi 6 ferri, ha un intreccio. Ci sono poi altri 5 ferri fino alla fine del motivo, ma il seguente intreccio praticamente è dopo 11 ferri. È giusto così?

08.02.2016 - 11:39

DROPS Design answered:

Buongiorno Paola, è corretto, il primo intreccio è sul 7° ferro e quello successivo è sul 12° ferro dall'intreccio. Buon lavoro!

08.02.2016 - 12:58

country flag Paola wrote:

Sto iniziando questo maglione ma quando passo ai ferri n. 4 i motivi da fare per la taglia XL non sono sufficienti per arrivare alle 134 maglie che ho dopo le diminuzioni. Ho tralasciato qualche passaggio?

07.02.2016 - 19:26

DROPS Design answered:

Buonasera Paola, abbiamo corretto il testo, mancava una ripetizione del diagramma M.2, grazie per la segnalazione. Buon lavoro!

07.02.2016 - 19:42

Karin wrote:

M1=24; M2=12 Maschen. 1+6+24+12+24+12+24+6+1=110

19.01.2016 - 16:43

country flag Alice Wilhelm wrote:

Beim Rückenteil in Größe M sollen nach dem Bündchen 12 Maschen abgenommen werden, so dass man dann 110 Maschen hat. Die für M angegebene Musterfolge ergibt jedoch 112 Maschen (und dann ja noch je eine Randmasche links und rechts, also insgesamt bräuchte man 114 Maschen. Wo ist mein Denkfehler? Oder ist ein Fehler in der Anleitung?

19.01.2016 - 15:57

DROPS Design answered:

Die Rand-Maschen sind ja in den 110 M enthalten. Die Maschenzahl geht auf: es sind insgesamt: 2 Rand-M, 12 M glatt re, 72 M Muster M.1 (= 3 x 24) + 24 M Muster M.2 (= 2 x 12) = 110 M insgesamt.

24.01.2016 - 20:48

country flag Hjördis Römer wrote:

Jag har stickat den här modellen i 2 storlekar nu - m och xl. Ärmgapet är för snålt tilltagit. Följer man beskrivningens mål, skaver det i armhålan. På båda storlekar har jag fått sticka det längre... mstorlek ca. 5cm och xl ca. 7cm. Måttt hela öppningen. Mottagarna av sweatrarna är helt vanliga killar utan overdrivet stora biceps.... mvh HjR

01.11.2015 - 21:43

country flag Nadine wrote:

Vielen Dank fü die Antwort. An die 12 abgenommen Maschen nach dem Bund hab ich überhaupt nicht mehr dran gedacht.

20.09.2015 - 13:24

country flag Nadine wrote:

Hallo liebes Drops-Team, Ich habe eine Frage zu den Abnahmen für die Ärmel in Größe XL. Hier sollen 3 Maschen in den folgenden 2 Reihen abgenommen werden, bei Hin- und Rückreihe komme ich hier auf 12 Maschen. Allerdings soll laut Anleitung die Anzahl von 146 Maschen auf 128 Maschen verkürzt werden, was 18 Machen ergibt. Nehme ich dann in den folgenden Runde nochmals ab? oder ist hier ein Fehler in der Maschenanzahl? Vielen Dank im voraus für Eure Antwort Nadine

18.09.2015 - 12:02

DROPS Design answered:

In Größe XL müssten Sie vor dem Abketten für die Armausschnitte 134 M haben, nicht 146 M. Sie beginnen zwar mit 146 M, nehmen aber nach dem Bündchen 12 M gleichmäßig verteilt ab, haben also 134 M. Dann ketten Sie am Anfang der nächsten beiden R (d.h. am Anfang der Hin-R und am Anfang der Rück-R) je 3 M ab, also insgesamt 6 M und kommen von 134 M auf 128 M.

20.09.2015 - 12:39

Maira Sandoval wrote:

En la parte que dice: "TODAS LAS TALLAS: Ahora rem 1-2-2-3-4-5 pts en cada lado para las sisas (es decir, rem al inicio de las 2 vtas sig) = 96-106-118-128-138-148 pts" ¿Cuáles son las sisas? y ¿cómo las hago? ¿las vueltas son una corrida en derecho + una en revés?

09.04.2015 - 04:38

DROPS Design answered:

hola Maira, las sisas son la parte del cuerpo donde se van a coser las mangas. Cuando tenemos varios números separados por un guión cada número corresponde a una talla (de la más pequeña a la más grande). Tenemos que rematar pts al inicio de cada fila, tanto al inicio de la fila del lado derecho como al inicio de la fila del lado revés (en un caso para la sisa derecha y en el otro para la sisa izquierda)

12.04.2015 - 09:31

Maira Sandoval wrote:

Hola, no entiendo como debo leer los patrones o diagramas de este tejido. Por que lado del diagrama comienzo la primera vuelta? y cómo continuo a la segunda?

09.04.2015 - 04:32

DROPS Design answered:

Hola Maira, todos los patrones se leen de derecha a izq y de abajo arriba en las filas impares (la primera, 3ª...) y de izquierda a derecha las pares. En este patrón dependiendo de la talla el dibujo se comienza donde marca la flecha correspondiente para ajustar el nº de pts con el dibujo. La segunda fila se trabaja con los pts que corresponden en el dibujo encima de los pts de la primera fila.

12.04.2015 - 09:24

country flag Torry Johnson wrote:

I am working on the front and can't get M3 to look anything like the M3 on the back. Help!

11.12.2014 - 19:38

DROPS Design answered:

Dear Mrs Johnson, when working M.3 start at the arrow for your size in diagram and mark last st worked in diagram (at the end of row), on return row, start with this st reading from left to the right (WS row). Happy knitting!

12.12.2014 - 09:24