
Popular categories
Looking for a yarn?


|
|
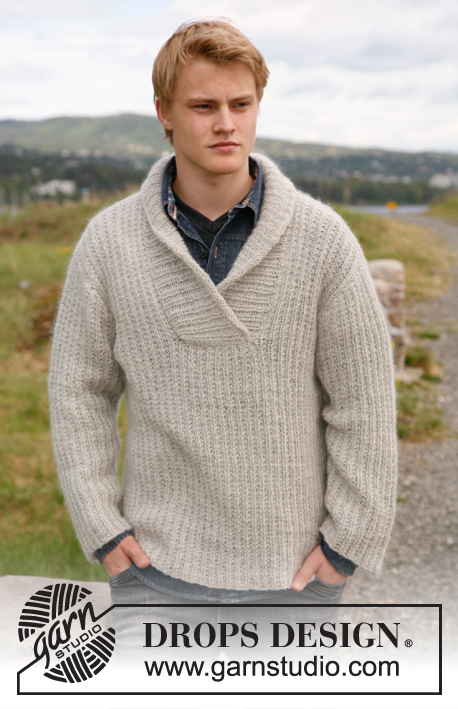
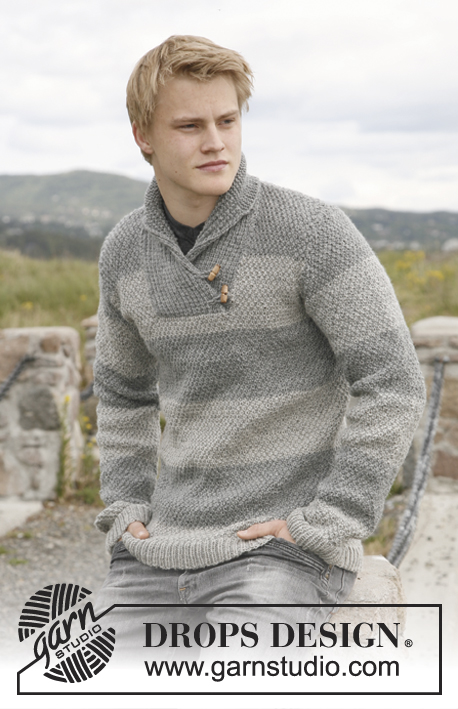
Limestone |
|
 |
 |
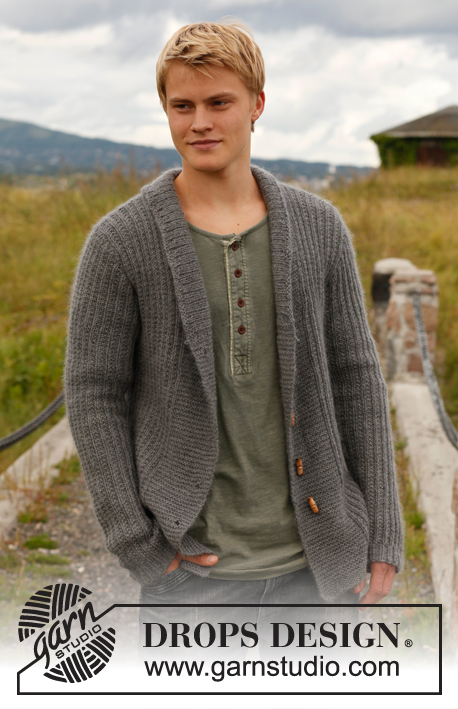
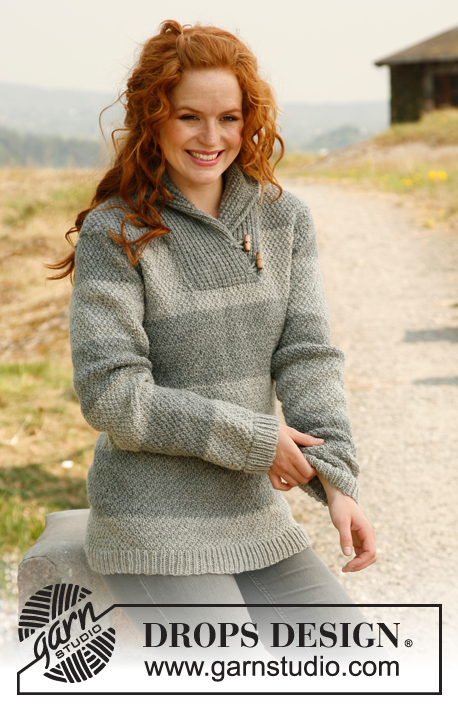
Men's knitted jumper with shawl collar, stripes and seed stitch in DROPS Karisma or DROPS Merino Extra Fine. Size S-XXXL.
DROPS 135-1 |
|
|
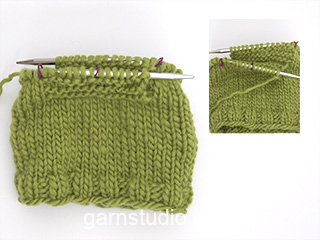
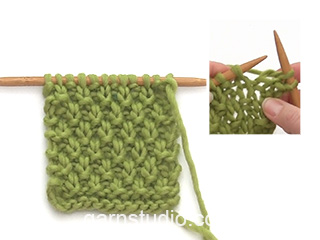
DOUBLE SEED ST: 1st round: * K 1, P 1 *, repeat from *-*. 2nd round: K over K and P over P. 3rd round: * P 1, K 1 *, repeat from *-*. 4th round: P over P and K over K. Repeat rounds 1-4. STRIPES: Work medium gray and light gray alternately every 11-11-11½-12-12-12½ cm / 4⅜"-4⅜"-4½"-4¾"-4¾"-5". NOTE: Measure first stripe from cast on edge. Work medium gray in the last stripe on the body and sleeve until finished measurements. INCREASE TIP: Inc 1 st by making 1 YO, on next round work YO twisted (i.e. work in back loop of st instead front) to avoid holes. PATTERN 1: Row 1 (= from RS): K all sts. Row 2 (= from WS): * K 1, P 1 *, repeat from *-*. Repeat 1st and 2nd row. GARTER ST (back and forth on needle): K all rows. -------------------------------------------------------- BODY: Worked in the round on circular needle. Cast on 213-234-255-288-318-351 sts on circular needle size 3.5 mm / US 4 with light gray. Work rib as follows: * K 1, P 2 *, repeat from *-*. When piece measures 4 cm / 1½", K 1 round while AT THE SAME TIME dec 53-58-63-72-78-87 sts evenly (dec by K tog approx. every 3rd and 4th st) = 160-176-192-216-240-264 sts. Then switch to circular needle size 4 mm / US 6 and continue in the round with DOUBLE SEED ST and STRIPES - See explanation above. REMEMBER THE KNITTING GAUGE! When piece measures 15-15-16-16-17-17 cm / 6"-6"-6¼"-6¼"-6¾-6¾", insert 2 markers in the piece; 1 at beg of round and 1 after 80-88-96-108-120-132 sts (marks the sides). On next round, inc 1 st on each side of every marker - Read INCREASE TIP above = 4 new sts on round. NOTE: Work the new sts in double seed st. Repeat inc one more time when piece measures 30-30-32-32-34-34 cm / 11¾"-11¾"-12½"-12½"-13½"-13½" = 168-184-200-224-248-272 sts. When piece measures 47-48-49-50-51-52 cm / 18½"-19"-19¼"-19¾"-20"-20½", divide the piece at the markers and finish each part separately. BACK PIECE: = 84-92-100-112-124-136 sts (1st row = RS). Continue with stripes and double seed st - while AT THE SAME TIME casting/binding off for armholes in beg of every row in each side: 3 sts 1 time, 2 sts 0-1-2-4-6-8 times and 1 st 1-2-3-4-5-6 times = 76-78-80-82-84-86 sts. When piece measures 64-66-68-70-72-74 cm / 25¼"-26"-26¾"-27½"-28⅜"-29⅛", bind off the middle 24-26-28-30-32-34 sts for neck and finish each shoulder separately. Then dec 1 st on next row from neck (dec by working the outermost 2 sts towards the neck tog) = 25 sts remain on shoulder in all sizes. Loosely bind off all sts when piece measures 66-68-70-72-74-76 cm / 26"-26¾"-27½"-28⅜"-29⅛"-30". FRONT PIECE: = 84-92-100-112-124-136 sts. Continue with stripes and double seed st. Start bind offs for armholes as on back piece on 1st row (= RS) - AT THE SAME TIME slip the middle 26-28-30-32-34-36 sts on a stitch holder for neck at the front, now finish each part separately. Bind off for armholes in each side as on back piece. When all bind offs are done, 25 sts remain on each shoulder. Continue in double seed st and with stripes. When piece measures 66-68-70-72-74-76 cm / 26"-26¾"-27½"-28⅜"-29⅛"-30", loosely bind off all sts. SLEEVE: Worked in the round on double pointed needles. Cast on 63-66-69-72-75-78 sts on double pointed needles size 3.5 mm / US 4 with light gray. Work rib as follows: * K 1, P 2 *, repeat from *-*. When piece measures 4 cm / 1½", K 1 round while AT THE SAME TIME dec 15-16-17-18-19-20 sts evenly (dec by K tog approx. every 3rd and 4th st) = 48-50-52-54-56-58 sts. Switch to double pointed needles size 4 mm / US 6 and insert a marker at beg of round. Continue in the round with DOUBLE SEED ST and STRIPES. When piece measures 8-8-7-7-7-6 cm / 3"-3"-2¾"-2¾"-2¾"-2½", inc 1 st on each side of marker = 2 new sts. Repeat inc every 5-4½-3½-3-2½-2½ cm / 2"-1¾"-1¼"-1⅛"-⅞" -⅞" a total of 10-11-13-15-17-18 times = 68-72-78-84-90-94 sts. When piece measures 57-57-56-56-54-53 cm / 22½"-22½"-22"-22"-21¼"-21" (shorter measurements in the larger sizes because of longer sleeve cap and wider shoulders) bind off 3 sts on each side of marker (= 6 sts mid under sleeve). Then work back and forth on circular needle. Continue to bind off for sleeve cap in beg of every row each side: 2 sts 2-2-3-3-5-5 times, and then 1 st 3-4-4-5-5-6 times. Then bind off 2 sts in each side until piece measures 64-65-65-66-66-67 cm / 25¼"-25½"-25½"-26"-26"-26⅜", then bind off 3 sts 1 time in each side. Loosely bind off all sts. Piece measures approx. 65-66-66-67-67-68 cm / 25½"-26"-26"-26⅜"-26⅜"-26¾". ASSEMBLY: Sew the shoulder seam.. Sew in the sleeves. RIGHT COLLAR: Worked back and forth on circular needle size 4 mm / US 6 with medium gray as follows: Pick up sts from stitch holder mid front (leave the stitch holder) = 26-28-30-32-34-36 sts, P 1 row from WS. Then work PATTERN 1 from RS - See explanation above. When collar measures 19-20-21-22-23-24 cm / 7½"-8"-8¼"-8¾"-9"-9½" (last row = 2nd row in PATTERN 1 = WS), insert a marker at the end of row seen from RS. Continue in GARTER ST - See explanation above - until finished measurements - At the same time work short rows as follows: * Work 2 rows over all sts, work 2 rows over the outermost 20 sts towards mid front *, repeat from *-* until piece measures 8-9-9-10-10-11 cm / 3⅛"-3½"-3½"-4"-4"-4⅜" from marker (in the shorter side). Bind off. LEFT COLLAR: Knit up the sts from stitch holder from RS behind right collar = left collar is underneath right collar. Work the same way as on right collar but reversed (work short rows over the outermost 20 sts towards mid front). ASSEMBLY: Sew right collar to right front piece and left collar to left front piece in outermost sts. Sew collar tog mid back and sew the neck on back piece. STRAP: Make 1 strap as follows: Twine 2 strands of 40 cm / 15¾" in medium gray and fold them double and let them twist. Make another strap the same way. Fasten the straps approx. 4 and 11 cm / 1½" and 4½" up from bottom edge on right collar (approx. 1 cm / ½" from edge mid front). Pull the strands through the collar and fasten the ends on the back. Sew button on left collar approx. 2 and 4 cm / ¾" and 1½" in from seam for left front piece. |
|

|
|
|
Have you made this or any other of our designs? Tag your pictures in social media with #dropsdesign so we can see them! Do you need help with this pattern?You'll find tutorial videos, a Comments/Questions area and more by visiting the pattern on garnstudio.com. © 1982-2024 DROPS Design A/S. We reserve all rights. This document, including all its sub-sections, has copyrights. Read more about what you can do with our patterns at the bottom of each pattern on our site. |
|


With over 40 years in knitting and crochet design, DROPS Design offers one of the most extensive collections of free patterns on the internet - translated to 17 languages. As of today we count 304 catalogs and 11422 patterns - 11417 of which are translated into English (US/in).
We work hard to bring you the best knitting and crochet have to offer, inspiration and advice as well as great quality yarns at incredible prices! Would you like to use our patterns for other than personal use? You can read what you are allowed to do in the Copyright text at the bottom of all our patterns. Happy crafting!
Comments / Questions (112)
Back every row in each side: 3 sts 1 time - Does this mean for a total of 6 stitches once on each side?
06.09.2015 - 16:35DROPS Design answered:
Dear Gail, you will bind off at the beg of every row in each side 3 sts 1 time, ie on first row bind off the first 3 sts, work remaining sts, turn and bind off the first sts = 3 sts are bound off on each side (= a total of 6 sts). Happy knitting!
07.09.2015 - 11:24Hej! Jag har fastnat på ökningarna i ärmen. Om jag lägger till en maska på vardera sida av markören blir den dubbla mosstickningen fel. Det blir antingen tre aviga eller räta maskor bredvid varandra Jag har försökt med olika lösningar men inget blir bra så jag undrar hur jag ska göra?
03.09.2015 - 14:00DROPS Design answered:
Hej Frida, Jo du skall se till att de nya m och mossstickningen stämmer mot ärmen på varje sida om mittm som bara vill stämma varannan gång du ökar. Lycka till!
03.09.2015 - 19:09Ik maak deze trui in maat xxxl. De mouw wordt in de rondte gebreid op breinld zonder kop, kan ik deze ook gewoon op de rondbreinaald beginnen? Met vriendelijke groet.
15.08.2015 - 21:15DROPS Design answered:
Hoi Toeti. Ja, dat kan. Je kan een kleine rondbreinaald gebruiken of de magic loop techniek:
18.08.2015 - 17:04Bonjour, n'ayant pas d'aiguilles circulaires et voulant tricoter le pull modèle limestone de drops design en taille L avec des aiguilles droites pourriez vous me dire combien je dois monter de mailles et comment faire les augmentations. Merci d'avance pour votre réponse et encore bravo pour votre site
06.08.2015 - 13:23DROPS Design answered:
Bonjour Mme Pavot, divisez le nombre de mailles en 2 et ajoutez 2 m lis pour les coutures pour le dos & le devant et pour les manches. Les augmentations des côtés (dos & devant) et des manches se feront en début et en fin de rang (= côtés). Bon tricot!
06.08.2015 - 16:53Ik ben nu zo ver dat ik na 16 cm 4 steken gemeerderd heb. Nu vraag ik mij af hoe precies verder te gaan. Want er zit een extra steek tussen, en als ik dan blijf door breien zoals ik deed klopt het patroon niet meer... Help?!
30.07.2015 - 17:53DROPS Design answered:
Hoi Lotte. Je breit de nieuwe st gaandeweg mee in het patroon.
31.07.2015 - 16:48Hoe kan ik dit patroon maken met gewone breinaalden ipv rondbreinaalden. Ik ben een beginnen breier, en dit wordt mijn eerste trui. Ik kom er nog niet helemaal uit hoe ik het op die manier moet aanpakken. Ik lees dat je voor het voor en achterpand de helft van het aantal steken moet opzetten, maar als ik de trui in maat L wil breien moet je bijvoorbeeld 255 steken opzetten met rondbreien, dat kan je niet door 2 delen.
31.03.2015 - 18:50DROPS Design answered:
Het patroon is geschreven om in de rondte te breien. Als u het wilt aanpassen, zult u inderdaad wat moeten rekenen en aanpassen. U kunt ook onze video's bekijken onder het kopje "help" en leren om in de rondte te breien, een hele mooie techniek.
31.03.2015 - 20:42J ai commandé et tricoté une robe pour ma petite fille, j'avais l'intention de commander de la laine modèle KARISMA mais pourquoi ne pas utiliser des aiguilles normales car avec les aiguilles circulaires je trouve les explications très compliquées. Peut-on avoir des explications plus simples ? avec des aiguilles normales ? merci par avance de votre réponse Cordialement
25.03.2015 - 13:59DROPS Design answered:
Bonjour Mme Roussin, vous pouvez adapter le modèle souhaité en recalculant le nombre de mailles pour chaque pièce et en ajoutant les m lis pour les coutures ou consulter nos vidéos (cf onglet du même nom sur chaque page d'explications) pour apprendre à utiliser les aiguilles circulaires. Beaucoup les ont finalement adoptées après avoir essayé. Bon tricot!
25.03.2015 - 15:56Jen wrote:
On the sleeves it states "Loosely bind off all sts." Could you please advise what the number of stitches should be or is it just an approximate? Thank you for your kind assistance.
15.02.2015 - 06:42DROPS Design answered:
Dear Jen, number of remaining sts will vary depending on the worked size as well as on your tension in high (number of rows for 10 cm, ie how many time you will cast off 2 sts each side until sleeve measures 64-67 cm - sleeve should then measure 65-68 cm when all sts are bound off. Happy knitting!
16.02.2015 - 10:57Det skulle värt morro, og det er pä tide at Drops fär noen nye mönstrer til Menner og gutter. F.eks Partnerlook. Pappa sönn f.eks
12.01.2015 - 11:35On the sleeve: it says "then bind off 2 sts in each side until piece measures 64-65-65-66-66-67" Does that mean bind off at the start and end of each row or just at the start of each row? Thanks!
19.12.2014 - 03:31DROPS Design answered:
Dear Mrs Nausse-McCord, you will bind off 2 sts at the beg of each row (both from RS and from WS) until sleeve measures a total of 64-67 cm (see size). Happy knitting!
19.12.2014 - 09:00