DROPS Verdi
DROPS Verdi
48% Acrylic, 20% Wool, 17% Polyester, 15% Mohair
Discontinued
find alternatives
DROPS SS24
DROPS 134-23
DROPS design: Pattern no VE-017
Yarn group D
--------------------------------------------------------
Measurements: approx. 155 cm x 75 cm

Materials: DROPS VERDI from Garnstudio
350 g colour no 04, purple/green
(Shawl weighs approx. 90 g)

DROPS CIRCULAR NEEDLE SIZE 8 mm (80 cm) - or size needed to get 11 sts x 14 rows in stocking st = 10 x 10 cm.

-------------------------------------------------------

Alternative Yarn – See how to change yarns here
Yarn Groups A to F – Use the same pattern and change the yarn here
Yarn usage using an alternative yarn – Use our yarn converter here

-------------------------------------------------------

DROPS Verdi
DROPS Verdi
48% Acrylic, 20% Wool, 17% Polyester, 15% Mohair
Discontinued
find alternatives

Pattern instructions

NOTE: This pattern is written in British English. All measurements in charts are in cm. For conversion from cm to inches - click here. There are different terms for crocheting in British and American English. If this pattern includes crochet, click for "crochet terms" here. For this pattern in American English, please click here.
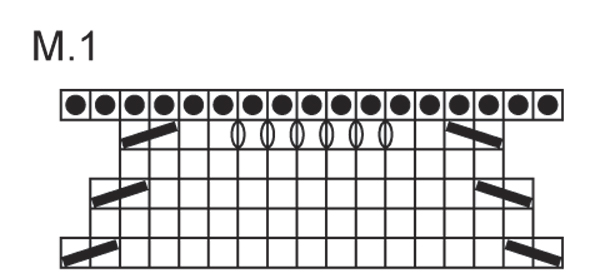
PATTERN:
See diagram M.1. The diagram shows the pattern from RS.

GARTER ST (back and forth on needle): K all rows.

RIDGE PATTERN:
1st row (= from RS): K
2nd row: P
3rd row: K
4th row: P
5th row: K
6th row: K

DOUBLE YO:
1 dbl YO = 2 YOs between 2 sts. On next row K dbl YO as K 1 (i.e. K 1st YO, drop the next YO).

INCREASE TIP:
All inc are done from RS.
Inc 4 sts on every other row until finished measurements as follows:
Inc 1 st at beg of row as follows: 3 sts in garter st, 1 dbl YO.
Inc 2 sts in the middle of piece as follows: 1 dbl YO, K 1 (= st with marker), 1 dbl YO.
Inc 1 st at end of row as follows:
1 dbl YO, 3 sts in garter st.
On next row K the 4 dbl YO as K 1 (i.e. K 1st YO, drop the next YO).
--------------------------------------------------------

SHAWL:
Worked back and forth on circular needle to make room for all the sts. The shawl is worked from neckline mid back and down. Cast on 13 sts on circular needle size 8 mm with Verdi. Insert a marker in the 7th st (= the middle of the shawl). Work first row as follows (from RS): 3 sts in GARTER ST – see explanation above, 1 dbl YO – see explanation above, K 3, 1 dbl YO, K 1 (middle st), 1 dbl YO, K 3, 1 dbl YO, 3 sts in garter st = 17 sts. K 1 row. Continue with RIDGE PATTERN with 3 sts in garter st in each side – see explanation above, while AT THE SAME TIME inc 4 sts on every other row (= every row from RS) – READ INCREASE TIP! Continue like this until there are 41 sts on the needle. REMEMBER THE KNITTING TENSION!
Then work as follows from RS: 3 sts in garter st, 1 dbl YO, diagram M.1 (= 17 sts), 1 dbl YO, K 1 (= middle st in stocking st),1 dbl YO, diagram M.1, finish with 1 dbl YO and 3 sts in garter st. Continue inc in the side and mid back, the inc sts are worked K or P according to diagram M.1 but without dec/yo's, until enough sts have been inc for a new repetition - i.e. all sts between dbl YOs are worked in wave pattern. Continue pattern and inc until shawl measures approx. 75 cm, measured in the middle of shawl, end after a full repeat of diagram M.1. Now cast off with YOs as follows: * Cast off 3 sts, make 1 YO on right needle, cast off YO *, repeat from *-* the entire row.

Diagram

symbols = K from RS, P from WS
symbols = K from WS
symbols = slip 1 st as if to K, K 1, psso
symbols = K 2 tog
symbols = 1 YO between 2 sts
diagram
Do you have a question? See a list of frequently asked questions (FAQ)

Knitting tension is what determines the final measurements of your work, and is usually measured per 10 x 10 cm. It is provided like so: number of stitches in width x number of rows in height - eg: 19 stitches x 26 rows = 10 x 10 cm.

The knitting tension is very individual; some people knit/crochet loosely while others work tightly. You adjust the knitting tension with the needle size, which is why the suggested needle size is only meant as a guide! You need to adjust this (up or down) to ensure that YOUR knitting tension matches the knitting tension provided in the pattern. If you work with a different knitting tension than provided you will have a different yarn consumption, and your work will have different measurements than what the pattern suggests.

The knitting tension also determines which yarns can replace each other. As long as you achieve the same knitting tension you can replace one yarn with another.

See DROPS lesson: How to measure your tension/gauge

See DROPS video: How to make a gauge tension swatch

The required amount of yarn is provided in grams, eg: 450 g. To calculate how many balls you’ll need you first need to know how many grams are in 1 ball (25g, 50g or 100g). This information is available if you click on the individual yarn quality on our pages. Divide the amount required with the amount of each ball. For example, if each ball is 50g (the most common amount), the calculation will be as follows: 450 / 50 = 9 balls.

The important thing when changing from one yarn to another is that the knitting/crochet tension remains the same. This is so that the measurements of the finished piece will be the same as on the sketch provided. It is easier to achieve the same knitting tension using yarns from the same yarn group. It is also possible to work with multiple strands of a thinner yarn to achieve the knitting tension of a thicker one. Please try our yarn converter. We recommend you to always work a test swatch.

Please NOTE: when changing yarn the garment might have a different look and feel to the garment in the photo, due to individual properties and qualities of each yarn.

See DROPS lesson: Can I use a different yarn than the one mentioned in the pattern?

All our yarns are categorised into yarn groups (from A to F) according to thickness and knitting tension – group A contains the thinnest yarns and group F the thickest. This makes it easier for you to find alternative yarns to our patterns, should you wish to switch yarn. All yarns within the same group have a similar knitting tension and can easily replace each other. However, different yarn qualities have different structures and properties which will give the finished work a unique look and feel.

Click here for an overview of the yarns in each yarn group

At the top of all our patterns you’ll find a link to our yarn calculator, which is a helpful tool should you wish to use a different yarn than suggested. By filling in the yarn quality you wish to replace, the amount (in your size) and number of strands, the calculator will present good alternative yarns with the same knitting tension. Additionally it will tell you how much you’ll require in the new qualities and whether you’ll need to work with multiple strands. Most skeins are 50g (some are 25g or 100g).

If the pattern is worked with multiple colours, every colour will have to be calculated separately. Similarly, if the pattern is worked with several strands of different yarns (for example 1 strand Alpaca and 1 strand Kid-Silk) you will have to find alternatives for each, individually.

Click here to see our yarn calculator

Since different yarns have different qualities and textures we have chosen to keep the original yarn in our patterns. However, you can easily find options among our available qualities by using our yarn calculator, or simply pick a yarn from the same yarn group.

It is possible that some retailers still have discontinued yarns in stock, or that someone has a few skeins at home that they would like to find patterns for.

The yarn calculator will provide both alternative yarn as well as required amount in the new quality.

If you think it's hard to decide what size to make, it can be a good idea to measure a garment you own already and like the size of. Then you can pick the size by comparing those measures with the ones available in the pattern's size chart.

You'll find the size chart at the bottom of the pattern.

See DROPS lesson: How to read size chart

The needle size provided in the pattern serves only as a guide, the important thing is to follow the knitting tension. And since knitting tension is very individual, you will have to adjust the needle size to ensure that YOUR tension is the same as in the pattern – maybe you’ll have to adjust 1, or even 2 needle sizes, up or down to achieve the correct tension. For this, we recommend that you work test swatches.

Should you work with a different knitting tension than the one provided, the measurements of the finished garment might deviate from the measurement sketch.

See DROPS lesson: How to measure your tension/gauge

See DROPS video: How to make a tension/gauge swatch

Working a garment top-down provides more flexibility and room for personal adjustment. For example it is easier to try the garment on while working, as well as making adjustments to length of yoke and shoulder caps.

The instructions are carefully explaining every step, in the correct order. Diagrams are adjusted to the knitting direction and are worked as usual.

The diagram depicts all rows/rounds, and every stitch seen from the right side. It is read from bottom to top, from right to left. 1 square = 1 stitch.

When working back and forth, every other row is worked from the right side and every other row is worked from the wrong side. When working from the wrong side, the diagram will have to be worked reversed: from left to right, knit stitches are purled, purl stitches are knit etc.

When working in the round every round is worked from the right side and the diagram are worked from right to left on all rounds.

See DROPS lesson: How to read knitting diagrams

The diagram depicts all rows/rounds, and every stitch seen from the right side. It is worked from bottom to top, from right to left.

When working back and forth every other row is worked from the right side: from right to left and every other row is worked from the wrong side: from left to right.

When working in the round, every row in the diagram are worked from the right side, from right to left.

When working a circular diagram you start in the middle and work your way outwards, counter clockwise, row by row.

The rows usually start with a given number of chain stitches (equivalent to the height of the following stitch), this will either be depicted in the diagram or explained in the pattern.

See DROPS lesson: How to read crochet diagrams

Instructions for working several diagrams after each other on the same row/round, will often be written like so: “work A.1, A.2, A.3 a total of 0-0-2-3-4 times". This means you work A.1 once, then A.2 is worked once, and A.3 is repeated (in width) the number of times provided for your size – in this case like so: S = 0 times, M = 0 times, L=2 times, XL= 3 times and XXL = 4 times.

The diagrams are worked as usual: begin with the first row in A.1, then work the first row in A.2 etc.

See DROPS lesson: How to read knitting diagrams

See DROPS lesson: How to read crochet diagrams

The total width of the garment (from wrist-to-wrist) will be larger in the larger sizes, despite the actual sleeves being shorter. The larger sizes have longer sleeve caps and wider shoulders, so there will be a good fit in all sizes.

The measurement sketch/schematic drawing provides information regarding the full length of the garment. If it’s a jumper or a jacket the length is measured from the highest point on the shoulder closest to the neckline, and straight down to the bottom of the garment. It is NOT measured from the tip of shoulder. Similarly, the length of yoke is measured from the highest point on the shoulder and down to where yoke is split into body and sleeves.

On a jacket measures are never taken along bands, unless specifically stated. Always measure inside band stitches when measuring the length.

See DROPS lesson: How to read a schematic drawing

Diagrams are often repeated on the round or in height. 1 repeat is the diagram the way it appears in the pattern. If it says to work 5 repeats of A.1 in the round, then you work A.1 a total of 5 times after/next to each other in the round. If it says to work 2 repeats of A.1 vertically/in height you work the entire diagram once, then begin again at the start and work the entire diagram one more time.

Chain stitches are slightly narrower than other stitches and to avoid working the cast-on edge too tight, we simply chain more stitches to begin with. The stitch count will be adjusted on the following row to fit the pattern and measurement sketch.

The rib edge is more elastic and will contract slightly compared to, for example, stocking stitch. By increasing before the rib edge, you avoid a visible difference in width between the rib edge and the rest of the body.

It’s very easy to cast off too tightly, and by making yarn overs while casting off (and simultaneously casting these off) you avoid a too tight cast off edge.

See DROPS video: How to bind off with yarn overs (yo)

To achieve an even increase (or decrease) you can increase on, for example: every 3rd and 4th row alternately, like so: work 2 rows and increase on the 3rd row, work 3 rows and increase on the 4th. Repeat this until the increase is complete.

See DROPS lesson: Increase or decrease 1 st on every 3rd and 4th row alternately

Should you prefer to work in the round instead of back and forth, you may of course adjust the pattern. You’ll need to add steeks mid-front (usually 5 stitches), and follow the instructions. When you would normally turn and work from the wrong side, simply work across the steek and continue in the round. At the end you’ll cut the piece open, pick up stitches to work bands, and cover the cut edges.

See DROPS video: How to knit steeks and cut open

Should you prefer to work back and forth instead of in the round, you may of course adjust the pattern so you work the pieces separately and then assemble them at the end. Divide the stitches for the body in 2, add 1 edge stitch in each side (for sewing) and work the front and back pieces separately.

See DROPS lesson: Can I adapt a pattern for circular needles into straight needles?

Pattern repeats can vary slightly in the different sizes, in order to get the correct proportions. If you’re not working the exact same size as the garment in the photo, yours might deviate slightly. This has been carefully developed and adjusted so that the complete impression of the garment is the same in all sizes.

Make sure to follow instructions and diagrams for your size!

If you have found a pattern you like which is available in women’s size it’s not very difficult to convert it to men’s size. The biggest difference will be the length of sleeves and body. Start working on the women size that you think would fit across the chest. The additional length will be worked right before you cast off for the armhole/sleeve cap. If the pattern is worked top-down you can add the length right after the armhole or before the first decrease on sleeve.

Regarding additional yarn amount, this will depend on how much length you add, but it is better with a skein too many than too few.

All yarns will have excess fibres (from production) that might come off as lint or shedding. Brushed yarns (ie hairier yarns) have more of these loose, excess fibres, causing more shedding.

Shedding also depends on what is worn under or over the garment, and whether this pulls at the yarn fibres. It’s therefore not possible to guarantee that there will be no shedding

Below are some tips on how to get the best result when working with hairier yarns:

1. When the garment is finished (before you wash it) shake it vigorously so the looser hairs come off. NOTE: do NOT use a lint roller, brush or any method that pulls at the yarn.

2. Place the garment in a plastic bag and put it in your freezer - the temperature will cause the fibres to become less attached to each other, and excess fibres will come off easier.

3. Leave in the freezer for a few hours before taking it out and shaking it again.

4. Wash the garment according to the instructions on the yarn label.

Pilling is a natural process that happens to even the most exclusive of fibers. It's a natural sign of wear and tear that is hard to avoid, and that is most visible in high friction areas of your garment like a sweater's arms and cuffs.

You can make your garment look as new by removing the pilling, using a fabric comb or a pill/lint remover.

Still can't find the answer you need? Then scroll down and leave your question so one of our experts can try to help you. This will be done normally within 5 to 10 working days.
In the meantime, you can read the questions and answers that others have left to this pattern or join the DROPS Workshop on Facebook to get help from fellow knitters/crocheters!

Post a comment to pattern DROPS 134-23

We would love to hear what you have to say about this pattern!

If you want to leave a question, please make sure you select the correct category in the form below, to speed up the answering process. Required fields are marked *.

Comments / Questions (27)

country flag Katarina wrote:

Jag vill använda ett annat garn. Jag har ett 200 g nystan som är 380 meter, angiven stickfasthet är 20 maskor/26 varv på 10 cm, stickor 5 men fungerar även med lite större. Kommer det att räcka till den här sjalen?

20.09.2020 - 11:20

DROPS Design answered:

Hei Katarina. Det kan vi ikke si mer sikkerhet. Er det et annet DROPS garn og hvilket da? Du må sjekke om du får den samme heklefastheten som er oppgitt i oppskriften om du bruker nål 8. mvh DROPS design

21.09.2020 - 13:58

country flag Jennifer H Pacifica CA wrote:

What is the total yardage of yarn needed for this project?

08.01.2020 - 03:42

DROPS Design answered:

Dear Jennifer, you need 345 yards aprox. as long as you mantain the gauge specified in the pattern. Happy knitting!

12.01.2020 - 23:45

country flag Siiri wrote:

Tere! Mulle jäi arusaamatuks kas äärtes ja keskel peab kasvatama parempidistel ridadel või ka pahempidistel.

31.03.2019 - 21:40

DROPS Design answered:

Tere Siiri! "KASVATAMISE NIPP: Kõik kasvatamised tehakse töö paremalt poolt (PP)." See tähendab kasvatada tuleb parempidistel ridadel. Head kudumist!

12.09.2019 - 14:15

country flag Annika wrote:

Det står "de ökade m stickas räta eller aviga efter M.1". Men efter mittmaskan så blir det väl så att de stickas innan M.1 för att stickningen ska bli symmetrisk. Alltså, om vi kallar de maskor som inte räcker till en ny rapport av M1 för X så blir det i mitten av stickningen, på rätsidan: ...M.1, X, 1 dbl-omslag, mittmaska, 1 dbl-omslag, X, M.1...? Har jag förstått det rätt?

19.11.2018 - 21:31

DROPS Design answered:

Hei Annika. Ja, det stemmer: de økte maskene strikkes rett eller vrang slik som i M.1, og du strikker dem slik til det er økt nok masker til at en ny rapport får plass mellom midtmasken og M.1. God fornøyelse.

03.12.2018 - 09:45

country flag Tineke Klatt wrote:

Kan je ipv eeN rondbreinaald ook op twee pennen dit patroonbreien?

28.08.2015 - 18:46

country flag Anita W. Thon wrote:

Je mer jeg leser, je mindre forstår jeg. En vet ikke, om en skal holde seg til det som står først, nemlig de forskjellige forklarinrer av mønsteret, eller det som står i teksten under Sjal. Jeg vet heller ikke hva åpne riller betyr. Har begynt forfra flere ganger, men gir opp nå, en stund. Når en skal strikke vrang på vrangen, nevnes aldri. Uoversiktelig oppskrift synest j e g, andre er kanskje bedre til å forstå, med 77 blir en trgt i hodet kanskje.

18.09.2014 - 19:31

DROPS Design answered:

Hej Anita, Du begynder et stykke nede på siden, hvor der står SJAL: Lägg opp 13 m och fölg beskrivningen herfra. Når vi henviser til Rille eller Åpne riller går du op øverst i teksten og ser forklaringen til det der. Spørg gerne hos din DROPS forhandler hvordan du skal læse opskriften. God fornøjelse!

23.09.2014 - 15:08

country flag Anita W. Thon wrote:

Forstår det nå slikt: I begynnelsen, helt til det er 41 masker, skal det strikkes rett fra retten og rett på vrangen, siden der står,at "på neste pinne" (vrangen) dbbl.omslagene også skal strikkes rett. Når M1 begynner, skal tilleggsmaskene strikkes rett fra retten, og vrang på vrangen! Er alt dette riktig?

14.09.2014 - 18:06

DROPS Design answered:

Hej Anita, De første 2 pinde står beskrevet i opskriften. Efter dem står det at man skal fortsætte med "ÅPNE RILLER" du finder forklaringen på det øverst i opskriften, SAMTIDIG som du øker 4 m på hver 2.p (hver pind fra retten). God fornøjelse!

18.09.2014 - 11:03

country flag Anita W. Thon wrote:

Må beg. forfra igjen pga feil! Nå tviler jeg. I begynnelsen, skal etter dbl.masker på retten, vrangen strikkes rett.Så står det et etterpå alle dbl.masker skal strikkes rett eller vrang. Vil det si, at maskene imellom hele tiden skal strikkes rett fra vragen?

14.09.2014 - 12:00

country flag Anita W. Thon wrote:

Hvordan vet jeg, at det er økt nok m til ny rapport? Må denne begynne med 41 m igjen, og hvorfra teller jeg disse? Mener du med rapport kun M1?

12.09.2014 - 13:27

DROPS Design answered:

Hej Anita, En rapport af diagrammet går over 17 m. Du strikker en ny rapport af M.1 når du har taget 17 nye m ud. God fornøjelse!

12.09.2014 - 13:40

Alexandra wrote:

Beautiful, very quick and very easy "TV knitting"!!! The knitted shawl is even more beautiful than on Drops' model! My mom and my daughter want one for themselves now, too!!! Thank you for the beautiful pattern!!!!

17.12.2013 - 12:44