
Popular categories
Looking for a yarn?


|
|
Wild Flower |
|
 |
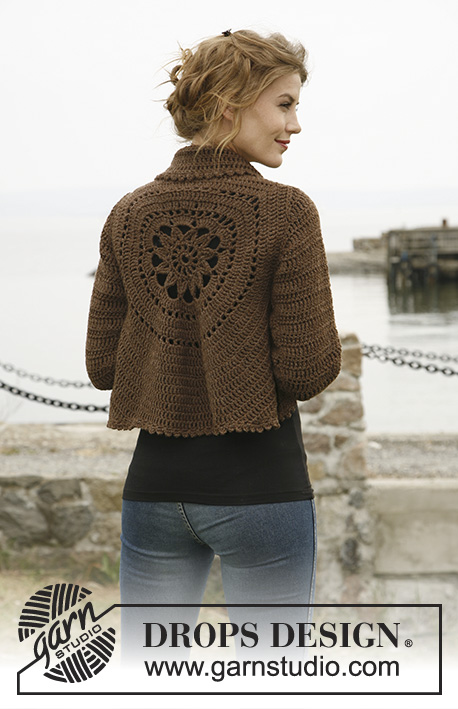 |
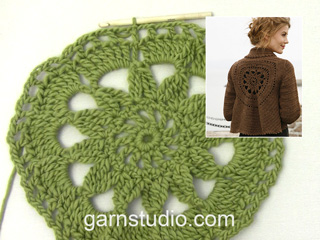
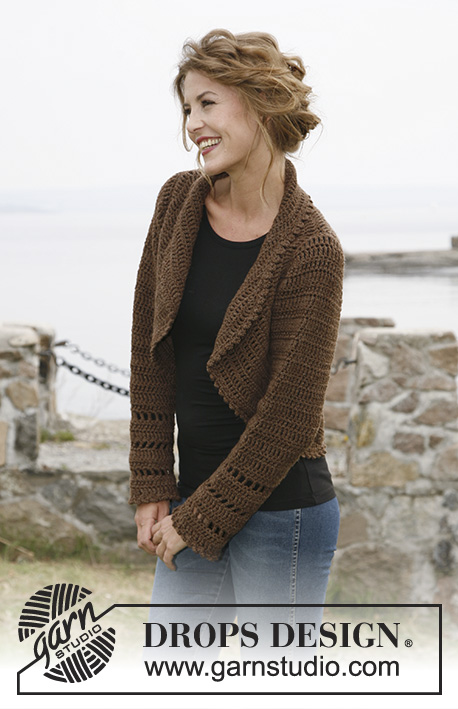
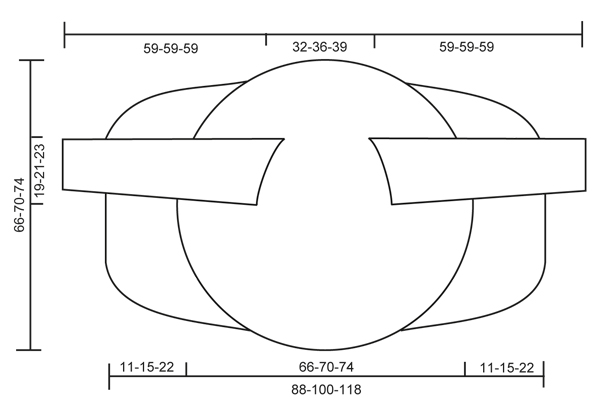
Crochet DROPS jacket worked in a circle in ”Nepal”. Size: S to XXXL
DROPS 132-2 |
|
|
CROCHET TIP: Replace first tr on every round/row with ch 4. DECREASE TIP 1 (applies to the body): Dec as follows: Work tr until 3 tr remain, * in the first of these work 1 dc, in the next 1 hdc and in the last 1 sc, turn with ch 1, skip sc, work 1 sl st in hdc and 1 sl st in dc, then 1 sc in first tr, 1 hdc in next tr and 1 dc in next tr, work tr until 3 tr remain at end of row *, repeat from *-* until a total of 6-8-12 rows have been worked. DECREASE TIP 2 (applies to sleeve cap): Dec at beg of row by working sl st over the no of tr to be dec. Dec at end of row by working until same no of sts to be dec remains, turn piece. -------------------------------------------------------- -------------------------------------------------------- BODY: Worked in the round in a circle from mid back. Ch 8 on hook size 5 mm / H/8 with Nepal and form a ring with 1 sl st in first ch. ROUND 1: Work 12 sc in ch-ring, finish with 1 sl st in first sc. ROUND 2: ch 5 (= 1 dc + 2 ch), * 1 dc in next sc, ch 2 *, repeat from *-* the entire round and finish with 1 sl st in 3rd ch from beg of round = 12 dc with 2 ch between each. ROUND 3: 1 ch, continue to crochet as follows in every ch-space the entire round: 1 sc + ch 1 + 1 sc + ch 1, finish round with 1 sl st in first ch = 24 sc with 1 ch between each. ROUND 4: 1 sl st in first sc, 1 sl st in first ch, ch 5, 1 dtr in same ch, * ch 7, then work 4 dtr tog as follows: Work 2 dtr in same ch as last dtr but wait with last YO and pull through on both dtr, skip 1 sc + 1 ch + 1 sc, work 1 dtr in next ch but wait with last YO and pull through, then work last dtr in same ch and pull last YO through all 5 sts on hook *, repeat from *-* a total of 11 times, ch 7, work 2 dtr tog in same ch (but wait with last YO and pull through on both), work 1 sl st in 5th ch from beg of round and pull thread through all 3 sts on hook. ROUND 5: 1 sl st in first ch-space, ch 4 (= 1 tr), 7 tr in same ch-space, then work 8 tr in every ch-space, finish with 1 sl st in 4th ch from beg of round = a total of 96 tr. ROUND 6: ch 5 (= 1 dc + 2 ch), * skip 1 tr, 1 dc in next tr, ch 2 *, repeat from *-* the entire round and finish with 1 sl st in 3rd ch from beg of round = 48 ch-spaces. ROUND 7 – READ CROCHET TIP: Work 1 tr in every dc and work 1 and 2 tr alternately in every ch-space the entire round = 120 tr. ROUND 8: Work 1 tr in every tr but work 2 tr in every 10th tr = 132 tr. ROUND 9: ch 5 (= 1 dc + 2 ch), * skip 1 tr, 1 dc in next tr, ch 2 *, repeat from *-* the entire round and finish with 1 sl st in 3rd ch from beg of round = 66 ch-spaces. ROUND 10: Work 1 tr in every dc and work 1 and 2 tr alternately in every ch-space the entire round = 165 tr. ROUND 11: Work 1 tr in every tr but work 2 tr in every 15th tr = 176 tr. ROUND 12: Work 1 tr in every tr but work 2 tr in every 16th tr = 187 tr. Piece measures approx. 20 cm / 8" from center and outwards. SIZE S/M: ROUND 13: ch 1, then work 1 sc in each of the first 45 tr (= up towards neck), ch 30 loosely, skip the next 27 tr (= armhole), then work 1 sc in each of the next 88 tr (= down towards back), ch 30 loosely, skip the next 27 tr (= armhole) and fasten with 1 sl st in first sc on round. ROUND 14: Work 1 tr in every sc - but inc 2 tr evenly over the first 45 sc (= 47 tr), then work 30 tr in ch-row over armhole, work 1 tr in every sc – but inc 3 tr evenly over the bottom 88 sc (= 91 tr), and work 30 tr in ch-row over armhole = 198 tr. ROUND 15 to 19: Continue with tr – while at the same time inc 6 tr evenly on every round. After 19th round there are 228 tr on the round and piece measures approx. 33 cm / 13" from center and outwards. Continue working only over 79 tr in each side – i.e. do not work over 35 tr at top by neck or 35 tr at bottom of back. Continue with explanation under FRONT PIECE. SIZE L/XL: ROUND 13: Work 1 tr in every tr but work 2 tr in every 17th tr = 198 tr. ROUND 14: ch 1, then work 1 sc in each of the first 50 tr (= up towards neck), ch 32 loosely, skip the next 29 tr (= armhole), then work 1 sc in each of the next 90 tr (= down towards back), ch 32 loosely, skip the next 29 tr (= armhole) and fasten with 1 sl st in first sc on round. ROUND 15: Work 1 tr in every sc - but inc 3 tr evenly over the first 50 sc (= 53 tr), then work 32 tr in ch-row over armhole, work 1 tr in every sc – but inc 3 tr evenly over the bottom 90 sc (= 93 tr), and work 32 tr in ch-row over armhole = 210 tr. ROUND 16 to 20: Continue with tr – while at the same time inc 6 tr evenly on every round. After 20th round there are 240 tr on the round and piece measures approx. 35 cm / 13¾" from center and outwards. Continue working only over 81 tr in each side – i.e. do not work over 39 tr at top by neck or 39 tr at bottom of back. Continue with explanation under FRONT PIECE. SIZE XXL and XXXL: ROUND 13: Work 1 tr in every tr but work 2 tr in every 17th tr = 198 tr. ROUND 14: Work 1 tr in every tr but work 2 tr in every 18th tr = 209 tr. ROUND 15: ch 1, then work 1 sc in each of the first 54 tr (= up towards neck), ch 36 loosely, skip the next 32 tr (= armhole), then work 1 sc in each of the next 91 tr (= down towards back), ch 36 loosely, skip the next 32 tr (= armhole) and fasten with 1 sl st in first sc on round. ROUND 16: Work 1 tr in every sc - but inc 2 tr evenly over the first 54 sc (= 56 tr), then work 36 tr in ch-row over armhole, work 1 tr in every sc – but inc 3 tr evenly over the bottom 91 sc (= 94 tr), and work 36 tr in ch-row over armhole = 222 tr. ROUND 17 to 22: Continue with tr – while at the same time inc 6 tr evenly on every round. After 22nd round there are 258 tr on the round and piece measures approx. 37 cm / 14½" from center and outwards. Continue working only over 89 tr in each side – i.e. do not work over 40 tr at top by neck or 40 tr at bottom of back. Continue with explanation under FRONT PIECE. LEFT FRONT PIECE - ALL SIZES: = 79-81-89 tr. Insert a marker after 23-24-27 sts in from each side (= 33-33-35 sts between markers). Then work tr back and forth over these sts while at the same time inc 1 st at every marker on every row (i.e. inc 2 sts on row, inc alternately before and after marker) and dec 3 sts at beg and end of every row in each side – SEE DECREASE TIP 1 until a total of 6-8-12 rows back and forth have been worked. RIGHT FRONT PIECE: Work same way as on left piece over 79-81-89 tr in right side. SLEEVE (worked back and forth): Ch 46-48-53 loosely (includes 4 ch to turn with) on hook size 5 mm / H/8 with Nepal. ROW 1: 1 tr in 5th ch from hook, 1 tr in each of the next 2-4-2 ch, * skip ch 1, 1 tr in each of the next 6 ch *, repeat from *-* until 4 ch remain, skip 1 ch and work 1 tr in each of the last 3 ch = 37-39-43 tr. ROW 2: 1 tr in every tr – READ CROCHET TIP! ROW 3: ch 6 (= 1 tr + 2 ch), skip 1 tr, 1 tr in next tr, * ch 2, skip 1 tr, 1 tr in next tr *, repeat from *-* the entire row = 18-19-21 ch-spaces. ROW 4: Work 1 tr in every tr and 1 tr in every ch-space = 37-39-43 tr. Repeat row 2-4 a total of 3 times. Piece measures approx. 18 cm / 7". Then work tr on all rows until finished measurements, while at the same time inc as follows: SIZE S/M: * Inc 1 tr in one side by working 2 tr in next to last tr. On next row inc 1 tr in the other side the same way. Inc 1 more time the same way in each side, then work 1 row without inc *, repeat from *-* a total of 3 times = 12 inc = 49 tr. SIZE L/XL + XXL/XXXL: * Inc 1 tr in one side by working 2 tr in next to last tr. On next row inc 1 tr in the other side the same way *, repeat from *-* a total of 8 times = 16 inc = 55-59 tr. ALL SIZES: Continue to work until piece measures 49 cm / 19¼" in all sizes. Now dec on every row in each side for sleeve cap – SEE DECREASE TIP 2: 3 tr 1 time, 2 tr 3 times and 3 tr 1 time = 25-31-35 tr remain at the top. Fasten off. ASSEMBLY: Sew sleeve seams tog edge to edge to avoid a chunky seam. Work 1 round around the entire body and at bottom of sleeves as follows: * ch 5, 1 dc in first ch, skip 1 st, fasten with 1 sc in next st *, repeat from *-* the entire round and finish with 1 sl st in first ch. Sew in the sleeves. If desired, close the jacket with a pin or sew on a button on to left front piece (try the jacket on to see where button should be) and button it in crochet edge. |
|
|
|
|
Have you made this or any other of our designs? Tag your pictures in social media with #dropsdesign so we can see them! Do you need help with this pattern?You'll find tutorial videos, a Comments/Questions area and more by visiting the pattern on garnstudio.com. © 1982-2024 DROPS Design A/S. We reserve all rights. This document, including all its sub-sections, has copyrights. Read more about what you can do with our patterns at the bottom of each pattern on our site. |
|


With over 40 years in knitting and crochet design, DROPS Design offers one of the most extensive collections of free patterns on the internet - translated to 17 languages. As of today we count 304 catalogs and 11422 patterns - 11417 of which are translated into English (US/in).
We work hard to bring you the best knitting and crochet have to offer, inspiration and advice as well as great quality yarns at incredible prices! Would you like to use our patterns for other than personal use? You can read what you are allowed to do in the Copyright text at the bottom of all our patterns. Happy crafting!
Comments / Questions (433)
The Drops store told me to contact you for adjustments to the pattern.
09.01.2015 - 20:30I am asking you how to adjust the pattern?
09.01.2015 - 16:06DROPS Design answered:
Dear Cheryl. I am sorry, but we don't make individual adjustments on the free patterns. This is a mistake by the store.
23.01.2015 - 16:17I crocheted the small, but it is very big on me. I used about 12.5 skeins. I am 5'3" and 118 lbs. my finished measurements are in line with your diagram. I would like to make this smaller. Where the sleeve joins at the shoulder is 2 inches down my arm rather than at the top of my shoulder on both sides. Hopefully this makes sense and your can tell me where to adjust. Thank you!
07.01.2015 - 21:34DROPS Design answered:
Dear Mrs Fialko, you are welcome to adjust the pattern to your own measurement, calculate where you rather get the sleeve to adjust armholes. Your DROPS store may help you if you need further assistance. Happy crocheting!
08.01.2015 - 10:02JANETH ELENA MARTINEZ MARTINEZ wrote:
Hola estoy realizando este patrón hermoso, pero aún no tengo claro sobre la repartición de puntos de los delanteros. Estoy en la talla XXL. Agradezco la aclaración.
12.12.2014 - 00:07DROPS Design answered:
Hola Janeth elena! Supongo que tu problema viene en la vuelta 15. Para visualizar mejor la labor te recomiendo insertar marcapuntos para separar bien espalda y delantero. 1 marcapuntos después de los 54 primeros p.a.d., 1 marcapuntos después de los siguientes 32, 1 marcapuntos después de los sig 91 y quedan 32. Ahora trabajar según el patrón. En los espacios de 32 p.a.d. no se trabajan p.a.d. Se trabaja una cadeneta de 36 pts y se une con el primer p.a.d.después del marcapuntos.
13.12.2014 - 10:57Ärmlängden är den samma oavsett storlek, borde finnas alt för kortare, nu fick man improvisera. Om jag skulle göra om den skulle jag göra smalare ärmar. Garn mängden är för lite räckte precis och jag gjorde 10 cm kortare ärmar.
18.11.2014 - 07:12I am having a bit of a problem understanding with the instruction on the sleeve (s/m) inc 1 tr in one side by working 2 tr in next to last tr. on next row inc 1 tr in the other side the same way. Inc
23.10.2014 - 00:45DROPS Design answered:
Dear Mrs Ward, you increase for sleeve at the end of the row (by working 2 tr in next to last tr), a total of 2 times (= you have inc 1 tr on each of these 2 rows, ie 1 tr each side). Repeat these 2 rows one more time then work 1 row without dec. You will then have 4 rows with 1 inc at the end of each of these 4 rows, 1 row without inc. Happy crocheting!
23.10.2014 - 10:23The questions are for after the 19th row, seem incomplete; how many rows of 79 triple stitches are worked?. Then the 33 stitches between the markers increases at the marks and after for 6 rows. The decreases how many rows of decreases are to be worked? This is a very confusing pattern and seems incomplete on the pattern notes of what is to be done to look like the picture, please, help as making this for my daughter.
21.10.2014 - 07:41DROPS Design answered:
Dear Mrs Ward, in first size, you will work a total of 6 rows back and forth for each front piece, with inc at each marker and dec at beg and end of each row (see decrease tip 1 at the beg of the pattern). Happy crocheting!
21.10.2014 - 10:08Mijn stekenverhouding was correct, 10 dstk was 10 cm. Ik ben nu uitgegaan dat ik wat losser haak door de cirkels en daardoor 10% groter uitkom. Maak nu patroon maat s/m.
06.10.2014 - 20:06Marjolein wrote:
Ik wil maat 40-42 maken en heb na de begincirkel 22 cm vanuit het midden. Volgens patroon zou dit ca 20 cm moeten zijn. Kan ik nu het beste doorgaan met maat s/m of l-xl?
05.10.2014 - 20:23DROPS Design answered:
Hoi Marjolein. Is je stekenverhouding correct?
06.10.2014 - 16:40Ich habe nun den Ärmel separat gehäkelt und zusammengenäht. Beim Anbringen an der Jacke sieht es jetzt aber aus, als würde unter der Achsel ein Sack hängen... Mir erscheint der Ärmel vor der Abnahme zu Sackgasse bzw zu groß... Wie kommt das.? Habe ich zu locker gehäkelt oder ist das so gewollt. Ich hoffe, sie verstehen die Frage.... Ich ändere jetzt einfach den Ärmel und häkele ihn bis zu Abnahme gerade hoch
04.10.2014 - 07:34