
Popular categories
Looking for a yarn?


|
||||||||||||||||||||||
Bluebird |
||||||||||||||||||||||
 |
 |
|||||||||||||||||||||
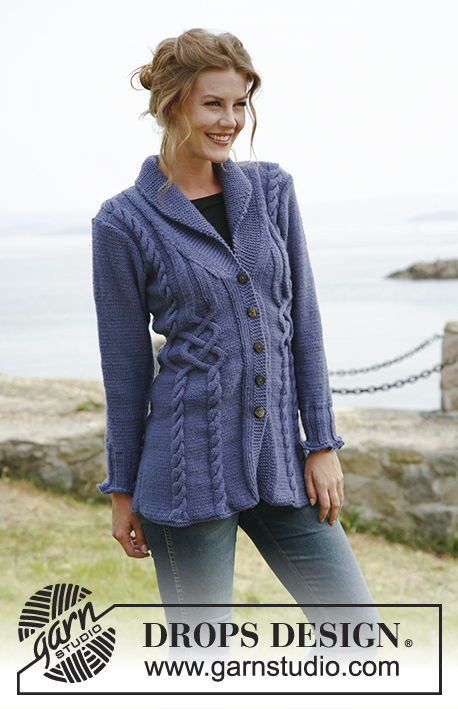
Knitted DROPS jacket with cables in ”Karisma”. Size: S to XXXL.
DROPS 134-1 |
||||||||||||||||||||||
|
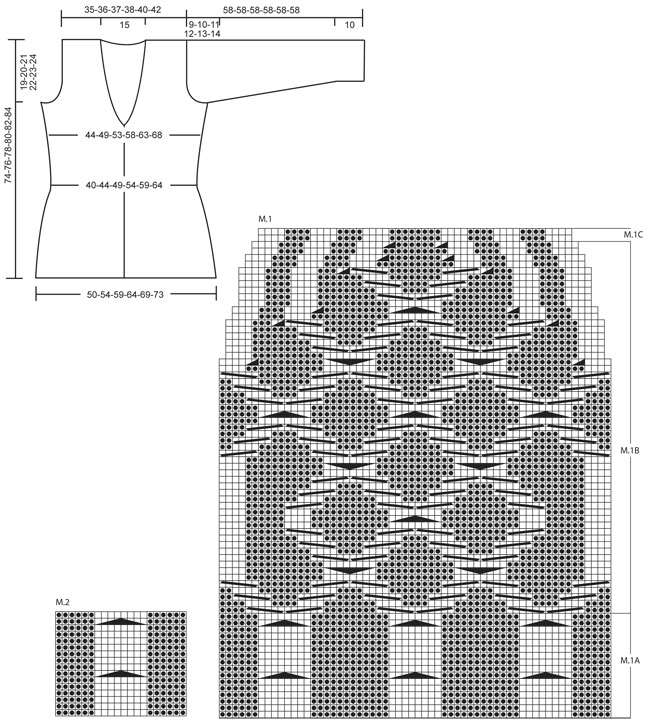
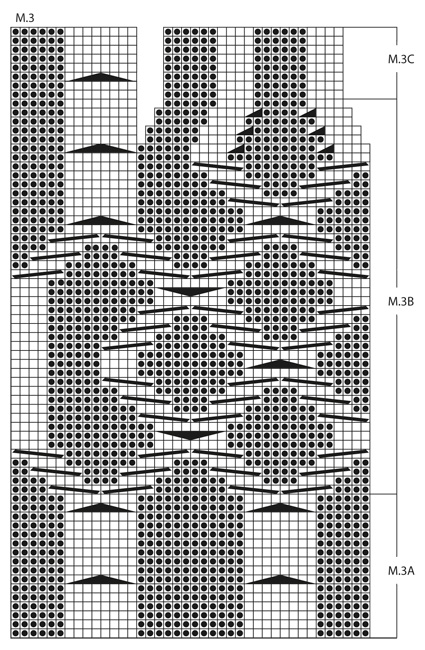
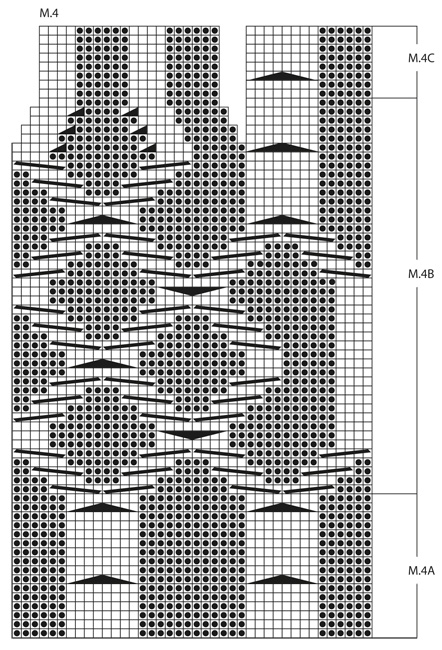
PATTERN: See diagram M.1 to M.4 – diagrams show all rows in pattern seen from RS (1st row = RS). GARTER ST (back and forth on needle): K all rows. KNITTING TIP (applies to band): Work the 5 band sts in garter st with double yarn the entire piece, i.e. have a little ball on the side that is only used on band. When inc for collar, work the inc sts with double yarn. This is done to make the band and the collar nice and firm. BUTTON HOLES: Bind off for button holes on right front band from RS. 1 BUTTON HOLE = bind off 3rd and 4th band st from mid front, on next row cast on 2 new sts over these sts. Bind off for button holes when piece measures: SIZE S: 18, 25, 32, 39 and 46 cm / 7",9¾",12½",15¼" and 18" SIZE M: 19, 26, 33, 40 and 47 cm / 7½",10¼",13",15¾" and 18½" SIZE L: 20, 27, 34, 41 and 48 cm / 8",10⅝",13⅜",16⅛" and 19" SIZE XL: 21, 28, 35, 42 and 49 cm / 8¼",11",13¾",16½" and 19¼" SIZE XXL: 22, 29, 36, 43 and 50 cm / 8¾",11⅜",14¼",17" and 19¾" SIZE XXXL: 23, 30, 37, 44 and 51 cm / 9",11¾",14½",17¼" and 20" INCREASE TIP (applies to collar): Inc inside outermost band st by making 1 YO, on next row K YO twisted (i.e. work in back loop of st instead of front) to avoid holes. DECREASE TIP (applies to neck): Dec from RS inside the sts inc for collar + the 5 band sts + the first 3 sts in stockinette st. Dec as follows AFTER these sts: Slip 1 st as if to K, K 1, psso. Dec as follows BEFORE these sts: K 2 tog. -------------------------------------------------------- -------------------------------------------------------- BACK PIECE: Worked back and forth on needle. Cast on 126-136-146-156-174-184 sts on straight needles size 3.5 mm / US 4 with Karisma. K 2 rows (1st row = RS), switch to needle size 4 mm / US 6. READ ALL OF THE FOLLOWING SECTION BEFORE CONTINUING: PATTERN: Continue as follows (from RS): 1 edge st in GARTER ST – see explanation above, 12-17-22-27-16-21 sts in reverse stockinette st, diagram M.2 (= 20 sts) 1-1-1-1-2-2 times, diagram M.1A (= 60 sts), diagram M.2 (= 20 sts) 1-1-1-1-2-2 times, 12-17-22-27-16-21 sts in reverse stockinette st and 1 edge st in garter st. When piece measures 29-30-31-32-33-34 cm / 11⅜"-11¾"-12¼"-12½"-13"-13⅜", work diagram M.1B over diagram M.1A, work the other sts as before (dec 12 sts in diagram M.1B as shown in diagram). After diagram M.1B, continue to work diagram M.1C over diagram M.1B. SIDE DEC AND SIDE INC: When piece measures 12 cm / 4¾", dec 1 st in each side. Repeat dec every 2½ cm / ⅞" a total of 10 times. When piece measures 40 cm / 15¾", inc 1 st in each side. Repeat inc every 3 cm / 1⅛" a total of 4 times (work inc sts in reverse stockinette st). After all dec and inc there are 102-112-122-132-150-160 sts on the needle. ARMHOLES: When piece measures 55-56-57-58-59-60 cm / 21⅝"-22"-22½"-22 ¾"-23¼"-23⅝", bind off and dec for armholes at the beg of every row in each side as follows: 5 sts 1 time in all sizes, 3 sts 0-1-1-2-3-4 times, 2 sts 1-2-4-4-5-5 times and 1 st 3-2-2-3-5-5 times = 82-84-86-88-92-96 sts. Continue the pattern as before with 1 edge st in garter st in each side. When piece measures 70-72-74-76-78-80 cm / 27½"-28⅜"-29⅛"-30"-30¾"-31½", K 4 rows over the middle 40 sts (work the other sts as before). Then bind off the middle 30 sts for neck. Finish each shoulder (= 26-27-28-29-30-31 sts) separately. Continue the pattern with 5 sts in garter st towards the neck. When piece measures 74-76-78-80-82-84 cm / 29⅛"-30"-30¾"-31½"-32¼"-33", work the 8 sts over the cable in diagram M.2 tog 2 by 2 = 22-23-24-25-26-27 sts remain on needle. On next row bind off all sts K over K and P over P. RIGHT FRONT PIECE: Worked back and forth on needle. Cast on 68-73-78-83-92-97 sts (includes 5 band sts towards mid front and 1 edge st in the side) on needles size 3.5 mm / US 4 with Karisma. READ KNITTING TIP! K 2 rows (1st row = RS), switch to needle size 4 mm / US 6. READ ALL OF THE FOLLOWING SECTION BEFORE CONTINUING! PATTERN: Continue as follows (= from RS): SIZE S, M, L and XL: 5 band sts in garter st, 4 sts in stockinette st, 6 sts in reverse stockinette st, diagram M.3A (= 40 sts), 12-17-22-27 sts in reverse stockinette st and 1 edge st in garter st. Size XXL and XXXL: 5 band sts in garter st, 4 sts in stockinette st, 6 sts in reverse stockinette st, diagram M.3A (= 40 sts), M.2 (= 20 sts), 16-21 sts in reverse stockinette st and 1 edge st in garter st. When piece measures 29-30-31-32-33-34 cm / 11⅜"-11¾"-12¼"-12½"-13"-13⅜", work diagram M.3B over diagram M.3A, work the other sts as before (dec 6 sts in diagram M.3B as shown in diagram). After diagram M.3B, continue to work diagram M.3C over these sts. SIDE DEC AND SIDE INC: When piece measures 12 cm / 4¾", dec 1 st in the side. Repeat dec every 2½ cm / ⅞" a total of 10 times. When piece measures 40 cm / 15¾", inc 1 st in the side. Repeat inc every 3 cm / 1⅛" a total of 4 times (work inc sts in reverse stockinette st). BUTTON HOLES: At the same time when piece measures 18-19-20-21-22-23 cm / 7"-7½"-8"-8¼"-8 ¾"-9", bind off for button holes - see explanation above. COLLAR: At the same time when piece measures 47-48-49-50-51-52 cm / 18½"-19"-19¼"-19¾"-20"-20½", from RS inc 2 sts for collar as follows: Make 1 YO after first st and 1 YO after second st, on next row K both YOs twisted to avoid holes. Continue to inc 1 st for collar on every other row a total of 12 times and then every 4th row a total of 6 times – SEE INCREASE TIP! After all inc, there are 20 inc collar sts and 25 sts in garter st in total (all these sts are worked with double yarn). NECKLINE: At the same time when piece measures 49-50-51-52-53-54 cm / 19¼"-19¾"-20"-20½"-21"-21¼", dec 1 st towards the neck - SEE DECREASE TIP! Repeat dec every other row a total of 12 times and then on every 4th row a total of 8 times. ARMHOLE: At the same time when piece measures 55-56-57-58-59-60 cm / 21⅝"-22"-22½"-22 ¾"-23¼"-23⅝", bind off and dec for armhole in the side as on back piece. After all inc and dec, there are 46-47-48-49-51-53 sts on needle. Work until piece measures 74-76-78-80-82-84 cm / 29⅛"-30"-30¾"-31½"-32¼"-33", adjust so that next row is worked from RS. Continue to work the 8 sts over the cable tog 2 by 2 = 42-43-44-45-47-49 sts on needle. On next row (= WS), bind off the first 22-23-24-25-27-29 sts for shoulder, K the rest of row. Continue like this over the remaining 20 collar sts: * K 2 rows over all sts, K 2 rows over only the outermost 14 sts (towards mid front) *, repeat from *-* until collar measures approx. 7-8 cm / 2¾"-3⅛" at the inside (it will then measure approx. 14-16 cm / 5½"-6¼" at the edge). Bind off. LEFT FRONT PIECE: Cast on and work as right front piece but reversed. I.e. after 2 rows K, work pattern as follows (from RS): SIZE S, M, L and XL: 1 edge st in garter st, P 12-17-22-27 sts, diagram M.4A (= 40 sts), P 6 sts, K 4 sts and 5 band sts in garter st. Size XXL and XXXL: 1 edge st in garter st, P 16-21 sts, diagram M.2 (= 20 sts), diagram M.4A, P 6 sts, K 4 sts and 5 band sts in garter st. Then work diagram M.4B and diagram M.4C instead of diagram M.3B and diagram M.3C. Sts over cable on shoulder are bind off from WS and shoulder sts from RS; this is done opposite from right front piece to avoid cutting the yarn when working the collar. SLEEVE: Worked back and forth on needle. Cast on 100-100-100-116-116-132 sts (includes 1 edge st in each side) on needle size 3.5 mm / US 4 with Karisma. K 1 row (1st row = RS) and P 1 row, then K all sts tog 2 by 2 = 50-50-50-58-58-66 sts. K 1 row from WS. Then work rib = K 4/P 4 with 1 edge st in garter st in each side. When piece measures 10 cm / 4", switch to needle size 4 mm / US 6 and continue in reverse stockinette st. AT THE SAME TIME when piece measures 13-13-13-13-11-11 cm / 5⅛"-5⅛"-5⅛"-5⅛"-4⅜"-4⅜"", inc 1 st each side, repeat inc every 3-2½-2-2-2-2 cm / 1⅛"-⅞"-¾"-¾"-¾"-¾" a total of 12-14-16-15-17-16 times = 74-78-82-88-92-98 sts. When piece measures 49-48-47-46-45-44 cm / 19¼"-19"-18½"-18"-17¾"-17¼" (shorter measurements in the larger sizes because of longer sleeve cap and wider shoulder width) bind off for sleeve cap at beg of every row in each side: 4 sts 1 time, 2 sts 3 times, 1 st 5-6-7-9-10-12 times and then 2 sts in each side until piece measures 57 cm / 22½". Continue to bind off 3 sts 1 time in each side, then bind off the remaining sts. Sleeve measures approx. 58 cm / 22¾". ASSEMBLY: Sew the shoulder seams. Sew collar tog mid back, edge to edge to avoid a chunky seam. Sew collar to the back of neckline. Sew in sleeves and sew under arm and side seams in one inside 1 edge st. Sew on buttons. |
||||||||||||||||||||||
Diagram explanations |
||||||||||||||||||||||
|
||||||||||||||||||||||
|
||||||||||||||||||||||
|
||||||||||||||||||||||
|
||||||||||||||||||||||
|
Have you made this or any other of our designs? Tag your pictures in social media with #dropsdesign so we can see them! Do you need help with this pattern?You'll find tutorial videos, a Comments/Questions area and more by visiting the pattern on garnstudio.com. © 1982-2024 DROPS Design A/S. We reserve all rights. This document, including all its sub-sections, has copyrights. Read more about what you can do with our patterns at the bottom of each pattern on our site. |
||||||||||||||||||||||


With over 40 years in knitting and crochet design, DROPS Design offers one of the most extensive collections of free patterns on the internet - translated to 17 languages. As of today we count 304 catalogs and 11422 patterns - 11417 of which are translated into English (US/in).
We work hard to bring you the best knitting and crochet have to offer, inspiration and advice as well as great quality yarns at incredible prices! Would you like to use our patterns for other than personal use? You can read what you are allowed to do in the Copyright text at the bottom of all our patterns. Happy crafting!
Comments / Questions (639)
How many rows or inches are there between each buttonhole?
25.10.2018 - 02:21DROPS Design answered:
Hi Kelly, The measurements for working each buttonhole are given under Instructions - buttonholes at the top of the pattern. Happy knitting!
25.10.2018 - 08:12Muchas gracias por la rápida respuesta. Ya me queda menos para terminar la chaqueta. Saludos :)
31.08.2018 - 12:31No entiendo cómo se teje el cuello: "Continuar de esta manera sobre los 20 pts restantes para el cuello: * Tejer 2 vtas de derecho sobre todos los pts, tejer 2 vtas de derecho solamente sobre los 14 pts externos (en el centro del frente) *, repetir de *a* hasta que el cuello mida aprox 7-8 cm en el lado interno (medirá aprox 14-16 cm en la orilla). Rem." ¿Cómo se tejen los 6 puntos restantes?
27.08.2018 - 14:50DROPS Design answered:
Hola Aránzazu. El cuello se trabaja con filas acortadas. Mira cómo trabajarlas en este vídeo:
28.08.2018 - 19:34E' possibile realizzare il cardigan in un solo pezzo. senza cuciture ai lati e dividere davanti e dietro all'altezza degli scalfi?
15.03.2018 - 07:28DROPS Design answered:
Buongiorno Maria Luisa. Sì può lavorare in un unico pezzo. Tolga solo le maglie vivagno ai lati e se le è comodo inserisca un segnapunti per individuare i davanti e il dietro e per rendere più agevole la divisione agli scalfi. Buon lavoro!
15.03.2018 - 08:26Jennifer wrote:
I have another question :). On the chart for the front pieces near the top of the chart there is a gape on the chart. Do I knit this separately with it forming two pieces at the top. Then joining these together at the end sewing them together? I am lovin this pattern, looking forward to finishing and wearing
30.12.2017 - 00:52DROPS Design answered:
Dear Jennifer, the "gape" at the top of the chart is there because there are less stitches in the row as a result of decreasing stitches in the previous row. It is there because this way you can still see how stitches should be paced above each other. No sewing up later there needed, just when you come to there jump to the next stitch, and knit that one. I hope this helps. Happy Knitting!
30.12.2017 - 15:42Jennifer wrote:
Thank you for your prompt answer. I have another question :). The charts right side does this start on the right or left hand of the chart? Thank you in advance
22.12.2017 - 21:38DROPS Design answered:
Hi Jennifer, the charts are as a rule read from right to left, unless it tells you otherwise in the text. Happy Christmas!
24.12.2017 - 07:05Jennifer wrote:
I am very excited to start this beautiful sweater. I am starting the back piece. After I finish M.1C then it comes to Side dec and side inc. when piece measures 12 cm dec1 st in each side. Now I am unsure about the measurement to start the decreases I will have more than 12cm when I get here. Please can you clarify how long should the back be when I start these decreases. I am doing the smallest size. Thank you for your attention
22.12.2017 - 04:55DROPS Design answered:
Hi Jennifer, The decreases start while you are working M.1 - so when the piece measures 12cm; and then the increases start when the piece measures 40 cm, again while you are working pattern. This is why we recommend that the whole section is read before working, as there are a number of things which need to be worked at the same time. Happy knitting and a Merry Christmas to you!
22.12.2017 - 06:21Un gros merci pour la rapidité de réponse. Vous m'avez réglé mon problème. La veste avance bien et rapidement.
26.10.2017 - 23:54Drops 134-1. pour ma compréhension (augmentation col). Sur end. de l'ouvrage, coté bordure, je tricote 1 m. lis, 1 jeté, 1 m, 1 jeté. Par la suite, aux 2 rangs, 1 m. lis. 1 jeté (12 fois au 2 Rg) (Diminution encolure), sur côté end. de l'ouvrage, je diminue 1 m. seulement après les m. end de la bordure et des augm. pour le col (donc à partir du jersey end.) je tricote les 3 prem. m. en jersey et 1 dim.
24.10.2017 - 00:02DROPS Design answered:
Bonjour Mme Trottier, vous augmentez pour le col et diminuez pour l'encolure sur l'endroit, tous les 2 rangs, donc sur l'endroit, tricotez l'augmentation en début de rang, puis la diminution pour l'encolure après les mailles indiquées, tricotez le rang sur l'envers et répétez ces 2 rangs autant de fois que vous devez encore augmenter/diminuer. Bon tricot!
24.10.2017 - 08:48Modèle 134-1 Je suis à l'étape de faire les diminutions pour l'encolure ainsi que les augmentations côté du col. Les augmentations vont bien (je les fais en début de rang, coté bordure. Mais à 52 cm, je dois aussi diminuer côté encolure. "Diminuer sur l'endroit après/avant les mailles augmentées pour le col + 5 m de bordure devant + les 3 premières m en jersey end de la bordure. Merci à l'avance
22.10.2017 - 18:13DROPS Design answered:
Bonjour Mme Trottier, les diminutions de l'encolure vont se faire (devant droit) après les mailles que vous augmentez pour le col + les 5 m de bordure devant et les 3 premières m jersey end = continuez à augmenter pour le col comme avant et diminuez après les mailles du col et les 3 premières m end. Bon tricot!
23.10.2017 - 11:50