DROPS Lace
DROPS Lace
70% Alpaca, 30% Silk
Discontinued
find alternatives
DROPS SS24
DROPS 133-2
DROPS design: Pattern no LA-001
Yarn group A
---------------------------------------------------------
Length mid back: approx. 48 cm when blocked
Width at top: approx. 155 cm when blocked

Materials: DROPS LACE from Garnstudio
100 g colour no 0501, light grey

DROPS CIRCULAR NEEDLE SIZE 3.5 mm (80 cm) - NOTE! Read about the knitting tension below.
DROPS CROCHET HOOK SIZE 2.5 and 3.5 mm

KNITTING TENSION:
This garment is to be soaked and stretched to size afterwards so the knitting tension is not that important. But to get a sense of whether you are working too loose/tight, work a test on needle size 3.5 mm in stocking st and get approx. 23 sts x 30 rows = 10 x 10 cm.

-------------------------------------------------------

Alternative Yarn – See how to change yarns here
Yarn Groups A to F – Use the same pattern and change the yarn here
Yarn usage using an alternative yarn – Use our yarn converter here

-------------------------------------------------------

DROPS Lace
DROPS Lace
70% Alpaca, 30% Silk
Discontinued
find alternatives

Pattern instructions

NOTE: This pattern is written in British English. All measurements in charts are in cm. For conversion from cm to inches - click here. There are different terms for crocheting in British and American English. If this pattern includes crochet, click for "crochet terms" here. For this pattern in American English, please click here.
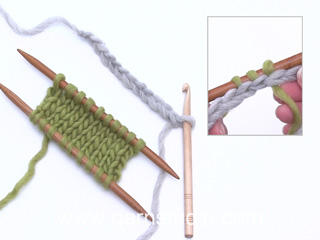
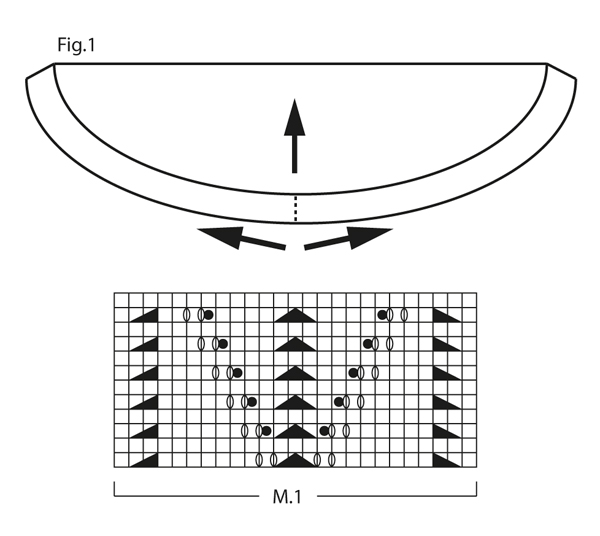
KNITTING TIP 1 (provisional cast on):
Work a row with 26 ch on hook size 3.5 mm in Lace. Cut the thread - do not fasten. Use a new thread to knit up 26 sts in this ch-row with circular needle 3.5 mm – this is the row you will be unraveling afterwards to slip the cast on sts back on needle again.

KNITTING TIP 2:
To make the edge look nice, slip first st as if to P without working it – this is done on all rows (i.e. the outermost st each side is only worked on every other row – i.e. half as many rows vertically over this st).

PATTERN:
See diagram M.1. The diagram shows the pattern from RS.

BOBBLE:
1st row (RS): Work 7 sts in 1 st as follows: * K 1, 1 YO *, repeat from *-* a total of 3 times and finish with K 1 = 7 sts. It is important to work the sts loosely (approx. 1 cm long).
2nd row (WS): P these 7 sts tog. It will be difficult to work the sts from 1st row tog if they are too short and too tight.
---------------------------------------------------------

SHAWL:
Beg by working the lace edge on the shawl then knit up sts along this edge and work the shawl - piece is worked back and forth on circular needle to make room for all the sts.
The lace edge is worked in 2 parts starting mid back - see Fig. 1. For cast on - follow KNITTING TIP 1 on how to cast on with Lace - and read KNITTING TIP 2 before continuing.
Start by working 1st row from WS as follows:
P 1 row and P the last 2 sts tog = 25 sts. Work 15 repetitions of diagram M.1(= approx. 60 cm = 180 rows have been worked). Then slip these 25 sts on a stitch holder.
Unravel the crochet row at the cast on edge, the cast on sts are then released and are ready to be worked as follows:
Slip the 25 cast on sts on circular needle size 3.5 mm and work 15 repetitions of diagram M.1 in the opposite direction (= approx. 60 cm = 180 rows have been worked). Then slip these 25 sts on a stitch holder.
Now work the shawl itself:
Knit up sts along the lace edge on circular needle size 3.5 mm from RS in front loop of outermost st as follows:
* Pick up 1 st in each of next 3 sts, skip 1 st *, repeat from *-* finish the row = 270 sts on needle - pick up 1 extra sts in last st = 271 sts on needle.
P 1 row from WS. Work next row as follows: * K 2 tog, 1 YO *, repeat from *-* and finish with K 1. P 1 row while at the same time slipping the outermost 116 sts in each side on two stitch holders and keeping the middle 39 sts on the needle.
Now work back and forth in stocking st over the middle 39 sts while AT THE SAME TIME working 3 sts from stitch holder at the end of every row until 24 sts remain on the two stitch holders in each side.
Continue to work back and forth in stocking st over the middle sts while AT THE SAME TIME working 2 sts from stitch holder at the end of every row until 11 sts remain on the two stitch holders in each side.
Continue to work back and forth in stocking st over the middle sts while AT THE SAME TIME working 1 st from stitch holder at the end of every row until all sts from the two stitch holders have been worked. Now slip sts in each side of the lace edge with diagram M.1 back on circular needle = 321 sts.
K 4 rows over all sts with double thread. Loosely cast off.

CROCHET BORDER:
The border is worked along bottom edge of diagram M.1. Use hook size 2.5 mm and Lace. In every edge st work as follows: * 1 dc, 2 ch, 1 tr, 2 ch, 1 dc *, repeat from *-*.

BLOCKING:
Place the shawl in lukewarm water until it is soaking wet. Carefully squeeze the water out of the shawl - do not twist the shawl - then roll the shawl in a towel and squeeze to remove more water - the shawl will now only be moist. Place the shawl on a carpet or mattress - carefully stretch it out to size and fasten it with pins. Leave to dry. Repeat the process each time when the garment has been washed.

This pattern has been corrected.

Updated online: 13.03.2015
New text under SHAWL:
Now work the shawl itself:
Knit up sts along the lace edge on circular needle size 3.5 mm from RS in front loop of outermost st as follows:

* Pick up 1 st in each of next 3 sts, skip 1 st *, repeat from *-* finish the row = 270 sts on needle - pick up 1 extra sts in last st = 271 sts on needle.

Diagram

symbols = K from RS, P from WS
symbols = 1 YO between 2 sts
symbols = slip 1 st as if to K, K 2 tog, psso
symbols = slip 1 st as if to K, K 1, psso
symbols = K 2 tog
symbols = bobble - see explanation above
symbols = temporary cast on edge
symbols = knitting direction
diagram
Do you have a question? See a list of frequently asked questions (FAQ)

Knitting tension is what determines the final measurements of your work, and is usually measured per 10 x 10 cm. It is provided like so: number of stitches in width x number of rows in height - eg: 19 stitches x 26 rows = 10 x 10 cm.

The knitting tension is very individual; some people knit/crochet loosely while others work tightly. You adjust the knitting tension with the needle size, which is why the suggested needle size is only meant as a guide! You need to adjust this (up or down) to ensure that YOUR knitting tension matches the knitting tension provided in the pattern. If you work with a different knitting tension than provided you will have a different yarn consumption, and your work will have different measurements than what the pattern suggests.

The knitting tension also determines which yarns can replace each other. As long as you achieve the same knitting tension you can replace one yarn with another.

See DROPS lesson: How to measure your tension/gauge

See DROPS video: How to make a gauge tension swatch

The required amount of yarn is provided in grams, eg: 450 g. To calculate how many balls you’ll need you first need to know how many grams are in 1 ball (25g, 50g or 100g). This information is available if you click on the individual yarn quality on our pages. Divide the amount required with the amount of each ball. For example, if each ball is 50g (the most common amount), the calculation will be as follows: 450 / 50 = 9 balls.

The important thing when changing from one yarn to another is that the knitting/crochet tension remains the same. This is so that the measurements of the finished piece will be the same as on the sketch provided. It is easier to achieve the same knitting tension using yarns from the same yarn group. It is also possible to work with multiple strands of a thinner yarn to achieve the knitting tension of a thicker one. Please try our yarn converter. We recommend you to always work a test swatch.

Please NOTE: when changing yarn the garment might have a different look and feel to the garment in the photo, due to individual properties and qualities of each yarn.

See DROPS lesson: Can I use a different yarn than the one mentioned in the pattern?

All our yarns are categorised into yarn groups (from A to F) according to thickness and knitting tension – group A contains the thinnest yarns and group F the thickest. This makes it easier for you to find alternative yarns to our patterns, should you wish to switch yarn. All yarns within the same group have a similar knitting tension and can easily replace each other. However, different yarn qualities have different structures and properties which will give the finished work a unique look and feel.

Click here for an overview of the yarns in each yarn group

At the top of all our patterns you’ll find a link to our yarn calculator, which is a helpful tool should you wish to use a different yarn than suggested. By filling in the yarn quality you wish to replace, the amount (in your size) and number of strands, the calculator will present good alternative yarns with the same knitting tension. Additionally it will tell you how much you’ll require in the new qualities and whether you’ll need to work with multiple strands. Most skeins are 50g (some are 25g or 100g).

If the pattern is worked with multiple colours, every colour will have to be calculated separately. Similarly, if the pattern is worked with several strands of different yarns (for example 1 strand Alpaca and 1 strand Kid-Silk) you will have to find alternatives for each, individually.

Click here to see our yarn calculator

Since different yarns have different qualities and textures we have chosen to keep the original yarn in our patterns. However, you can easily find options among our available qualities by using our yarn calculator, or simply pick a yarn from the same yarn group.

It is possible that some retailers still have discontinued yarns in stock, or that someone has a few skeins at home that they would like to find patterns for.

The yarn calculator will provide both alternative yarn as well as required amount in the new quality.

If you think it's hard to decide what size to make, it can be a good idea to measure a garment you own already and like the size of. Then you can pick the size by comparing those measures with the ones available in the pattern's size chart.

You'll find the size chart at the bottom of the pattern.

See DROPS lesson: How to read size chart

The needle size provided in the pattern serves only as a guide, the important thing is to follow the knitting tension. And since knitting tension is very individual, you will have to adjust the needle size to ensure that YOUR tension is the same as in the pattern – maybe you’ll have to adjust 1, or even 2 needle sizes, up or down to achieve the correct tension. For this, we recommend that you work test swatches.

Should you work with a different knitting tension than the one provided, the measurements of the finished garment might deviate from the measurement sketch.

See DROPS lesson: How to measure your tension/gauge

See DROPS video: How to make a tension/gauge swatch

Working a garment top-down provides more flexibility and room for personal adjustment. For example it is easier to try the garment on while working, as well as making adjustments to length of yoke and shoulder caps.

The instructions are carefully explaining every step, in the correct order. Diagrams are adjusted to the knitting direction and are worked as usual.

The diagram depicts all rows/rounds, and every stitch seen from the right side. It is read from bottom to top, from right to left. 1 square = 1 stitch.

When working back and forth, every other row is worked from the right side and every other row is worked from the wrong side. When working from the wrong side, the diagram will have to be worked reversed: from left to right, knit stitches are purled, purl stitches are knit etc.

When working in the round every round is worked from the right side and the diagram are worked from right to left on all rounds.

See DROPS lesson: How to read knitting diagrams

The diagram depicts all rows/rounds, and every stitch seen from the right side. It is worked from bottom to top, from right to left.

When working back and forth every other row is worked from the right side: from right to left and every other row is worked from the wrong side: from left to right.

When working in the round, every row in the diagram are worked from the right side, from right to left.

When working a circular diagram you start in the middle and work your way outwards, counter clockwise, row by row.

The rows usually start with a given number of chain stitches (equivalent to the height of the following stitch), this will either be depicted in the diagram or explained in the pattern.

See DROPS lesson: How to read crochet diagrams

Instructions for working several diagrams after each other on the same row/round, will often be written like so: “work A.1, A.2, A.3 a total of 0-0-2-3-4 times". This means you work A.1 once, then A.2 is worked once, and A.3 is repeated (in width) the number of times provided for your size – in this case like so: S = 0 times, M = 0 times, L=2 times, XL= 3 times and XXL = 4 times.

The diagrams are worked as usual: begin with the first row in A.1, then work the first row in A.2 etc.

See DROPS lesson: How to read knitting diagrams

See DROPS lesson: How to read crochet diagrams

The total width of the garment (from wrist-to-wrist) will be larger in the larger sizes, despite the actual sleeves being shorter. The larger sizes have longer sleeve caps and wider shoulders, so there will be a good fit in all sizes.

The measurement sketch/schematic drawing provides information regarding the full length of the garment. If it’s a jumper or a jacket the length is measured from the highest point on the shoulder closest to the neckline, and straight down to the bottom of the garment. It is NOT measured from the tip of shoulder. Similarly, the length of yoke is measured from the highest point on the shoulder and down to where yoke is split into body and sleeves.

On a jacket measures are never taken along bands, unless specifically stated. Always measure inside band stitches when measuring the length.

See DROPS lesson: How to read a schematic drawing

Diagrams are often repeated on the round or in height. 1 repeat is the diagram the way it appears in the pattern. If it says to work 5 repeats of A.1 in the round, then you work A.1 a total of 5 times after/next to each other in the round. If it says to work 2 repeats of A.1 vertically/in height you work the entire diagram once, then begin again at the start and work the entire diagram one more time.

Chain stitches are slightly narrower than other stitches and to avoid working the cast-on edge too tight, we simply chain more stitches to begin with. The stitch count will be adjusted on the following row to fit the pattern and measurement sketch.

The rib edge is more elastic and will contract slightly compared to, for example, stocking stitch. By increasing before the rib edge, you avoid a visible difference in width between the rib edge and the rest of the body.

It’s very easy to cast off too tightly, and by making yarn overs while casting off (and simultaneously casting these off) you avoid a too tight cast off edge.

See DROPS video: How to bind off with yarn overs (yo)

To achieve an even increase (or decrease) you can increase on, for example: every 3rd and 4th row alternately, like so: work 2 rows and increase on the 3rd row, work 3 rows and increase on the 4th. Repeat this until the increase is complete.

See DROPS lesson: Increase or decrease 1 st on every 3rd and 4th row alternately

Should you prefer to work in the round instead of back and forth, you may of course adjust the pattern. You’ll need to add steeks mid-front (usually 5 stitches), and follow the instructions. When you would normally turn and work from the wrong side, simply work across the steek and continue in the round. At the end you’ll cut the piece open, pick up stitches to work bands, and cover the cut edges.

See DROPS video: How to knit steeks and cut open

Should you prefer to work back and forth instead of in the round, you may of course adjust the pattern so you work the pieces separately and then assemble them at the end. Divide the stitches for the body in 2, add 1 edge stitch in each side (for sewing) and work the front and back pieces separately.

See DROPS lesson: Can I adapt a pattern for circular needles into straight needles?

Pattern repeats can vary slightly in the different sizes, in order to get the correct proportions. If you’re not working the exact same size as the garment in the photo, yours might deviate slightly. This has been carefully developed and adjusted so that the complete impression of the garment is the same in all sizes.

Make sure to follow instructions and diagrams for your size!

If you have found a pattern you like which is available in women’s size it’s not very difficult to convert it to men’s size. The biggest difference will be the length of sleeves and body. Start working on the women size that you think would fit across the chest. The additional length will be worked right before you cast off for the armhole/sleeve cap. If the pattern is worked top-down you can add the length right after the armhole or before the first decrease on sleeve.

Regarding additional yarn amount, this will depend on how much length you add, but it is better with a skein too many than too few.

All yarns will have excess fibres (from production) that might come off as lint or shedding. Brushed yarns (ie hairier yarns) have more of these loose, excess fibres, causing more shedding.

Shedding also depends on what is worn under or over the garment, and whether this pulls at the yarn fibres. It’s therefore not possible to guarantee that there will be no shedding

Below are some tips on how to get the best result when working with hairier yarns:

1. When the garment is finished (before you wash it) shake it vigorously so the looser hairs come off. NOTE: do NOT use a lint roller, brush or any method that pulls at the yarn.

2. Place the garment in a plastic bag and put it in your freezer - the temperature will cause the fibres to become less attached to each other, and excess fibres will come off easier.

3. Leave in the freezer for a few hours before taking it out and shaking it again.

4. Wash the garment according to the instructions on the yarn label.

Pilling is a natural process that happens to even the most exclusive of fibers. It's a natural sign of wear and tear that is hard to avoid, and that is most visible in high friction areas of your garment like a sweater's arms and cuffs.

You can make your garment look as new by removing the pilling, using a fabric comb or a pill/lint remover.

Still can't find the answer you need? Then scroll down and leave your question so one of our experts can try to help you. This will be done normally within 5 to 10 working days.
In the meantime, you can read the questions and answers that others have left to this pattern or join the DROPS Workshop on Facebook to get help from fellow knitters/crocheters!

Post a comment to pattern DROPS 133-2

We would love to hear what you have to say about this pattern!

If you want to leave a question, please make sure you select the correct category in the form below, to speed up the answering process. Required fields are marked *.

Comments / Questions (54)

country flag Chris wrote:

Bonjour, voilà je me suis lancée et Super j'ai réussi le point de dentelle ! Mais comment faire pour reprendre 270+1mailles ? ... Car 12x15=180rangs sur chaque moitié...X2=360rangs...si je relève toutes les 2 m en hauteur ... J'ai 180 m X3 = 540....!!!! MeRci d'avance pour votre aide !

01.06.2013 - 10:21

DROPS Design answered:

Bonjour Chris, vous avez 180 rangs, vous relevez les mailles dans 1 m sur 2 tout le long soit dans 90 m au total, et à chaque fois, vous relevez 3 mailles dans la même maille soit un total de 270 + 1 dans la dernière m = 271m. Bon tricot !

03.06.2013 - 09:53

country flag Melinda wrote:

Question about picking up stitches: with 180 rows on each side of center for a total of 360. Picking up 3 stitches for every 2 can't equal 270. Maybe 2 stitches for every 3 rows?

20.01.2013 - 03:53

DROPS Design answered:

Dear Melinda, you will pick up 3 sts in every other st, ie : 180 / 2 = 90 sts x 3 = 270 sts + 1 extra = 271 sts. Happy knitting !

01.02.2013 - 10:41

country flag Sissel wrote:

Det står i oppskriften: (oval) "ett kast mellom to m". jeg tolker dette som: "ett kast, en rett, ett kast, en rett". Dette skal gjentas på den andre siden av midtfellingen. Skal da "kast-maskene" speilvendes på den andre siden, slik at det blir "1m rett,kast,1m rett, kast"?

02.01.2013 - 19:12

DROPS Design answered:

Nej, du skal ikke. Du skal ikke spejlvende. Du har de 25 m paa pinden efter midtfellingen og strikker igen M.1 praecis som beskrevet. Mönstret skal da automatisk komme ud fra midten. Du kan se det paa det 2. billede ogsaa (naerbillede af kanten).

17.01.2013 - 14:28

country flag Chris wrote:

Bonjour, J'aime vraiment beaucoup ce modèle... Je compte bien me lancer ! Pas contre, je n ai jamais tricoté de dentelle .... Pour quel niveau est il plutôt conseillé ? ...(Histoire de ne pas être définitivement écoeurée !)... Dans l'attente de votre réponse,. encore Bravo pour votre site qui est ExTrA !

02.01.2013 - 01:04

DROPS Design answered:

Bonjour Chris, trop de paramètres sont à prendre en compte pour donner un "niveau". Lisez attentivement les explications, visualisez les vidéos si nécessaire, et surtout, n'hésitez pas à demander de l'aide à votre magasin DROPS au fur et/ou à vous inscrire sur le forum Drops pour y recevoir un support à mesure de l'avancée de votre ouvrage. Bon tricot !

02.01.2013 - 11:04

country flag Ulrike Bartram wrote:

Ich habe mich regelrecht in dieses Modell verliebt und gleich begonnen, die Borte zu üben. Ich stelle fest, dass die Noppen vor der Mitte anders aussehen als die Noppen nach der Mitte. Der Unterschied ist nicht groß aber bemerkbar. Haben Sie einen Tipp, wie die Noppen rechts der Mitte genauso schön werden wie die links der Mitte? Danke

09.08.2012 - 08:20

DROPS Design answered:

Inwiefern sehen die Noppen anders aus? Liegt es daran, dass der Umschlag vor oder nach der Noppe ist? Vielleicht müssen Sie auf gleiche Fadenspannung achten.

09.08.2012 - 13:46

country flag Mariella wrote:

Mi piace tantissimo questo scialle, lo farò al più presto

03.10.2011 - 16:46

Eliete wrote:

Belíssimo!Moro no sul do Brasil e acompanho os lançamentos.Alguns consigo entender a receita.

14.07.2011 - 01:18

Judith Pedetti wrote:

Comodisimo. Ojala publiquen el patron. Saludos Judith Montevideo,Uruguay.

15.06.2011 - 14:29

country flag Christien wrote:

Heel mooi, wil ik graag maken.

13.06.2011 - 14:35

country flag Trudy wrote:

Very, very pretty. I like the lily of the valley pattern

12.06.2011 - 22:43