DROPS 133-2
DROPS design: Pattern no LA-001
Yarn group A
---------------------------------------------------------
Length mid back: approx. 48 cm / 19'' when blocked
Width at top: approx. 155 cm / 61'' when blocked

Materials: DROPS LACE from Garnstudio
100 g color no 0501, light gray

DROPS CIRCULAR NEEDLE size 3.5 mm / US 4 (80 cm / 32'') - NOTE! Read about the knitting gauge below.

DROPS CROCHET HOOK SIZE 2.5mm and 3.5mm / C/2 and E/4

KNITTING GAUGE:
This garment is to be soaked and stretched to size afterwards so the knitting gauge is not that important. But to get a sense of whether you are working too loose/tight, work a test on needle size 3.5 mm / US 4 in stockinette st and get approx. 23 sts x 30 rows = 10 x 10 cm / 4'' x 4''.

-------------------------------------------------------

Alternative Yarn – See how to change yarns here
Yarn Groups A to F – Use the same pattern and change the yarn here
Yarn usage using an alternative yarn – Use our yarn converter here

-------------------------------------------------------

Pattern instructions

NOTE: This pattern is written in American English. All measurements in charts are in cm. For conversion from inches to cm - click here. There are different terms for crocheting in American and British English. If this pattern includes crochet, click for "crochet terms" here. For this pattern in British English, please click here.
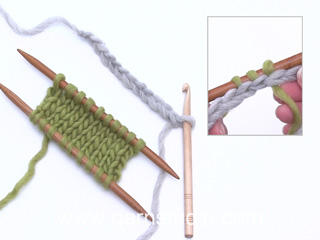
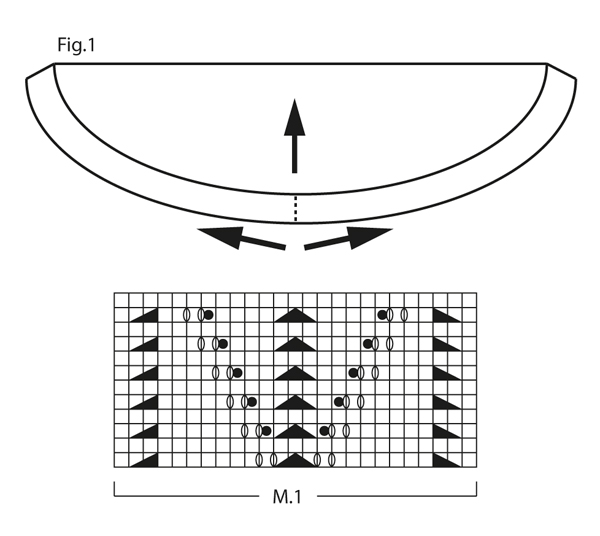
KNITTING TIP 1 (provisional cast on):
Work a row with 26 ch on hook size 3.5mm/E/4 in Lace. Cut the yarn - do not fasten. Use a new strand of yarn to knit up 26 sts in this ch-row with circular needle 3.5 mm/US 4 – this is the row you will be unraveling afterwards to slip the cast on sts back on needle again.

KNITTING TIP 2:
To make the edge look nice, slip first st as if to P without working it – this is done on all rows (i.e. the outermost st each side is only worked on every other row – i.e. half as many rows vertically over this st).

PATTERN:
See diagram M.1. The diagram shows the pattern from RS.

BOBBLE:
1st row (RS): Work 7 sts in 1 st as follows: * K 1, 1 YO *, repeat from *-* a total of 3 times and finish with K 1 = 7 sts. It is important to work the sts loosely (approx. 1 cm / 3/8'' long).
2nd row (WS): P these 7 sts tog. It will be difficult to work the sts from 1st row tog if they are too short and too tight.
---------------------------------------------------------
---------------------------------------------------------

SHAWL:
Beg by working the lace edge on the shawl then knit up sts along this edge and work the shawl - piece is worked back and forth on circular needle to make room for all the sts.
The lace edge is worked in 2 parts starting mid back - see Fig. 1. For cast on - follow KNITTING TIP 1 on how to cast on with Lace - and read KNITTING TIP 2 before continuing.
Start by working 1st row from WS as follows:
P 1 row and P the last 2 sts tog = 25 sts. Work 15 repetitions of diagram M.1 (= approx. 60 cm / 23½'' = 180 rows have been worked). Then slip these 25 sts on a stitch holder.
Unravel the crochet row at the cast on edge, the cast on sts are then released and are ready to be worked as follows:
Slip the 25 cast on sts on circular needle size 3.5mm / US 4 and work 15 repetitions of diagram M.1 in the opposite direction (= approx. 60 cm / 23½'' = 180 rows have been worked). Then slip these 25 sts on a stitch holder.
Now work the shawl itself:
Knit up sts along the lace edge on circular needle size 3.5 mm / US 4 from RS in front loop of outermost st as follows:
New text under SHAWL:
Now work the shawl itself:
Knit up sts along the lace edge on circular needle size 3.5 mm from RS in front loop of outermost st as follows:

* Pick up 1 st in each of next 3 sts, skip 1 st *, repeat from *-* finish the row = 270 sts on needle - pick up 1 extra sts in last st = 271 sts on needle.

P 1 row from WS. Work next row as follows: * K 2 tog, 1 YO *, repeat from *-* and finish with K 1. P 1 row while at the same time slipping the outermost 116 sts in each side on two stitch holders and keeping the middle 39 sts on the needle.
Now work back and forth in stockinette st over the middle 39 sts while AT THE SAME TIME working 3 sts from stitch holder at the end of every row until 24 sts remain on the two stitch holders in each side.
Continue to work back and forth in stockinette st over the middle sts while AT THE SAME TIME working 2 sts from stitch holder at the end of every row until 11 sts remain on the two stitch holders in each side.
Continue to work back and forth in stockinette st over the middle sts while AT THE SAME TIME working 1 st from stitch holder at the end of every row until all sts from the two stitch holders have been worked. Now slip sts in each side of the lace edge with diagram M.1 back on circular needle = 321 sts.
K 4 rows over all sts with 2 strands of the yarn = double strands. Loosely bind off.

CROCHET BORDER:
The border is worked along bottom edge of diagram M.1. Use hook size 2.5mm/C/2 and Lace. In every edge st work as follows: * 1 sc, ch 2, 1 dc, ch 2, 1 sc *, repeat from *-*.

BLOCKING:
Place the shawl in lukewarm water until it is soaking wet. Carefully squeeze the water out of the shawl - do not twist the shawl - then roll the shawl in a towel and squeeze to remove more water - the shawl will now only be moist. Place the shawl on a carpet or mattress - carefully stretch it out to size and fasten it with pins. Leave to dry. Repeat the process each time the garment has been washed.

This pattern has been corrected.

Updated online: 13.03.2015
New text under SHAWL:
Now work the shawl itself:
Knit up sts along the lace edge on circular needle size 3.5 mm from RS in front loop of outermost st as follows:

(NEW TEXT:)
* Pick up 1 st in each of next 3 sts, skip 1 st *, repeat from *-* finish the row = 270 sts on needle - pick up 1 extra sts in last st = 271 sts on needle.

Diagram

All measurements in charts are in cm.

symbols = K from RS, P from WS
symbols = 1 YO between 2 sts
symbols = slip 1 st as if to K, K 2 tog, psso
symbols = slip 1 st as if to K, K 1, psso
symbols = K 2 tog
symbols = bobble - see explanation above
symbols = temporary cast on edge
symbols = knitting direction
diagram
Do you have a question? See a list of frequently asked questions (FAQ)

Knitting tension is what determines the final measurements of your work, and is usually measured per 10 x 10 cm. It is provided like so: number of stitches in width x number of rows in height - eg: 19 stitches x 26 rows = 10 x 10 cm.

The knitting tension is very individual; some people knit/crochet loosely while others work tightly. You adjust the knitting tension with the needle size, which is why the suggested needle size only serve as a guide! You need to adjust this (up or down) to ensure that YOUR knitting tension matches the knitting tension provided in the pattern. If you work with a different knitting tension than provided you will have a different yarn consumption, and your work will have different measurements than what the pattern suggests.

The knitting tension also determines which yarns can replace each other. As long as you achieve the same knitting tension you can replace one yarn with another.

See DROPS lesson: How to measure your tension/gauge

See DROPS video: How to make a gauge tension swatch

The required amount of yarn is provided in grams, eg: 450 g. To calculate how many balls you’ll need you first need to know how many grams are in 1 ball (25g, 50g or 100g). This information is available if you click on the individual yarn quality on our pages. Divide the amount required with the amount of each ball. For example, if each ball is 50g (the most common amount), the calculation will be as follows: 450 / 50 = 9 balls.

The important thing when changing from one yarn to another is that the knitting/crochet tension remains the same. This is so that the measurements of the finished piece will be the same as on the sketch provided. It is easier to achieve the same knitting tension using yarns from the same yarn group. It is also possible to work with multiple strands of a thinner yarn to achieve the knitting tension of a thicker one. Please try our yarn converter. We recommend you to always work a test swatch.

Please NOTE: when changing yarn the garment might have a different look and feel to the garment in the photo, due to individual properties and qualities of each yarn.

See DROPS lesson: Can I use a different yarn than the one mentioned in the pattern?

All our yarns are categorised into yarn groups (from A to F) according to thickness and knitting tension – group A contains the thinnest yarns and group F the thickest. This makes it easier for you to find alternative yarns to our patterns, should you wish to switch yarn. All yarns within the same group have a similar knitting tension and can easily replace each other. However, different yarn qualities have different structures and properties which will give the finished work a unique look and feel.

Click here for an overview of the yarns in each yarn group

At the top of all our patterns you’ll find a link to our yarn converter, which is a helpful tool should you wish to use a different yarn than suggested. By filling in the yarn quality you wish to replace, the amount (in your size) and number of strands, the converter will present good alternative yarns with the same knitting tension. Additionally it will tell you how much you’ll require in the new qualities and whether you’ll need to work with multiple strands. Most skeins are 50g (some are 25g or 100g).

If the pattern is worked with multiple colours, every colour will have to be converted separately. Similarly, if the pattern is worked with several strands of different yarns (for example 1 strand Alpaca and 1 strand Kid-Silk) you will have to find alternatives for each, individually.

Click here to see our yarn converter

Since different yarns have different qualities and textures we have chosen to keep the original yarn in our patterns. However, you can easily find options among our available qualities by using our yarn converter, or simply pick a yarn from the same yarn group.

It is possible that some retailers still have discontinued yarns in stock, or that someone has a few skeins at home that they would like to find patterns for.

The yarn converter will provide both alternative yarn as well as required amount in the new quality.

If you think it's hard to decide what size to make, it can be a good idea to measure a garment you own already and like the size of. Then you can pick the size by comparing those measures with the ones available in the pattern's size chart.

You'll find the size chart at the bottom of the pattern.

See DROPS lesson: How to read size chart

The needle size provided in the pattern serves only as a guide, the important thing is to follow the knitting tension. And since knitting tension is very individual, you will have to adjust the needle size to ensure that YOUR tension is the same as in the pattern – maybe you’ll have to adjust 1, or even 2 needle sizes, up or down to achieve the correct tension. For this, we recommend that you work test swatches.

Should you work with a different knitting tension than the one provided, the measurements of the finished garment might deviate from the measurement sketch.

See DROPS lesson: How to measure your tension/gauge

See DROPS video: How to make a gauge tension swatch

Working a garment top-down provides more flexibility and room for personal adjustment. For example it is easier to try the garment on while working, as well as making adjustments to length of yoke and shoulder caps.

The instructions are carefully explaining every step, in the correct order. Diagrams are adjusted to the knitting direction and are worked as usual.

The diagram depicts all rows/rounds, and every stitch seen from the right side. It is read from bottom to top, from right to left. 1 square = 1 stitch.

When working back and forth, every other row is worked from the right side and every other row is worked from the wrong side. When working from the wrong side, the diagram will have to be worked reversed: from left to right, knit stitches are purled, purl stitches are knit etc.

When working in the round every round is worked from the right side and the diagram are worked from right to left on all rounds.

See DROPS lesson: How to read knitting diagrams

The diagram depicts all rows/rounds, and every stitch seen from the right side. It is worked from bottom to top, from right to left.

When working back and forth every other row is worked from the right side: from right to left and every other row is worked from the wrong side: from left to right.

When working in the round, every row in the diagram are worked from the right side, from right to left.

When working a circular diagram you start in the middle and work your way outwards, counter clockwise, row by row.

The rows usually start with a given number of chain stitches (equivalent to the height of the following stitch), this will either be depicted in the diagram or explained in the pattern.

See DROPS lesson: How to read crochet diagrams

Instructions for working several diagrams after each other on the same row/round, will often be written like so: “work A.1, A.2, A.3 a total of 0-0-2-3-4 times". This means you work A.1 once, then A.2 is worked once, and A.3 is repeated (in width) the number of times provided for your size – in this case like so: S = 0 times, M = 0 times, L=2 times, XL= 3 times and XXL = 4 times.

The diagrams are worked as usual: begin with the first row in A.1, then work the first row in A.2 etc.

See DROPS lesson: How to read knitting diagrams

See DROPS lesson: How to read crochet diagrams

The total width of the garment (from wrist-to-wrist) will be larger in the larger sizes, despite the actual sleeves being shorter. The larger sizes have longer sleeve caps and wider shoulders, so there will be a good fit in all sizes.

The measurement sketch/schematic drawing provides information regarding the full length of the garment. If it’s a jumper or a jacket the length is measured from the highest point on the shoulder (usually closest to the neckline), and straight down to the bottom of the garment. It is NOT measured from the tip of shoulder. Similarly, the length of yoke is measured from the highest point on the shoulder and down to where yoke is split into body and sleeves.

See DROPS lesson: How to read a schematic drawing

Diagrams are often repeated on the round or in height. 1 repeat is the diagram the way it appears in the pattern. If it says to work 5 repeats of A.1 in the round, then you work A.1 a total of 5 times after/next to each other in the round. If it says to work 2 repeats of A.1 vertically/in height you work the entire diagram once, then begin again at the start and work the entire diagram one more time.

Chain stitches are slightly narrower than other stitches and to avoid working the cast-on edge too tight, we simply chain more stitches to begin with. The stitch count will be adjusted on the following row to fit the pattern and measurement sketch.

The rib edge is more elastic and will contract slightly compared to, for example, stocking stitch. By increasing before the rib edge, you avoid a visible difference in width between the rib edge and the rest of the body.

It’s very easy to cast off too tightly, and by making yarn overs while casting off (and simultaneously casting these off) you avoid a too tight cast off edge.

See DROPS video: How to bind off with yarn overs (yo)

To achieve an even increase (or decrease) you can increase on, for example: every 3rd and 4th row alternately, like so: work 2 rows and increase on the 3rd row, work 3 rows and increase on the 4th. Repeat this until the increase is complete.

See DROPS lesson: Increase or decrease 1 st on every 3rd and 4th row alternately

Should you prefer to work in the round instead of back and forth, you may of course adjust the pattern. You’ll need to add steeks mid-front (usually 5 stitches), and follow the instructions. When you would normally turn and work from the wrong side, simply work across the steek and continue in the round. At the end you’ll cut the piece open, pick up stitches to work bands, and cover the cut edges.

See DROPS video: How to knit steeks and cut open

Should you prefer to work back and forth instead of in the round, you may of course adjust the pattern so you work the pieces separately and then assemble them at the end. Divide the stitches for the body in 2, add 1 edge stitch in each side (for sewing) and work the front and back pieces separately.

See DROPS lesson: Can I adapt a pattern for circular needles into straight needles?

Pattern repeats can vary slightly in the different sizes, in order to get the correct proportions. If you’re not working the exact same size as the garment in the photo, yours might deviate slightly. This has been carefully developed and adjusted so that the complete impression of the garment is the same in all sizes.

Make sure to follow instructions and diagrams for your size!

If you have found a pattern you like which is available in women’s size it’s not very difficult to convert it to men’s size. The biggest difference will be the length of sleeves and body. Start working on the women size that you think would fit across the chest. The additional length will be worked right before you cast off for the armhole/sleeve cap. If the pattern is worked top-down you can add the length right after the armhole or before the first decrease on sleeve.

Regarding additional yarn amount, this will depend on how much length you add, but it is better with a skein too many than too few.

All yarns will have excess fibres (from production) that might come off as lint or shedding. Brushed yarns (ie hairier yarns) have more of these loose, excess fibres, causing more shedding.

Shedding also depends on what is worn under or over the garment, and whether this pulls at the yarn fibres. It’s therefore not possible to guarantee that there will be no shedding

Below are some tips on how to get the best result when working with hairier yarns:

1. When the garment is finished (before you wash it) shake it vigorously so the looser hairs come off. NOTE: do NOT use a lint roller, brush or any method that pulls at the yarn.

2. Place the garment in a plastic bag and put it in your freezer - the temperature will cause the fibres to become less attached to each other, and excess fibres will come off easier.

3. Leave in the freezer for a few hours before taking it out and shaking it again.

4. Wash the garment according to the instructions on the yarn label.

Pilling is a natural process that happens to even the most exclusive of fibers. It's a natural sign of wear and tear that is hard to avoid, and that is most visible in high friction areas of your garment like a sweater's arms and cuffs.

You can make your garment look as new by removing the pilling, using a fabric comb or a pill/lint remover.

Still can't find the answer you need? Then scroll down and leave your question so one of our experts can try to help you. This will be done normally within 5 to 10 working days.
In the meantime, you can read the questions and answers that others have left to this pattern or join the DROPS Workshop on Facebook to get help from fellow knitters/crocheters!

Post a comment to pattern DROPS 133-2

We would love to hear what you have to say about this pattern!

If you want to leave a question, please make sure you select the correct category in the form below, to speed up the answering process. Required fields are marked *.

Comments / Questions (54)

country flag Friederike wrote:

Hallo! Wenn ich ein alternatives Lace-Garn verwende: Benötige ich 800 m davon oder wie hoch war der Garnverbrauch in m. in der Drops-Lace-Variante? Danke!

05.02.2024 - 18:54

DROPS Design answered:

Liebe Friederike, DROPS Lace war 100 g Knäuel, und das Tuch haben wir nicht mehr, so am besten zählen Sie mit 800 m Lace Garn sonnst könnten Sie nicht genügend Garn haben. Viel Spaß beim stricken!

06.02.2024 - 08:24

country flag Etta wrote:

Non capisco la spiegazione del pizzo delmod La 001 Per favore vorrei una spiegazione più chiara e dettagliata . Grazie .

31.12.2023 - 14:23

DROPS Design answered:

Buonasera Etta, quale parte del modello non è chiara? Buon lavoro!

31.12.2023 - 17:49

country flag Sofia Broborg wrote:

I svensk beskrivning står: ”Det plockas upp 3 m i varannan maska på höjden längs hålkanten = 270 m på st – plocka upp en m extra i sista m = 271 m på st.” Kanten har 180 m, plocka upp i varannan = plocka upp i 90 maskor. 3x90 = 270 Hur ska man plocka upp 3 maskor i en maska? På detaljbild ser det inte ut som att 3 maskor är plockade ur 1 maska.

22.05.2023 - 15:06

DROPS Design answered:

Hej Sofia, du har ret, den norske er rettet. Vi skal rette så det står samme i den svenske og den danske opskrift. Tak for info :)

23.05.2023 - 11:49

country flag Sofia Broborg wrote:

Enligt t ex norsk & engelsk beskrivnin ska man ”*plocka upp 1 m i vardera av följande 3 maskor, hoppa över 1 m* = 270 maskor”, sedan plocka upp 1 m extra =271 m MEN kantmaskorna på spetskanten lyfts i börja på varv = totalt 180 m längs kanten. Plocka upp 1 m i 3 av 4 m längs kanten = 180/4x3= 135 maskor, inte 270. Så borde det inte stå att man ska *plocka upp 1 maska i vardera av följande 3 VARV, hoppa över 1 varv*?

22.05.2023 - 15:04

DROPS Design answered:

Tal for info Sofia, vi retter teksten :)

23.05.2023 - 11:58

country flag Silvia wrote:

Dónde compro estambres Drops o con que otra marca o hilo puedo tejer este chal? Gracias. Silvia

02.10.2022 - 19:32

DROPS Design answered:

Hola Silvia, puedes encontrar las tiendas con envío internacional en el siguiente link: https://www.garnstudio.com/findastore.php?id=19&w=1&cid=23

02.10.2022 - 23:54

country flag İlke Karakaya wrote:

Please add Turkish to your charts, thank you.. aİlke

11.02.2022 - 16:57

country flag Lili wrote:

I’ve noticed that in the video there are two knit stiches before the ‘slip 1 st as if to k k1 psso’ part of the M. 1 lace pattern, but that in the pattern, there is only one. Am I misreading the diagram? Could this be why my bobbles seem to be in the wrong place?

24.08.2021 - 22:17

DROPS Design answered:

Dear Lili, in the video we are working with 1 edge stitch in garter stitch on each side, so that we work: K1 (= edge stitch), then M.1 starting with K1, slip 1 as if to K, K1, psso, etc... The first bobble is on the 2nd row after 2nd yarn over and the 2nd bobble is after the decrease, before 3rd yarn over on the row. Can this help?

25.08.2021 - 07:28

country flag Rosanna wrote:

Buon pomeriggio a voi Desidero sapere se questo filato è disponibile, non avendolo trovato tra quelli del gruppo A Per acquistare i filati, devo rivolgermi necessariamente ai negozi presenti sul territorio? Non avete più la vendita on line? Ringrazio per l'aiuto che vorrete darmi Cordiali saluti Rosanna

27.04.2021 - 15:43

DROPS Design answered:

Buonasera Rosanna, purtroppo il filato Lace è fuori produzione. In ogni caso tutti i nostri rivenditori offrono l'acquisto online. Buon lavoro!

27.04.2021 - 19:59

country flag Corsini Rosanna wrote:

Vorrei fare un maglione con il vostro disegno del traforo da ripetere in verticale su tutto il davanti mi serve la procedura del lavoro grazie

03.02.2021 - 16:26

DROPS Design answered:

Buongiorno Rosanna, ci sono tanti modelli gratuiti sul nostro sito, continui a cercare. Buon lavoro!

03.02.2021 - 22:25

country flag Lyne wrote:

J’aimerai s’avoir si je peu modifié la largeur du châle présentement est de 155 cm a 175 cm Dit moi si on peut le faire . Mon idée serait À la section dentelle au lieu de 15 faire augmenter de 1 de plus soit 16 de chaque côté automatiquement nous allons devoir relevé plus de mailles pour 289 au lieu de 271 . Dit moi si mon idée est bonne Merci de me revenir

19.11.2020 - 21:51

DROPS Design answered:

Bonjour Lyne, probablement, mais nous ne sommes malheureusement pas en mesure de vous aider à ajuster les explications à votre convenance, n'hésitez pas à demander assistance auprès de votre magasin ou bien auprès d'un forum spécialisé, merci pour votre compréhension. Bon tricot!

20.11.2020 - 08:36