
Popular categories
Looking for a yarn?


|
|
Lazy Sunday |
|
|
|
|
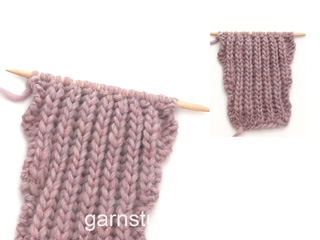
Knitted DROPS jumper with English rib in 3 threads "Verdi".
DROPS 133-23 |
|
|
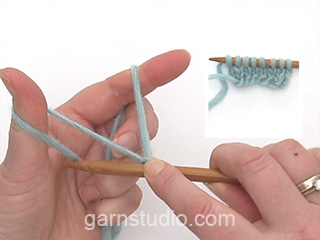
DOUBLE THREAD TIP: Use thread from both inside and outside of the ball. When switching to a new ball, try to avoid switching the 2 threads at the same time - to avoid a thick thread when fastening. ENGLISH RIB: Row 1: K 1, * K 1, 1 YO, slip 1 st as if to P *, repeat from *-* until 2 sts remain, finish with K 2. Row 2: K 1, * 1 YO, slip 1 st as if to P, K YO and slipped st tog *, repeat from *-* until 2 sts remain, finish with 1 YO, slip 1 st as if to P, K 1. Row 3: K 1, * K YO and slipped st tog, 1 YO, slip 1 st as if to P *, repeat from *-* until 1 YO and 2 sts remain, K YO and slipped st tog, K 1. Repeat 2nd and 3rd row upwards. --------------------------------------------------------- BACK PIECE: Worked back and forth on needle. Loosely cast on 41 sts with 3 threads Verdi on needle size 9 mm - see DOUBLE THREAD TIP. Work ENGLISH RIB - see explanation above. When piece measures approx. 75 cm - finish after 2nd row in English rib - work next row as follows: K 1, * K YO and slipped st tog, P 1 *, repeat from *-* until 1 st remains, finish with K 1. Then cast off with K over K and P over P. FRONT PIECE: Cast on and work as on back piece until piece measures 68 cm. Now cast off the middle 15 sts for neck and finish each part separately. When piece measures approx. 75 cm - finish after 2nd row in English rib - work next row as follows: K 1, * K YO and slipped st tog, P 1 *, repeat from *-* until 1 st remains, finish with K 1. Then cast off with K over K and P over P. SLEEVE: Cast on 15 sts with 3 threads Verdi on needle size 9 mm. Work English rib until piece measures 8 cm, now inc 1 st in each side. Repeat inc every 8 cm a total of 5 times - work inc sts in English rib = 25 sts after all inc. When piece measures approx. 50 cm - finish after 2nd row in English rib - work next row as follows: K 1, * K YO and slipped st tog, P 1 *, repeat from *-* until 1 st remains, finish with K 1. Then cast off with K over K and P over P. NECK EDGE: Sew the shoulder seams. Knit up approx. 36 sts around the neck with 3 threads Verdi on circular needle size 9 mm. K 3 rows in stocking st. Loosely cast off. ASSEMBLY: Sew in sleeves and sew under arm and side seams in one inside 1 edge st. |
|

|
|
|
Have you made this or any other of our designs? Tag your pictures in social media with #dropsdesign so we can see them! Do you need help with this pattern?You'll find tutorial videos, a Comments/Questions area and more by visiting the pattern on garnstudio.com. © 1982-2024 DROPS Design A/S. We reserve all rights. This document, including all its sub-sections, has copyrights. Read more about what you can do with our patterns at the bottom of each pattern on our site. |


With over 40 years in knitting and crochet design, DROPS Design offers one of the most extensive collections of free patterns on the internet - translated to 17 languages. As of today we count 304 catalogues and 11422 patterns - 11422 of which are translated into English (UK/cm).
We work hard to bring you the best knitting and crochet have to offer, inspiration and advice as well as great quality yarns at incredible prices! Would you like to use our patterns for other than personal use? You can read what you are allowed to do in the Copyright text at the bottom of all our patterns. Happy crafting!
Comments / Questions (44)
Hej! Jeg vil gerne strikke lazy sunday med 1 tråd. Hvor mange nøgler/meter garn skal så bruges til denne opskrift? Tak for svar. Ulla
19.12.2023 - 20:41DROPS Design answered:
Hej Ulla, du kan strikke den i en tråd DROPS SNOW som den her: Dame patent 7 masker eller så kan du prøve med 1 tråd DROPS Melody, men lav en strikkeprøve, så du ved at du holder strikkefastheden ifølge opskriften : )
20.12.2023 - 09:58Hallo, ik kom er niet uit hoeveel bollen ik nodig heb met Drops delicht en Drops brushed.🤨 Voor de trui lazy sunday.
18.09.2022 - 10:05DROPS Design answered:
Dag Sil,
Om het garen te vervangen kun je de garenvervanger gebruiken om dit uit te rekenen. Hiervan staat een link onder de materialenlijst bij het patroon. Voor DROPS Alpaca Silk heb je dan in totaal 875 gram nodig in totaal en je breit dan met 2 draden. DROPS Delight valt in een andere garencategorie, vandaar dat deze niet bij de alternatieven staat.
19.09.2022 - 21:24Hej. Skal man bruge 2 tråde Delight og 1 tråd Brushed Alpaca Silk til Lazy Sunday for at få ca samme tykkelse som 3 tråde Verdi? Vh Grete
13.08.2022 - 23:43DROPS Design answered:
Hei Grete. 1 tråd DROPS Delight + 1 tråd DROPS Brushed Alpaca Silk (= 2 tråder) = 1 tråd DROPS Verdi. Om du skal erstatte 3 tråder DROPS Verdi må du bruke 3 tråder DROPS Delight + 3 tråd DROPS Brushed Alpaca Silk (=6 tråder). mvh DROPS Design
15.08.2022 - 11:17Hej. Bliver modellen Lazy Sunday stribet, hvis man strikker den med Delight farve 05 og Brushed Alpaca Silk farve 12? Eller blir farvebilledet nogenlunde som på billedet af blusen, der er strikket med Verdi?
11.08.2022 - 21:14DROPS Design answered:
Hej Grete, her ser du hvordan den kommer til at se ud. Meleringerne er naturligvis forskellige alt efter hvilken farve du vælger. DROPS Delight + Brushed Alpaca Silk
12.08.2022 - 10:40Hej Hvilket garn har I, som jeg kan bruge til denne sweater?
12.06.2022 - 10:17DROPS Design answered:
Hei Maria. Garnet DROPS Verdi er utgått fra vårt sortiment. Denne kvaliteten var multifarget, slik at 1 nøste innholdt flere farger (som du ser på genseren). Ønsker du å strikke denne genseren, men da ensfargen kan du bruke DROPS Melody eller DROPS Brushed Alpaca Silk (men i Brushed Alpaca Silk må du bruker 2 tråder for å få samme tykkelse som 1 tråd DROPS Verdi). Men vær obs på at denne genseren er strikket i 3 tråder DROPS Verdi, så da må det brukes 3 tråder Melody eller 6 tråder DROPS Brushed Alpaca Silk. mvh DROPS Design
13.06.2022 - 11:20Hvilket garn kan erstatte drops Verdi til opskrift strikket med 3 tråde (Lazy Sunday)?
29.01.2022 - 17:54DROPS Design answered:
Hei Trine. Vi har ingen garn som vil gi den fargemeleringen du ser på modellen. Du kan erstatte DROPS Verdi med DROPS Melody og om du velger 3-4 farger i Melody kan du prøve strikke/bytte farger som du ser på bildet. Strikkes også da med 3 tråder Melody. Du kan også strikke med 6 tråder DROPS Brushed Alpaca Silk. Bare husk å få den oppgitte strikkefastheten. mvh DROPS Design
31.01.2022 - 14:03Buongiorno, Per gli aumenti sulle maniche del modello 133/23,vanno lavorate alternando 1° ferro e dopo 8cm 2° ferro o si possono lavorare tutti gli aumenti lavorando sempre nel 1° ferro? Grazie e complimenti per il vostro lavoro!
15.02.2018 - 09:59DROPS Design answered:
Buongiorno Bettina, non è specificato di fare gli aumenti in modo alternato, può lavorarli come preferisce ogni 8 cm. Buon lavoro!
15.02.2018 - 11:37Bonjour, vous indiquez de monter 41 mailles pour le dos, hors si je regarde la photo du pull et les mails montées sur mon aiguille, je trouve que cela fait peut pour la largeur. pourriez-vous m'expliquer pour un pull taille unique si peut de maille svp, merci
11.09.2017 - 11:05DROPS Design answered:
Bonjour Mme Marinier, pensez à bien vérifier votre échantillon, vous devez avoir 7 m x 7 rangs en côtes anglaises = 10 x 10 cm soit 41 m en côtes anglaises = environ 60 cm de large. Bon tricot!
11.09.2017 - 11:19Ich finde den link zu vorgeschlagenen Garn nicht.
05.11.2016 - 22:39DROPS Design answered:
Liebe Christa, Verdi ist leider nicht mehr verfügbar, gerne können Sie anstatt Melody oder Brushed Alpaca Silk und Delight stricken. Hier lesen Sie mehr über Garn-Alternative.
07.11.2016 - 09:23Hvis jeg strikker den i drops melody, blir det riktig med 14 nøster i henhold til oppskriften ? Takk for svar på forhånd !
02.11.2015 - 21:18DROPS Design answered:
Hej. Ja det ska vara tillräckligt till detta mönster. Här kan du läsa om hur du gör för att byta ut ett garn mot ett annat. Lycka till!
03.11.2015 - 08:11