
Popular categories
Looking for a yarn?


|
|
Rondo |
|
 |
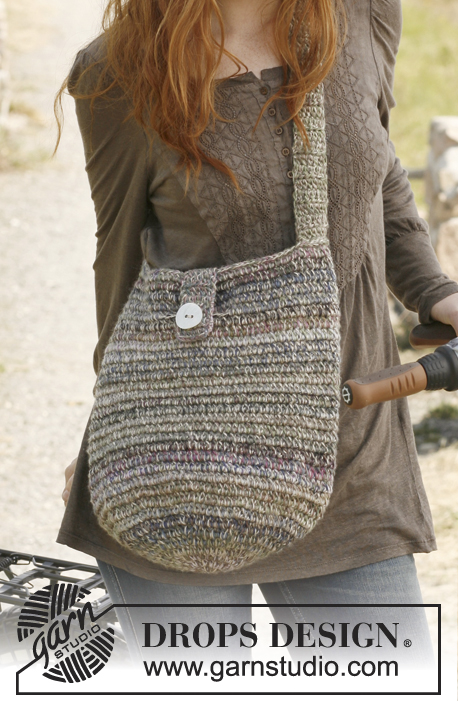 |
Crochet DROPS bag in ”Delight” and “Cotton Light”.
DROPS 132-20 |
|
|
WORK IN THE ROUND IN A CIRCLE: After last htr on the round, continue to next round with 1 htr in next st (= first st on next round). NOTE: Insert a marker at the beg of round between last st and first st on the round, move the marker upwards. -------------------------------------------------------- BAG: Worked in the round from bottom up. Work 2 ch on hook size 5 mm with 1 thread in each colour/material (= 4 threads). ROUND 1: Work 10 htr in 1st ch - Read WORK IN THE ROUND IN A CIRCLE above. ROUND 2: 2 htr in every st = 20 htr (10 new sts). ROUND 3: * 1 htr in next st, 2 htr in next st *, repeat from *-* the rest of the round = 30 htr. ROUND 4: * 1 htr in the next 2 sts, 2 htr in next st *, repeat from *-* the rest of the round = 40 htr. Continue to inc 10 sts on the round by working 2 htr in next st after every 3rd, 4th, 5th st etc. until 100 sts have been worked on the round. Continue with 1 htr in every st until piece measures 40 cm vertically (or desired height). Do not cut the threads. SHOULDER STRAP: Turn piece, work 2 ch and 1 htr in each of the next 7 sts = 7 htr. Turn piece with 2 ch and work 7 htr on the row until shoulder strap measures 80 cm, cut the threads. Fasten strap in the other side of bag. FLAP: With 1 thread in each colour/material (= 4 threads) work 7 htr on the upper edge (between shoulder strap). Turn piece with 2 ch and work 7 htr on the row until flap measures 6 cm. Then work button hole as follows: 2 htr, 3 ch and skip 3 sts, finish with 2 htr. On next row, work 1 htr in every ch from previous row. Continue with htr for 2 cm. Cut and fasten the thread. Sew button on to bag. |
|
|
Have you made this or any other of our designs? Tag your pictures in social media with #dropsdesign so we can see them! Do you need help with this pattern?You'll find tutorial videos, a Comments/Questions area and more by visiting the pattern on garnstudio.com. © 1982-2024 DROPS Design A/S. We reserve all rights. This document, including all its sub-sections, has copyrights. Read more about what you can do with our patterns at the bottom of each pattern on our site. |
|


With over 40 years in knitting and crochet design, DROPS Design offers one of the most extensive collections of free patterns on the internet - translated to 17 languages. As of today we count 304 catalogues and 11422 patterns - 11422 of which are translated into English (UK/cm).
We work hard to bring you the best knitting and crochet have to offer, inspiration and advice as well as great quality yarns at incredible prices! Would you like to use our patterns for other than personal use? You can read what you are allowed to do in the Copyright text at the bottom of all our patterns. Happy crafting!
Comments / Questions (37)
Merciiiii bcp pr votre aide et c bien noté!😁!tbon w end a vs!!!!😘!
10.11.2017 - 16:24Bonjour je compte faire se super sac mais jai 1soucis que veux dire pour vous db double bride ou demie bride?? je crois que c double bride?? Car c est sa qui manque parfois pour les explication sur chaq modèle sa serait bien!!! Ben merci pour votre aide et tbon vendredi!!😘!!
10.11.2017 - 08:16DROPS Design answered:
Bonjour Mme Moijl, 1 dB = 1 demi-bride (et 1 DB = 1 double bride). Bon crochet!
10.11.2017 - 13:57Ich würde gerne wissen, warum man von der hellgrauen Wolle 200g benötigt, wobei man von den anderen Wollen je nur 100g benötigt, wenn doch alle Farben zusammen verhäkelt werden? Vielen Dank und viele Grüße Alexandra Kampp
10.02.2017 - 08:46DROPS Design answered:
Liebe Frau Kampp, wenn Sie 100 g Delight benutzen, bedeutet es 175 m (= 1 Knäuel Delight) x 2 = 350 m Delight. Cotton Light ist 105 m für 50 g, so brauchen Sie genauso viel Lauflänge im Cotton Light: 350 m / 105 = 3.33 Knäuel = 4 Knäuel im Cotton Light und nur 2 im Delight wegen Lauflänge jeder Qualität. Viel Spaß beim stricken!
10.02.2017 - 09:23Vi wrote:
Hi, this is my first time here. Absolutely love the website. Just wanted to clarify that when I order yarn, it will include the required amount for the project. Also, hope you ship to Australia! Cheers, V :)
06.07.2016 - 13:00DROPS Design answered:
Dear Vi, you will find total weight of yarn required under tab "materials" - 100 g Delight = 2 balls delight (= 2 balls Delight in 3 different colours) + 200 g cotton light = 4 balls Cotton light 50 g each. Find here list of DROPS stores shipping worldwide. Happy crocheting!
06.07.2016 - 13:35What are the actual standard weight or size (worsted or number) of yarns required. Thank you
06.07.2016 - 01:28DROPS Design answered:
Dear Tracy, please click here for more informations about our yarn - your DROPS Store will provide you any further individual help. Happy knitting!
06.07.2016 - 08:13Die Tasche ist wunderschön, schnell und leicht gehäkelt. Leider reicht auch bei mir die angegebene Garnmenge nicht aus, ich muss jetzt für die Lasche nochmal Wolle nachordern. Das tut allerdings der Freude an der Tasche keinen Abbruch...
03.07.2016 - 00:29What is the circumference of the bag?
11.03.2016 - 22:19DROPS Design answered:
Dear Mrs Pritchard, bag is approx. 38 cm / 15" in width (see final measurements under tab "Materials". Happy crocheting!
12.03.2016 - 17:27Bonjour, Je suis en train de réaliser ce joli sac, j'ai bien respecté les augmentations jusqu'à obtenir 100 mailles mais le fond du sac n'est pas droit et forme des plis, Et c'est pas très joli. Peut-être cela vient-il des augmentation de 10 mailles après le 4ème rang je les ai réalisé à partir de la maille 3 jusqu'à la 23 en alternant deux dB 1 dB soit 2 dB ds la maille 3 et 1 dB ds maille 4, 2 dB dans la 5 et 1 dB ds 6...jusquà la maille 23. Merci de voir réponse.
31.03.2015 - 17:07DROPS Design answered:
Bonjour Xivia, pour que les augmentations soient bien régulières, on doit continuer à augmenter 10 B par tour, au 5ème tour: *1 dB dans les 3 m suiv, 2 dB dans la suiv*, puis au 6ème tour: *1 dB dans les 4 m suiv, 2 dB dans la suiv*, et ainsi de suite, à chaque tour, on crochète 1 dB en plus entre chaque augmentation jusqu'à ce qu'on ait un total de 100 m. Bon crochet!
01.04.2015 - 09:13I needed three balls of each of the colour yarns, instead of the two balls specified in the pattern, in order to complete the bag. I think you should reflect this in the pattern.
02.03.2015 - 12:38Mijn proeflapje werd precies 10 cm Maar ipv 38 cm word hij aan de boven kant wel 48 cm... Op de foto lijkt het net of er geminderd is, staat niet in het patroon, vraag me af wat ik verkeerd doe
05.10.2014 - 13:45DROPS Design answered:
Hoi Letty. Er wordt niet geminderd in dit patroon. Als het proeflapje correct is, dan denk ik dat je verkeerd hebt gemeten (te veel gerekt misschien). Je moest gewoon doorhaken tot 40 cm, maar omdat je met een dubbele draad haakt op naald 5 zit er best rek in het werk. Dus meet plat liggend en trek niet in het werk.
06.10.2014 - 16:45