
Popular categories
Looking for a yarn?


|
||||||||||
Atlantica |
||||||||||
|
|
||||||||||
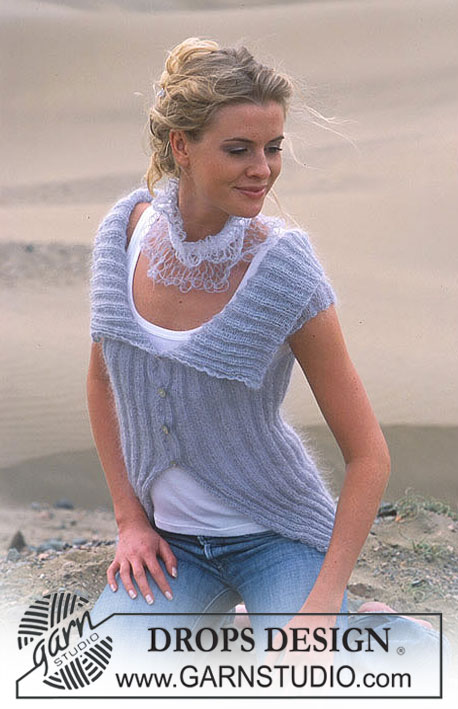
DROPS Children’s crochet jacket in "Muskat"
DROPS 90-16 |
||||||||||
|
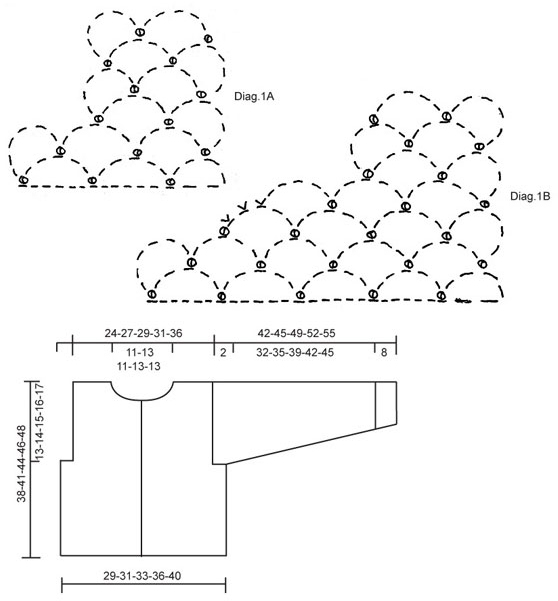
Crochet tension: Remember hook size is only a guide. 4.5 chain-spaces in width and 10 rows in height with hook size 4.5 mm = 10 x 10 cm. NOTE: Due to different crochet techniques, the crochet tension can vary from person to person; you can increase or decrease a hook size if necessary to get the right tension. ------------------------------------------------------- Back piece: Work 79-85-91-97-109 chain stitches (incl. 6 chain stitches to turn) with hook size 4.5 mm and Muskat. The first row is worked as follows: 1 double crochet in the 7th chain stitch from the hook, * 5 chain stitches, skip 5 chain stitches, 1 double crochet in next chain stitch *, repeat from *-* = 13-14-15-16-18 chain-spaces, turn piece. Then work as follows: 6 chain stitches (incl. 1 chain stitch to turn), 1 double crochet around first chain-space, * 5 chain stitches, 1 double crochet around next chain-space *, repeat from *-* to end of row and turn piece. Continue in this way upwards. Remember the crochet tension! When piece measures 25-27-29-30-31 cm, decrease to armholes as follows: Work as before until there is 1 chain-space left, turn piece, continue with chain-spaces and repeat the decrease in the other side - or see Diag.1A. You have now decreased 1 chain-space in each side = 11-12-13-14-16 chain-spaces on row. Continue working as before. When piece measures 36-39-42-44-46 cm, decrease for neck by working 2 rows just over the 3-3-4-4-5 chain-spaces on each shoulder (do not work the middle 5-6-5-6-6 chain-spaces). Piece measures approx. 38-41-44-46-48 cm, cut strand. Right front piece: Work 43-43-49-49-55 chain stitches (incl. 6 chain stitches to turn) with hook size 4.5 mm and Muskat. Continue working as for back piece = 7-7-8-8-9 chain-spaces. When piece measures 25-27-29-30-31 cm, decrease for armhole in the side as for back piece = 6-6-7-7-8 chain-spaces on row. When piece measures 33-35-38-39-41 cm, decrease for neck according to Diag.1B. You have now decreased 3 chain-spaces for neck and there are 3-3-4-4-5 chain-spaces left on the shoulder. Continue working until piece measures 38-41-44-46-48 cm and cut strand. Left front piece: Work as for right, but in reverse. Assembly: Work the shoulders together as follows: 1 slip stitch in first chain-space on back piece, 3 chain stitches, 1 double crochet around first chain-space on front piece, 3 chain stitches, 1 double crochet around first chain-space on back piece, etc. Sleeve: Work chain-spaces along the armhole and work the sleeve from the top down as follows: Crochet up evenly 12-13-14-14-15 chain-spaces with hook size 4.5 mm and Muskat with 5 chain stitches in each space. Then work back and forth in the same way as for body. When piece measures 2 cm from where the chain-spaces were crocheted up, insert 1 marker thread in each side - the piece is now measured from here. When piece measures 2-2-3-3-3 cm, decrease 1 chain-space in the one side - see Diag.1A. When piece measures 12-13-15-16-17 cm, decrease 1 chain-space in the other side. Repeat the decrease in right and left side one more time with 10-11-12-13-14 cm between each decrease = 8-9-10-10-11 chain-spaces left. Continue working until piece measures 40-43-47-50-53 cm from the marker threads and cut strand. More assembly: Work sleeve and side seams in one go in the same way as you worked the shoulders. Sew sleeves to armholes at bottom with a small stitch where you decreased 1 chain-space on front and back piece. Neck: Work 2 rows of double crochets around neck (row 1is worked from the wrong side) - work approx. 3 double crochets in each chain-space - adjust so the edge is neither too tight nor too loose. Left band: Work 4 rows of double crochets up the left front piece (over the neck band too - first row worked from the wrong side) - there should be approx. 3 double crochets in each chain-space = approx. 99-105-114-117-123 double crochets, turn each row with 1 chain stitch. Right band: Work as for left, but after row 2 work 5 buttonholes evenly spaced on band. The bottom buttonhole should be approx. 2 cm from the bottom edge and the top button 2 stitches from the top. 1 buttonhole = 2 chain stitches, skip 2 double crochets, 1 double crochet in next stitch. On the next row work 2 double crochets around the chain-space. Sew on buttons. |
||||||||||
Diagram explanations |
||||||||||
|
||||||||||
|
||||||||||
|
Have you made this or any other of our designs? Tag your pictures in social media with #dropsdesign so we can see them! Do you need help with this pattern?You'll find tutorial videos, a Comments/Questions area and more by visiting the pattern on garnstudio.com. © 1982-2024 DROPS Design A/S. We reserve all rights. This document, including all its sub-sections, has copyrights. Read more about what you can do with our patterns at the bottom of each pattern on our site. |
||||||||||


With over 40 years in knitting and crochet design, DROPS Design offers one of the most extensive collections of free patterns on the internet - translated to 17 languages. As of today we count 304 catalogues and 11422 patterns - 11422 of which are translated into English (UK/cm).
We work hard to bring you the best knitting and crochet have to offer, inspiration and advice as well as great quality yarns at incredible prices! Would you like to use our patterns for other than personal use? You can read what you are allowed to do in the Copyright text at the bottom of all our patterns. Happy crafting!
Comments / Questions (28)
Förstår inte framstyckets diagram 1B. Det ser ut som det är 2 lm-bågar kvar efter avm. Men i mönstret står det att det ska återstå 4 lm-bågar (strl 146/152).??
16.05.2019 - 20:38DROPS Design answered:
Hei Lotti. Du har 8 luftmaskebuer, så feller du 1 luftmaskebue til ermhull og har 7 luftmaskebuer igjen. Videre feller du til hals som i A.1B. A.1B går over 5 luftmaskebuer, dvs du strikker A.1A som før over de 2 første luftmaskebuene, og A.1B over de 5 ytterste luftmaskebuene. Når A.1B er ferdig har du igjen 2 luftmaskebuer i A.1B og 2 luftmaskebuer i A.1A = 4 luftmaskebuer. Du har altså felt 3 luftmaskebuer. God fornøyelse
20.05.2019 - 08:37Hej kan det virkelig passe at ærmet skal være 43 cm langt??? Det er næsten 10 cm for langt?
20.11.2018 - 20:45DROPS Design answered:
Hei Sussi. Ja dette stemmer. Om du syntes det blir for langt er det selvfølgelig ikke noe i veien for at du hekler ermene kortere slik at det passer mottakeren. Du kan da felle oftere (mindre cm mellom hver felling), avhengig av hvor mye kortere du vil de skal være. God fornøyelse
23.11.2018 - 09:33Janet Garner wrote:
Hi i love the DROPS Girl’s Crocheted Cardigan in Muskat but need to make this in a bigger size age 14-15 years is the any way this can be done please ???
10.03.2018 - 23:31DROPS Design answered:
Dear janet, it's not possible to send you a customized pattern. You can make a bigger size of this pattern by making your own calculus or you could use a bigger sized crochet and worked the largest size of the pattern.
11.03.2018 - 16:08Bonjour, je ne comprends pas où il faut commencer les manches ? Pourriez vous me détailler un peu plus s'il vous plaît ? Il faut faire pareil pour l autre manche ? Merci par avance. Vos modèles sont super, c est la première fois que je bloque sur une explication.
21.01.2018 - 16:57DROPS Design answered:
Bonjour Stéphanie, les manches se crochètent de haut en bas, on va crocheter le 1er rang le long des emmanchures en commençant sur l'endroit au niveau des premières diminutions de l'emmanchure du devant/dos pour terminer à la dernière diminution de l'emmanchure du dos/devant. Bon crochet!
22.01.2018 - 10:10I'm not sure I understand the arms. When you start them are you crocheting them to the body as you go. Or by themselves to add on when completed.
24.09.2017 - 01:48DROPS Design answered:
Dear Debbie, the sleeves of this jacket is crocheted into the armhole, (and not added later). In other words, the sc'a of the first row are crocheted into the ch-loops of the body. I hope this helps. Happy crocheting!
24.09.2017 - 23:56Ik heb het rugpand en de voorpanden gehaakt en wil de mouwen erin haken. Nu moet ik voor de maat 13 lussen haken maar heb dan lussen over in de oksel. Klopt dat of wat doe ik fout? De afmetingen kloppen precies met de beschrijving van het rugpand en voorpand maar de armsgaten zijn veel groter dan de mouwen die er in komen.
08.04.2015 - 18:18DROPS Design answered:
U moet de lussen gelijkmatig verdelen over het armsgat en dan verder naar beneden haken.
08.04.2015 - 22:39Hej! Jag har kommit till vänster framkant och än så länge stämmer måtten mot skiss. I framkant har jag ca 20 lm-bågar, om jag ska virkar 3 fm om varje båge blir det 60 fm i framkant plus 2 i halskanten, alltså 62 fm. Men i mönstret står det att det ska bli, i min storlek, 117fm. Var blir det fel? (Har provat att virka 3fm även i varje "rombspets" också och fått ihop till 113 fm, men framkanten blir alldeles för lång). Hur ska man göra? Tack på förhand!
28.03.2015 - 14:46DROPS Design answered:
Hej Ursula, det kan låta som om du virkar lösare än vi, men om du får det till at se fint ut, så är du ju nästan klar med koftan. Lycka till :)
15.05.2015 - 14:03We are making this cardigan and are having trouble understanding how to "decrease for the neck by crocheting 2 rows over only 3 ch-loops on each shoulder (do not crochet over the center5 ch-loops)." Could you please clarify how to get from one side to the other with out crocheting over the middle or binding off and reattaching. Help! Thanks
29.05.2014 - 06:12DROPS Design answered:
Dear Mrs Holmquist, you will here crochet the shoulder, simply crochet 2 rows over the 3 ch-loops towards shoulder on one side, leaving remaining ch-loops unworked. Cut the yarn and work 2 rows over the 3 ch-loops towards shoulder on the other side. Happy crocheting!
29.05.2014 - 18:33Ich bin heute das erste mal auf Eure tolle Seite gestossen. Frage ist: was bedeuten die Sternchen?(1 fM in die 7. Lm häkeln, * 5 Lm, 5 Lm überspringen, 1 fM in die nächste Lm *, von *-* wiederholen )......es ist gleich zu welcher Anleitung, bei allen gibt es das und ich kann damit nichts anfangen.
09.05.2013 - 15:34DROPS Design answered:
Liebe An, die Sternchen markieren eine Stelle. Es steht: „von *-* wiederholen“, bei Ihrem Beispiel wiederholen Sie also fortlaufend: „ 5 Lm, 5 Lm überspringen, 1 fM in die nächste Lm“.
10.05.2013 - 07:45What does dec for the neck by crocheting 2 rows over only 3-34-4-5 ch-loops on each shoulder (do not crochet over the center 5-6-5-6-6 ch-loops?
26.08.2012 - 20:08DROPS Design answered:
Since you only work loops on shoulder not on loops along neck, this will then be a dec for neck. Work each shoulder separately.
28.08.2012 - 02:31