
Popular categories
Looking for a yarn?


|
|
Hooked On You |
|
 |
 |
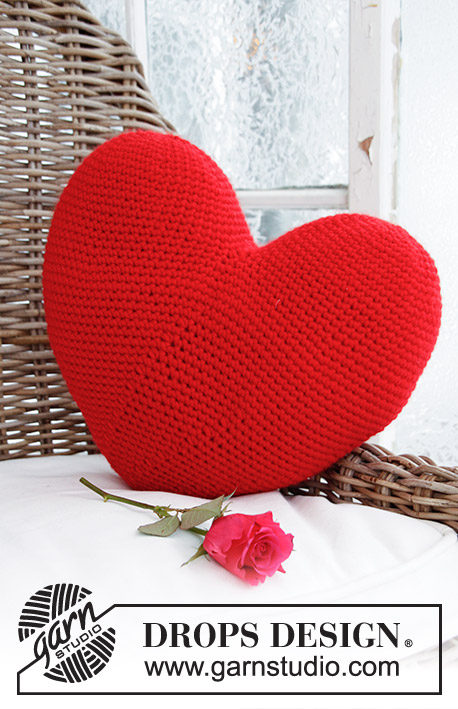
Crochet DROPS heart in ”Snow”.
DROPS Extra 0-760 |
|
|
CROCHET INFO: MAGIC CIRCLE: When piece is worked in the round, start with this technique to avoid holes in the middle (instead of ch): Hold the yarn end and wind the yarn one time around the index finger to make a loop. Hold the loop with left thumb and middle finger, place the thread over left index finger. Insert hook through the loop, make a YO and pull thread through loop, work 1 ch, then work dc around the loop. When the desired no of dc have been reached, pull the yarn end to tighten the loop. Fasten the yarn end on the back side. Continue to work in the round in a circle. WORK IN THE ROUND IN A CIRCLE: After last dc on the round, continue to next round with 1 dc in next dc (= first dc on next round). NOTE: Insert a marker between last dc and first dc on the round, move the marker upwards. WORKING 2 DC TOG: * Insert hook in next st, get thread *, repeat from *-* one more time, make a YO and pull thread through all 3 sts on hook. -------------------------------------------------------- HEART: First work 2 halves top down, then place the 2 parts tog and continue to work in the round towards the bottom of the heart. Start by working a Magic circle with Snow on hook size 5 mm - READ EXPLANATION ABOVE! ROUND 1: Work 7 dc in the magic circle. READ WORK IN THE ROUND IN A CIRCLE! ROUND 2: 2 dc in every dc = 14 dc. ROUND 3: * 1 dc in next dc, 2 dc in next dc *, repeat from *-* the rest of the round = 21 dc. ROUND 4: * 1 dc in the next 2 dc, 2 dc in next dc *, repeat from *-* the rest of the round = 28 dc. ROUND 5: * 1 dc in the next 3 dc, 2 dc in next dc *, repeat from *-* the rest of the round = 35 dc. ROUND 6: Work 1 dc in every dc = 35 dc. ROUND 7: * 1 dc in the next 4 dc, 2 dc in next dc *, repeat from *-* the rest of the round = 42 dc. ROUND 8: Work 1 dc in every dc = 42 dc. ROUND 9: * 1 dc in the next 5 dc, 2 dc in next dc *, repeat from *-* the rest of the round = 49 dc. ROUND 10-11: Work 1 dc in every dc = 49 dc on the round. ROUND 12: * 1 dc in the next 6 dc, 2 dc in next dc *, repeat from *-* the rest of the round = 56 dc. ROUND 13-18: Work 1 dc in every dc = 56 dc on the round. Cut the thread and keep 40 cm for assembly. Work another half heart the same way but do not cut the thread to continue to next round. Now place the 2 parts tog so that last dc from last round on both parts is against each other. Sew tog the next 8 dc on both parts with 1 stitch in every st, cut and fasten the thread. Pick up thread from the last dc from ROUND 18 on the second half heart (= now the mid of heart) and continue to work around both parts as follows: ROUND 19: Work 1 dc in every dc = 96 dc. ROUND 20: * 1 dc in the next 11 dc, 2 dc in next dc *, repeat from *-* the rest of the round = 104 dc. ROUND 21: Work 1 dc in every dc = 104 dc. ROUND 22: * 1 dc in the next 12 dc, 2 dc in next dc *, repeat from *-* the rest of the round = 112 dc. ROUND 23-24: Work 1 dc in every dc = 112 dc on the round. ROUND 25: * 1 dc in the next 26 dc, then crochet the next 2 dc tog * - Read explanation above, repeat from *-* the rest of the round = 108 dc. ROUND 26: Work 1 dc in every dc = 108 dc. ROUND 27: * 1 dc in the next 25 dc, then crochet the next 2 dc tog *, repeat from *-* the rest of the round = 104 dc. ROUND 28: Work 1 dc in every dc = 104 dc. ROUND 29: * 1 dc in the next 24 dc, then crochet the next 2 dc tog *, repeat from *-* the rest of the round = 100 dc. ROUND 30: Work 1 dc in every dc = 100 dc. ROUND 31: * 1 dc in the next 23 dc, then crochet the next 2 dc tog *, repeat from *-* the rest of the round = 96 dc. ROUND 32: Work 1 dc in every dc = 96 dc. ROUND 33: * 1 dc in the next 10 dc, then crochet the next 2 dc tog *, repeat from *-* the rest of the round = 88 dc. ROUND 34: Work 1 dc in every dc = 88 dc. ROUND 35: * 1 dc in the next 9 dc, then crochet the next 2 dc tog *, repeat from *-* the rest of the round = 80 dc. ROUND 36: Work 1 dc in every dc = 80 dc. ROUND 37: * 1 dc in the next 8 dc, then crochet the next 2 dc tog *, repeat from *-* the rest of the round = 72 dc. ROUND 38: Work 1 dc in every dc = 72 dc. ROUND 39: * 1 dc in the next 7 dc, then crochet the next 2 dc tog *, repeat from *-* the rest of the round = 64 dc. ROUND 40: Work 1 dc in every dc = 64 dc. ROUND 41: * 1 dc in the next 6 dc, then crochet the next 2 dc tog *, repeat from *-* the rest of the round = 56 dc. ROUND 42: Work 1 dc in every dc = 56 dc. ROUND 43: * 1 dc in the next 5 dc, then crochet the next 2 dc tog *, repeat from *-* the rest of the round = 48 dc. ROUND 44: Work 1 dc in every dc = 48 dc. ROUND 45: * 1 dc in the next 4 dc, then crochet the next 2 dc tog *, repeat from *-* the rest of the round = 40 dc. ROUND 46: Work 1 dc in every dc = 40 dc. ROUND 47: * 1 dc in the next 3 dc, then crochet the next 2 dc tog *, repeat from *-* the rest of the round = 32 dc. ROUND 48: Work 1 dc in every dc = 32 dc. ROUND 49: * 1 dc in the next 2 dc, then crochet the next 2 dc tog *, repeat from *-* the rest of the round = 24 dc. ROUND 50: Work 1 dc in every dc = 24 dc. ROUND 51: * 1 dc in next dc, then crochet the next 2 dc tog *, repeat from *-* the rest of the round = 16 dc. Fill the heart with some cotton wool until approx. 1 cm from edge. ROUND 52: Work 1 dc in every dc = 16 dc. ROUND 53: Crochet all dc tog 2 by 2 = 8 dc. ROUND 54: Crochet all dc tog 2 by 2 = 4 dc. Fill some cotton wool through the hole. Cut the thread and pull it through all the sts, fasten the thread. |
|
|
Have you made this or any other of our designs? Tag your pictures in social media with #dropsdesign so we can see them! Do you need help with this pattern?You'll find tutorial videos, a Comments/Questions area and more by visiting the pattern on garnstudio.com. © 1982-2024 DROPS Design A/S. We reserve all rights. This document, including all its sub-sections, has copyrights. Read more about what you can do with our patterns at the bottom of each pattern on our site. |
|


With over 40 years in knitting and crochet design, DROPS Design offers one of the most extensive collections of free patterns on the internet - translated to 17 languages. As of today we count 304 catalogues and 11422 patterns - 11422 of which are translated into English (UK/cm).
We work hard to bring you the best knitting and crochet have to offer, inspiration and advice as well as great quality yarns at incredible prices! Would you like to use our patterns for other than personal use? You can read what you are allowed to do in the Copyright text at the bottom of all our patterns. Happy crafting!
Comments / Questions (20)
Should the first half of the heart be wavy when your making it? X
29.12.2023 - 17:57DROPS Design answered:
Dear Mollie, it shouldn't be weavy, just make sure to check and keep same tension all the way. Happy crocheting!
02.01.2024 - 10:25Thank you so much for including this pattern! I was so worried about what to get for my mom for Christmas, but when I saw the picture, I just knew. She will be so elated to receive this!
21.12.2023 - 21:49V 21. riadku má byť nie 112 ks celkom, ale 104 ks, takže je tam menšia chyba.
14.01.2023 - 21:36DROPS Design answered:
Dobrý den, Jancoolko, děkujeme za upozornění - opraveno! Ať se vám hezky háčkuje, Hana
16.01.2023 - 12:56Kan jeg bruge bomuld 8/4 og nål 3,0 og så måske fordoble antal masker og rækker?
13.04.2021 - 16:47DROPS Design answered:
Hej Anna, du er nødt til at lave en hækleprøve så du er sikker på at få 12 fm på 10 cm (for at få samme størrelse som her) God fornøjelse!
14.04.2021 - 15:15Do you have a knitted pattern for the large heart cushion .I do not crochet. Thank you ,Geraldine
09.02.2021 - 00:59DROPS Design answered:
Hi Geraldine, Sadly, we do not have a knitted heart-cushion at the moment. Regards, Drops Team.
09.02.2021 - 07:32I don’t know if I’m being a little thick here but how many stitches are needed in the magic circle?
31.01.2021 - 20:16DROPS Design answered:
Dear Serena, you are working 7 dc in the magic circle - see ROUND 1: Work 7 dc in the magic circle. READ WORK IN THE ROUND IN A CIRCLE! Hope this helps. Happy crocheting!
01.02.2021 - 10:18Varje hjärthalva slutar med att man har 56 fm det blir 112 m sammanlagt. Sen står det att man skall sy ihop 8, lite oklart hur.Det innebär att jag skulle ha 104 fm att virka på. Men i mönster står det att efter jag sytt ihop 8 skall jag virka över 96 fm. Jag har fått det till 98. Det är något som inte stämmer.
19.02.2020 - 10:27DROPS Design answered:
Hej Mariette, du syr ihop 8 maskor från varje hjärthalva. 56-8=48 x 2 = 96 maskor. Lycka till :)
20.02.2020 - 08:58Hej Jeg er i gang med at hækle det flotte hjerte og er nu færdig med overdelen..de 2 hjertehalvdele ;-) Mit spørgsmål er....skal disse 2 halvdele ik vendes efter de er blevet monteret sammen?? Det står ikke i opskriften. Men jeg har aldrig hæklet andet en tæpper og klude. Derfor svare mit spørgsmål nok til en nybegynder :-) Jeg håber at høre fra jer snarest. Mvh Maria
18.02.2020 - 01:51DROPS Design answered:
Hej Maria, nej du skal ikke vende arbejdet, du fortsætter med at hækle rundt fra retsiden over de to hjertehalvdele. Du må gerne sy de 8 fm sammen fra vrangen om du får det pænere hvis det egentlig er det du mener... God fornøjelse :)
20.02.2020 - 08:54My question prior can be disregarded, I should have did a little investigating......looked up the yarn and figured it out! Bulky Yarn about 440 yards!
01.02.2020 - 04:30I love this heart, and is the only one I like that I've found anywhere on the net. My question to start is how much yarn do I need? The type of yarn is only listed but not the yardage and number of hanks or skeins. thank you, Karen USA
01.02.2020 - 04:23DROPS Design answered:
Hi Karen, The pattern uses 400 g (or 8 balls) of Drops Eskimo. This will give you 55 x 8 = 440 yards. Happy knitting!
03.02.2020 - 07:27