
Popular categories
Looking for a yarn?


|
|||||||||||||||||||
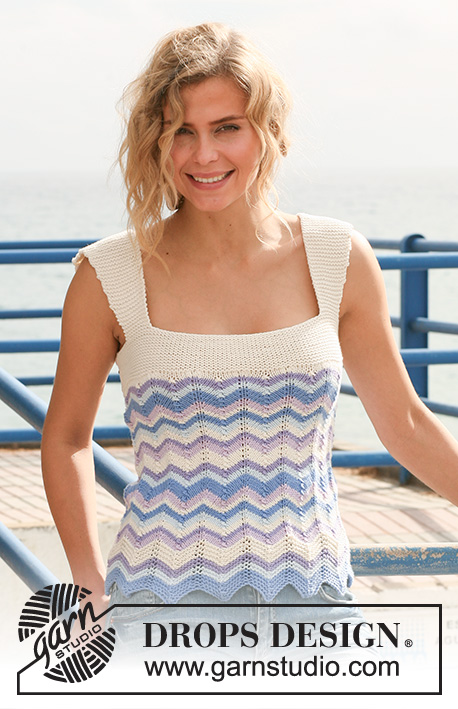
Breaking Waves Top |
|||||||||||||||||||
 |
 |
||||||||||||||||||
Knitted DROPS top with zigzag pattern and stripes in ”Muskat”. Size S-XXXL.
DROPS 128-3 |
|||||||||||||||||||
|
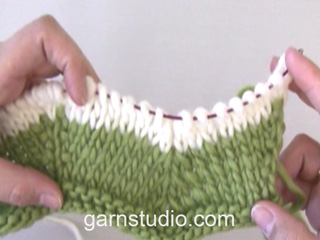
GARTER ST (in the round on circular needle): 1 ridge = 2 rounds * K 1 round and P 1 round *, repeat from *-*. GARTER ST (back and forth on needle): K all rows. PATTERN: See diagram M.1 - M.8. STRIPES IN RIDGES: (1 repetition of M.2 vertically = 1 ridge (2 rounds in garter st)) 3 ridges in light blue 2 ridges in ice blue 2 ridges in light blue purple 4 ridges in off white STRIPES IN STOCKING ST: 3 rounds in lilac 2 rounds in light blue purple 3 rounds in off white 3 rounds in ice blue 3 rounds in light blue 2 rounds in off white 3 rounds in lilac 5 rounds in light blue 3 rounds in ice blue 3 rounds in light blue purple 5 rounds in off white Repeat stripe repetition until anything else is stated. BUTTON HOLES: Cast off for button holes on right button band. 1 button hole = K tog 2nd and 3rd st from RS, then make 1 YO. -------------------------------------------------------- TOP: Worked in the round on circular needle. Cast on 224-240-256-288-320-352 sts on circular needle size 4 mm with light blue. Work M.1 over all sts - see PATTERN (= 14-15-16-18-20-22 repetitions). When M.1 has been worked 1 time vertically, there are 196-210-224-252-280-308 sts on needle. REMEMBER THE KNITTING TENSION! Continue with M.2 over M.1 AT THE SAME TIME work STRIPES IN RIDGES - see explanation above! Continue with M.3 over all sts AT THE SAME TIME work STRIPES IN STOCKING ST - see explanation above! When piece measures 18 cm (finish after one whole repetition of M.3 vertically), work M.4 over M.3. When M.4 has been worked 1 time vertically, there are 168-180-192-216-240-264 sts on needle. Continue with M.5 over M.4. When piece measures 23 cm, work as follows in the different sizes (start of round = mid back): SIZE S-L: Continue with M.5 over the first 4-4-4 repetitions as before, work M.6 over the next 6-7-8 repetitions, continue with M.5 over the remaining 4-4-4 repetitions as before (= 2 rounds) = 180-194-208 sts. Work M.3 over M.6, work the remaining repetitions in M.5 as before (= 2 rounds). Then continue to repeat the last 2 rounds of the pattern. SIZE XL-XXXL: Work M.6 over M.5. When M.6 has been worked 1 time vertically (= 2 rounds), there are 252-280-308 sts on needle. Then work M.3 over M.6 (= 2 rounds). Then continue to repeat the last 2 rounds of the pattern. ALL SIZES: When piece measures 35-36-37-38-39-40 cm, finish stripe pattern and zigzag pattern (after one whole repetition vertically). Switch to circular needle size 2.5 mm and off white. Then work as follows from start of round (= mid back): M.7 over all M.3 and M.8 over all M.5 = 152-164-176-216-240-264 sts. Work next round as follows: K 3 sts, turn and K 1 row from WS until the 3 sts mid back, then cast on 6 new sts at the end of row mid back for right button band = 158-170-182-222-246-270 sts. Continue in GARTER ST back and forth over all sts on the needle - see explanation above! When section in garter st measures 2 cm, cast off for first BUTTON HOLE - see explanation above! Repeat cast off for button hole when section in garter st measures 5 cm vertically. When section in garter st measures 7 cm vertically (the whole top now measures 42-43-44-45-46-47 cm), work next row from RS as follows: Cast off the first 24-25-26-27-28-29 sts on the needle. Then work half a shoulder strap back and forth over the next sts as follows: K 12-13-14-15-16-17 sts, turn and K back over the 12-13-14-15-16-17 sts, continue to K back and forth over these sts. AT THE SAME TIME when 4 rows in garter st (2 ridges) have been worked vertically, inc 1 st for wing sleeve by knitting 2 sts in last st from RS. Repeat inc every 8th row a total of 9-9-9-10-10-10 times = 21-22-23-25-26-27 sts. Cast off with K when strap measures 16-17-18-19-20-21 cm. Cast off the next 10-12-14-30-38-46 sts on the top (first armhole). Work half a shoulder strap over the next 12-13-14-15-16-17 sts, while AT THE SAME TIME inc for wing sleeve by knitting 2 sts in last st from WS. Cast off when strap measures 16-17-18-19-20-21 cm. Cast off the next 42-44-46-48-50-52 sts mid front of the top. Work half a shoulder strap over the next 12-13-14-15-16-17 sts (inc towards the side by knitting 2 sts in last st from RS). Cast off when strap measures 16-17-18-19-20-21 cm. Cast off the next 10-12-14-30-38-46 sts on the top (2nd armhole). Work half a shoulder strap over the next 12-13-14-15-16-17 sts (inc towards the side by knitting 2 sts in last st from WS). Cast off when strap measures 16-17-18-19-20-21 cm. Cast off the remaining 24-25-26-27-28-29 sts. Now piece measures approx. 58-60-62-64-66-68 cm. ASSEMBLY: Sew the shoulder seams. Sew cast on edge on right button band in front of the bottom of left button band with some stitches. Sew the buttons on to the left button band. |
|||||||||||||||||||
Diagram explanations |
|||||||||||||||||||
|
|||||||||||||||||||

|
|||||||||||||||||||

|
|||||||||||||||||||
|
Have you made this or any other of our designs? Tag your pictures in social media with #dropsdesign so we can see them! Do you need help with this pattern?You'll find tutorial videos, a Comments/Questions area and more by visiting the pattern on garnstudio.com. © 1982-2024 DROPS Design A/S. We reserve all rights. This document, including all its sub-sections, has copyrights. Read more about what you can do with our patterns at the bottom of each pattern on our site. |
|||||||||||||||||||


With over 40 years in knitting and crochet design, DROPS Design offers one of the most extensive collections of free patterns on the internet - translated to 17 languages. As of today we count 304 catalogues and 11422 patterns - 11422 of which are translated into English (UK/cm).
We work hard to bring you the best knitting and crochet have to offer, inspiration and advice as well as great quality yarns at incredible prices! Would you like to use our patterns for other than personal use? You can read what you are allowed to do in the Copyright text at the bottom of all our patterns. Happy crafting!
Comments / Questions (130)
128-3 jeg strikker s. Dette er starten: Strik M1 over alle masker(14 rapporter. Fortsæt med M2 i stribet i retstrik Vil det sige at jeg skal strikke M1 en gang og derefter M2 og så igen M1 og M 2 og hvor langt. Skal jeg strikke 22 omgange Eller kun en M1 og derefter kun M2 til jeg har strikket alle striber i retstrik Kh Nete Svar venligst hurtigt
31.03.2022 - 00:02DROPS Design answered:
Hej Nete. Du stickar M1 en gång och därefter stickar du M2 i 22 omg (STRIBER I RETSTRIK). Därefter stickar du M3 (STRIBER I GLATSTRIK) till arbetet måler 18 cm och fortsätter då enligt beskrivningen. Mvh DROPS Design
31.03.2022 - 08:24Hi, I've started this pattern, but have come stuck when changing yarn colours. Where I have joined in the round and changing colours I'd be starting the new round and colour with a K1, but the previous stitch is a yarn over in a different colour. How do I get around this please? I hope that makes sense. Thanks
26.02.2022 - 00:56DROPS Design answered:
Dear Christine, when working the diagrams M.2 to M.6, the last stitch of the round is a yarn over with the previous colour and the first stitch of the round should be always K1 and the yarn over should come as 2nd stitch. When changing colour, work the first stitch of the round with the new colour all the round (starting with working 1 and ending this round working the yarn over). Can this help or do I misunderstand your question?
28.02.2022 - 09:01Hvordan deller man et billeder?? Til opskriftter I har lave på jerres hjemsidde?? Kh Henriette
17.04.2021 - 15:17DROPS Design answered:
Hej Henriette, Har du lavet denne eller nogle af vore andre modeller? Del dine billeder i sociale medier og mærk dem med #dropsdesign, så vi kan se dem!
19.04.2021 - 15:10Hejza drops Super flot model❤️🌺😉 jeg har lige købbe garn til den så jeg glædder mig til se resultatte når jeg er færdi med den 🤗🌹 Kh Henriette ps ha en Dejli dag
12.03.2021 - 06:01Hej! Jag hade en fråga angående knapphålen var de ska placeras samt hur de stickas hur många maskor I mönstret står det ingenting bara att avmaska när rätstickning är 2 cm samt se förklaring ovan och Jag kan inte se någon förklaring ovan. Tacksam för hjälp och förklaring
15.07.2020 - 22:28DROPS Design answered:
Hej Eva, jo øverst i opskriften under INSTRKTIONER skriver vi hvordan du strikker knaphuller: KNAPPHÅL: Avm för knapphål på höger kant. 1 knapphål = sticka ihop den 2:a och 3:e m räta från rätsidan, gör sedan 1 omslag. Lycka till
30.07.2020 - 14:40Hej jag förstår inte hur jag stickar upptill med vita garnet och axelbanden och knapphålen var gör man dem. Jag har 158 m på en sticka och det står sticka 3 räta maskor vänd och sticka räta maskor från avigsidan det går ju inte du har ju bara dessa tre maskor . Jag har stickat hela modellen fram och tillbaka. Tacksam för svar o hjälp
12.07.2020 - 11:24DROPS Design answered:
Hei Eva. Denne oppskriften er skrevet for å strikke rundt, om du strikker frem og tilbake må du tilpasse oppskriften slik at det stemmer. Design avd har dessverre ikke mulighet til å skrive om / legge til forklaring på hvordan den strikkes frem og tilbake. mvh DROPS design.
13.07.2020 - 13:17Hej Min veninde vil gerne strikke denne top, men i Love you 9, hvad skal hun være opmærksom på. Her tænker jeg størrelses mæssig. er selv i tvivl om at det kan lade sig gøre
21.03.2020 - 14:07Suomenkielisessa ohjeessa on jäänyt tärkeä kohta suomentamatta. Jumiuduin kohtaan "toista jatkossa mallineuleen viim 2 krs:ta" (KOOT S-L). Vasta kun vertasin ruotsinkieliseen ohjeeseen, selvisi, mitä pitää toistaa.
14.01.2020 - 17:11Hvordan ser toppen ut bak? Skal stroppene ligge oppå hverendre midt bak? Hvor skal knapphullene være? Midt på de 6 «nyopplagde» maskene? Detburde absolutt ha vært bilde av hvorden denne ser ut bak! Umulig å forstå mønsteret.
26.03.2019 - 21:45DROPS Design answered:
Hei Hilde. Med unntak av at det er knappestolpe midt bak så er toppen lik foran og bak. Du feller av de første 24-25-26-27-28-29 maskene (fra midt bak og ut mot skulderen), så strikkes halve venstre skulderstropp. Videre felles 10-12-14-30-38-46 masker (= under ermet) og andre halvdelen av venstre skulderstropp strikkes (denne syes til første halvdel midt oppå skulderen). Så felles de midterste 42-44-46-48-50-52 maskene midt foran. Så strikkes begge halvdeler av høyre skulderstropp på samme måte som venstre, før du feller av de siste 24-25-26-27-28-29 maskene (halve bakstykket). Du har nå felt av like mange masker midt foran og midt bak. God fornøyelse
02.04.2019 - 14:23Wäre es möglich von diesem Modell eine Rückenansicht zu sehen? Habe ein bisschen Probleme und kann mir das hinten auch nicht so richtig vorstellen. Lg Busetti
01.08.2018 - 20:54DROPS Design answered:
Liebe Frau Busetti, wir haben leider keine Rückansicht. Nach 35-40 cm (siehe Größe) schlagen Sie 6 neuen Maschen am Ende der Reihe (= Blende) und stricken Sie krausrippen hin und zurück bis zur Ende (mit Knopflöchern auf der rechten Blende), dann werden die ersten 24-29 Maschen abgekettet und die erste Träger gestrickt. Die nächsten Maschem vom Top abketten (Armloch) und die Träger (Vorne) stricken, die nächsten Maschen vom mitte Vorne abketten, die 2. Träger (vorne) stricken, die Maschen für das 2. Armloch abketten, die 2. Träger (Rücken) stricken und die letzten M vom Top abketten. Viel Spaß beim stricken!
02.08.2018 - 09:08