
Popular categories
Looking for a yarn?


|
|
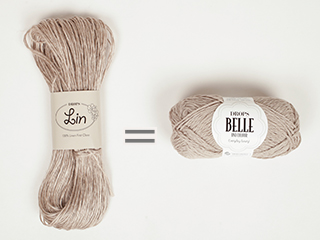
Lady Jane |
|
 |
 |
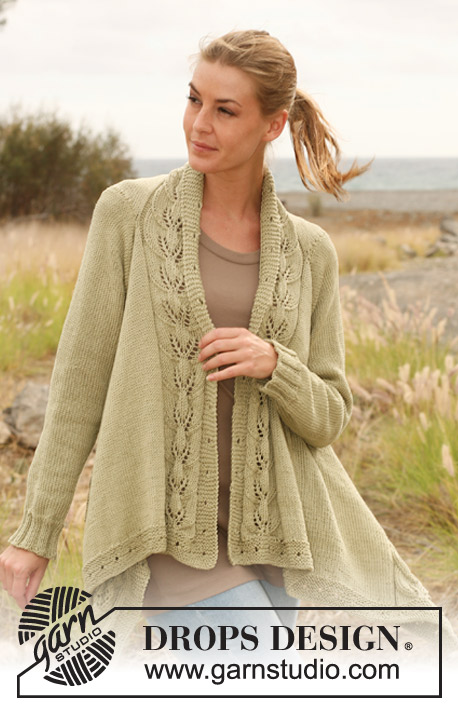
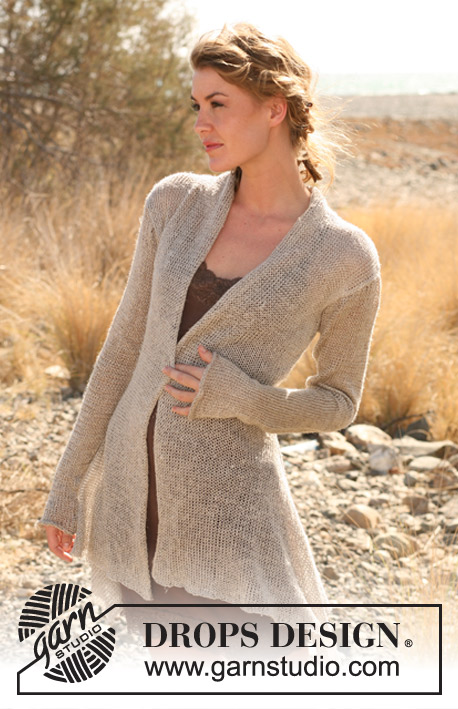
Knitted DROPS asymmetric jacket in ”Lin” or ”Muskat”. Size S-XXXL.
DROPS 129-3 |
|
|
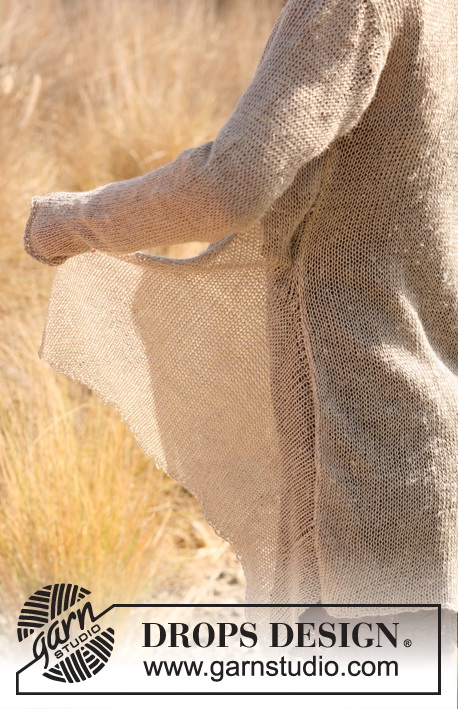
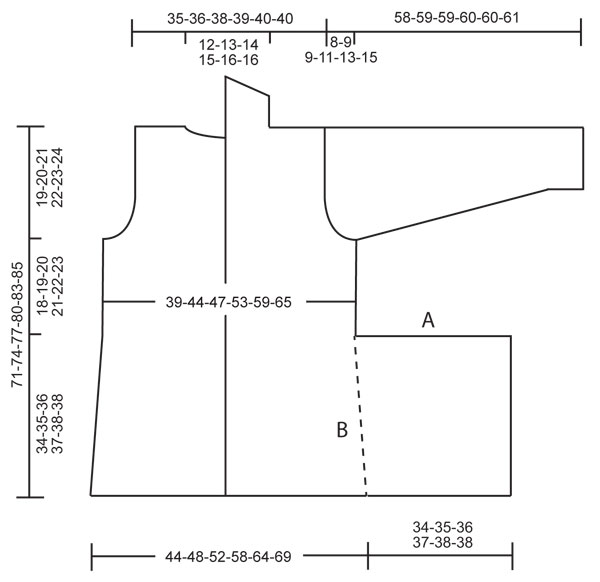
BACK PIECE: Worked back and forth on circular needle. Cast on 76-84-90-100-110-120 sts (incl 1 edge st in each side) on circular needle size 5 mm with Lin. Work in stocking st. When piece measures 10 cm, dec 1 st in each side. Repeat dec every 7-7½-7½-8-8½-8½ cm a total of 4 times = 68-76-82-92-102-112 sts. REMEMBER THE KNITTING TENSION! Insert a marker in edge st in each side when piece measures 34-35-36-37-38-38 cm (= markers for assembly). When piece measures 52-54-56-58-60-61 cm, cast off and dec for armholes at the beg of row in each side as follows: 3 sts 1 time, 2 sts 0-1-2-3-5-7 times and dec 1 st 1-2-2-4-4-5 times = 60-62-64-66-68-68 sts. When piece measures 69-72-75-78-81-83 cm, cast off the middle 18-20-22-24-26-26 sts for neck and finish each shoulder separately. Dec 1 st on next row from neck = 20 sts remain in all sizes. Cast off when piece measures 71-74-77-80-83-85 cm. LEFT FRONT PIECE: Worked back and forth on circular needle. Cast on 91-97-103-109-115-121 sts (incl 1 edge st in the side) on circular needle size 5 mm with Lin. Work in stocking st. When piece measures 34-35-36-37-38-38 cm, cast off the first 57-59-62-63-64-65 sts from RS = 34-38-41-46-51-56 sts. Continue in stocking st. When piece measures 52-54-56-58-60-61 cm, cast off and dec for armhole in the side as on back piece = 30-31-32-33-34-34 sts. When piece measures 71-74-77-80-83-85 cm, cast off the first 20 sts from RS for shoulder in all sizes = 10-11-12-13-14-14 sts remain for collar. Continue in stocking st until collar measures 8-8-9-9-10-10 cm, measured from the shoulder. Continue in stocking st, AT THE SAME TIME cast off 1 st at the beg of every row from RS until all sts have been cast off. RIGHT FRONT PIECE: Work as left front piece but reversed. SLEEVE: Worked back and forth on circular needle. Cast on 36-38-40-42-44-46 sts (incl 1 edge st in each side) on circular needle size 5 mm with Lin. Work in stocking st. When piece measures 8 cm, inc 1 st in each side. Repeat inc every 4-3½-3-2½-2½-2 cm a total of 10-12-13-15-15-17 times = 56-62-66-72-74-80 sts. When piece measures 50-50-50-49-47-46 cm (NOTE! Shorter measurements in the larger sizes because of longer sleeve cap and broader shoulder width), cast off for sleeve cap at beg of row in each side as follows: 3 sts 1 time, 2 sts 2-2-3-3-3-3 times, 1 st 3-4-2-5-7-9 times. Then cast off 2 sts in each side until piece measures 57-58-58-59-59-60 cm, then cast off 3 sts 1 time in each side. Cast off. Now piece measures approx. 58-59-59-60-60-61 cm. Knit another sleeve. ASSEMBLY: Sew the shoulder seams. Sew collar tog mid back and sew on to back of neck. Sew side seams inside 1 edge st (sew A (= cast off edge on front piece) against B (= side of back piece) - see chart. NOTE! Adjust so that cast off edge on each front piece is sewn up to marker on back piece, then continue side seam as before inside 1 edge st up to armhole) - see chart. Sew sleeve seams inside 1 edge st and sew in the sleeves. |
|
|
|
|
Have you made this or any other of our designs? Tag your pictures in social media with #dropsdesign so we can see them! Do you need help with this pattern?You'll find tutorial videos, a Comments/Questions area and more by visiting the pattern on garnstudio.com. © 1982-2024 DROPS Design A/S. We reserve all rights. This document, including all its sub-sections, has copyrights. Read more about what you can do with our patterns at the bottom of each pattern on our site. |
|


With over 40 years in knitting and crochet design, DROPS Design offers one of the most extensive collections of free patterns on the internet - translated to 17 languages. As of today we count 304 catalogues and 11422 patterns - 11422 of which are translated into English (UK/cm).
We work hard to bring you the best knitting and crochet have to offer, inspiration and advice as well as great quality yarns at incredible prices! Would you like to use our patterns for other than personal use? You can read what you are allowed to do in the Copyright text at the bottom of all our patterns. Happy crafting!
Comments / Questions (90)
I am confused about the flap (A) of Drops 129-3. Will it just hang? On what side should the armhole binding be done on each on each front piece (on the totally straight side or side with binding offs? Is there a video on assembly? Thank you!
16.03.2024 - 23:24DROPS Design answered:
Dear Reed, you can see in the second photo how A will look. When not straightened out it will look like a big fold. The armhole decreases are always in the side or lateral edge of the piece (not towards the neck), that is, where you had previously cast off stitches for the flap. There are no videos on how to assembly this piece. Happy knitting!
18.03.2024 - 00:19What is an "edge stitch"? Is it simply one knit or purl? (Lady Jane pattern LN-009)
19.02.2024 - 06:39DROPS Design answered:
Dera Mrs Loder, this edge stitch is used for the seam allowance, it can be worked in stocking stitch or in garter stitch, as you like. Happy knitting!
19.02.2024 - 09:54Hallo, Leider reicht bei mir die Wolle nicht mal ansatzweise. Wie viel Wolle muss ich circa für die Ärmel in Größe M nachbestellen?
22.09.2022 - 21:17DROPS Design answered:
Liebe Jirina, die Jacke haben wir leider nicht mehr, so können wir damit nicht helfen, aber gerne wird Ihnen damit Ihr Wollladen weiterhelfen (auch per Telephon oder per E-Mail). Viel Spaß beim stricken!
23.09.2022 - 07:50Could you please provide some additional detail re: "Sew collar tog mid back..."? For example, which two edges do I sew together (is it the angled parts of each half of the collar?), and then is it the shorter side of each collar that gets attached to the back piece? Thanks!
07.06.2021 - 17:14DROPS Design answered:
Dear Sharon, you will sew together the cast off stitches on each collar piece and then sew the long side towards shoulder along back piece, ie as in this video. Happy knitting!
08.06.2021 - 08:50This is my first attempt at following a cardigan pattern. I’m having trouble understanding the purpose of the extended side piece B and where the front B sides will attach.
16.05.2021 - 23:05DROPS Design answered:
Dear Sharon, this is an extra piece that will be then sewn to the side, maybe the 2nd picture will help you to visualize how it will look like. Happy knitting!
17.05.2021 - 09:43I’m having trouble getting yarn to make 129-3. No one has this yarn. Muskat. Is it a DK so that I can go elsewhere and get a suitable replacement yarn. I’m really upset that the two Places that are listed on your site do not respond or don’t offer a place for contacting them. Very upsetting. LesLee
22.07.2018 - 16:53DROPS Design answered:
Dear Leslee, DROPS Lin can here be replaced by DROPS Muskat - make sure you will get the correct tension adjusting needle size if needed. You'll find here list of DROPS stores shipping to USA - click on the profile each store to get email/social medias to contact them. Happy knitting!
23.07.2018 - 08:17Hallo, bei mir wird der schräge Teil des Kragens nochmals 8cm lang (nach den 10 cm grade), ist das nicht zu lange? Ich habe Angst, dass der Kragen nach dem Zusammennähen als Spitze hinten absteht. Oder müsste ich beim zweiten Vorderteil die Schräge weg vom Hals stricken, so dass eine schräge Kragennaht entsteht? Danke!
24.06.2018 - 09:49DROPS Design answered:
Liebe Kathi, diese abgeketteten Maschen von beiden Kragen werden zusammengenäht, nur die ersten 10 m werden am Rückenteil (Halsauschnitt) genäht. Viel Spaß beim stricken!
25.06.2018 - 08:27Bonjour, J'aimerais savoir si tous les fils de la catégorie de fils B peuvent être utilisés ou seulement Muskat, merci. Cordialement.
16.03.2017 - 23:31DROPS Design answered:
Bonjour Bénédicte, vous trouverez ici toutes les informations nécessaires relatives aux alternatives possibles. Bon tricot!
17.03.2017 - 08:50Liebes Drops-Team, ich möchte diese Jacke gerne mit "Belle" stricken. Können Sie mir das auch empfehlen, oder raten Sie mir eher ab. Bei den Garnalternative zu "Lin" ist sie schon mit aufgeführt. Ich müsste allerdings auch noch wissen, welche Lauflänge "Lin" hatte. Vielen Dank!
26.05.2016 - 20:32DROPS Design answered:
Liebe Margrit, Belle könnne wir sehr empfehlen. Die Lauflänge der älteren Garne finden Sie unter "Auslaufgarne" (oben im Menu unter "Garne").
27.05.2016 - 08:05Og en ting til, vil ikke kanten på forstykkene rulle veldig innover? (altså i åpningen foran) Hvordan kan jeg evt strikke for å unngå dette?
04.04.2016 - 17:00DROPS Design answered:
Hej igen, Du kan dampe kanterne let når du er klar, hvis du vil have en lille kant mod midt foran, så kan du strikke de yderste 4-5 masker mod midt foran i retstrik, men sådan er den ikke ifølge opskriften. God fornøjelse!
05.04.2016 - 11:12