
Popular categories
Looking for a yarn?


|
|||||||||||||
Up North |
|||||||||||||
 |
 |
||||||||||||
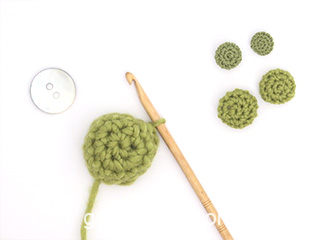
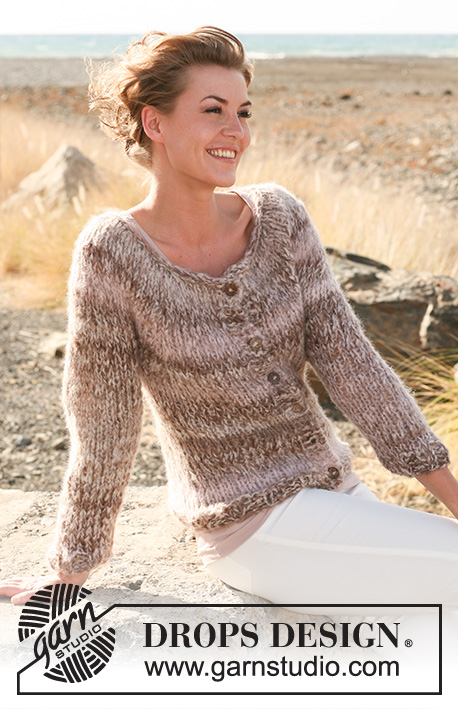
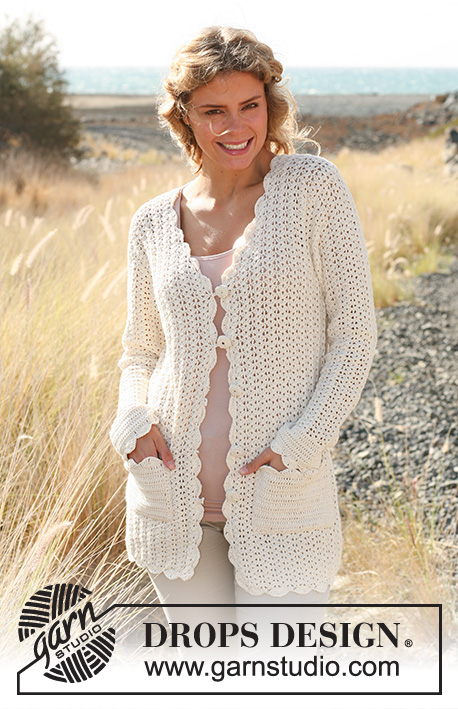
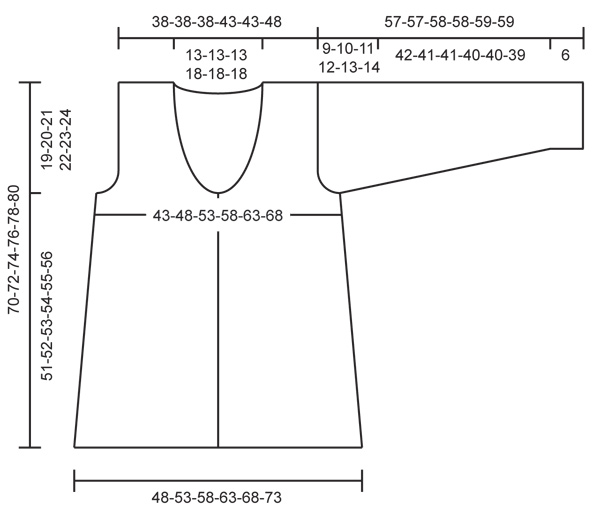
Crochet DROPS jacket in ”Safran”. Size: S - XXXL
DROPS 127-7 |
|||||||||||||
|
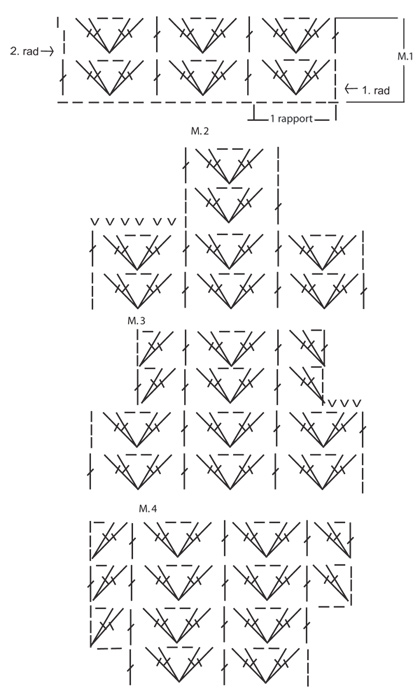
CROCHET INFO: Replace first dc on every row with ch 3. TR-GROUP: In same st work: 2 dc, ch 2, 2 dc. PATTERN: See diagram M.1 – M.4. DECREASE TIP: Dec 1 or ½ repetition - see M.2 and M.3. Dec at beg of row as follows: Replace 1 repetition with 6 sl st and ½ repetition with 3 sl st. Dec at end of row as follows: Turn piece when either 1 or ½ repetition remains. INCREASE TIP (applies to sleeve): Inc ½ repetition. Inc by turning with 5 ch instead of 3 ch. On next row, work ½ repetition over the extra 2 ch – see M.4. --------------------------------------------------------- BACK PIECE: Ch 118-130-142-154-166-178 (includes 6 ch to turn with) on hook size 3 mm / C with Safran. Work 1 dc-group – see explanation – in the 7th ch from hook, skip 2 ch, 1 dc in next ch, * skip 2 ch , 1 dc-group in next ch, skip ch 2, 1 dc in next ch*, repeat from *-* (18-20-22-24-26-28 times). Continue to work M.1 (1st row is now done, beg on 2nd row) = 19-21-23-25-27-29 repetitions. When piece measures 10 and 20 cm / 4" and 8", dec ½ repetition in each side – read Decrease tip = 17-19-21-23-25-27 repetitions. When piece measures 51-52-53-54-55-56 cm / 20"-20½"-21"-21¼"-21⅝"-22", dec for armhole in each side on every row as follows – read Decrease tip: 1 repetition a total of 1-1-2-2-2-2 times, then ½ repetition 0-2-2-2-4-4 times = 15-15-15-17-17-19 repetitions. When piece measures 68-70-72-74-76-78 cm / 26¾"-27½"-28⅜"-29⅛"-30"-30¾", divide the piece for neck and finish each shoulder separately. RIGHT SHOULDER: Start in the side and work in towards the middle. Work pattern over the first 6-6-6-6-6-7 repetitions, on next row dec 1 repetition towards the neck, 5-5-5-5-5-6 repetitions remain for shoulder. Cut and fasten the thread, piece measures approx. 70-72-74-76-78-80 cm / 27½"-28⅜"-29⅛"-30"-30¾"-31½. LEFT SHOULDER: Work as right shoulder but reversed. RIGHT FRONT PIECE: Ch 64-70-76-82-88-94 (includes 6 ch to turn with) on hook size 3 mm / C with Safran. 1st row = RS: Beg from mid front and work towards the side. Work 1 dc-group in the 7th ch from hook, skip 2 ch, 1 dc in next ch, * skip 2 ch, 1 dc-group in next ch, skip 2 ch, 1 dc in next ch *, repeat from *-* (9-10-11-12-13-14 times). Continue to work M.1 (1st row is now done, beg on 2nd row) = 10-11-12-13-14-15 repetitions. When piece measures 15 and 25 cm / 6" and 9¾", dec in the side (end of row from RS) as on back piece = 9-10-11-12-13-14 repetitions. When piece measures 51-52-53-54-55-56 cm / 20"-20½"-21"-21¼"-21⅝"-22", dec for armhole in the side as on back piece while AT THE SAME TIME dec for neck on every other row towards mid front as follows: Dec ½ repetition a total of 6-6-6-8-8-8 times. After all dec, 5-5-5-5-5-6 repetitions remain for shoulder. Continue to work until piece measures 70-72-74-76-78-80 cm / 27½"-28⅜"-29⅛"-30"-30¾"-31½, fasten off. LEFT FRONT PIECE: Work as right front piece. 1st row = from WS. SLEEVE: Work sleeve back and forth. Ch 65-65-72-72-79-79 (includes 3 ch to turn with) on hook size 3 mm / C with Safran. Work 1 dc in the 4th ch from hook, * 1 dc in each of the next ch 6, skip 1 ch *, repeat from *-*, and finish with 1 dc in each of the last 5 ch = 55-55-61-61-67-67 dc. Work 1 dc in every dc until piece measures 6 cm / 2⅜" – see CROCHET INFO, now work M.1. (Work first row in M.1 as follows: ch 3 in 1st dc, * skip 2 dc, 1 dc-group in next dc, skip 2 dc, 1 dc in next dc*, repeat from *-*) = 9-9-10-10-11-11 repetitions. When piece measures 15-18-18-18-18-18 cm / 6"-7"-7"-7"-7"-7", inc ½ repetition in each side, repeat on every 8th-4th-4th-4th-4th-4th row a total of 4-6-6-6-6-6 times - Read INCREASE TIP = 13-15-16-16-17-17 repetitions. When piece measures 48-47-47-46-46-45 cm / 19"-18½"-18½"-18"-18"-17¾" (shorter measurements in the larger sizes because of longer sleeve cap and wider shoulders), dec 1 repetition in each side for sleeve cap. Then dec ½ repetition in each side on every other row a total of 0-0-0-0-2-2 times then on every row a total of 6-7-8-8-6-6 times = 5-6-6-6-7-7 repetitions – read Decrease tip. Work until piece measures 57-57-58-58-59-59 cm / 22½"-22½"-22¾"-22¾"-23¼"-23¼", fasten off. POCKETS: Ch 44 (includes 3 ch to turn with) on hook size 3 mm / C with Safran. Work 1 dc in the 4th ch from hook, * 1 dc in each of the next ch 6, skip 1 ch *, repeat from *-*, and finish with 1 dc in each of the last 5 ch = 37 dc. Work 1 dc in every dc back and forth until piece measures 12 cm / 4¾". Then work edge as follows: Work 1 sc, * skip 2 cm / ¾", 4 tr in next dc, ch 2, 4 tr in same dc, skip 2 cm / ¾", 1 sc in next dc *, repeat from *-* a total of 4 times. Continue to work an edge around the rest of the pocket as follows: 1 sc, * ch 2, skip ½ cm / ¼", 1 sc *, repeat from *-* down along the side, along the bottom and up the other side. Fasten off. Work another pocket. ASSEMBLY: Sew the shoulder seams tog. Sew in sleeves. Sew sleeve and side seams in one - sew edge to edge with neat, little stitches. Sew the pockets on each front piece, approx. 10 cm / 4" from bottom edge on jacket and approx. 4 cm / 1½" from front edge, sew with neat little stitches. CROCHET BORDER: Work edge from WS of jacket. Work an edge on hook size 3 mm / C with Safran up along left front piece, around the neckline, down along right front piece, around the edge at the bottom and then around the sleeves as follows: Work 1 sc, * skip 2 cm / ¾", 4 tr in next ch, ch 2, 4 tr in same st, skip 2 cm / ¾", 1 sc in next st *, repeat from *-*. AT THE SAME TIME work 5 button loops along the edge of right front piece as follows: Work first loop 2-4 cm / ¾"-1½" after neck dec (measured from top). Make the loop between two tr-loops (i.e 1 tr-loop = * skip 2 cm / ¾", 4 tr in next ch, ch 2, 4 tr in same st, skip 2 cm / ¾", 1 sc in next st *), so after the sc in next st, ch 12, 1 sc in same st. Continue with crochet edge as before with two tr-loops between each button loop until 5 loops have been worked. BUTTONS: Work covers for 5 buttons on hook size 3 mm / C with Safran as follows: Ch 2, then work 16 dc in the first of the 2 ch worked, finish with 1 sl st at top of first dc (= 1st round). 2nd round: Work 1 sc in every dc and finish with 1 sl st in first sc on round. 3rd round: Work 1 dc in every other sc and finish with 1 sl st in first dc on round = 8 dc. Place the button in the cover, sew around the edge, tighten tog and fasten the thread. Sew buttons on to left front piece. |
|||||||||||||
Diagram explanations |
|||||||||||||
|
|||||||||||||
|
|||||||||||||
|
|||||||||||||
|
Have you made this or any other of our designs? Tag your pictures in social media with #dropsdesign so we can see them! Do you need help with this pattern?You'll find tutorial videos, a Comments/Questions area and more by visiting the pattern on garnstudio.com. © 1982-2024 DROPS Design A/S. We reserve all rights. This document, including all its sub-sections, has copyrights. Read more about what you can do with our patterns at the bottom of each pattern on our site. |
|||||||||||||


With over 40 years in knitting and crochet design, DROPS Design offers one of the most extensive collections of free patterns on the internet - translated to 17 languages. As of today we count 304 catalogs and 11422 patterns - 11417 of which are translated into English (US/in).
We work hard to bring you the best knitting and crochet have to offer, inspiration and advice as well as great quality yarns at incredible prices! Would you like to use our patterns for other than personal use? You can read what you are allowed to do in the Copyright text at the bottom of all our patterns. Happy crafting!
Comments / Questions (115)
Danka wrote:
Please translate to CZ. I want crochet.
10.06.2016 - 12:02DROPS Design answered:
Milá Danko, překlad je doplněný. Hodně zdaru při háčkování! Hana
13.06.2016 - 16:01Hej. Jeg har tænkt mig at hækle denne flotte cardigan, men kan I fortælle mig, i hvilke af jeres online-butikker, man kan købe knapperne? Jeg har kigget i både Rito og YarnLiving, men de har ikke de anbefalede metalknapper. Med venlig hilsen Sine Askbo
10.06.2016 - 10:51DROPS Design answered:
Hej Sine. Kontakt vores Superstores (eventuelt Rito.dk) vedrörende leveringstid paa disse knapper, hvis de ikke har dem. Superstores betiller altid hvis du mangler.
10.06.2016 - 13:02Referring to the sleeve - after you increase 1/2 rep on each side then you turn the pattern, where do you place the first stitch and the last stitch at the end of the row?
10.05.2016 - 11:35DROPS Design answered:
Dear Mrs Comber, for inc 1/2 repetition on sleeve, turn with 5 ch instead of 3 ch and on next row, work 1/2 repetition over the 2 extra ch, ie work 1 ch, 2 tr in 4th ch from hook - see also diagram M.4. Happy crocheting!
10.05.2016 - 13:42Even een vraag over de mouwen: Klopt het dat het boord breder wordt dan de mouwen zelf? Ik ben weer eens overnieuw begonnen en heb nu 42 stokjes gemaakt ipv 55 stokjes. Daarna heb ik, gewoon volgens patroon, 9 patroonherhalingen gemaakt. Volgens mij komt het dan beter uit. Ik maak maat M, hij wordt heel leuk. Voor en achterpand is al af!
11.03.2016 - 13:37DROPS Design answered:
Hoi Sandra. Zo te zien is er een klein verschil in de breedte van de boord / rest van de mouw. Maar het zou niet een hele grote zijn (ook als ik proefhaak met stk tegenover het patroon). De verschil komt in het verschil van steken / rekbaarheid. Maar als het voor jouw beter uitkomt met minder stk, dan is dat goed. En natuurlijk dat de stekenverhouding klopt :) Veel haakplezier verder!
11.03.2016 - 15:06Carolin wrote:
Hallo Drops Team, Ich arbeite im Moment am Rückenteil und frage mich welcher Unterschied zwischen Stäbchengruppe mit Lm, Stäbchen und der M1 ist. Gibt es da einen?
14.02.2016 - 22:26DROPS Design answered:
Liebe Carolin, bei M1 ist zwischen den Stächengruppen noch ein zusätzliches Stb und Sie sehen auch, wie das Muster übereinander gehäkelt wird.
09.03.2016 - 10:53Liebes Drops-Team, ich komme mit den Zunahmen der Ärmel nicht klar.da steht in jeder 8.Reihe einen halben Rapport beidseitig zunehmen.Da die Zunahmen sich über 2 Reihen erstrecken (wenn ich das so richtig verstanden habe) ist meine Frage:Ab welcher Reihe zähle ich wieder die erste der 8 Reihen?Vielen Dank
09.01.2016 - 21:56DROPS Design answered:
Liebe Susan, die erste Reihe ist die erste Reihe mit den Zunahmen.
08.03.2016 - 14:05Ich habe alle Teile für diese wunderschöne Jacke nun fertiggestellt. Habe zwar ein anderes Garn benutzt, die Maschenprobe stimmt aber überein. Mein Problem ist nun beim Annähen der Ärmel: Der Armausschnitt am "Rumpfteil" ist größer, als der Teil des Ärmels, der eingesetzt wird. Habe schon mehrfach kontrolliert, ob ich evtl. einen Fehler gemacht habe, kann aber keinen entdecken. Habt ihr vielleicht eine Idee, worin der Fehler evtl. bestehen könnte? Oder ist das so gewollt?
03.12.2015 - 22:15DROPS Design answered:
An sich müsste der Ärmel in den Ausschnitt passen. Es ist etwas schwierig, per "Ferndiagnose" festzustellen, warum er bei Ihnen nicht passt. Vielleicht fragen Sie in dem Laden nach, indem Sie das Garn gekauft haben.
09.12.2015 - 19:32Hi, I'm confused by this bit (using the smallest size reference) : When piece measures 10 and 20 cm, dec ½ repetition in each side = 17 repetitions. Two half decreases from 19 repition only takes us down to 18 repitions (ie, we've only taken off one complete repition; half on each side) so how can that leave 17 repitions? And does the following bit mean a whole repition ON EACH Side? : 1 repetition a total of 1- time, then ½ repetition 0 time = 15 repetition
19.10.2015 - 21:05DROPS Design answered:
Dear Mrs Hodgetts, you dec ½ repetition in each side when piece measures 10 cm = 18 repetitions remain, then dec ½ repetition in each side when piece measures 20 cm = 17 repetitions remain. Diagrams M.2 and M.3 show how to dec ½ repetition. Happy crocheting!
20.10.2015 - 10:28Sömmen blev riktigt bra, fast jag tvivlade (se nedan). Mycket nöjd med tröjan!
25.09.2015 - 15:32Warum nehme ich am Rücken nach 10 und 20 cm ab und bei den Vorderteilen nach 15 und 25 cm? Ich habe das rechte Vorderteil und den Rücken fertig. Wenn ich das jetzt übereinander lege passt es doch gar nicht! Vielen Dank Janine
19.09.2015 - 11:50DROPS Design answered:
Das ist absichtlich so versetzt, damit die Schrägung regelmäßiger und nicht so stufig verläuft. Die Abnahmen stoßen also nicht aneinander, sondern laufen versetzt, sodass also hinterher beim Aneinanderfügen alle 5 cm eine Abnahme kommt.
20.09.2015 - 15:29