DROPS Alpaca
DROPS Alpaca
100% Alpaca
from 6.75 CAD /50g
DROPS Kid-Silk
DROPS Kid-Silk
75% Mohair, 25% Silk
from 9.40 CAD /25g
Get the yarn to make this pattern from 71.35CAD.

The yarn cost is calculated from the pattern’s smallest size and the yarn’s cheapest product type. Looking for an even better price? You might find it on the DROPS Deals!

DROPS SS24

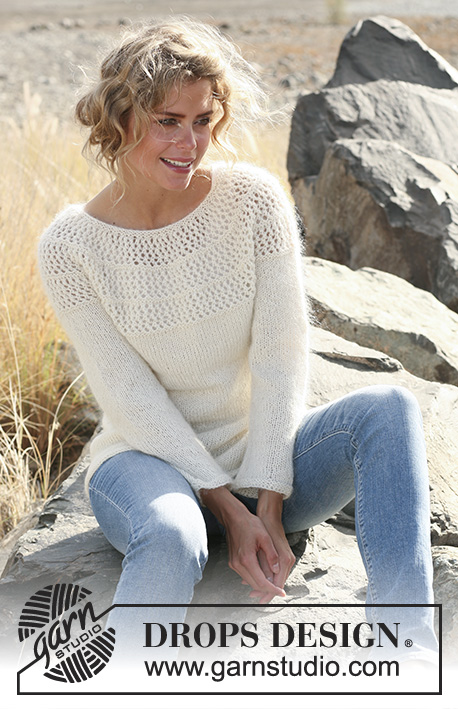
Autumn Afternoon Cardigan

Knitted DROPS jacket with lace pattern and round yoke in "Alpaca" and "Kid-Silk". Size: S - XXXL.

DROPS 127-3
DROPS design: Pattern no Z-537
--------------------------------------------------------
Size: S - M - L - XL - XXL - XXXL
Finished measurements:
Bust: 82-90-100-110-118-126 cm /
32 1/4"-35½"-39 3/8"-43 3/8"-46½"-49½"
Full length: 58-60-62-64-66-68 cm /
22¾''-23 5/8''-24 3/8''-25¼''-26''-26¾''

Materials: DROPS ALPACA from Garnstudio
Color no 0100, eco off white:
250-300-300-350-350-400 g
And use: DROPS KID-SILK from Garnstudio
Color no 01, off white:
100-125-125-150-150-175 g

DROPS DOUBLE POINTED NEEDLES AND CIRCULAR NEEDLE (80 cm / 32'') SIZE 5 mm/US 8 - or size needed to get 17 sts x 22 rows in stockinette st with 1 strand Alpaca and 1 strand Kid-Silk = 10 x 10 cm / 4'' x 4''.
DROPS DOUBLE POINTED NEEDLES AND CIRCULAR NEEDLE (80 cm / 32'') SIZE 4 mm/US 6 - for garter st.

DROPS MOTHER-OF-PEARL BUTTONS NO 522: 7-7-8-8-8-8 pieces

-------------------------------------------------------

Alternative Yarn – See how to change yarns here
Yarn Groups A to F – Use the same pattern and change the yarn here
Yarn usage using an alternative yarn – Use our yarn converter here

-------------------------------------------------------

DROPS Alpaca
DROPS Alpaca
100% Alpaca
from 6.75 CAD /50g
DROPS Kid-Silk
DROPS Kid-Silk
75% Mohair, 25% Silk
from 9.40 CAD /25g
Get the yarn to make this pattern from 71.35CAD.

The yarn cost is calculated from the pattern’s smallest size and the yarn’s cheapest product type. Looking for an even better price? You might find it on the DROPS Deals!

Pattern instructions

NOTE: This pattern is written in American English. All measurements in charts are in cm. For conversion from inches to cm - click here. There are different terms for crocheting in American and British English. If this pattern includes crochet, click for "crochet terms" here. For this pattern in British English, please click here.
GARTER ST (back and forth on needle): K all rows.

GARTER ST (in the round): * K 1 round and P 1 round *, repeat from *-*.

DECREASE TIP (applies to the body):
Dec as follows before marker: K 2 tog.
Dec as follows after marker: Slip 1 st as if to K, K 1, psso.

RAGLAN:
Dec on each side of markers.
Dec as follows BEFORE marker: K 2 tog.
Dec as follows AFTER marker: Slip 1 st as if to K, K 1, psso.

BUTTON HOLES:
bind off for button holes on right front band. 1 button hole = bind off 4th st from mid front. On next row cast on 1 new st over the bind off st. Bind off for the first 3-3-4-4-4-4 button holes when piece measures:
SIZE S: 11, 20, 29 cm / 4½",8",11½"
SIZE M: 13, 22, 31 cm / 5",8 3/4",12 1/4"
SIZE L: 10, 18, 26, 34 cm / 4",7",10 1/4", 13½"
SIZE XL: 11, 19, 27, 35 cm / 4½",7½",10½",13½"
SIZE XXL: 11, 20, 29, 38 cm / 4½",8",11½",15"
SIZE XXXL: 12, 21, 30, 39 cm / 4 3/4",8 1/4",11 3/4",15 1/4"
The 4 button holes at the top are described under YOKE.
--------------------------------------------------------

BODY:
Worked back and forth on circular needle.
Cast on 153-171-183-201-219-231 sts on circular needle size 4 mm / US 6 with 1 strand Alpaca and 1 strand Kid-Silk. Insert 2 markers in the piece after 41-46-48-53-58-61 sts from each side (back piece = 71-79-87-95-103-109 sts). READ ALL OF THE FOLLOWING SECTION BEFORE CONTINUING! Work 6 rows in GARTER ST - see explanation above. Switch to circular needle size 5 mm / US 8 and continue in stockinette st with 6 sts in garter st each side (= bands) REMEMBER THE GAUGE! When piece measures 7 cm / 2¾'', dec 1 st each side of both markers - READ DECREASE TIP! Repeat the dec every 2½ cm / 7/8'' a total of 6 times = 129-147-159-177-195-207 sts. AT THE SAME TIME when piece measures 11-13-10-11-11-12 cm / 4½"-5"-4"-4½"-4½"-4 3/4", bind off for BUTTON HOLES on right front band - see explanation above! When piece measures 25 cm / 9 3/4'', inc 1 st on each side of both markers by K 2 sts in the st before and after the marker. Repeat the inc every 2-2½-2½-3-3½-3½ cm / 3/4"-7/8"-7/8"-1 1/8"-1 1/4"-1 1/4" a total of 5 times = 149-167-179-197-215-227 sts. When piece measures 37-38-40-42-43-44 cm / 14½"-15"-15 3/4"-16½"-17½"-17 1/4", bind off the middle 8 sts each side for armholes from RS (i.e. Bind off 4 sts each side of every marker) = 133-151-163-181-199-211 sts remain on needle. Put piece aside and work the sleeves.

SLEEVE:
Worked in the round on double pointed needles. Cast on 38-40-42-44-46-48 sts on double pointed needles size 4 mm / US 6 with 1 strand Alpaca and 1 strand Kid-Silk. Work 6 rounds in GARTER ST - see explanation above! Switch to double pointed needles size 5 mm / US 8. Insert a marker at beg of round (= mid under sleeve). Continue in stockinette st. AT THE SAME TIME when piece measures 8 cm / 3'', inc 1 st on each side of marker by K 2 sts in the st before and after the marker. Repeat inc every 3½-3-3-3-2½-2½ cm / 1 1/4"-1 1/8"-1 1/8"-1 1/8"-7/8"-7/8" a total of 8-9-10-10-11-12 times = 54-58-62-64-68-72 sts. When piece measures 39-39-40-40-40-40 cm / 15 1/4"-15 1/4"-15 3/4"-15 3/4"-15 3/4"-15 3/4", bind off 8 sts mid under sleeve (i.e. Bind off 4 sts each side of marker) = 46-50-54-56-60-64 sts remain on needle. Put piece aside and knit another sleeve.

YOKE:
Slip sleeves on to same circular needle as body = 225-251-271-293-319-339 sts. Insert a marker in all transitions between sleeves and body piece (= 4 markers). 1st row = from WS: Continue in stockinette st and 6 sts in garter st each side towards mid front, AT THE SAME TIME on next row from RS dec for RAGLAN (= 8 dec per dec-row) - see explanation above! Repeat dec on every row from RS a total of 2-3-3-3-4-5 times = 209-227-247-269-287-299 sts. Switch to circular needle size 4 mm / US 6 and work 4 rows in garter st, AT THE SAME TIME on first row bind off for button holes on right front band and on last row from WS adjust the no of sts to 212-228-248-268-288-300 sts (do not adjust over front band sts).
Switch to circular needle size 5 mm / US 8 and work diagram M.1 with 6 sts in garter st each side. Work like this for 5 cm / 2''.
Switch to circular needle size 4 mm/US 6 and work 4 rows in garter st, AT THE SAME TIME on first row bind off for button holes on right front band and on last row from WS dec 28-32-36-44-52-52 sts evenly (do not dec over bands) = 184-196-212-224-236-248 sts.
Switch to circular needle size 5 mm / US 8 and work M.1 with 6 sts in garter st each side. Work like this for 5 cm / 2''.
Switch to circular needle size 4 mm/US 6 and work 4 rows in garter st, AT THE SAME TIME on first row bind off for button holes on right front band and on last row from WS dec 32-32-32-36-40-40 sts evenly (do not dec over bands) = 152-164-180-188-196-208 sts.
Switch to circular needle size 5 mm / US 8 and work M.1 with 6 sts in garter st each side. Work like this for 5 cm / 2''.
Switch to circular needle size 4 mm / US 6. K 1 row while AT THE SAME TIME dec 45-54-70-72-76-88 sts evenly and bind off for button holes on right front band = 107-110-110-116-120-120 sts. K 1 row from WS. Continue to work an elevation in the neck with short rows as follows (1st row = from RS): K until 25-27-27-29-30-30 sts remain on needle, turn and K back until 25-27-27-29-30-30 sts remain on the other side. Turn and K until 32-34-34-36-37-37 sts remain on needle, turn and K back until 32-34-34-36-37-37 sts remain on the other side. Turn and K until 39-41-41-43-44-44 sts remain on needle, turn and K back until 39-41-41-43-44-44 sts remain on the other side. Turn and K until 45-47-47-50-52-52 sts remain on needle, turn and K back until 45-47-47-50-52-52 sts remain on the other side. Turn piece and K the entire row, then K 2 rows over all sts. Bind off. Piece measures approx. 58-60-62-64-66-68 cm / 22¾''-23 5/8''-24 3/8''-25¼''-26''-26¾''.

ASSEMBLY:
Sew tog the openings under the sleeves . Sew the buttons on to left front piece.

Diagram

symbols = K from RS, P from WS
symbols = 1 YO between 2 sts
symbols = K 2 tog
symbols = slip 1 st as if to K, K1, psso
diagram

Each of our patterns has specific tutorial videos to help you.

Do you have a question? See a list of frequently asked questions (FAQ)

Knitting tension is what determines the final measurements of your work, and is usually measured per 10 x 10 cm. It is provided like so: number of stitches in width x number of rows in height - eg: 19 stitches x 26 rows = 10 x 10 cm.

The knitting tension is very individual; some people knit/crochet loosely while others work tightly. You adjust the knitting tension with the needle size, which is why the suggested needle size only serve as a guide! You need to adjust this (up or down) to ensure that YOUR knitting tension matches the knitting tension provided in the pattern. If you work with a different knitting tension than provided you will have a different yarn consumption, and your work will have different measurements than what the pattern suggests.

The knitting tension also determines which yarns can replace each other. As long as you achieve the same knitting tension you can replace one yarn with another.

See DROPS lesson: How to measure your tension/gauge

See DROPS video: How to make a gauge tension swatch

The required amount of yarn is provided in grams, eg: 450 g. To calculate how many balls you’ll need you first need to know how many grams are in 1 ball (25g, 50g or 100g). This information is available if you click on the individual yarn quality on our pages. Divide the amount required with the amount of each ball. For example, if each ball is 50g (the most common amount), the calculation will be as follows: 450 / 50 = 9 balls.

The important thing when changing from one yarn to another is that the knitting/crochet tension remains the same. This is so that the measurements of the finished piece will be the same as on the sketch provided. It is easier to achieve the same knitting tension using yarns from the same yarn group. It is also possible to work with multiple strands of a thinner yarn to achieve the knitting tension of a thicker one. Please try our yarn converter. We recommend you to always work a test swatch.

Please NOTE: when changing yarn the garment might have a different look and feel to the garment in the photo, due to individual properties and qualities of each yarn.

See DROPS lesson: Can I use a different yarn than the one mentioned in the pattern?

All our yarns are categorised into yarn groups (from A to F) according to thickness and knitting tension – group A contains the thinnest yarns and group F the thickest. This makes it easier for you to find alternative yarns to our patterns, should you wish to switch yarn. All yarns within the same group have a similar knitting tension and can easily replace each other. However, different yarn qualities have different structures and properties which will give the finished work a unique look and feel.

Click here for an overview of the yarns in each yarn group

At the top of all our patterns you’ll find a link to our yarn converter, which is a helpful tool should you wish to use a different yarn than suggested. By filling in the yarn quality you wish to replace, the amount (in your size) and number of strands, the converter will present good alternative yarns with the same knitting tension. Additionally it will tell you how much you’ll require in the new qualities and whether you’ll need to work with multiple strands. Most skeins are 50g (some are 25g or 100g).

If the pattern is worked with multiple colours, every colour will have to be converted separately. Similarly, if the pattern is worked with several strands of different yarns (for example 1 strand Alpaca and 1 strand Kid-Silk) you will have to find alternatives for each, individually.

Click here to see our yarn converter

Since different yarns have different qualities and textures we have chosen to keep the original yarn in our patterns. However, you can easily find options among our available qualities by using our yarn converter, or simply pick a yarn from the same yarn group.

It is possible that some retailers still have discontinued yarns in stock, or that someone has a few skeins at home that they would like to find patterns for.

The yarn converter will provide both alternative yarn as well as required amount in the new quality.

If you think it's hard to decide what size to make, it can be a good idea to measure a garment you own already and like the size of. Then you can pick the size by comparing those measures with the ones available in the pattern's size chart.

You'll find the size chart at the bottom of the pattern.

See DROPS lesson: How to read size chart

The needle size provided in the pattern serves only as a guide, the important thing is to follow the knitting tension. And since knitting tension is very individual, you will have to adjust the needle size to ensure that YOUR tension is the same as in the pattern – maybe you’ll have to adjust 1, or even 2 needle sizes, up or down to achieve the correct tension. For this, we recommend that you work test swatches.

Should you work with a different knitting tension than the one provided, the measurements of the finished garment might deviate from the measurement sketch.

See DROPS lesson: How to measure your tension/gauge

See DROPS video: How to make a gauge tension swatch

Working a garment top-down provides more flexibility and room for personal adjustment. For example it is easier to try the garment on while working, as well as making adjustments to length of yoke and shoulder caps.

The instructions are carefully explaining every step, in the correct order. Diagrams are adjusted to the knitting direction and are worked as usual.

The diagram depicts all rows/rounds, and every stitch seen from the right side. It is read from bottom to top, from right to left. 1 square = 1 stitch.

When working back and forth, every other row is worked from the right side and every other row is worked from the wrong side. When working from the wrong side, the diagram will have to be worked reversed: from left to right, knit stitches are purled, purl stitches are knit etc.

When working in the round every round is worked from the right side and the diagram are worked from right to left on all rounds.

See DROPS lesson: How to read knitting diagrams

The diagram depicts all rows/rounds, and every stitch seen from the right side. It is worked from bottom to top, from right to left.

When working back and forth every other row is worked from the right side: from right to left and every other row is worked from the wrong side: from left to right.

When working in the round, every row in the diagram are worked from the right side, from right to left.

When working a circular diagram you start in the middle and work your way outwards, counter clockwise, row by row.

The rows usually start with a given number of chain stitches (equivalent to the height of the following stitch), this will either be depicted in the diagram or explained in the pattern.

See DROPS lesson: How to read crochet diagrams

Instructions for working several diagrams after each other on the same row/round, will often be written like so: “work A.1, A.2, A.3 a total of 0-0-2-3-4 times". This means you work A.1 once, then A.2 is worked once, and A.3 is repeated (in width) the number of times provided for your size – in this case like so: S = 0 times, M = 0 times, L=2 times, XL= 3 times and XXL = 4 times.

The diagrams are worked as usual: begin with the first row in A.1, then work the first row in A.2 etc.

See DROPS lesson: How to read knitting diagrams

See DROPS lesson: How to read crochet diagrams

The total width of the garment (from wrist-to-wrist) will be larger in the larger sizes, despite the actual sleeves being shorter. The larger sizes have longer sleeve caps and wider shoulders, so there will be a good fit in all sizes.

The measurement sketch/schematic drawing provides information regarding the full length of the garment. If it’s a jumper or a jacket the length is measured from the highest point on the shoulder (usually closest to the neckline), and straight down to the bottom of the garment. It is NOT measured from the tip of shoulder. Similarly, the length of yoke is measured from the highest point on the shoulder and down to where yoke is split into body and sleeves.

See DROPS lesson: How to read a schematic drawing

Diagrams are often repeated on the round or in height. 1 repeat is the diagram the way it appears in the pattern. If it says to work 5 repeats of A.1 in the round, then you work A.1 a total of 5 times after/next to each other in the round. If it says to work 2 repeats of A.1 vertically/in height you work the entire diagram once, then begin again at the start and work the entire diagram one more time.

Chain stitches are slightly narrower than other stitches and to avoid working the cast-on edge too tight, we simply chain more stitches to begin with. The stitch count will be adjusted on the following row to fit the pattern and measurement sketch.

The rib edge is more elastic and will contract slightly compared to, for example, stocking stitch. By increasing before the rib edge, you avoid a visible difference in width between the rib edge and the rest of the body.

It’s very easy to cast off too tightly, and by making yarn overs while casting off (and simultaneously casting these off) you avoid a too tight cast off edge.

See DROPS video: How to bind off with yarn overs (yo)

To achieve an even increase (or decrease) you can increase on, for example: every 3rd and 4th row alternately, like so: work 2 rows and increase on the 3rd row, work 3 rows and increase on the 4th. Repeat this until the increase is complete.

See DROPS lesson: Increase or decrease 1 st on every 3rd and 4th row alternately

Should you prefer to work in the round instead of back and forth, you may of course adjust the pattern. You’ll need to add steeks mid-front (usually 5 stitches), and follow the instructions. When you would normally turn and work from the wrong side, simply work across the steek and continue in the round. At the end you’ll cut the piece open, pick up stitches to work bands, and cover the cut edges.

See DROPS video: How to knit steeks and cut open

Should you prefer to work back and forth instead of in the round, you may of course adjust the pattern so you work the pieces separately and then assemble them at the end. Divide the stitches for the body in 2, add 1 edge stitch in each side (for sewing) and work the front and back pieces separately.

See DROPS lesson: Can I adapt a pattern for circular needles into straight needles?

Pattern repeats can vary slightly in the different sizes, in order to get the correct proportions. If you’re not working the exact same size as the garment in the photo, yours might deviate slightly. This has been carefully developed and adjusted so that the complete impression of the garment is the same in all sizes.

Make sure to follow instructions and diagrams for your size!

If you have found a pattern you like which is available in women’s size it’s not very difficult to convert it to men’s size. The biggest difference will be the length of sleeves and body. Start working on the women size that you think would fit across the chest. The additional length will be worked right before you cast off for the armhole/sleeve cap. If the pattern is worked top-down you can add the length right after the armhole or before the first decrease on sleeve.

Regarding additional yarn amount, this will depend on how much length you add, but it is better with a skein too many than too few.

All yarns will have excess fibres (from production) that might come off as lint or shedding. Brushed yarns (ie hairier yarns) have more of these loose, excess fibres, causing more shedding.

Shedding also depends on what is worn under or over the garment, and whether this pulls at the yarn fibres. It’s therefore not possible to guarantee that there will be no shedding

Below are some tips on how to get the best result when working with hairier yarns:

1. When the garment is finished (before you wash it) shake it vigorously so the looser hairs come off. NOTE: do NOT use a lint roller, brush or any method that pulls at the yarn.

2. Place the garment in a plastic bag and put it in your freezer - the temperature will cause the fibres to become less attached to each other, and excess fibres will come off easier.

3. Leave in the freezer for a few hours before taking it out and shaking it again.

4. Wash the garment according to the instructions on the yarn label.

Pilling is a natural process that happens to even the most exclusive of fibers. It's a natural sign of wear and tear that is hard to avoid, and that is most visible in high friction areas of your garment like a sweater's arms and cuffs.

You can make your garment look as new by removing the pilling, using a fabric comb or a pill/lint remover.

Still can't find the answer you need? Then scroll down and leave your question so one of our experts can try to help you. This will be done normally within 5 to 10 working days.
In the meantime, you can read the questions and answers that others have left to this pattern or join the DROPS Workshop on Facebook to get help from fellow knitters/crocheters!

You might also like...

Post a comment to pattern DROPS 127-3

We would love to hear what you have to say about this pattern!

If you want to leave a question, please make sure you select the correct category in the form below, to speed up the answering process. Required fields are marked *.

Comments / Questions (28)

country flag Gail wrote:

Hello! Do I follow the instructions for the decrease in body before and after markers exactly the same for both markers? Or should I reverse the order and do the psso first and then the k 2 tog as it reflects the other side? Should I just follow the order across the row for both markers? Thanks Thanks

10.04.2024 - 07:41

DROPS Design answered:

Dear Gail, decrease on each side of the body the same way before 1st marker + before 2nd marker and after 1st marker + after 2nd marker. Happy knitting!

10.04.2024 - 08:18

country flag Gail wrote:

Hello! I am finding the yoke directions on the Autumn Garden Cardigan challenging to understand. I have switched to the circular needle to work diagram M1. I can read the diagram fine, but what is meant by 'with 6 sts in garter st each side'? What is the 'side' referring to? Is this meaning each side of diagram M1, so it's 6 garter sts, 4 Diagram M1 sts, 6 garter sts and so on til end of row? This would be a total of 10 sts - 6 garter sts+ 4 M1 sts. 248 sts, won't be even.

01.03.2024 - 05:03

DROPS Design answered:

Hi Gail, The 6 garter stitches are the bands, so each row starts and finishes with 6 garter stitches. Happy knitting!

01.03.2024 - 08:07

country flag Janne wrote:

Hvorfor er dere sluttet å skrive hvilken garn gruppe hver enkelt oppskrift har? Syns det var veldig greit når det sto skrevet. En annen ting er at en får ikke somet inn på hver oppskrift. Vi med dårlig syn syns det var kjekt å kunne gjøre. På forhånd takk. Mvh Janne.

20.07.2022 - 09:38

DROPS Design answered:

Hej Janne, Alpaca = A och Kid-Silk = A / A+A=C Se här: Garngrupper

03.08.2022 - 15:24

country flag Yvette wrote:

Une deuxième question… les raglans à faire sur ce modèle ce font sur les rangs au point de mousse… donc au retour les mailles se font aussi à l’endroit. Comment dois-je procéder pour les raglans ? On fait les diminutions à l’aller et au retour? Merci ☺️

19.01.2022 - 18:34

DROPS Design answered:

Re-bonjour Yvette, lorsque vous diminuez pour le raglan, vous tricotez en jersey avec les mailles de bordure devant au point mousse, autrement dit, les diminutions du raglan se tricotent en jersey. Les diminutions du raglan se font tous les rangs sur l'endroit, autrement dit tous les 2 rangs. Lorsque ces diminutions seront terminées, vous tricoterez le point ajouré en diminuant progressivement à chaque "tranche" de point mousse entre les points ajourés. Bon tricot!

20.01.2022 - 09:10

country flag Yvette wrote:

Bonjour, c’est la première fois que je fait un pull-over avec ce genre d’empiècement. Je me trouve au rang ou je commence le raglan mais je ne comprends pas les instructions suivantes «  …, et au dernier rang sur l'envers, ajuster le nombre de mailles à 212-228-248-268-288-300 m (ne pas ajuster sur les mailles de bordures devant). » Comment est-ce que je dois ajuster? Merci ☺️

19.01.2022 - 18:08

DROPS Design answered:

Bonjour Yvette, vous devez diminuer ou augmenter (selon la taille tricotée et donc votre nombre de mailles avant) pour qu'à la fin de ce rang, vous ayez le nombre de mailles souhaité: prenez votre nombre de mailles, retirez les 12 mailles de bordure devant et divisez ce nombre par le nombre d'augmentations/de diminutions à faire. Cette leçon vous en dira plus. Bon tricot!

20.01.2022 - 09:07

country flag Tanja Müller wrote:

Hallo, ich hätte zwei Fragen: 1. Warum wird die Nadelstärke zwischen 4 und 5 gewechselt? 2. Bei der Maschenprobe benötige ich Stärke 4, muss ich die Krausrippe dann in Stärke 3 stricken? Grüße Tanja

27.12.2021 - 22:35

DROPS Design answered:

Liebe Frau Müller, die Nadelstärke wird gewechselt um die gewünschte Textur und Maßen zu bekommen - ja richtig, dann sollen Sie eine kleinere Nadel bzw 3 benutzen. Viel Spaß beim stricken!

03.01.2022 - 14:32

country flag Mari wrote:

Hej, jag undrar varför det stickas olika när det kommer till knapphålen på oket respektive längre ner på koftan. Varför inte samma princip? Blir orolig om det blir fel har ingen lust att riva upp. Tacksam för svar då jag fastnat just där.

06.01.2021 - 18:25

DROPS Design answered:

Hej Mari, knapphålen stickas lika men med olika mellanrum (tätare på oket). Lycka till :)

15.01.2021 - 14:08

country flag Brigitte wrote:

Bonjour,après avoir suivi les explications de la veste je me retrouve avec le corps du gilet sur l envers après les diminutions des emmanchures pour reprendre les manches qui sont sur l endroit.je n ai pas compris comment je dois procéder.merci de votre réponse.j aime beaucoup vos modèles et c est la première fois que je n arrive pas à comprendre les explications.

29.03.2016 - 18:43

DROPS Design answered:

Bonjour Brigitte, la vidéo ci-dessous montre comment placer les mailles des manches (tricotées en rond) sur la même aiguille circulaire que les devants et le dos - placez bien vos marqueurs. Quand toutes les mailles sont sur l'aiguille, tricotez le 1er rang sur l'envers comme avant (= jersey avec les bordures devant au point mousse) et commencez le raglan au rang suivant (= sur l'endroit). Bon tricot!

30.03.2016 - 08:53

country flag Rhea wrote:

Jeg beklager at jeg ikke kan finne diagrammet M.1

15.09.2013 - 10:29

DROPS Design answered:

Hej Rhea. Se nederst paa mönstret ved maalskitsen - under det venstre aerme finder du M.1

17.09.2013 - 17:34

country flag Kerstin wrote:

Ich trage die Größe XL. Die Passe war nach Fertigstellung der Jacke viel zu groß. Ich habe folgende Veränderungen vorgenommen: 1. für die `gesamte` Passe Nadelstärke 4 2. in der letzten Reihe der ersten Krausrippen (zum Beginn der Passe) Maschenanzahl auf Größe L reduziert Jetzt paßt die Jacke so gut, wie alle anderen Jacken die ich bisher nach Drops-Anleitungen gestrickt habe. Bin sehr zufrieden !

11.03.2013 - 09:45