DROPS Paris
DROPS Paris
100% Cotton
from 2.20 CAD /50g
Get the yarn to make this pattern from 22.00CAD.

The yarn cost is calculated from the pattern’s smallest size and the yarn’s cheapest product type. Looking for an even better price? You might find it on the DROPS Deals!

DROPS SS24

Hortensia

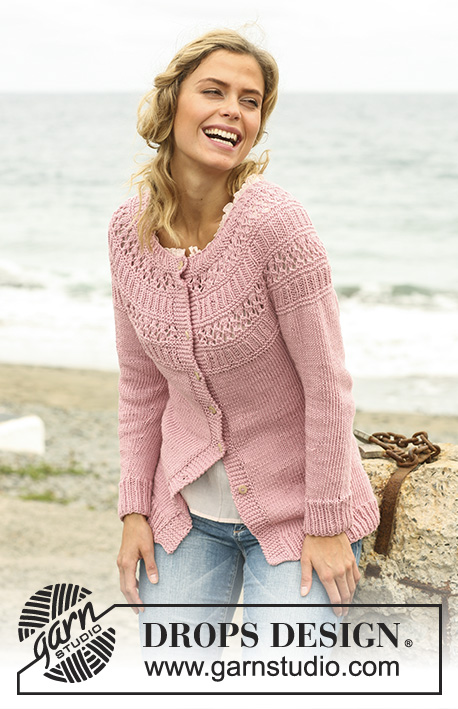
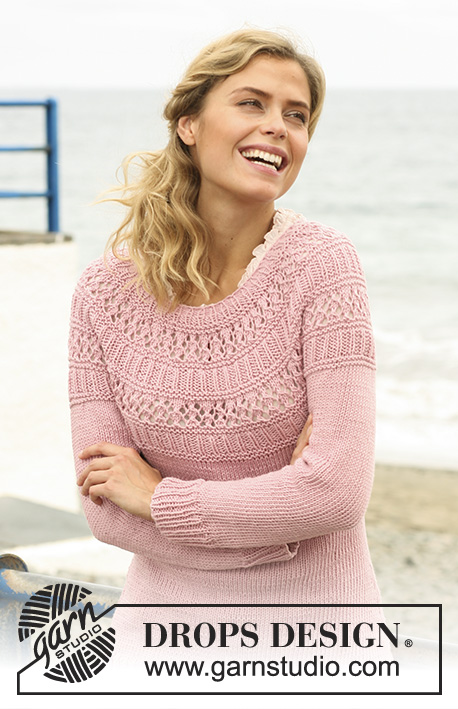
Knitted DROPS sweater with rib and lace pattern on round yoke in "Paris". Size: S - XXXL

DROPS 127-15
DROPS design: Pattern no W-401
--------------------------------------------------------
Size: S - M - L - XL - XXL - XXXL
Finished measurements:
Bust: 80-90-96-106-120-132 cm /
31½''-35½''-37 3/4''-41 3/4''-47 1/4''-52''
Full length: 58-60-62-64-66-68 cm /
22¾''-23 5/8''-24 3/8''-25¼''-26''-26¾''

Materials: DROPS PARIS from Garnstudio
Color no 59, light old pink:
500-550-600-650-700-800 g

DROPS DOUBLE POINTED NEEDLES AND CIRCULAR NEEDLE (40 and 80 cm / 16'' and 32'') SIZE 5 mm / US 8 - or size needed to get 17 sts x 22 rows in stockinette st = 10 x 10 cm / 4'' x 4''.

DROPS DOUBLE POINTED NEEDLES AND CIRCULAR NEEDLE (40 and 80 cm / 16'' and 32'') SIZE 4.5 mm / US 7 - or size needed to get 18 sts x 23 rows in stockinette st = 10 x 10 cm / 4'' x 4''.

-------------------------------------------------------

Alternative Yarn – See how to change yarns here
Yarn Groups A to F – Use the same pattern and change the yarn here
Yarn usage using an alternative yarn – Use our yarn converter here

-------------------------------------------------------

DROPS Paris
DROPS Paris
100% Cotton
from 2.20 CAD /50g
Get the yarn to make this pattern from 22.00CAD.

The yarn cost is calculated from the pattern’s smallest size and the yarn’s cheapest product type. Looking for an even better price? You might find it on the DROPS Deals!

Pattern instructions

NOTE: This pattern is written in American English. All measurements in charts are in cm. For conversion from inches to cm - click here. There are different terms for crocheting in American and British English. If this pattern includes crochet, click for "crochet terms" here. For this pattern in British English, please click here.
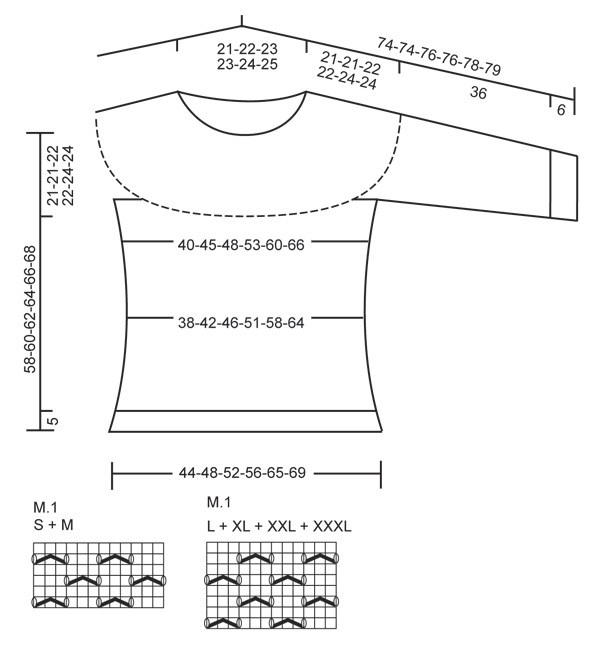
PATTERN:
See diagram M.1. NOTE! See diagram for size.
--------------------------------------------------------

SWEATER:
Worked in the round on circular needle.
Cast on 174-195-210-231-255-279 sts on circular needle size 4.5 mm / US 7 with Paris. Work rib K1/P2 until piece measures 5 cm / 2''. Switch to circular needle size 5 mm / US 8. K next round while AT THE SAME TIME dec 26-31-34-39-39-43 sts evenly = 148-164-176-192-216-236 sts. Insert a marker at beg of round and a marker after 74-82-88-96-108-118 sts (= mid of each side). Continue in stockinette st. REMEMBER THE GAUGE!
When piece measures 10 cm / 4'', dec 1 st each side of every marker (= 4 dec). Repeat the dec every 2 cm / 3/4'' a total of 5 times = 128-144-156-172-196-216 sts. When piece measures 23 cm / 9'', inc 1 st each side of every marker (= 4 inc). Repeat inc when piece measures 33-34-35-36-37-38 cm / 13''-13 3/8''-13¾''-14¼''-14½''-15'' = 136-152-164-180-204-224 sts. When piece measures 37-39-40-42-42-44 cm / 14½"-15 1/4"-15 3/4"-16½"-16½"-17 1/4", bind off 8 sts each side for armholes (bind off 4 sts each side of every marker) = 120-136-148-164-188-208 sts remain on needle. Cut the thread. Put piece aside and knit the sleeves.

SLEEVE:
Worked in the round on double pointed needles/circular needle. Cast on 48-48-51-54-54-57 sts on double pointed needles size 4.5 mm / US 7. Work rib K1/P2 over all sts. When rib measures 6 cm / 2½'', switch to double pointed needles size 5 mm / US 8.
K 1 round while AT THE SAME TIME dec 8-8-9-10-10-11 sts evenly = 40-40-42-44-44-46 sts. Insert a marker at beg of round (= mid under sleeve). Continue in the round in stockinette st. When piece measures 8 cm / 3 1/8'', inc 1 st each side of marker. Repeat inc every 4-3½-3½-3½-2½-2½ cm / 1½"-1 1/4"-1 1/4"-1 1/4"-7/8"-7/8" a total of 8-9-10-10-12-13 times = 56-58-62-64-68-72 sts. When piece measures 42 cm / 16½'', bind off 8 sts mid under sleeve (i.e. Bind off 4 sts each side of marker) = 48-50-54-56-60-64 sts remain on needle. Put piece aside and knit another sleeve.

YOKE:
Slip sleeves and body on to same circular needle size 4.5 mm / US 7 = 216-236-256-276-308-336 sts. Beg round in transition between right sleeve and back piece.
K 1 round while AT THE SAME TIME dec 15-20-22-24-26-33 sts evenly = 201-216-234-252-282-303 sts. P 1 round, K 1 round, P 1 round and K 1 round. Then work 7-7-7-7-9-9 rounds rib K1/P2.
Continue to K 1 round while AT THE SAME TIME dec 15-18-24-24-30-33 sts evenly = 186-198-210-228-252-270 sts.
P 1 round, K 1 round and P 1 round. Continue to work diagram M.1 over all sts (NOTE! see diagram for right size). When M.1 has been worked 1 time vertically, K 1 round while AT THE SAME TIME dec 18-21-24-27-33-36 sts evenly = 168-177-186-201-219-234 sts. P 1 round, K 1 round, P 1 round and K 1 round. Then work 7-7-7-7-9-9 rounds rib K1/P2.
Continue to K 1 round while AT THE SAME TIME dec 18-21-24-27-33-36 sts evenly = 150-156-162-174-186-198 sts. P 1 round, K 1 round and P 1 round. Continue to work M.1 over all sts ( NOTE! see diagram for size). When M.1 has been worked 1 time vertically, K 1 round while AT THE SAME TIME dec 21-24-27-36-42-48 sts evenly = 129-132-135-138-144-150 sts. P 1 round, K 1 round, P 1 round and K 1 round. Work next round rib K1/P2. Then insert a marker mid front of front piece.
Then work an elevation in the neck, back and forth, with short rows with K over K and P over P as follows (1st row = from RS): Work until 31-32-33-34-35-36 sts remain before marker, turn piece, work back until 31-32-33-34-35-36 sts remain before marker in the other side. Turn piece, work until 39-40-41-42-43-44 sts remain before marker, turn piece and work back until 39-40-41-42-43-44 sts remain before marker in the other side. Turn piece, work until 47-48-49-50-51-52 sts remain before marker, turn piece and work back until 47-48-49-50-51-52 sts remain before marker in the other side. Turn piece, work until 55-56-57-58-60-62 sts remain before marker, turn piece and work back until 55-56-57-58-60-62 sts remain before marker in the other side. Turn piece. Continue to work in the round over all sts with K over K and P over P. AT THE SAME TIME when all sts have been worked 1 round, dec 1 st in every P section by P all P sts tog = 86-88-90-92-96-100 sts. Work 3 rounds rib K1/P1 before binding off with K over K and P over P.

ASSEMBLY:
Sew the openings under the sleeves tog.

Diagram

symbols = K
symbols = 1 YO between 2 sts
symbols = slip 1 st as if to K, K 2 tog, psso
diagram

Each of our patterns has specific tutorial videos to help you.

Do you have a question? See a list of frequently asked questions (FAQ)

Knitting tension is what determines the final measurements of your work, and is usually measured per 10 x 10 cm. It is provided like so: number of stitches in width x number of rows in height - eg: 19 stitches x 26 rows = 10 x 10 cm.

The knitting tension is very individual; some people knit/crochet loosely while others work tightly. You adjust the knitting tension with the needle size, which is why the suggested needle size only serve as a guide! You need to adjust this (up or down) to ensure that YOUR knitting tension matches the knitting tension provided in the pattern. If you work with a different knitting tension than provided you will have a different yarn consumption, and your work will have different measurements than what the pattern suggests.

The knitting tension also determines which yarns can replace each other. As long as you achieve the same knitting tension you can replace one yarn with another.

See DROPS lesson: How to measure your tension/gauge

See DROPS video: How to make a gauge tension swatch

The required amount of yarn is provided in grams, eg: 450 g. To calculate how many balls you’ll need you first need to know how many grams are in 1 ball (25g, 50g or 100g). This information is available if you click on the individual yarn quality on our pages. Divide the amount required with the amount of each ball. For example, if each ball is 50g (the most common amount), the calculation will be as follows: 450 / 50 = 9 balls.

The important thing when changing from one yarn to another is that the knitting/crochet tension remains the same. This is so that the measurements of the finished piece will be the same as on the sketch provided. It is easier to achieve the same knitting tension using yarns from the same yarn group. It is also possible to work with multiple strands of a thinner yarn to achieve the knitting tension of a thicker one. Please try our yarn converter. We recommend you to always work a test swatch.

Please NOTE: when changing yarn the garment might have a different look and feel to the garment in the photo, due to individual properties and qualities of each yarn.

See DROPS lesson: Can I use a different yarn than the one mentioned in the pattern?

All our yarns are categorised into yarn groups (from A to F) according to thickness and knitting tension – group A contains the thinnest yarns and group F the thickest. This makes it easier for you to find alternative yarns to our patterns, should you wish to switch yarn. All yarns within the same group have a similar knitting tension and can easily replace each other. However, different yarn qualities have different structures and properties which will give the finished work a unique look and feel.

Click here for an overview of the yarns in each yarn group

At the top of all our patterns you’ll find a link to our yarn converter, which is a helpful tool should you wish to use a different yarn than suggested. By filling in the yarn quality you wish to replace, the amount (in your size) and number of strands, the converter will present good alternative yarns with the same knitting tension. Additionally it will tell you how much you’ll require in the new qualities and whether you’ll need to work with multiple strands. Most skeins are 50g (some are 25g or 100g).

If the pattern is worked with multiple colours, every colour will have to be converted separately. Similarly, if the pattern is worked with several strands of different yarns (for example 1 strand Alpaca and 1 strand Kid-Silk) you will have to find alternatives for each, individually.

Click here to see our yarn converter

Since different yarns have different qualities and textures we have chosen to keep the original yarn in our patterns. However, you can easily find options among our available qualities by using our yarn converter, or simply pick a yarn from the same yarn group.

It is possible that some retailers still have discontinued yarns in stock, or that someone has a few skeins at home that they would like to find patterns for.

The yarn converter will provide both alternative yarn as well as required amount in the new quality.

If you think it's hard to decide what size to make, it can be a good idea to measure a garment you own already and like the size of. Then you can pick the size by comparing those measures with the ones available in the pattern's size chart.

You'll find the size chart at the bottom of the pattern.

See DROPS lesson: How to read size chart

The needle size provided in the pattern serves only as a guide, the important thing is to follow the knitting tension. And since knitting tension is very individual, you will have to adjust the needle size to ensure that YOUR tension is the same as in the pattern – maybe you’ll have to adjust 1, or even 2 needle sizes, up or down to achieve the correct tension. For this, we recommend that you work test swatches.

Should you work with a different knitting tension than the one provided, the measurements of the finished garment might deviate from the measurement sketch.

See DROPS lesson: How to measure your tension/gauge

See DROPS video: How to make a gauge tension swatch

Working a garment top-down provides more flexibility and room for personal adjustment. For example it is easier to try the garment on while working, as well as making adjustments to length of yoke and shoulder caps.

The instructions are carefully explaining every step, in the correct order. Diagrams are adjusted to the knitting direction and are worked as usual.

The diagram depicts all rows/rounds, and every stitch seen from the right side. It is read from bottom to top, from right to left. 1 square = 1 stitch.

When working back and forth, every other row is worked from the right side and every other row is worked from the wrong side. When working from the wrong side, the diagram will have to be worked reversed: from left to right, knit stitches are purled, purl stitches are knit etc.

When working in the round every round is worked from the right side and the diagram are worked from right to left on all rounds.

See DROPS lesson: How to read knitting diagrams

The diagram depicts all rows/rounds, and every stitch seen from the right side. It is worked from bottom to top, from right to left.

When working back and forth every other row is worked from the right side: from right to left and every other row is worked from the wrong side: from left to right.

When working in the round, every row in the diagram are worked from the right side, from right to left.

When working a circular diagram you start in the middle and work your way outwards, counter clockwise, row by row.

The rows usually start with a given number of chain stitches (equivalent to the height of the following stitch), this will either be depicted in the diagram or explained in the pattern.

See DROPS lesson: How to read crochet diagrams

Instructions for working several diagrams after each other on the same row/round, will often be written like so: “work A.1, A.2, A.3 a total of 0-0-2-3-4 times". This means you work A.1 once, then A.2 is worked once, and A.3 is repeated (in width) the number of times provided for your size – in this case like so: S = 0 times, M = 0 times, L=2 times, XL= 3 times and XXL = 4 times.

The diagrams are worked as usual: begin with the first row in A.1, then work the first row in A.2 etc.

See DROPS lesson: How to read knitting diagrams

See DROPS lesson: How to read crochet diagrams

The total width of the garment (from wrist-to-wrist) will be larger in the larger sizes, despite the actual sleeves being shorter. The larger sizes have longer sleeve caps and wider shoulders, so there will be a good fit in all sizes.

The measurement sketch/schematic drawing provides information regarding the full length of the garment. If it’s a jumper or a jacket the length is measured from the highest point on the shoulder (usually closest to the neckline), and straight down to the bottom of the garment. It is NOT measured from the tip of shoulder. Similarly, the length of yoke is measured from the highest point on the shoulder and down to where yoke is split into body and sleeves.

See DROPS lesson: How to read a schematic drawing

Diagrams are often repeated on the round or in height. 1 repeat is the diagram the way it appears in the pattern. If it says to work 5 repeats of A.1 in the round, then you work A.1 a total of 5 times after/next to each other in the round. If it says to work 2 repeats of A.1 vertically/in height you work the entire diagram once, then begin again at the start and work the entire diagram one more time.

Chain stitches are slightly narrower than other stitches and to avoid working the cast-on edge too tight, we simply chain more stitches to begin with. The stitch count will be adjusted on the following row to fit the pattern and measurement sketch.

The rib edge is more elastic and will contract slightly compared to, for example, stocking stitch. By increasing before the rib edge, you avoid a visible difference in width between the rib edge and the rest of the body.

It’s very easy to cast off too tightly, and by making yarn overs while casting off (and simultaneously casting these off) you avoid a too tight cast off edge.

See DROPS video: How to bind off with yarn overs (yo)

To achieve an even increase (or decrease) you can increase on, for example: every 3rd and 4th row alternately, like so: work 2 rows and increase on the 3rd row, work 3 rows and increase on the 4th. Repeat this until the increase is complete.

See DROPS lesson: Increase or decrease 1 st on every 3rd and 4th row alternately

Should you prefer to work in the round instead of back and forth, you may of course adjust the pattern. You’ll need to add steeks mid-front (usually 5 stitches), and follow the instructions. When you would normally turn and work from the wrong side, simply work across the steek and continue in the round. At the end you’ll cut the piece open, pick up stitches to work bands, and cover the cut edges.

See DROPS video: How to knit steeks and cut open

Should you prefer to work back and forth instead of in the round, you may of course adjust the pattern so you work the pieces separately and then assemble them at the end. Divide the stitches for the body in 2, add 1 edge stitch in each side (for sewing) and work the front and back pieces separately.

See DROPS lesson: Can I adapt a pattern for circular needles into straight needles?

Pattern repeats can vary slightly in the different sizes, in order to get the correct proportions. If you’re not working the exact same size as the garment in the photo, yours might deviate slightly. This has been carefully developed and adjusted so that the complete impression of the garment is the same in all sizes.

Make sure to follow instructions and diagrams for your size!

If you have found a pattern you like which is available in women’s size it’s not very difficult to convert it to men’s size. The biggest difference will be the length of sleeves and body. Start working on the women size that you think would fit across the chest. The additional length will be worked right before you cast off for the armhole/sleeve cap. If the pattern is worked top-down you can add the length right after the armhole or before the first decrease on sleeve.

Regarding additional yarn amount, this will depend on how much length you add, but it is better with a skein too many than too few.

All yarns will have excess fibres (from production) that might come off as lint or shedding. Brushed yarns (ie hairier yarns) have more of these loose, excess fibres, causing more shedding.

Shedding also depends on what is worn under or over the garment, and whether this pulls at the yarn fibres. It’s therefore not possible to guarantee that there will be no shedding

Below are some tips on how to get the best result when working with hairier yarns:

1. When the garment is finished (before you wash it) shake it vigorously so the looser hairs come off. NOTE: do NOT use a lint roller, brush or any method that pulls at the yarn.

2. Place the garment in a plastic bag and put it in your freezer - the temperature will cause the fibres to become less attached to each other, and excess fibres will come off easier.

3. Leave in the freezer for a few hours before taking it out and shaking it again.

4. Wash the garment according to the instructions on the yarn label.

Pilling is a natural process that happens to even the most exclusive of fibers. It's a natural sign of wear and tear that is hard to avoid, and that is most visible in high friction areas of your garment like a sweater's arms and cuffs.

You can make your garment look as new by removing the pilling, using a fabric comb or a pill/lint remover.

Still can't find the answer you need? Then scroll down and leave your question so one of our experts can try to help you. This will be done normally within 5 to 10 working days.
In the meantime, you can read the questions and answers that others have left to this pattern or join the DROPS Workshop on Facebook to get help from fellow knitters/crocheters!

You might also like...

Hortensia

Sylwia, Norway

Hortensia

Rikka, Germany

Hortensia

Micol, Italy

Post a comment to pattern DROPS 127-15

We would love to hear what you have to say about this pattern!

If you want to leave a question, please make sure you select the correct category in the form below, to speed up the answering process. Required fields are marked *.

Comments / Questions (26)

country flag Elisabeth wrote:

Hei, kan man strikke denne uten å strikke forhøyet nakke med forkortede pinner?

11.04.2021 - 01:22

DROPS Design answered:

Hei Elizabeth, Ja det er fullt mulig. Da blir genseren lik foran og bak. God fornøyelse!

12.04.2021 - 06:58

country flag Steffi wrote:

Moin!Moin! Nach mehreren Anläufen (Es fehlte mir leider immer die Zeit.) habe ich es endlich bis zur passe geschafft. Ich bin mir nicht sicher, ob ich es richtig gemacht habe. Ich habe alle Maschen auf die Rundnadel gelegt und habe Schwierigkeiten, die Schulter zu stricken. Die Runde ist dort so eng, dass ich eine Hilfsnadel nehmen muss. Habe ich die Maschen falsch verteilt? Liebe Grüsse Steffi

04.02.2021 - 15:18

DROPS Design answered:

Liebe Steffi, so werden die Maschen von den Ärmeln mit dem Rumpfteil auf eine nadel gestrickt - die ersten Runden können etwas trickig sein, aber nach einige Runden wird es ganz schön anpassen, für die ersten Runden können Sie mit einer anderen Rundnadel oder mit dem Nadelset noch stricken, bis Sie genügende Runden gestrickt haben, um alle Maschen bequem auf die Rundnadel zu legen und stricken. Viel Spaß beim stricken!

04.02.2021 - 15:22

country flag Manon wrote:

Bonjour. La manche est beaucoup plus ample par rapport à ce qu'il est montré sur l'image qui est plus ajustée, il y aurait-il une erreur dans le patron? Merci

15.10.2020 - 20:05

DROPS Design answered:

Bonjour Manon, pensez à bien vérifier votre tension, si vous avez bien conservé la même tension que pour votre échantillon, vous devriez avoir les mêmes mesures que dans le shéma/un résultat analogue à la photo. Bon tricot!

16.10.2020 - 09:01

country flag Manon wrote:

Pour l'empiècement on dit de reprendre les manches sur la même aiguille circulaire 4.5 que le dos et le devant. .. le dos et le devant ont été tricoté avec les aiguilles 5. Je suis confuse. Merci

15.10.2020 - 19:51

DROPS Design answered:

Bonjour Manon, tout à fait, l'empiècement se tricote avec l'aiguille circulaire 4,5 - raison pour laquelle l'échantillon est indiqué dans les 2 tailles d'aiguilles. Bon tricot!

16.10.2020 - 09:00

country flag Marge wrote:

Superbe modèle, je viens de le finir. Par contre, je préfère des manches plus longues et plus étroites pour mes pulls, j'ai donc fait des manches de 50cm au lieu de 42 et mis 11 augmentations (pour le modèle en taille M) au lieu de 9. J'ai aussi commencé avec 42m, puis 6 diminutions au lieu de 8. Du coup, à la fin de mes manches, je retombe sur 50m comme c'était prévu. Il tombe nickel au niveau du début du pouce.

14.09.2018 - 20:33

country flag Nelly Koster wrote:

Hartelijk bedankt voor de snelle reactie, nu kom ik er wel uit!!!

18.11.2015 - 08:29

country flag Nelly Koster wrote:

Ik begrijp niet hoe ik de ronding van de hals moet breien, vanaf waar brei ik de 32 steken heen en terug en wat doe ik dan met de andere steken die op de naald staan? Ik heb in mijn leven al heel wat verschillende truien gebreid met allerlei moeilijke patronen, maar hier kom ik even niet uit

16.11.2015 - 15:49

DROPS Design answered:

Hoi Nelly. Je doet precies zoals er staat; Je hebt een markeerder geplaatst middenvoor. Je breit nu eerst tot 32 st VOOR deze markeerder, keer het werk (dus brei terug - verkeerde kant) en brei de hele naald tot 32 st voor de markeerder aan de andere kant, keer nogmaals en brei tot 40 st voor de markeerder enzovoort. Op deze manier brei je verkorte naalden en maakt een verhoging middenachter.

17.11.2015 - 13:07

country flag Astrid wrote:

Danke für die Antwort. Da werden sie wohl Recht haben.Es ist sicher nicht richtig es so zu machen.... aber nun versuch ich es einfach....auch wenn es schief geht. Astrid

11.10.2014 - 21:03

country flag Astrid wrote:

Liebes Team Habe eine andere Maschenprobe, 10 Maschen und 14 Reihen glatt rechts....10 mal 10 cm. Wie rechne ich nun die aufzunehmende Maschenanzahl aus ? Was bedeuten die vielen Zahlen im Schnittmuster unten.... Danke schon vorab.

09.10.2014 - 12:32

DROPS Design answered:

Liebe Astrid - M-Zahl umrechnen ist grundsätzlich schlecht, gerade bei Modellen mit Mustern funktionieren diese dann nicht mehr. Sie müssen die Nadelstärke wählen, die Sie brauchen, um die angegebene Maschenprobe zu erhalten. Sie scheinen hier mit einer ganz anderen Garnstärke stricken zu wollen? Dann ist das Modell für das Garn leider ungeeignet.

11.10.2014 - 10:56

Une Americanne wrote:

Putain c'est beau ce pull!! ...excuse moi mais mon francais est un peu rouillé

30.04.2014 - 15:50