
Popular categories
Looking for a yarn?


|
|
Little Blue Dream |
|
 |
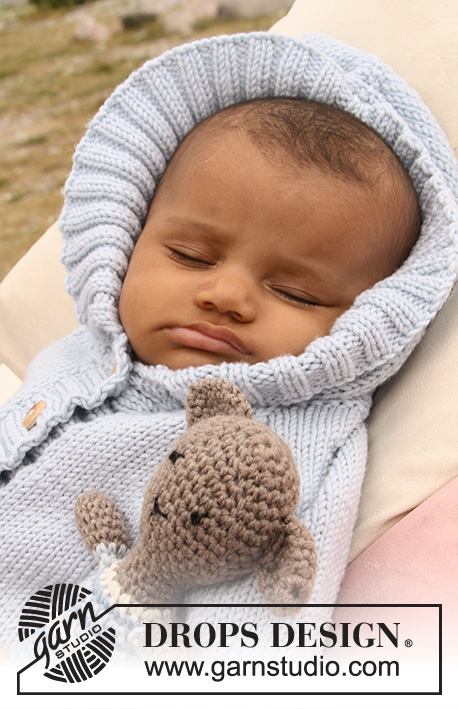 |
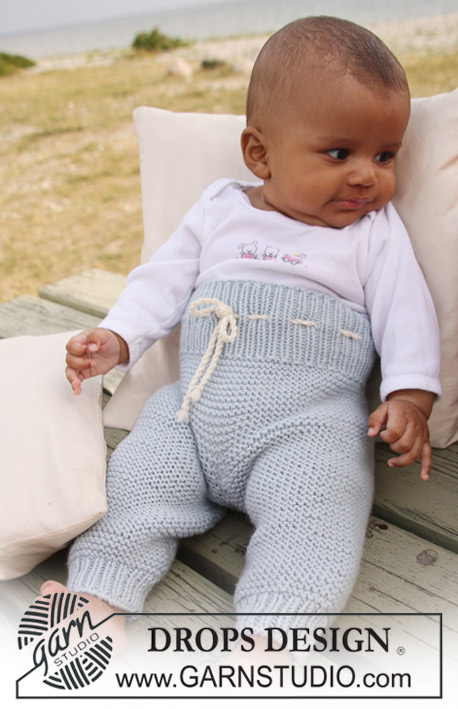
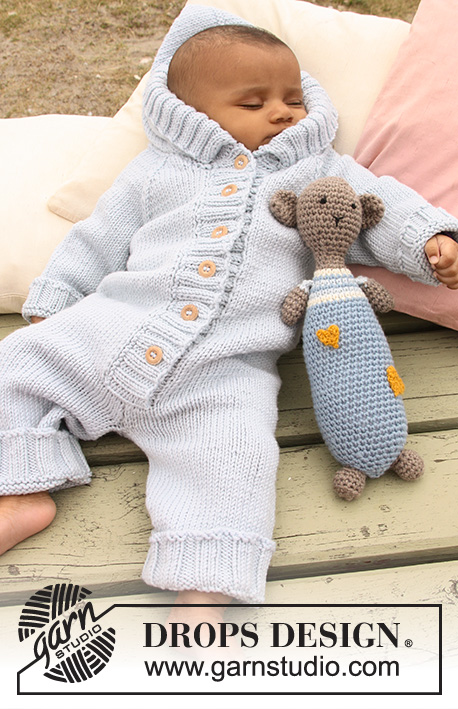
Set of knitted jumpsuit with raglan and crochet teddy bear for baby and children in DROPS Merino Extra Fine
DROPS Baby 20-23 |
|
|
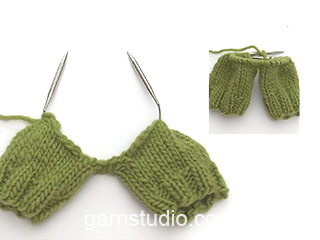
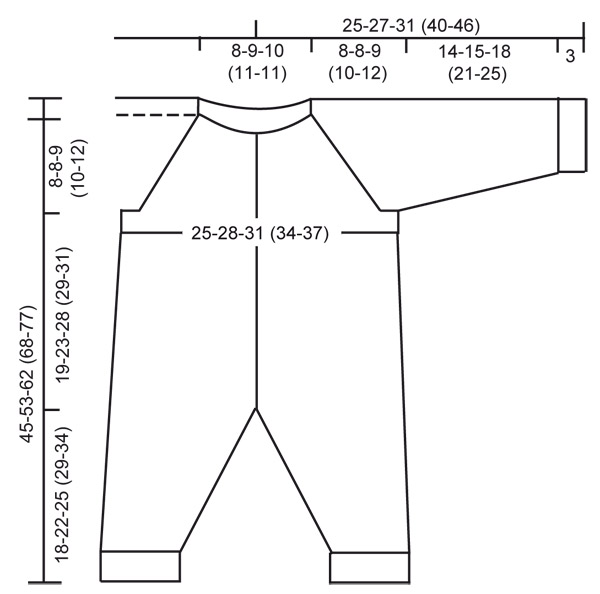
JUMPSUIT: GARTER ST (back and forth on needle): K all rows. DECREASING TIP: Make all dec from RS. Dec as follows before marker: K2 tog. Dec as follows after marker: slip 1 st as if to K, K1, psso. -------------------------------------------------------- LEG: Worked in the round. Cast on 48-54-60 (66-72) sts on double pointed needles size 3.5 mm with Merino Extra Fine. Insert a marker at beg of round = inside of leg. K 1 round and continue in rib K3/ P3. When rib measures 4-4-4 (5-5) cm K 1 round, AT THE SAME TIME dec 6 sts evenly = 42-48-54 (60-66) sts. Change to double pointed needles size 4.5 mm. P 1 round and continue in stocking st. When piece measures 6-6-6 (7-7) cm inc 1 st each side of marker, and repeat the inc on every 3-4-5 (5-7) cm a total of 4 times = 50-56-62 (68-74) sts. When piece measures 16-20-23 (25-32) cm divide piece at inside of leg and complete piece back and forth on needle (to make it easier to slip sts on circular needle later on). Cast on 1 edge st each side = 52-58-64 (70-76) sts. When piece measures 18-22-25 (29-34) cm cast off 1 edge st each side. Put piece aside and knit the other leg in the same way. BODY PIECE: Slip legs on the same circular needle size 4.5 mm = 100-112-124 (136-148) sts. Continue back and forth from mid front as follows (first row = RS): Cast off 4 sts, K remaining sts on row. Turn piece, cast off 4 sts and P remaining sts on row = 92-104-116 (128-140) sts. Continue in stocking st back and forth on all sts. When piece measures 37-45-53 (58-65) cm work next row as follows (from RS): 17-20-23 (26-29) stocking sts (= right front piece), cast of 8 sts for armhole, work 42-48-54 (60-66) stocking sts (= back piece), cast off 8 sts for armhole, work 17-20-23 (26-29) stocking sts (= left front piece). Put piece aside and knit the sleeves. SLEEVE: Worked in the round. Cast on 36-42-42 (48-48) sts on double pointed needles size 3.5 mm with Merino Extra Fine. K 1 round and continue in rib K3/P3. When piece measures approx 3 cm K 1 round, AT THE SAME TIME dec 6-10-8 (12-10) sts evenly = 30-32-34 (36-38) sts. Change to double pointed needles size 4.5 mm and P 1 round. Insert a marker at beg of round = mid under sleeve. Continue in stocking st. AT THE SAME TIME when piece measures 5 cm inc 1 st each side of marker mid under sleeve, and repeat the inc on every 5-5-6 (6-6) round a total of 6-6-7 (8-9) times = 42-44-48 (52-56) sts. When piece measures 17-18-21 (24-28) cm cast off 8 sts mid under sleeve (4 sts each side of marker) = 34-36-40 (44-48) sts. Put piece aside and knit the other sleeve. YOKE: Slip sleeves on the same circular needle as body piece where cast off for armhole = 144-160-180 (200-220) sts. Insert a marker in all transitions between body piece and sleeves = 4 markers. Work stocking st back and forth on all sts. AT THE SAME TIME on 3rd row dec 1 st each side of all markers for raglan - see DECREASING TIP! Repeat the dec on every other row (= every row from RS) a total of 10-11-12 (13-15) times. AT THE SAME TIME when you have dec 7-6-6 (6-7) times for raglan cast off for neck at the beg of every row each side: 2 sts 3-3-4 (5-5) times and then 1 st 0-2-2 (2-3) times. After all dec for raglan and neck are complete there are 52-56-64 (72-74) sts left on needle and piece measures approx 45-53-62 (68-77) cm. Cast off all sts. FRONT BAND: Pick up 63-75-91 (95-103) sts along right front piece from bottom edge towards the neck on circular needle size 3.5 mm with Merino Extra Fine. K 1 row from WS, K 1 row from RS and continue in rib as follows (from WS): 1 garter st, * P2, K2 *, repeat from *-* and finish with P2. When rib measures 2 cm make buttonholes on next row from RS as follows: rib on the first 10-10-2 (6-2) sts, * P2 tog, 1 YO, 10 sts rib * repeat from *-* a total of 4-5-7 (7-8) times, finish with P2 tog, 1 YO, K2, 1 garter st. Continue in rib until front band measures 4 cm, cast off with K over K and P over P. Repeat on left front piece – do not make buttonholes. HOOD: Pick up approx 60 to 100 sts (do not pick up on front bands) round neck on circular needle size 4.5 mm. K 1 row from WS, AT THE SAME TIME adjust no of sts to 44-48-52 (56-60) sts. Work 4 rows garter st. Then K 1 row from RS, AT THE SAME TIME inc 24 sts evenly = 68-72-76 (80-84) sts. Continue in stocking st with 1 garter st each side towards mid front until hood measures 21-23-25 (27-28) cm, cast off. Fold hood double and sew tog at the top, sew edge to edge to avoid a chunky seam. Pick up 112-124-136 (144-152) sts round opening of hood on circular needle size 3.5 mm. K 1 row from WS, K 1 row from RS and continue in rib as follows (from WS): 1 edge st, * P2, K2 *, repeat from *-* on the next 108-120-132 (140-148) sts and finish with P2 and 1 edge st. Work rib for 8 cm, cast off with K over K and P over P. ASSEMBLY: Sew openings under sleeves and sew seam on the inside of leg inside 1 edge st. Sew left front band to the bottom of body piece. Sew buttons to left front band. Sew the first 4 cm from hood to the top edge of front band each side. Fold the other 4 cm towards RS and fasten with a few sts. -------------------------------------------------------- TEDDY: TEDDY: CROCHET INFO: Replace first dc on round with 1 ch and finish each round with 1 sl st in first dc from beg of round. CROCHET DC TOG: Crochet 2 dc tog to 1 dc as follows: Insert hook in first st, pick up thread, insert hook in next st, pick up thread, make 1 YO and pull thread through all 3 sts on hook. --------------------------------------------------------- --------------------------------------------------------- HEAD AND BODY: Beg at the top of head and after the head crochet the body. Then crochet ears, arms, and the hearts, which are sewn on afterwards. HEAD: SEE CROCHET INFO! Crochet 4 ch with crochet hook size 4 mm with light brown mix and form a ring with 1 sl st in first ch. ROUND 1: Crochet 6 dc in ring. ROUND 2: 2 dc in each dc = 12 dc. ROUND 3: * 1 dc in first dc, 2 dc in next dc *, repeat from *-* = 18 dc. ROUND 4: * 1 dc in each of the first 2 dc, 2 dc in next dc *, repeat from *-* = 24 dc. ROUND 5: * 1 dc in each of the first 3 dc, 2 dc in next dc *, repeat from *-* = 30 dc. ROUND 6-11: Crochet 1 dc in each dc = 30 dc. ROUND 12: * 1 dc in each of the first 3 dc, then crochet the next 2 dc tog (see above) *, repeat from *-* = 24 dc. ROUND 13: Crochet 1 dc in each dc = 24 dc. ROUND 14: * 1 dc in each of the first 2 dc, then crochet the next 2 dc tog *, repeat from *-* = 18 dc. ROUND 15: * 1 dc in first dc, then crochet the next 2 dc tog *, repeat from *-* = 12 dc. Now fill the head with cotton wool and continue in the round for body without cutting the thread. ROUND 16-18: Crochet 1 dc in each dc = 12 dc. ROUND 19: * 1 dc in each of the first 2 dc, 2 dc in next dc *, repeat from *-* = 16 dc. Change to off-white. ROUND 20: * 1 dc in each of the first 3 dc, 2 dc in next dc *, repeat from *-* = 20 dc. Change to light grey/blue. ROUND 21: Crochet 1 dc in each dc = 20 dc. Change to light grey/green. ROUND 22: * 1 dc in each of the first 4 dc, 2 dc in next dc *, repeat from *-* = 24 dc. Change to light grey/blue. ROUND 23: Crochet 1 dc in each dc = 24 dc. Change to light grey/green. ROUND 24: * 1 dc in each of the first 3 dc, 2 dc in next dc *, repeat from *-* = 30 dc. Change to off-white. ROUND 25: Crochet 1 dc in each dc = 30 dc. Change to light grey blue and crochet the rest of the body as follows: ROUND 26-29: Crochet 1 dc in each dc = 30 dc. ROUND 30: * 1 dc in each of the first 9 dc, 2 dc in next dc *, repeat from *-* = 33 dc. ROUND 31-39: Crochet 1 dc in each dc = 33 dc. ROUND 40: * 1 dc in each of the first 10 dc, 2 dc in next dc *, repeat from *-* = 36 dc. ROUND 41-46: Crochet 1 dc in each dc = 36 dc. ROUND 47: * 1 dc in each of the first 10 dc, then crochet the next 2 dc tog *, repeat from *-* = 33 dc. ROUND 48: Crochet 1 dc in each dc = 33 dc. ROUND 49: * 1 dc in each of the first 9 dc, then crochet the next 2 dc tog *, repeat from *-* = 30 dc. ROUND 50: * 1 dc in each of the first 3 dc, then crochet the next 2 dc tog *, repeat from *-* = 24 dc. ROUND 51: Crochet 1 dc in each dc = 24 dc. ROUND 52: * 1 dc in each of the first 2 dc, then crochet the next 2 dc tog *, repeat from *-* = 18 dc. ROUND 53: Crochet 1 dc in each dc = 18 dc. ROUND 54: * 1 dc in first dc, then crochet the next 2 dc tog *, repeat from *-* = 12 dc. ROUND 55: Crochet 2 dc tog all the way round = 6 dc. Fill the body with cotton wool, cut the thread, pull thread through remaining sts, tighten and fasten. LEGS: Crochet 4 ch with crochet hook size 4 mm with light brown mix and form a ring with 1 sl st in first ch. ROUND 1: Crochet 8 dc in ring. ROUND 2: * 1 dc in first dc, 2 dc in next dc *, repeat from *-*= 12 dc. ROUND 3: Crochet 1 dc in each dc = 12 dc – NOTE: Crochet in back loop of st. ROUND 4: Crochet 1 dc in each dc = 12 dc – NOTE: Crochet through both loops again. ROUND 5: Crochet 1 dc in each dc, at the same time crochet 2 dc tog at the beg and at the end of round = 10 dc. ROUND 6: Crochet 1 dc in each dc, at the same time crochet tog 5th and 6th dc and crochet tog 7th and 8th dc on round = 8 dc. Cut the thread. Crochet 1 more leg in the same way. Fill the legs with cotton wool and sew the legs to bottom of body. ARMS: Crochet 4 ch with crochet hook size 4 mm with light brown mix and form a ring with 1 sl st in first ch. ROUND 1: Crochet 4 dc in ring. ROUND 2: Crochet 2 dc in each dc = 8 dc. ROUND 3-6: Crochet 1 dc in each dc = 8 dc. Change to light grey/green. ROUND 7: Crochet 1 dc in each dc = 8 dc Fill the arm with cotton wool, place piece flat and crochet 1 dc in each dc through both layers = 4 dc. Cut the thread. Crochet 1 more arm in the same way and sew arms to the side of body at the top. EARS: Crochet 4 ch with crochet hook size 4 mm with light brown mix and form a ring with 1 sl st in first ch. ROUND 1: Crochet 6 dc in ring. ROUND 2: * 1 dc in first dc, 2 dc in next dc *, repeat from *-* = 9 dc. ROUND 3: * 1 dc in each of the first 2 dc, 2 dc in next dc *, repeat from *-* = 12 dc. ROUND 4-6: Crochet 1 dc in each dc = 12 dc. Place piece flat and crochet 1 dc in each dc through both layers = 6 dc, turn piece and crochet 2 dc tog across the row = 3 dc. Cut the thread and sew ear to the top of head to the side. Crochet 1 more ear and attach to the opposite side of head. SMALL HEART: Crochet 2 ch with crochet hook size 3 mm with guacamole (try to find a yellow section of the yarn) and crochet 3 dc in first ch, turn piece. Crochet 1 ch, then 1 dc in each st = 5 dc (includes ch at beg and end of row), turn piece. Crochet 3 ch, 1 tr in first ch, 1 dc in middle of heart, 3 ch, 1 tr in first ch, 1 sl st in ch from beg of previous row. Cut the thread and sew the heart to the front of teddy. LARGE HEART: Crochet 2 ch with crochet hook size 3 mm with guacamole (try to find a yellow section of the yarn) and crochet 3 dc in first ch, turn piece. Crochet 1 ch, then 1 dc in each st = 5 dc (includes ch at beg and end of row), turn piece. Crochet 1 ch, then 1 dc in each st = 6 dc (includes ch at beg of row), turn piece. Crochet 4 ch, 1 tr in first ch, 1 dc in the middle of heart, 4 ch,1 tr in first ch, 1 sl st in ch from beg of previous row. Cut the thread and sew the heart to the front of teddy. Crochet 1 more heart and sew to the back of teddy. Embroider eyes and mouth at the front of teddy with black. |
|
|
|
|
Have you made this or any other of our designs? Tag your pictures in social media with #dropsdesign so we can see them! Do you need help with this pattern?You'll find tutorial videos, a Comments/Questions area and more by visiting the pattern on garnstudio.com. © 1982-2024 DROPS Design A/S. We reserve all rights. This document, including all its sub-sections, has copyrights. Read more about what you can do with our patterns at the bottom of each pattern on our site. |
|


With over 40 years in knitting and crochet design, DROPS Design offers one of the most extensive collections of free patterns on the internet - translated to 17 languages. As of today we count 304 catalogues and 11422 patterns - 11422 of which are translated into English (UK/cm).
We work hard to bring you the best knitting and crochet have to offer, inspiration and advice as well as great quality yarns at incredible prices! Would you like to use our patterns for other than personal use? You can read what you are allowed to do in the Copyright text at the bottom of all our patterns. Happy crafting!
Comments / Questions (118)
Hei! Voiko langan korvata neuleessa DropsBaby merino-langalla? Mikä mahtaa olla menekki koossa 68?
08.10.2019 - 20:35DROPS Design answered:
Hei, DROPS Baby Merino - lanka on Merino Extra Fine -lankaa ohuempi lanka, joten se ei käy vaihtoehtoisena lankana. Valitse joku lankaryhmään B kuuluva lanka.
17.12.2019 - 17:12Jeg strikker minste størrelsen. Skal arbeidet måle 18 cm på beinet fra oppbrettet kant?
09.09.2019 - 21:03DROPS Design answered:
Hej Eli, du måler benet fra starten af arbejdet. God fornøjelse!
10.09.2019 - 16:00Huppu kohdassa silmukoiden poiminta. Miten? Ohjeessa :pääntien reunasta n. 60-100 s (älä poimi silmukoita etureunojen kohdalla). Eli miten poimitaan? En ymmärrä. Kiitos avusta
14.03.2019 - 07:25DROPS Design answered:
Hei, silmukat poimitaan neulepuikon ja langan avulla pääntien reunan päätetyistä silmukoista, mutta etureunojen kohdalta ei poimita silmukoita.
27.05.2019 - 18:03Beklager, jeg har tenkt feil🤦🏻♀️ Så da fant jeg ut av det selv!
28.02.2019 - 12:52Lurer på en ting ang bena - er målene riktig? For hvis de skal være 6 cm før økningene begynner, så blir jo bena 26 cm før man er ferdig med å øke. Og det er mer enn hva oppskriften sier om full lengde før sammenstrikking..🤔
28.02.2019 - 12:33DROPS Design answered:
Hei Tina. Så flott at du fant ut av det. God fornøyelse videre
07.03.2019 - 14:39Hej, varför är det engelska och det svenska mönstret så olika för huvan? I de engelska ska man sticka resår före slätstickning (vilket låter konstigt) men inte i det svenska. Missar jag ngt?
18.02.2019 - 10:09DROPS Design answered:
Hei Mito. Det har du helt rett i, her er det noe galt med den engelske oppskriften. Det skal strikkes riller før glattstrikk på hette, vi skal få rettet dette snarest. Den svenske oppskrifter er korrekt. Takk for beskjed og god fornøyelse.
18.02.2019 - 14:04Hvað þýðir: Eftir þetta er prjónað sléttprjón með 1l garðaprjón á hvorri hlið við miðju að framan þar til hettan mælist 21 sm. skil ekki hvar brugna lykkjan á að koma
14.02.2019 - 21:24DROPS Design answered:
Blessuð. Það er ein lykkja prjónuð í garðaprjóni í hvorri hlið við miðju að framan
20.02.2019 - 15:43Hallo, Ik ben een beginnende breier en worstel al bij de pijp. Ik heb de eerste pijp direct al met een rondbreinaald gebreid. Nu ben ik bij dit stuk ...”Splits bij een hoogte van 16-20-23 (25-32) cm het werk aan de binnenkant van de pijp en brei het werk verder heen en weer op de nld (om het makkelijker te maken beide pijpen straks op een rondbreinld te zetten).”. Is dit ook van toepassing als ik met een rondbreinaald brei? Ik hoor het graag. Groet! Jennifer
09.01.2019 - 17:11DROPS Design answered:
Dag Jennifer,
Ja dit is ook van toepassing als je op de rondbreinaald breit. (Overigens wordt in het patroon ook aangegeven dat je met de rondbreinaald de pijpen breit). Nadat je de tweede pijp hebt gebreid worden beide pijpen samengevoegd op een rondbreinaald.
11.01.2019 - 11:29Ich habe mal eine Frage zu der Blende. Ich habe nur 42 Randmaschen, es sollen aber 75 Maschen für die Blende aufgenommen werden. Wie soll das gehen?
08.10.2018 - 10:31DROPS Design answered:
Liebe Astrid, seien Sie sicher, Sie genügend Maschen für die Blende aufgenommen haben - siehe Video. Viel Spaß beim stricken!
08.10.2018 - 14:10Okay I'm having a problem. When I added the sleeves to the body part I have the exact amount of stitches called for 24 months 220 stitches total. I have dec. before and after each stitch marker like it said. after 7 times dec on rs I bound off on each side 2 sts. 5 times. then 1 st. both sides 3 times. I end up with 46 extra sts. I should have 74sts. But I've got 120sts. What am I doing wrong??? Please help🙏
05.10.2018 - 18:44DROPS Design answered:
Dear Carrie, continue decreasing for raglan at the same time as you dec for neck and after neck dec have been worked, you will have 74 sts left. Happy knitting!
08.10.2018 - 07:52