
Popular categories
Looking for a yarn?


|
|
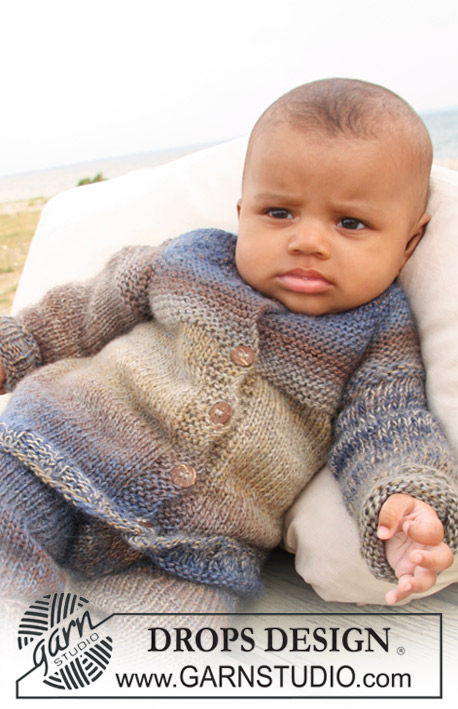
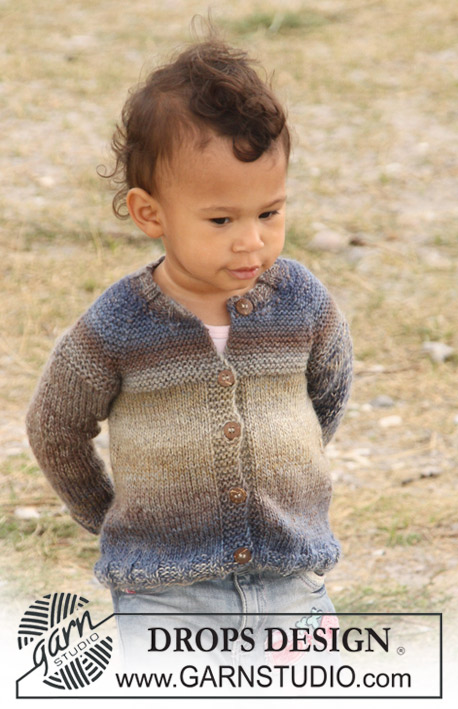
Nathan Jacket |
|
 |
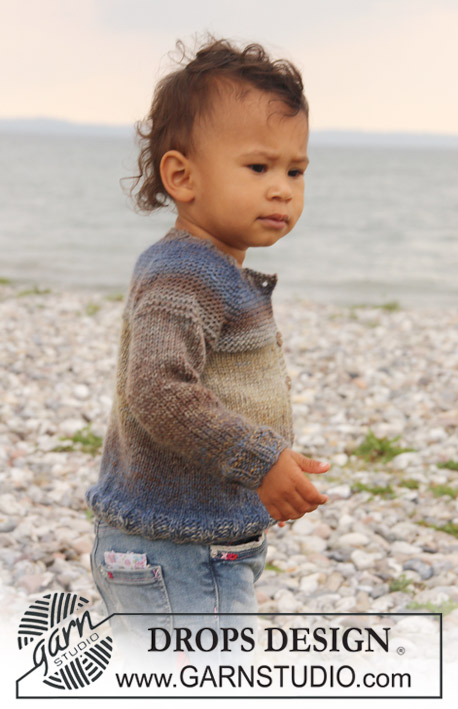 |
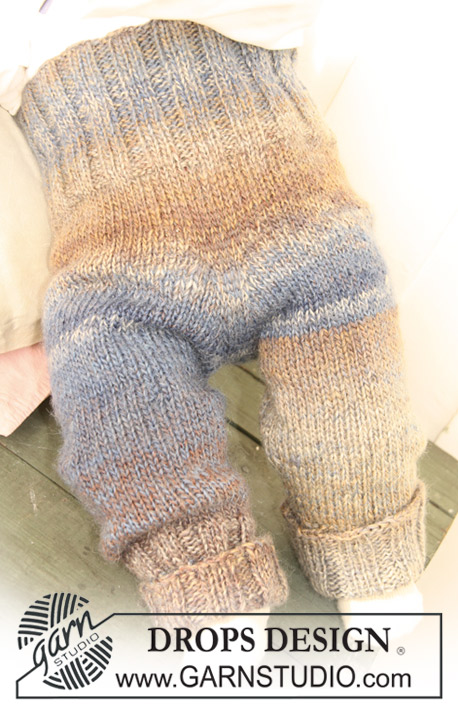
Knitted jacket with raglan for baby and children in 2 threads DROPS Delight
DROPS Baby 20-16 |
|
|
GARTER ST (back and forth on needle): 1 garter = K 2 rows. BUTTON HOLE: Dec for button hole on right front band. 1 button hole = K tog 2nd and 3rd st from edge and make 1 YO. Dec for button hole when piece measures: Size 1/3 months: 2, 8, 15 and 22 cm Size 6/9 months: 2, 9, 16 and 24 cm Size 12/18 months: 2, 8, 14, 20 and 26 cm Size 2 years: 2, 8, 15, 22 and 29 cm Size 3/4 years: 2, 9, 16, 24 and 32 cm Size 5/6 years: 2, 8, 15, 22, 29 and 36 cm NOTE: Dec the last button hole on the neckline. DECREASE TIP (applies to raglan): All dec are done from RS! Dec as follows in each transition between sleeve and body piece (beg 3 sts before marker): K2 tog, K2 (marker is between these 2 sts), slip 1 st as if to K, K1, psso. -------------------------------------------------------- BODY: Worked back and forth on circular needle from mid front. Cast on 132-138-150 (162-168-174) sts (incl 5 band sts in each side towards mid front) on circular needle 4.5 mm with 2 threads Delight. P 1 row from WS, then work next row as follows from RS: 5 band sts in garter st, * K2, P4 *, repeat from *-* and finish with K2 and 5 band sts in garter st. Continue rib as follows until 3-3-3 (4-4-4) cm, remember button holes on right front band – see explanation above. Continue to work stocking sts but work the 5 band sts in each side in garter st until piece is completed. AT THE SAME TIME on 1st row after rib, adjust no of sts to 118-128-140 (146-158-168) sts – do not dec over the band. Insert 1 marker 32-34-38 (39-42-44) sts in from each side = 54-60-64 (68-74-80) sts between markers on the back piece. When piece measures 5-5-6 (6-6-6) cm, dec 1 st on each side of the markers every 2-2-2 (3-3-4) cm a total of 5 times = 98-108-120 (126-138-148) sts. When piece measures approx. 15-16-17 (19-21-24) cm - adjust so that next row is worked from WS - K 3 rows over all stitches. On next row cast off 6-8-8 (8-10-10) sts in each side for armhole (i.e. 3-4-4 (4-5-5) sts on each side of markers) = 38-42-46 (50-54-60) sts on back piece and 24-25-29 (30-32-34) sts on each front piece. Put piece aside and knit the sleeves. SLEEVE: Worked in the round. Cast on 30-30-36 (36-36-36) sts on double pointed needles size 4.5 mm with 2 threads Delight. K 1 round. Then knit rib with K2/P4 until piece measures 3-3-3 (4-4-4) cm. Continue with stocking st AT THE SAME TIME adjust no of sts to 28-28-30 (30-32-32) sts on 1st round after rib. When piece measures 8-6-6 (6-6-7) cm, inc 2 sts mid under each sleeve every 7-4-3 (3-3.5-3.5) cm a total of 2-4-5 (7-7-8) times = 32-36-40 (44-46-48) sts. When piece measures 18-20-21 (26-30-34) cm, P 1 round, K 1 round and P 1 round, then K 1 round AT THE SAME TIME dec 6-8-8 (8-10-10) sts mid under each sleeve = 26-28-32 (36-36-38) sts left on the needle. Put piece aside and knit another sleeve. YOKE: Switch to circular needle size 4 mm on body and slip sleeves onto same circular needle where cast off for armholes is = 138-148-168 (182-190-204) sts. Insert a marker in all transitions between sleeves and body piece (= 4 markers). READ ALL OF THE FOLLOWING SECTION BEFORE CONTINUING! Work in garter st back and forth on needle over all sts – and K 1 row from WS before beg dec for raglan. RAGLAN: Dec 1 st on each side of all markers (= 8 dec) – read Decrease tip! Dec every 4 rows: 7-8-8 (9-10-11) times and then on every other row: 0-0-2 (2-2-2) times. NECK: At the same time when piece measures 21-23-25 (28-31-35) cm slip the 8-8-10 (10-10-12) outermost sts in each side towards mid front on a stitch holder for neck. Continue to dec for neck towards mid front on every other row: 2 sts 2 times and 1 st 2 times. After all dec for raglan and neck there are 54-56-56 (62-62-64) sts left on the needle and piece measures approx. 26-28-30 (33-36-40) cm up to shoulder. ASSEMBLY: Knit up approx. 80 to 105 sts around the neck (incl sts on stitch holder at the front) on circular needle 4 mm with 2 threads Delight. K 1 row from WS, then K 1 row from RS AT THE SAME TIME dec evenly to 54-60-60 (66-66-72) sts. Continue to work rib as follows (1st row = WS): 5 band sts rib, * P2, K4 *, repeat from *-* and finish with P2 and 5 band sts rib (from RS there are 5 band sts in rib and K2 on each side towards mid front). After 1 cm dec for 1 button hole over the other holes on the right side. When rib measures 2 cm, loosely cast off with K over K and P over P. Sew the openings under the sleeves. Sew on buttons. |
|

|
|
|
Have you made this or any other of our designs? Tag your pictures in social media with #dropsdesign so we can see them! Do you need help with this pattern?You'll find tutorial videos, a Comments/Questions area and more by visiting the pattern on garnstudio.com. © 1982-2024 DROPS Design A/S. We reserve all rights. This document, including all its sub-sections, has copyrights. Read more about what you can do with our patterns at the bottom of each pattern on our site. |
|


With over 40 years in knitting and crochet design, DROPS Design offers one of the most extensive collections of free patterns on the internet - translated to 17 languages. As of today we count 304 catalogues and 11422 patterns - 11422 of which are translated into English (UK/cm).
We work hard to bring you the best knitting and crochet have to offer, inspiration and advice as well as great quality yarns at incredible prices! Would you like to use our patterns for other than personal use? You can read what you are allowed to do in the Copyright text at the bottom of all our patterns. Happy crafting!
Comments / Questions (68)
Je suis un peu dans la même question qu'Emilie vous a posée en janvier. Où faire les diminutions 2fois 2 et 1 fois 1, mais je pense avoir compris votre réponse. En revanche, les mailles en attente ne se retrouvent-elles pas un cran en dessous quand on continue de tricoter le reste ? D'autre part, faut-il encore une boutonnière dans l'encolure ? Merci pour votre réponse.
03.11.2015 - 00:12DROPS Design answered:
Bonjour Evelyne, quand toutes les diminutions de l'empiècement sont faites, on va reprendre les mailles en attente sur le devant droit, relever les mailles le long des mailles rabattues pour l'encolure, reprendre les mailles de l'empiècement, relever les mailles le long des mailles rabattues de l'autre côté de l'encolure et reprendre les mailles de l'autre devant en attente, puis on tricote le col en ouvrant 1 boutonnière (cf § "Assemblage"). Bon tricot!
03.11.2015 - 09:47Vielen Dank für die schnelle Antwort! Jetzt wird sofort Garn bestellt:-)
20.09.2015 - 15:08Hallo, wäre es auch möglich, diese Jacke mit EINEM Faden Big Delight zu stricken? Oder kommt das überhaupt nicht hin?
20.09.2015 - 11:54DROPS Design answered:
Doch, das geht. Unsere Garne sind in Garngruppen eingeteilt, die Sie untereinander tauschen können, in diesem Fall gilt: 2 Fäden der Garngruppe A (= Delight) entspricht 1 Faden der Garngruppe C (= Big Delight). Beachten Sie, dass Sie die Maschenprobe unbedingt einhalten müssen. Außerdem müssen Sie die Garnmenge anhand des Originalgarns neu berechnen. Dafür rechnen Sie die benötigten Meter von Delight aus (1 Knäuel = 50 g = 175 m), teilen das Ergebnis durch 2 (da ja ursprünglich mit doppeltem Faden gestrickt wird) und berechnen anhand dessen, wie viel Garn Sie von Big Delight benötigen (1 Knäuel = 100 g = 190 m).
20.09.2015 - 13:04Bonjour, j'en suis à l'étape de l'encolure où il est demandé de faire des diminutions côté encolure tous les deux rangs. Je me demande ou doit on effectuer ces diminutions sur le rang. J' ai mes 10 mailles de chaque côté en attente.Dois je les faire en début et fin de rang, avant le 1er marqueur, après,...? Mes marqueurs servent-ils encore? Merci d'avance pour votre réponse et pour ce service de questions-réponses!
31.01.2015 - 16:17DROPS Design answered:
Bonjour Émilie, on met en attente pour l'encolure 10 m de chaque côté (= les 10 premières et les 10 dernières m du rang), puis on rabat côté encolure toujours (= au début de chaque rang de chaque côté) 2 fois 2 m et 2 fois 1 m, en même temps, vous continuez les diminutions du raglan comme avant. Bon tricot!
02.02.2015 - 09:33Dobrý den prosím nerozumím začátku při přidávání ok na těle svetru. Jak můžu z nahozených 132 ok přidat na 118 ok? Děkuji
30.12.2014 - 12:08DROPS Design answered:
Dobrý den, omlouváme se, český text návodu byl chybný - nyní byl překlad kompletně zrevidován a opraven, takže by už vše mělo být srozumitelné. Oka samozřejmě nepřidáváte, ale ujímáte. Hodně zdaru!
07.03.2016 - 18:30Ich bin keine besonders strickerfahrene Person und konnte das Modell dank der guten Erläuterungen problemlos nachstricken. Größe 86/92 passt mit den Maßen der Skizze und den Maschenproben überein. Für meine Tochter (trägt gerade 86, teilweise 92) ist diese Größe aber mind. eineinhalb Größen zu groß. Im Nachhinein würde ich das Modell auch unten nicht mehr ausgestellt, sondern relativ gerade stricken, da es für meinen Geschmack unten zu weit ist.
15.11.2014 - 13:01Hallo, bitte helft mir bei der Ärmellänge (2 Jahre): Ich habe 4 cm Bündchen, danach 6 cm glatt gestrickt und das erste Mal 2 Maschen zugenommen. Wenn ich alle 3 cm je 2 Maschen zunehme, insgesamt 7 Mal, komme ich mit Bündchen auf 28 cm Länge. In der Beschreibung steht, nach 26 cm kommen 3 Reihen Krausrippe. Könnt ihr mir bitte sagen, welche Maße stimmen und bei welcher Gesamtlänge ich mit den 3 Reihen Krausrippe beginne? Danke & LG, Daniela
21.10.2014 - 22:45DROPS Design answered:
Liebe Daniela, Sie müssen die erste Abnahme bei einer Gesamtlänge von 6 cm machen, nicht nach den 4 cm noch 6 cm stricken. Dann sollte es passen.
22.10.2014 - 12:38Hei, Mikä on DROPS PUUNAPPI (513) koko?
20.10.2014 - 08:11DROPS Design answered:
Hei! Tämän puunapin halkaisija on 15 mm.
20.10.2014 - 16:10Jetzt hab ich auch noch eine Frage zum Abschluss. (Zusammennähen). 56 M habe ich auch der Rundnadel. Dann steht in der Anleitung ca. 80 bis 105 M aufnehmen (inkl Maschen von den Hilfsfäden. - Sollen also die 56 M ergänzt werden bis zu einer Zahl von 80M? Oder sollen im vorderen Bereich 80 M aufgenommen werden? Vielen Dank im Voraus
26.09.2014 - 00:14DROPS Design answered:
Sie ergänzen die M-Zahl, bis Sie ca. 80 M oder etwas mehr auf der Nadel haben (wahrscheinlich in etwa 84-86 M), je nachdem, wie viele M Sie aus der Halsrundung vorne auffassen. Dann stricken Sie 2 R re und nehmen dann gleichmäßig verteilt so ab, dass nur noch 60 M auf der Nadel sind.
26.09.2014 - 14:49Herzlichen Dank für die schnelle Antwort.
24.09.2014 - 15:13