
Popular categories
Looking for a yarn?


|
|
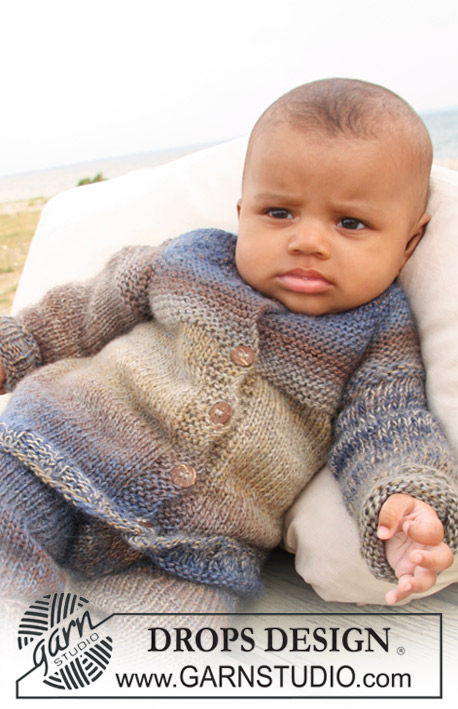
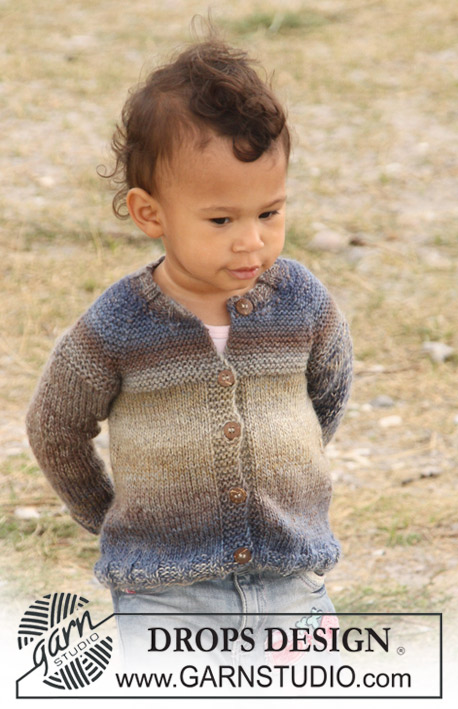
Nathan Jacket |
|
 |
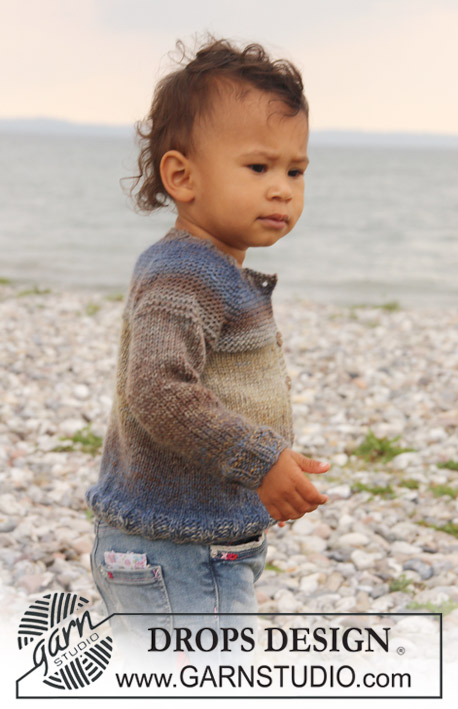 |
Knitted jacket with raglan for baby and children in 2 threads DROPS Delight
DROPS Baby 20-16 |
|
|
GARTER ST (back and forth on needle): 1 garter = K 2 rows. BUTTON HOLE: Dec for button hole on right front band. 1 button hole = K tog 2nd and 3rd st from edge and make 1 YO. Dec for button hole when piece measures: Size 1/3 months: 2, 8, 15 and 22 cm = 3/4", 3 1/8", 6" and 8 3/4" Size 6/9 months: 2, 9, 16 and 24 cm = 3/4", 3 1/2", 6 1/4" and 9 1/2" Size 12/18 months: 2, 8, 14, 20 and 26 cm = 3/4", 3 1/8", 5 1/2", 8" and 10 1/4" Size 2 years: 2, 8, 15, 22 and 29 cm = 3/4", 3 1/8", 6", 8 3/4" and 11 3/8" Size 3/4 years: 2, 9, 16, 24 and 32 cm = 3/4", 3 1/2", 6 1/4", 9 1/2" and 12 1/2" Size 5/6 years: 2, 8, 15, 22, 29 and 36 cm = 3/4", 3 1/8", 6", 8 3/4", 11 3/8" and 14 1/4" NOTE: Dec the last button hole on the neckline. DECREASE TIP (applies to raglan): All dec are done from RS! Dec as follows in each transition between sleeve and body piece (beg 3 sts before marker): K2 tog, K2 (marker is between these 2 sts), slip 1 st as if to K, K1, psso. -------------------------------------------------------- BODY: Worked back and forth on circular needle from mid front. Cast on 132-138-150 (162-168-174) sts (incl 5 band sts in each side towards mid front) on circular needle 4.5 MM = US 7 with 2 threads Delight. P 1 row from WS, then work next row as follows from RS: 5 band sts in garter st, * K2, P4 *, repeat from *-* and finish with K2 and 5 band sts in garter st. Continue rib as follows until 3-3-3 (4-4-4) cm = 1 1/8"-1 1/8"-1 1/8" (1 1/2"-1 1/2"-1 1/2"), remember button holes on right front band – see explanation above. Continue to work stockinette sts but work the 5 band sts in each side in garter st until piece is completed. AT THE SAME TIME on 1st row after rib, adjust no of sts to 118-128-140 (146-158-168) sts – do not dec over the band. Insert 1 marker 32-34-38 (39-42-44) sts in from each side = 54-60-64 (68-74-80) sts between markers on the back piece. When piece measures 5-5-6 (6-6-6) cm = 2"-2"-2 3/8" (2 3/8"-2 3/8"-2 3/8"), dec 1 st on each side of the markers every 2-2-2 (3-3-4) cm = 3/4"-3/4"-3/4" (1 1/8"-1 1/8"-1 1/2") a total of 5 times = 98-108-120 (126-138-148) sts. When piece measures approx. 15-16-17 (19-21-24) cm = 6"-6 1/4"-6 3/4" (7 1/2"-8 1/4"-9 1/2") - adjust so that next row is worked from WS - K 3 rows over all stitches. On next row bind off 6-8-8 (8-10-10) sts in each side for armhole (i.e. 3-4-4 (4-5-5) sts on each side of markers) = 38-42-46 (50-54-60) sts on back piece and 24-25-29 (30-32-34) sts on each front piece. Put piece aside and knit the sleeves. SLEEVE: Worked in the round. Cast on 30-30-36 (36-36-36) sts on double pointed needles size 4.5 MM = US 7 with 2 threads Delight. K 1 round. Then knit rib with K2/P4 until piece measures 3-3-3 (4-4-4) cm = 1 1/8"-1 1/8"-1 1/8" (1 1/2"-1 1/2"-1 1/2"). Continue with stockinette st AT THE SAME TIME adjust no of sts to 28-28-30 (30-32-32) sts on 1st round after rib. When piece measures 8-6-6 (6-6-7) cm = 3 1/8"-2 3/8"-2 3/8" (2 3/8"-2 3/8"-2 3/4"), inc 2 sts mid under each sleeve every 7-4-3 (3-3.5-3.5) cm = 2 3/4"-1 1/2"-1 1/8" (1 1/8"-1 1/4"-1 1/4") a total of 2-4-5 (7-7-8) times = 32-36-40 (44-46-48) sts. When piece measures 18-20-21 (26-30-34) cm = 7"-8"-8 1/4" (10 1/4"-11 3/4"-13 3/8"), P 1 round, K 1 round and P 1 round, then K 1 round AT THE SAME TIME dec 6-8-8 (8-10-10) sts mid under each sleeve = 26-28-32 (36-36-38) sts left on the needle. Put piece aside and knit another sleeve. YOKE: Switch to circular needle size 4 MM = US 6 on body and slip sleeves onto same circular needle where bind off for armholes is = 138-148-168 (182-190-204) sts. Insert a marker in all transitions between sleeves and body piece (= 4 markers). READ ALL OF THE FOLLOWING SECTION BEFORE CONTINUING! Work in garter st back and forth on needle over all sts – and K 1 row from WS before beg dec for raglan. RAGLAN: Dec 1 st on each side of all markers (= 8 dec) – read Decrease tip! Dec every 4 rows: 7-8-8 (9-10-11) times and then on every other row: 0-0-2 (2-2-2) times. NECK: At the same time when piece measures 21-23-25 (28-31-35) cm = 8 1/4"-9"-9 3/4" (11"-12 1/4"-13 3/4") slip the 8-8-10 (10-10-12) outermost sts in each side towards mid front on a stitch holder for neck. Continue to dec for neck towards mid front on every other row: 2 sts 2 times and 1 st 2 times. After all dec for raglan and neck there are 54-56-56 (62-62-64) sts left on the needle and piece measures approx. 26-28-30 (33-36-40) cm = 10 1/4"-11"-11 3/4" (13"-14 1/4"-15 3/4") up to shoulder. ASSEMBLY: Knit up approx. 80 to 105 sts around the neck (incl sts on stitch holder at the front) on circular needle 4 MM = US 6 with 2 threads Delight. K 1 row from WS, then K 1 row from RS AT THE SAME TIME dec evenly to 54-60-60 (66-66-72) sts. Continue to work rib as follows (1st row = WS): 5 band sts rib, * P2, K4 *, repeat from *-* and finish with P2 and 5 band sts rib (from RS there are 5 band sts in rib and K2 on each side towards mid front). After 1 cm = 3/8" dec for 1 button hole over the other holes on the right side. When rib measures 2 cm = 3/4", loosely bind off with K over K and P over P. Sew the openings under the sleeves. Sew on buttons. |
|

|
|
|
Have you made this or any other of our designs? Tag your pictures in social media with #dropsdesign so we can see them! Do you need help with this pattern?You'll find tutorial videos, a Comments/Questions area and more by visiting the pattern on garnstudio.com. © 1982-2024 DROPS Design A/S. We reserve all rights. This document, including all its sub-sections, has copyrights. Read more about what you can do with our patterns at the bottom of each pattern on our site. |
|


With over 40 years in knitting and crochet design, DROPS Design offers one of the most extensive collections of free patterns on the internet - translated to 17 languages. As of today we count 304 catalogs and 11415 patterns - 11410 of which are translated into English (US/in).
We work hard to bring you the best knitting and crochet have to offer, inspiration and advice as well as great quality yarns at incredible prices! Would you like to use our patterns for other than personal use? You can read what you are allowed to do in the Copyright text at the bottom of all our patterns. Happy crafting!
Comments / Questions (68)
Ich meinte an welchen Markierungsfäden sind die Abnahmen zu machen?
13.08.2013 - 19:59DROPS Design answered:
..hatte ich schon gedacht :)
15.08.2013 - 08:05Hallo, leider hilft mir Ihre Antwort nicht weiter. Ich bin mit dem Armloch und den Ärmeln schon fertig und auch mit dem Raglan. Ich habe noch die vier Markierungsfäden. Wo sind die Maschen für den Hals auf die Hilfsnadeln zu legen und an welchen Hilfsgeldern sind die Abnahmen zu machen?
13.08.2013 - 19:57DROPS Design answered:
Liebe Dana, unter dem Abschnitt "Hals" finden Sie das beschrieben: die Maschen werden an der vorderen Mitte auf den Hilfsfaden gelegt (damit sie nachher direkt wieder für das Bündchen gestrickt werden können) Wenn Sie das irritiert, können Sie die Maschen auch abketten und nachher wieder daraus Maschen auffassen. Sie arbeiten nun nicht mehr mit den Hilfsfäden, die waren nur für den Raglan. Die Abn sind am Halsausschnitt.
15.08.2013 - 08:04Guten Tag, ich sticke die Jacke in der Größe 12/18 Monate und bin mit dem Raglan fertig. Jetzt sind die äußersten 10 M auf eine Hilfsnade zu legen, sind das recht und links jeweils 5 M? An welchen Stellen nehme ich die weiteren Abnahmen von 2 M 2 Mal und 1 M 2 Mal vor?
12.08.2013 - 14:22DROPS Design answered:
Liebe Dana, Sie ketten pro Armloch 10 M ab, das sind je 5 M VOR und NACH der seitlichen Markierung. Sie Abn von 2 x 2 M und 2 x 1 M sind am Halsausschnitt.
13.08.2013 - 09:37Hallo, versuche mich gerade in der Grösse 2 Jahre und habe jetzt die 162 Maschen aufgenommen. Das scheint ziemlich viel zu sein für die Grösse. ( Habe genau das Garn, welches die Abbildung hat) Vielen Dank
29.01.2013 - 23:44DROPS Design answered:
Liebe Charlotte, haben Sie gesehen, dass die Maschenzahl nach der Blende auf 146 Maschen angepasst wird? Wenn Sie lieber ein engeres Bündchen möchten, können Sie gleich mit weniger Maschen beginnen.
01.02.2013 - 20:52Hab direkt noch ne Frage: wenn ich nach dem Stilllegen und der Abnahme nur noch 54 M. auf der Nadel habe, muss ich die dann abketten bevor ich neue Maschen rund am Hals aufnehme?
25.01.2013 - 21:20Bin jetzt mit der Abnahme beim Raglan fertig und hab noch 82 M. auf der Nadel. Jetzt muss ich ja die äußersten 8 Maschen auf Hilfsfäden lagern. Heißt das vorne auf jeder Seite 4 M. stilllegen? Wenn ich dann 2mal 2 Maschen abkette und 2 mal 1 komme ich aber nicht auf 54 Maschen am Ende. Was heißt denn gegen den Hals abketten?
25.01.2013 - 11:20DROPS Design answered:
Liebe Frau Brombach, dürfen wir Sie bitten, für weitere Erklärungen der Anleitung in individuelle Strickhilfe den Laden zu kontaktieren, in dem Sie die Wolle gekauft haben.
26.01.2013 - 23:07Hej!Har nu stickat denna fina kofta i stl. 3/4 år och då var garnåtgången för liten. Behövde köpa till 0,5 hg. Har följt stickfasthet och mönstret.
22.01.2013 - 17:30Habe jetzt 3 Wollknäul an dem Strickstück hängen (hab für Vorder-und Rückenteil und für jeweils einen Ärmel ein neues Knäul angefangen). Mit welchem Knäul strick ich denn jetzt weiter? Sorry für die vielen Fragen, aber wie gesagt, ist mein 1. Babyjäckchen. Vielen Dank schon mal.
22.01.2013 - 15:41DROPS Design answered:
Liebe Frau Brombach - stricken Sie einfach mit einem Knäuel weiter und schneiden Sie die anderen ab. Achten Sie darauf, dass beide Ärmel gleich viele Reihen haben und alle Rumpfteile ebenso.
23.01.2013 - 09:55Hallo! Ich habe jetzt das Vorder-und Rückenteil und beide Ärmel gestrickt. Habe die Ärmel zwischen die Maschen von den Vorderteilen und dem Rückenteil eingesetzt, d.h. erst 24 M.Vorderteil, dann den 1. Ärmel, dann 54 M. Rückenteil, dann 2. Ärmel und dann die M.vom 2. Vorderteil. Wenn ich jetzt weiterstricke, muss ich dann einfach die Maschen von den Ärmeln mit abstricken, als wenn alles ein Strickstück wäre?
22.01.2013 - 15:40DROPS Design answered:
Hallo Frau Brombach, ja , das ist richtig.
23.01.2013 - 09:53Versuche mich zum 1. Mal an einem Babyjäckchen und bin mir nicht ganz sicher. In der Anleitung steht, dass man nach dem Bündchen in der 1. Runde die Maschenanzahl auf 118 Maschen anpassen soll. Werden alle 14 überschüssigen Maschen in 1 Runde abgenommen oder über mehrere Runden? Verteile ich die Abnahme dann auf die gesamte Runde oder nehme ich alle Maschen direkt am Anfang ab? Vielen Dank.
09.01.2013 - 22:40DROPS Design answered:
Liebe Frau Brombach , es wird in einer Reihe gleichmäßig verteilt – aber nicht über den Blendenmaschen – abgenommen. Es ist nun deutlicher in er Anleitung vermerkt. Es stand in dieser Anleitung auch noch ein paar Mal „Abketten“ statt „Abnehmen“ – vielleicht hat Sie das auch irritiert, ich habe es nun ebenfalls korrigiert.
10.01.2013 - 13:55