
Popular categories
Looking for a yarn?


|
|
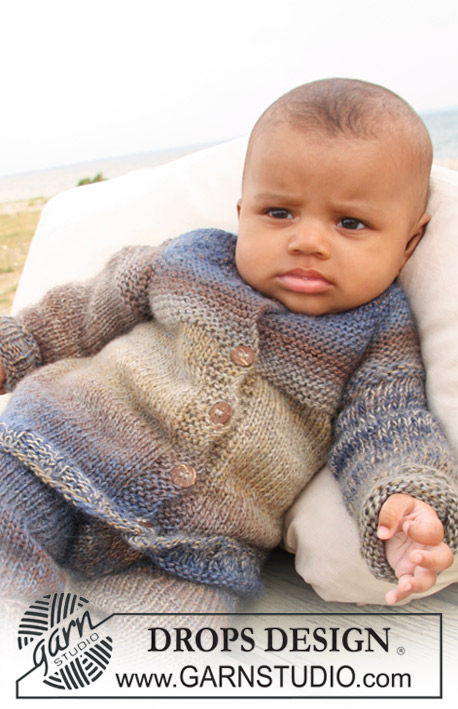
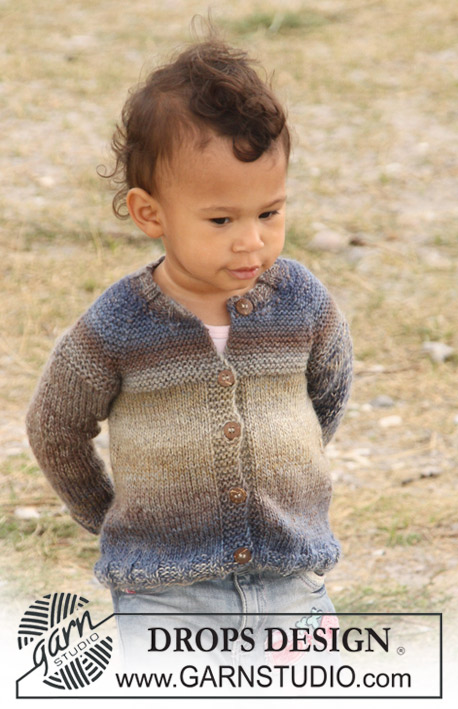
Nathan Jacket |
|
 |
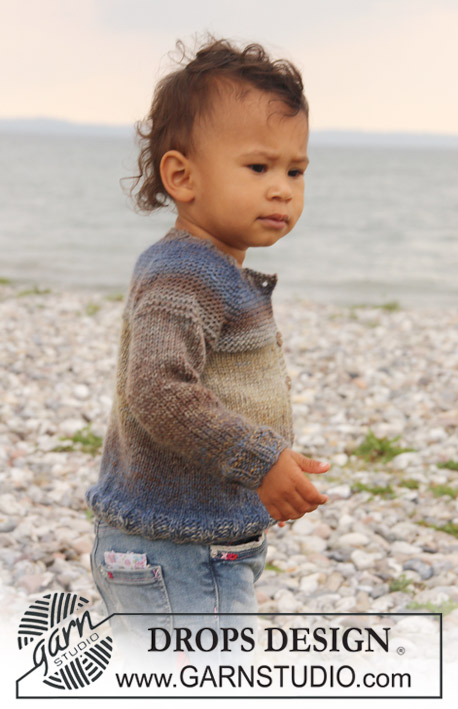 |
Knitted jacket with raglan for baby and children in 2 threads DROPS Delight
DROPS Baby 20-16 |
|
|
GARTER ST (back and forth on needle): 1 garter = K 2 rows. BUTTON HOLE: Dec for button hole on right front band. 1 button hole = K tog 2nd and 3rd st from edge and make 1 YO. Dec for button hole when piece measures: Size 1/3 months: 2, 8, 15 and 22 cm Size 6/9 months: 2, 9, 16 and 24 cm Size 12/18 months: 2, 8, 14, 20 and 26 cm Size 2 years: 2, 8, 15, 22 and 29 cm Size 3/4 years: 2, 9, 16, 24 and 32 cm Size 5/6 years: 2, 8, 15, 22, 29 and 36 cm NOTE: Dec the last button hole on the neckline. DECREASE TIP (applies to raglan): All dec are done from RS! Dec as follows in each transition between sleeve and body piece (beg 3 sts before marker): K2 tog, K2 (marker is between these 2 sts), slip 1 st as if to K, K1, psso. -------------------------------------------------------- BODY: Worked back and forth on circular needle from mid front. Cast on 132-138-150 (162-168-174) sts (incl 5 band sts in each side towards mid front) on circular needle 4.5 mm with 2 threads Delight. P 1 row from WS, then work next row as follows from RS: 5 band sts in garter st, * K2, P4 *, repeat from *-* and finish with K2 and 5 band sts in garter st. Continue rib as follows until 3-3-3 (4-4-4) cm, remember button holes on right front band – see explanation above. Continue to work stocking sts but work the 5 band sts in each side in garter st until piece is completed. AT THE SAME TIME on 1st row after rib, adjust no of sts to 118-128-140 (146-158-168) sts – do not dec over the band. Insert 1 marker 32-34-38 (39-42-44) sts in from each side = 54-60-64 (68-74-80) sts between markers on the back piece. When piece measures 5-5-6 (6-6-6) cm, dec 1 st on each side of the markers every 2-2-2 (3-3-4) cm a total of 5 times = 98-108-120 (126-138-148) sts. When piece measures approx. 15-16-17 (19-21-24) cm - adjust so that next row is worked from WS - K 3 rows over all stitches. On next row cast off 6-8-8 (8-10-10) sts in each side for armhole (i.e. 3-4-4 (4-5-5) sts on each side of markers) = 38-42-46 (50-54-60) sts on back piece and 24-25-29 (30-32-34) sts on each front piece. Put piece aside and knit the sleeves. SLEEVE: Worked in the round. Cast on 30-30-36 (36-36-36) sts on double pointed needles size 4.5 mm with 2 threads Delight. K 1 round. Then knit rib with K2/P4 until piece measures 3-3-3 (4-4-4) cm. Continue with stocking st AT THE SAME TIME adjust no of sts to 28-28-30 (30-32-32) sts on 1st round after rib. When piece measures 8-6-6 (6-6-7) cm, inc 2 sts mid under each sleeve every 7-4-3 (3-3.5-3.5) cm a total of 2-4-5 (7-7-8) times = 32-36-40 (44-46-48) sts. When piece measures 18-20-21 (26-30-34) cm, P 1 round, K 1 round and P 1 round, then K 1 round AT THE SAME TIME dec 6-8-8 (8-10-10) sts mid under each sleeve = 26-28-32 (36-36-38) sts left on the needle. Put piece aside and knit another sleeve. YOKE: Switch to circular needle size 4 mm on body and slip sleeves onto same circular needle where cast off for armholes is = 138-148-168 (182-190-204) sts. Insert a marker in all transitions between sleeves and body piece (= 4 markers). READ ALL OF THE FOLLOWING SECTION BEFORE CONTINUING! Work in garter st back and forth on needle over all sts – and K 1 row from WS before beg dec for raglan. RAGLAN: Dec 1 st on each side of all markers (= 8 dec) – read Decrease tip! Dec every 4 rows: 7-8-8 (9-10-11) times and then on every other row: 0-0-2 (2-2-2) times. NECK: At the same time when piece measures 21-23-25 (28-31-35) cm slip the 8-8-10 (10-10-12) outermost sts in each side towards mid front on a stitch holder for neck. Continue to dec for neck towards mid front on every other row: 2 sts 2 times and 1 st 2 times. After all dec for raglan and neck there are 54-56-56 (62-62-64) sts left on the needle and piece measures approx. 26-28-30 (33-36-40) cm up to shoulder. ASSEMBLY: Knit up approx. 80 to 105 sts around the neck (incl sts on stitch holder at the front) on circular needle 4 mm with 2 threads Delight. K 1 row from WS, then K 1 row from RS AT THE SAME TIME dec evenly to 54-60-60 (66-66-72) sts. Continue to work rib as follows (1st row = WS): 5 band sts rib, * P2, K4 *, repeat from *-* and finish with P2 and 5 band sts rib (from RS there are 5 band sts in rib and K2 on each side towards mid front). After 1 cm dec for 1 button hole over the other holes on the right side. When rib measures 2 cm, loosely cast off with K over K and P over P. Sew the openings under the sleeves. Sew on buttons. |
|

|
|
|
Have you made this or any other of our designs? Tag your pictures in social media with #dropsdesign so we can see them! Do you need help with this pattern?You'll find tutorial videos, a Comments/Questions area and more by visiting the pattern on garnstudio.com. © 1982-2024 DROPS Design A/S. We reserve all rights. This document, including all its sub-sections, has copyrights. Read more about what you can do with our patterns at the bottom of each pattern on our site. |
|


With over 40 years in knitting and crochet design, DROPS Design offers one of the most extensive collections of free patterns on the internet - translated to 17 languages. As of today we count 304 catalogues and 11422 patterns - 11422 of which are translated into English (UK/cm).
We work hard to bring you the best knitting and crochet have to offer, inspiration and advice as well as great quality yarns at incredible prices! Would you like to use our patterns for other than personal use? You can read what you are allowed to do in the Copyright text at the bottom of all our patterns. Happy crafting!
Comments / Questions (68)
Bonjour. J'ai fini les diminutions du raglan et de l'encoulure mais je n'ai pas du tout 64 mailles sur l'aiguille, mais 46. Pourtant il me semble avoir bien suivi les instructions. Je suis désemparée. Pouvez-vous m'aider ? Merci.
05.11.2023 - 15:35DROPS Design answered:
Bonjour Mme Laustriat, vous aviez 204 et avez diminué pour le raglan 13 fois 8 mailles au total (11 fois tous les 4 rangs + 2 fois tous les 2 rangs); vous avez en plus glissé en attente pour l'encolure 12 mailles de chaque côté et rabattu pour l'encolure 2 x 2 et 2 x 1 m soit = 18 mailles au total pour l'encolure; vous devez avoir: 204-(13x8)-(18x2)=64 mailles. Bon tricot!
06.11.2023 - 08:43Making size 3/4, have dec for raglan - dec every 4 rowsx10, & then on every other row x2 - 74 stitches rem. Reached neck - have slipped outermost 10 sts on each side on to holder, (incl 5 sts of band). Pattern reads "cont to dec from neck towards mid front on every other row: 2 stsx2 & 1 stx2. Where am i decreasing? Still at raglan sleeve edge, or next to the band? what happens to sts on holder? How do they get to same no. of rows as body? already 41cm not 36cm & still to do this dec? thanks
01.08.2022 - 12:44DROPS Design answered:
Dear Mrs Willmot, the decreases for raglan are not supposed to be finished when you start shaping neck, this means you decrease for raglan as you said, but at the same time, when piece will measure 31 cm, slip the first 10 sts at the beginning of next 2 rows on a thread and continue decreasing for raglan while casting off for neck on each side: 2 sts 2 times and 1 stitch 2 times (= 2 sts at the beginning of next 4 rows and 1 stitch at the beginning of next 4 rows). Happy knitting!
01.08.2022 - 16:16Les explications de ce modele ne sont pas claires, par ex. le terme diminuer est employé pour l’encolure alors qu’il s’agit de rabattre. Les mesures par rapport à l’age sont totalement fausses ce qui oblige à recalculer toutes données. C’est vraiment un très mauvais modèle et il devrait être rectifié
07.04.2022 - 23:25Je crois que les tailles par rapport aux âges est totalement faux, c’est beaucoup trop grand et plusieurs commentaires le mentionnent. Pourquoi ne pas rectifier et afficher un diagramme avec des mesures justes ? Pourquoi obliger les personnes à mesurer un pull, recalculer les donnees du tricot? Pourquoi publiera des modèles à l’evidence faux
28.03.2022 - 20:17Ich stricke gerade für Zwillinge mit einem Faden Big Delight, finde es übrigens sehr schade, dass Big Delight langsam verschwindet.\r\nDie Jacke soll für 12-18 Monate 36 cm lang werden (siehe oben) - das wird ja ein Mantel!! Das ist doch viel zu lang!
06.01.2022 - 01:33Projekt 2016 babyjacke\\r\\nWas bedeutet: vor und nach Markierung je 1 M abn., und alle 4 cm total 5 mal
03.06.2021 - 12:55DROPS Design answered:
Liebe Frau Steinmann, beim Rumpfteil setzen Sie 2 Markierungen, bzw 1 Markierung an jeder Seite, dann sollen Sie 1 Masche beidseitig jeder Markierung abnehmen (= 2 Abnahmen bei jeder Markierung = 4 Abnahmen pro Abnahmenreihe), und diese Abnahmenreihen stricken Sie insgesamt 5 Mal in jeder 4 cm( Größe 2. Jahre) = Sie haben 5 M weniger bei jedem Vorderteil und 10 M weniger beim Rückenteil = 126 M sind noch übrig. Viel Spaß beim stricken!
10.06.2021 - 08:43Hi. I have completed the sleeves and body and need to slip all stitches onto circular needle. I have 2 questions: 1. There are 10 cast off stitches (3/4 yrs size) on the body, but no corresponding cast off stitches on the sleeves to match as shown on the video? 2. When knitting sleeves in the round the inside is the ‘right’ side. When slipping on the circular needle, do I need to turn the sleeves the other way? Many thanks.
10.04.2021 - 19:00DROPS Design answered:
Dear Jackie, the pattern actually says "AT THE SAME TIME dec 6-8-8 (8-10-10) sts mid under each sleeve = 26-28-32 (36-36-38) sts left on the needle" in which "decrease" means cast off. As for the sleeves, the pattern does not say you have to knit the sleeves with the RS inside, it says you knit the sleeves on the round with stocking stitch. When putting together the body and the sleeves, all part should have RS on teh outside. Happy Knitting.
10.04.2021 - 19:29Please could you explain a little more what this instruction in the sleeve means ‘ inc 2 sts mid under each sleeve’ -especially the term ‘mid under’. Many thanks.
14.02.2021 - 22:05DROPS Design answered:
Dear Jackie, you will have to increase 1 stitch at the beg + 1 stitch at the end of the round = 2 stitches (mid under sleeve = beg of round). You can increase as follows: work until 1 stitch remains at the end of the round, increase 1 stitch, work 2 (marker for beg of round is in the middle of these 2 stitches), increase 1 stitch. Happy knitting!
15.02.2021 - 09:14Bonjour,est-ce que je rabat les mailles lorsque le raglan et les diminutions de l’encolure sont terminés? Merci
23.08.2019 - 14:02DROPS Design answered:
Bonjour Francine, quand toutes les diminutions du raglan et de l'encolure sont faites, vous relevez les mailles le long de l'encolure (y compris les mailles en attente) et tricotez le col. Bon tricot!
23.08.2019 - 14:53Bonjour,je commence à mettre les mailles en attente et les diminuions pour l’encolure à 5 cm avant l’assemblage? Merci!
23.08.2019 - 13:12DROPS Design answered:
Bonjour Francine, vous commencez à former l'encolure à 27 cm de hauteur totale, quand toutes les diminutions du raglan et de l'encolure sont faites, l'ouvrage mesure 32 cm à partir de l'épaule jusqu'en bas, terminez ensuite par le col. Bon tricot!
23.08.2019 - 14:47