
Popular categories
Looking for a yarn?


|
||||
Tamzyn |
||||
 |
 |
|||
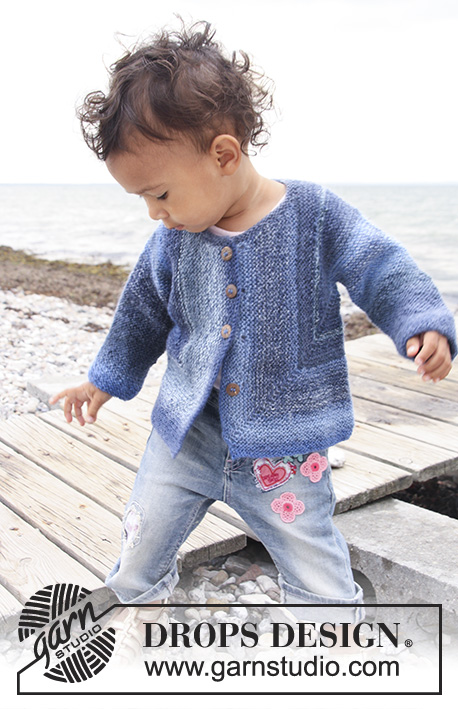
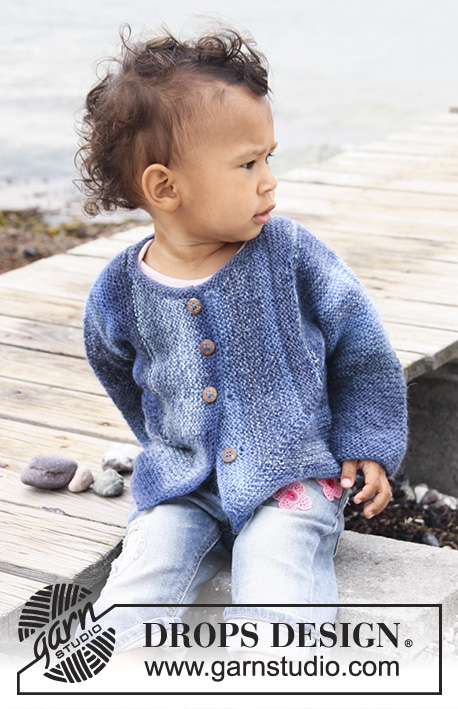
Knitted domino jacket in garter st for baby and children in DROPS Delight
DROPS Baby 20-15 |
||||
|
INCREASE TIP: Inc 1 st in each side of marker by making 1 YO. Work YO twisted on next row (i.e. knit in back loop of st instead of front loop) to avoid holes. ---------------------------------------------------------- JACKET: Work the piece sideways. Work 2 pieces and finish by sewing pieces tog in the back. Work the pieces from the sleeve edge towards the mid of jacket. RIGHT HALF: Worked back and forth on circular needle. Cast on 36-38-40 (40-42-44) sts on circular needle size 3 mm / US 2or3 with Delight. K back and forth on all rows until completed (= garter st). REMEMBER THE GAUGE! AT THE SAME TIME when piece measures 6-6-5 (5-6-6) cm / 2⅜"-2⅜"-2" (2"-2⅜"-2⅜"), inc 1 st in each side, repeat the inc on every 8th row a total of 6-7-9 (11-13-14) times = 48-52-58 (62-68-72) sts. Work until piece measures 17-19-20 (25-29-33) cm / 6¾"-7½"-8" (9¾"-11⅜"-13") – adjust so that the last row is worked from WS. BODY: K 1 row (= RS), at end of row cast on 41-43-50 (53-58-60) sts (= towards the back) = 89-95-108 (115-126-132) sts. NOW MEASURE PIECE FROM HERE! K 1 row, turn, insert a marker in the 2nd st on needle from RS (= in right side). Continue – AT THE SAME TIME inc 1 st on each side of the st with marker every other row a total of 38-40-46 (48-50-52) times – SEE INCREASE TIP. AT THE SAME TIME when piece measures 8.5-9-10.5 (11-12-13) cm / 3¼"-3½"-4¼" (4⅜"-4¾"-5⅛") work only over the last 60-65-74 (79-86-91) sts in the left side seen from RS (= back piece), slip the remaining sts on a stitch holder. BACK PIECE: Work until piece measures 13-14-16 (17-18-19) cm / 5⅛"-5½"-6¼" (6¾"-7"-7½") (from where back piece sts was cast on), bind off. FRONT PIECE: Put sts from stitch holder back on needle but leave 9-10-10 (10-12-12) sts towards the back on the stitch holder for neckline. Continue inc on every other row – AT THE SAME TIME dec 1 st towards the neck (= towards sts on stitch holder) on every 4th row a total of 6-7-7 (7-7-7) times. AT THE SAME TIME when piece measures 14-15-17 (18-19-20) cm / 5½"-6"-6¾" (7"-7½"-8") (from where inc on front piece started and towards mid front) bind off for 3-4-4 (5-5-5) button holes as follows (from neck, i.e. from WS): K 2, bind off 2 sts, * K 12-9-11 (9-10-10) sts, bind off 2 sts *, repeat from *-* a total of 2-3-3 (4-4-4) times, K rest of row. On next row cast on 2 new sts over the bound off sts. After all inc and dec there are 90-93-109 (115-121-126) sts on the needle. When finished with inc on right side, bind off 51-52-62 (66-70-74) sts from the neckline and down the front band of jacket (bind off from WS) = 39-41-47 (49-51-52) sts left on needle. K back and forth over these sts for approx. 1-1-2 (2-3-3) cm / ⅜"-⅜"-¾" (3/4"-1⅛"-1⅛") (fold piece at the shoulder and check that the front piece is the same length as back piece). Bind off. LEFT HALF: Work as right half but without button holes – this piece is assembled with wrong side out. ASSEMBLY: Put the 2 pieces towards each other and sew tog mid back – sew edge to edge to avoid a chunky seam. Fold the jacket and sew underarm and side seams in front loop of outermost sts. Sew on buttons. NECKLINE: Knit up 55 to 80 sts (including sts on stitch holder) around the neck on circular needle size 3 mm / US 2or3 with Delight. K 3 rows back and forth, bind off. |
||||
Diagram explanations |
||||
|
||||

|
||||
|
Have you made this or any other of our designs? Tag your pictures in social media with #dropsdesign so we can see them! Do you need help with this pattern?You'll find tutorial videos, a Comments/Questions area and more by visiting the pattern on garnstudio.com. © 1982-2024 DROPS Design A/S. We reserve all rights. This document, including all its sub-sections, has copyrights. Read more about what you can do with our patterns at the bottom of each pattern on our site. |
||||


With over 40 years in knitting and crochet design, DROPS Design offers one of the most extensive collections of free patterns on the internet - translated to 17 languages. As of today we count 304 catalogs and 11422 patterns - 11417 of which are translated into English (US/in).
We work hard to bring you the best knitting and crochet have to offer, inspiration and advice as well as great quality yarns at incredible prices! Would you like to use our patterns for other than personal use? You can read what you are allowed to do in the Copyright text at the bottom of all our patterns. Happy crafting!
Comments / Questions (191)
Thank you for sharing
22.01.2020 - 09:39Hej, jag är en mycket van stickerska, men detta mönster går jag inte iland med. Det är det mest konstiga mönster jag nånsin sett!
28.12.2019 - 16:16Die Jacke als solches ist ja hübsch aber ich habe alles wieder aufgetrennt denn mir hat keine Naht gefallen für die Rückennaht. Schade drum aber da finde ich die Jacke nach ...... angenehmer.Ich wollte eben auf etwas anderes noch hinweisen und komme mir ganz schön zensiert vor da ich das Wort nicht benutzen darf weil es verboten ist?!
28.10.2019 - 12:41DROPS Design answered:
Liebe Frau Habenreich, könnten Sie uns kurz auf Facebook sagen, was Sie schreiben sollten? Je nach den Sprachen können die Wörter ändern. Viel Spaß beim stricken!
05.11.2019 - 09:39Moin Moin, ich bin wohl zu doof um dieses Jäckchen zu stricken :-/ Die Anleitung ist derart kompliziert geschrieben dass ich im Moment nicht weiß wo vorne und wo hinten ist. Ist der neu angeschlagene Teil das Rückenteil? und Vorderteil dann der Teil bei dem beidseitig der markierten Masche zugenommen wird?
15.10.2019 - 15:37DROPS Design answered:
Liebe Frau Habenreich, ja so ist es; siehe auch die Maßskizze, die Masche mit der Markierung (= es wird beidseitig dieser Masche zugenommen = gestrichte Linie) ist beim Vorderteil. Viel Spaß beim stricken!
15.10.2019 - 17:19Non capisco come fare ad intrecciare 66 m. dalla scollatura e giù lungo il bordo del davanti e poi fare la metà sx. Non sono riuscita a spiegarmi bene.
27.09.2019 - 21:56DROPS Design answered:
Buongiorno Paola. Partendo dallo scollo, deve chiudere 66 maglie e proseguire sulle maglie rimaste (maglie del bordo in basso del davanti) per 2 cm circa. Lavora la parte sinistra come la destra, senza aprire le asole e cuce le due parti al centro sul dietro. Buon lavoro!
28.09.2019 - 19:20Bonjour. Je remercie DROPS carje viens de tricoter la veste pour enfant n° DE-006-by en DELIGHT et c'est une réussite! Existe-t-il un modèle similaire pour FEMME? Cordiaux remerciements.
19.09.2019 - 15:21DROPS Design answered:
Bonjour Mme Pecout, ce modèle est probablement le plus proche, même si les manches se tricotent ici séparément - vous trouverez ici, d'autres modèles tricotés en transversal. Bon tricot!
19.09.2019 - 15:26FRONT PIECE: What do I do with the 10 neckline stitches that is have left on the stitch holder?
23.06.2019 - 03:02DROPS Design answered:
Dear Donna, You should use those stitches, whenmaking the edging for the neckline. The number of stitches to pick up includes these stitches. Happy Kntiing!
23.06.2019 - 08:33When increasing on either side of stitch with marker, do you increase 38 stitches or 38 times? I feel that if it is 38 times it would be longer than stated. Than’s
18.06.2019 - 05:21DROPS Design answered:
Dear Judi, in the first size you increase a total of 38 times 1 stitch on each side of the stitch with the marker every row from RS (= 2 sts increased on every other row). See chart: the dotted line is matching the stitch with marker, the increases on each side will shape front piece and side at the same time. You will then have to increase 38 times 2 sts = 76 sts when all increases on front piece are done. Happy knitting!
18.06.2019 - 08:43Ik begrijp niet hoe ik aan de rechter kant moet meerderen. Ik heb de 2. steek van rechts gemarkeerd,links en rechts daarvan 1 steek gemeerderd. Elke 2. toer meerder ik nu. Maar blijft de gemarkeerde steek steeds de 2. steek,of wandelt die naar links?
25.05.2019 - 11:32DROPS Design answered:
Dag Martine,
De markeerdraad blijft steeds in dezelfde steek zitten en je kunt de markeerdraad in de hoogte meenemen. Aan beide kanten van deze markeerdraad meerder je steeds. Door het meerderen krijg je er dus steken bij aan beide kanten van de markeerdraad.
26.05.2019 - 09:56Perhaps I am looking in the wrong spot for tutorials but as an experienced knitter I am having trouble envisioning how this all works. So I will use the diagram on the pattern and wing it. I found the 8 tutorials not to be of help. Sorry, love the yarn.
07.03.2019 - 00:20DROPS Design answered:
Dear Ellie, the jacket is worked sideways, when you have worked all inc on sleeve (and piece measure 19-33 cm), cast on new sts for back piece at the end of next RS row, turn and work WS row. At the beg of next row from RS, insert a marker in the 2nd st on the right side and from now on leave the marker in this stitch and increase 1 st on each side of this stitch with a marker: this will create the dotted line in chart and increase the number of sts for front piece. Happy knitting!
07.03.2019 - 10:05