
Popular categories
Looking for a yarn?


|
||||
Tamzyn |
||||
 |
 |
|||
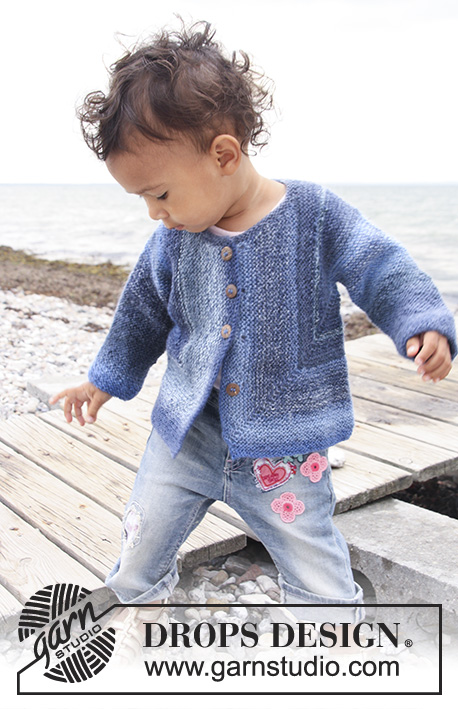
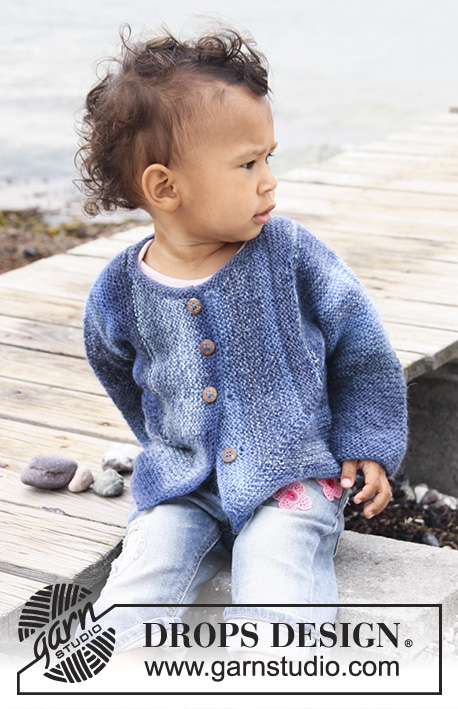
Knitted domino jacket in garter st for baby and children in DROPS Delight
DROPS Baby 20-15 |
||||
|
INCREASE TIP: Inc 1 st in each side of marker by making 1 YO. Work YO twisted on next row (i.e. knit in back loop of st instead of front loop) to avoid holes. ---------------------------------------------------------- JACKET: Work the piece sideways. Work 2 pieces and finish by sewing pieces tog in the back. Work the pieces from the sleeve towards the mid of jacket. RIGHT HALF: Worked back and forth on circular needle. Cast on 36-38-40 (40-42-44) sts on circular needle size 3 mm with Delight. K back and forth on all rows until completed (= garter st). REMEMBER THE KNITTING TENSION! AT THE SAME TIME when piece measures 6-6-5 (5-6-6) cm, inc 1 st in each side, repeat the inc on every 8th row a total of 6-7-9 (11-13-14) times = 48-52-58 (62-68-72) sts. Work until piece measures 17-19-20 (25-29-33) cm – adjust so that the last row is worked from WS. BODY: K 1 row (= RS), at end of row cast on 41-43-50 (53-58-60) sts (= towards the back) = 89-95-108 (115-126-132) sts. NOW MEASURE PIECE FROM HERE! K 1 row, turn, insert a marker in the 2nd st on needle from RS (= in right side). Continue – AT THE SAME TIME inc 1 st on each side of the st with marker every other row a total of 38-40-46 (48-50-52) times – SEE INCREASE TIP. AT THE SAME TIME when piece measures 8.5 - 9 - 10.5 (11 - 12 - 13) cm work only over the last 60-65-74 (79-86-91) sts in the left side seen from RS (= back piece), slip the remaining sts on a stitch holder. BACK PIECE: Work until piece measures 13-14-16 (17-18-19) cm (from where back piece sts was cast on), cast off. FRONT PIECE: Put sts from stitch holder back on needle but leave 9-10-10 (10-12-12) sts towards the back on the stitch holder for neckline. Continue inc on every other row – AT THE SAME TIME dec 1 st towards the neck (= towards sts on stitch holder) on every 4th row a total of 6-7-7 (7-7-7) times. AT THE SAME TIME when piece measures 14-15-17 (18-19-20 cm (from where inc on front piece started and towards mid front) cast off for 3-4-4 (5-5-5) button holes as follows (from neck, i.e. from WS): K 2, cast off 2 sts, * K 12-9-11 (9-10-10) sts, cast off 2 sts *, repeat from *-* a total of 2-3-3 (4-4-4) times, K rest of row. On next row cast on 2 new sts over the cast off sts. After all inc and dec there are 90-93-109 (115-121-126) sts on the needle. When finished with inc on right side, cast off 51-52-62 (66-70-74) sts from the neckline and down the front band of jacket (cast off from WS) = 39-41-47 (49-51-52) sts left on needle. K back and forth over these sts for approx. 1-1-2 (2-3-3) cm (fold piece at the shoulder and check that the front piece is the same length as back piece). Cast off. LEFT HALF: Work as right half but without button holes – this piece is assembled with wrong side out. ASSEMBLY: Put the 2 pieces towards each other and sew tog mid back – sew edge to edge to avoid a chunky seam. Fold the jacket and sew underarm and side seams in front loop of outermost sts. Sew on buttons. NECKLINE: Knit up 55 to 80 sts (including sts on stitch holder) around the neck on circular needle size 3 mm with Delight. K 3 rows back and forth, cast off. |
||||
Diagram explanations |
||||
|
||||

|
||||
|
Have you made this or any other of our designs? Tag your pictures in social media with #dropsdesign so we can see them! Do you need help with this pattern?You'll find tutorial videos, a Comments/Questions area and more by visiting the pattern on garnstudio.com. © 1982-2024 DROPS Design A/S. We reserve all rights. This document, including all its sub-sections, has copyrights. Read more about what you can do with our patterns at the bottom of each pattern on our site. |
||||


With over 40 years in knitting and crochet design, DROPS Design offers one of the most extensive collections of free patterns on the internet - translated to 17 languages. As of today we count 304 catalogues and 11422 patterns - 11422 of which are translated into English (UK/cm).
We work hard to bring you the best knitting and crochet have to offer, inspiration and advice as well as great quality yarns at incredible prices! Would you like to use our patterns for other than personal use? You can read what you are allowed to do in the Copyright text at the bottom of all our patterns. Happy crafting!
Comments / Questions (191)
How would I make this for an 8 year old?
25.07.2021 - 06:29DROPS Design answered:
Dear Joanne, please understand that we cannot modify our patterns for each individual request. This is a pattern for babies and small children, because this kind of cut suits their sizes the best. Having said that for one size bigger you can try using somewhat thicker yarn and needles, but you will have to recalculate the stitchnumbers. Happy Stitching!
25.07.2021 - 09:40Tejer 1 fila del derecho, girar, insertar un MP en el 2º pt en la ag por el LD (=lado derecho). Continuar – AL MISMO TIEMPO aum 1 pt a cada lado del MP cada 2ª fila un total de 38-40-46 (48-50-52) vcs – VER TIP PARA LOS AUMENTOS. AL MISMO TIEMPO. Esta es la parte que no sé cómo se hace ni qué quiere decir, porque si aumento quedaría deformada la delantera. Traté pero no pude, no queda como debería. Gracias
25.06.2021 - 23:36DROPS Design answered:
Hola Grace, a continuación tienes un vídeo sobre el cuadrado domino. En el vídeo esta en el punto central y te explica como se trabajan los aumentos. En nuestro caso, estaría en el 2º punto y hay que aumentar a cada lado del marcapuntos: https://www.garnstudio.com/video.php?patternid=9250&lang=es
15.07.2021 - 00:46Hi. La explicación no está clara. Cuando termino con la manga, mi sentido común dice que tengo que agregar la misma cantidad de puntos del lado derecho que del lado izquierdo pero eso no está claro en la explicación. Veo que del lado de la espalda debo seguir tejiendo como vienen los puntos pero en el delantero debo hacer esos aumentos que no son aumentos sino una vista. Debo ir desplazando esos "aumentos" hacia el exterior del sweater? No sé cómo hacer eso. Hay video de esa técnica?
24.06.2021 - 21:21DROPS Design answered:
Hola Grace, puedes ver nuestra respuesta arriba.
15.07.2021 - 00:46I am not clear about the instructions following the cast on stitches for the back. It reads cast on sts at the end of right side row, then knit 1 row. if you knit back, this would still be on the Right Side of the work. It then says "turn" and place marker in 2nd stitch. This would make it on the wrong side of the work, but the instructions say RS. Please clarify. I don't know that it makes much difference, but I would like to know.
17.05.2021 - 18:06DROPS Design answered:
Hi Natasza, You cast on stitches at the end of the row from the right side, then you turn and knit back from the wrong side. Now you turn and insert the marker in the 2nd stitch on the right side. Happy knitting
18.05.2021 - 08:07Good Morning, this jacket reminds very much of the surprise Jacket Elisabeth Zimmermann designed. Her way of knitting the jacket is much more comprehendable. Very sad, that there is no mentioning of her!
06.05.2021 - 12:23I am knitting second size of this adorable sweater. I checked my gauge and it is correct; however like another knitter mentioned, at 9cm I have only had 22 increases. My question is do you continue working on the left side, putting the right side stitches, where the increases were made, on the holder and continue the increases after these stitches are picked up later? I have read the instructions many times and I am having trouble figuring this out.
04.05.2021 - 15:13DROPS Design answered:
Dear Mrs Dimmock, when piece measures 9 cm (2nd size) you divide piece for neck, ie increasees on front piece are not finished yet but you first work the left side of piece (= back piece) and will finish the front piece later. Work only the 65 sts on the left side of piece (= the last 65 sts on needle, seen from RS) and put all remaining sts on a thread/stitch holder for front piece. Hope this will help. Happy knitting!
05.05.2021 - 08:19Ich musste die linke Seite bis zum Ärmel wieder aufmachen. Die Anleitung hat einen Fehler. LINKES TEIL: 1 R re stricken, 60M anschlagen, 1 R zurück stricken, vor der zweitletzten M 1 U, Maschenmarkierer, M stricken, 1 U 1 M, wenden und die M und U stricken, dann stimmt auch die Frontansicht.
13.03.2021 - 14:20DROPS Design answered:
Liebe Edith, da kraus rechts gestrickt wird, sind Vorderseite und Rückseite jeder gestrickten Hälfte komplett identisch. Die linke Hälfte wird daher genauso wie die rechte gestrickt und anschließend einfach umgedreht. Die Anleitung wurde noch einmal sprachlich überarbeitet, damit das noch klarer wird. Gutes Gelingen weiterhin!
16.03.2021 - 23:50Hallo, ich komme mit der Anleitung gut klar, bis auf einen Punkt: ab wo messe ich die cm für das erste Knopfloch? Die Beschreibung an dieser Stelle ist mir nicht verständlich. Wenn ich die Jacke für meinen Enkel dann fertig habe, werde ich sie für mich umrechnen und stricken. Dann aber mit Taschen. Freue mich schon darauf😊
04.03.2021 - 22:46DROPS Design answered:
Liebe Eulalia-Frederike, messen Sie von dem Anfang der Zunahmen für das Vorderteil (am Anfang der gestrichten Linien in Diagram aber dann gerade dh in der selben Richtung wie der Pfeil messen, nicht in die Strickrichtung vor den Zunahmen). Viel Spaß beim stricken!
05.03.2021 - 07:42Ich bin eine erfahrene Strickerin u.verstehe den Grund der Zunahme gar nicht? Finde zum 1.mal eine Anleitung von DROPS sehe chaotisch,schade
26.02.2021 - 18:27DROPS Design answered:
Liebe Gisela, meinen Sie die Zunahmen beidseitig von der Markierung am Vorderteil? Diese werden den Rückenteil machen, schauen Sie die gestrichelte Linie in der Skizze, diese ist die Masche mit der Markierung, wo Sie beidseitig zunehmen werden, ein Winklel (wie auf dem Foto) wird sich so bilden - der "Aufbau" dieses Modell ist etwas unterschiedlich als ein ganz "normalen" Modell - folgen Sie die Anleitung Schritt für Schritt, und so sehen Sie die Jacke wachsen. Viel Spaß beim stricken!
01.03.2021 - 07:37I absolutely love this design and so want to get it right but find that the right back is 14 cm wide but the front is 20 cm wide (second size). The front and back are the same length and the pattern looks correct otherwise. Could you kindly help me out please?
25.02.2021 - 09:57DROPS Design answered:
Dear Chris, you cast off for buttonholes when front piece measures 15 cm from beg of increase for front piece and then when you have finished all increases (= 93 sts on needle) you should have approx 17 cm when casting off the sts towards front band then work 1 more cm over the sts on bottom edge. Maybe it could be a good idea to show/bring your work to your store, they could check together with you while seing the jacket. (make sure tension in height is right, it may be the reason). Happy knitting!
25.02.2021 - 12:01