
Popular categories
Looking for a yarn?


|
||||||||||||||||||||||
DROPS Baby 20-12 |
||||||||||||||||||||||
 |
 |
|||||||||||||||||||||
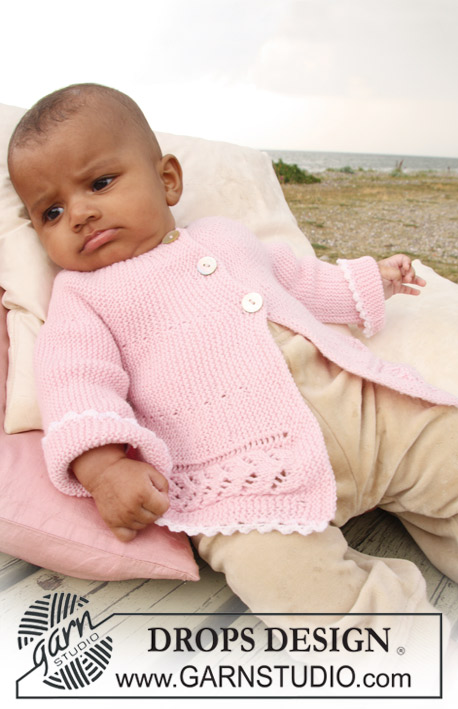
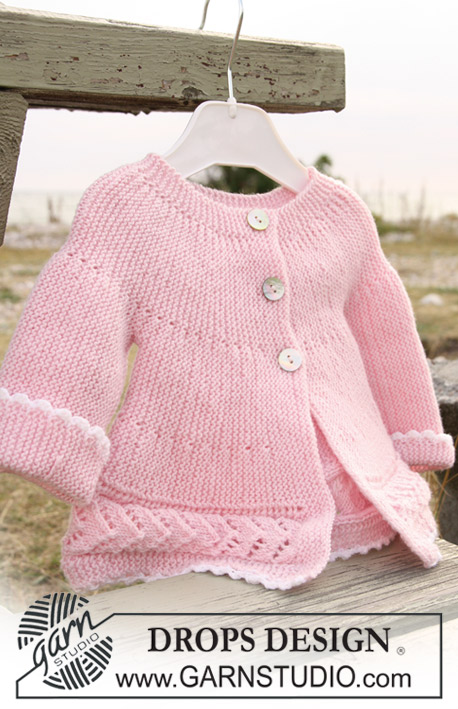
Jacket knitted from side to side in garter st and lace pattern for baby and children in DROPS BabyMerino
DROPS Baby 20-12 |
||||||||||||||||||||||
|
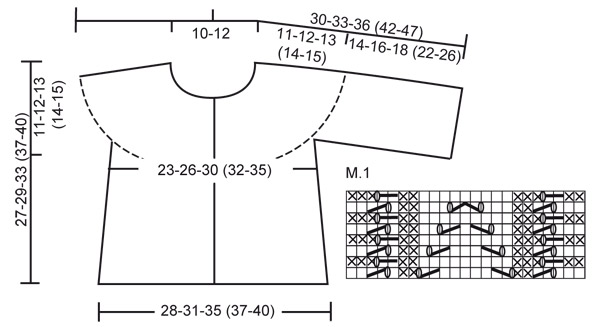
JACKET: PATTERN: See diagram M.1. Diagram shows the pattern from RS. KNITTING TIP: When turning mid piece, slip the first st as if to K, tighten thread and continue as before, do this to avoid a hole in transition. -------------------------------------------------------- -------------------------------------------------------- JACKET: Beg on left front piece, work towards the sleeve, back piece, the other sleeve and finish with right front piece. Loosely cast on 62-68-78 (88-96) sts on needle size 2.5 mm / US 1 with Baby Merino and K 8 rows for front band (first row = RS). Work next row as follows from RS: K the first 15 sts, AT THE SAME TIME inc 8 sts evenly (inc1 st by making 1 YO), K remaining sts on needle = 70-76-86 (96-104) sts. K 1 row from WS on all sts, work YO into back of loop to avoid a hole. Continue as follows: work the first 23 sts on needle in M.1, and K remaining sts on every row. AT THE SAME TIME work shortened rows as follows – see KNITTING TIP: * work the first 30-32-38 (42-47) sts, turn piece and work return row, work the first 46-50-57 (65-70) sts, turn piece and work return row, work the first 64-70-80 (90-98) sts, turn piece and work return row, work all 70-76-86 (96-104) sts, turn and work return row *, repeat from *-* until piece measures approx 16-17.5-19.5 (20.5-22) cm / 6¼"-6⅞"-7¾" (8⅛"-8¾") from cast on row (measured just before the first turn, i.e. over M.1). Cut the thread. Now slip the first 41-45-52 (60-65) sts towards bottom edge on a stitch holder (= the side). Cast on 36-42-46 (60-70) new sts over sts on stitch holder (i.e. before the 29-31-34 (36-39) sts left on needle) for sleeve and now continue as follows (first row = from RS): * work the first 41-47-51 (65-75) sts, turn piece and work return row, work the first 59-67-74 (90-103) sts, turn piece and work return row, work all 65-73-80 (96-109) sts, turn and work return row *. Repeat from *-*. When piece measures 16-17-18 (18-20) cm / 6¼"-6¾"-7" (7"-8") from where sts for sleeve were cast on (measured where widest, i.e. along bottom edge) bind off 36-42-46 (60-70) sts from sleeve edge towards body piece. Cut the thread. Slip the 41-45-52 (60-65) sts from stitch holder at the side back on needle and insert a marker in piece. Continue from bottom of body piece as before from *-* as described for front piece (first row = from RS). When piece measures 28-31-35 (37-40) cm / 11"-12¼"-13¾" (14½"-15¾") from marker (measured just before the first turn, i.e. over M.1) cut the thread. Slip the first 41-45-52 (60-65) sts towards bottom edge on a stitch holder (= the side). Cast on 36-42-46 (60-70) new sts over sts on stitch holder (i.e. before the 29-31-34 (36-39) sts left on needle) for sleeve and continue as before from *-* as described for the other sleeve. When sleeve measures the same as the left sleeve bind off 36-42-46 (60-70) sts from sleeve edge towards body piece. Cut the thread. Slip the 41-45-52 (60-65) sts from stitch holder at the side back on needle and continue from bottom of body piece as before from *-* as described for front piece (first row = RS). When right front piece measures the same as left front piece (less front band) work next row from RS as follows: K the first 23 sts, AT THE SAME TIME dec 8 sts evenly (dec 1 st by K2 tog) and K remaining 47-53-63 (73-81) sts on row = 62-68-78 (88-96) sts. Now work front band as follows (first row = from WS): K 3 rows on all sts, on next row from RS make 3 buttonholes as follows (i.e. from bottom edge towards neckline): K 41-45-53 (61-65) sts, 1 YO, K2 tog, K 7-8-9 (10-12) sts, 1 YO, K2 tog, K 7-8-9 (10-12) sts, 1 YO, K2 tog and finish with K1. Turn and K all sts on return row. Now K 5 rows on all sts and bind off loosely from RS. ASSEMBLY: Sew under arm seams, edge to edge. Sew on buttons. CROCHET BORDER: Crochet a border along bottom edge with crochet hook size 3 mm / C and white as follows: 1 sc, * ch 3, 1 dc in the first of the 3 ch, skip approx 1 cm / ⅜", 1 dc *, repeat from *-*. Crochet a similar border round both sleeves. |
||||||||||||||||||||||
Diagram explanations |
||||||||||||||||||||||
|
||||||||||||||||||||||
|
||||||||||||||||||||||
|
Have you made this or any other of our designs? Tag your pictures in social media with #dropsdesign so we can see them! Do you need help with this pattern?You'll find tutorial videos, a Comments/Questions area and more by visiting the pattern on garnstudio.com. © 1982-2024 DROPS Design A/S. We reserve all rights. This document, including all its sub-sections, has copyrights. Read more about what you can do with our patterns at the bottom of each pattern on our site. |
||||||||||||||||||||||


With over 40 years in knitting and crochet design, DROPS Design offers one of the most extensive collections of free patterns on the internet - translated to 17 languages. As of today we count 304 catalogs and 11422 patterns - 11417 of which are translated into English (US/in).
We work hard to bring you the best knitting and crochet have to offer, inspiration and advice as well as great quality yarns at incredible prices! Would you like to use our patterns for other than personal use? You can read what you are allowed to do in the Copyright text at the bottom of all our patterns. Happy crafting!
Comments / Questions (121)
El borde inferior de la chaqueta donde va el remate de ganchillo no aparece en el diagrama?. Esta pregunta he visto que la han hecho varias personas, y a todas contestáis que sigan el diagrama. Yo lo he hecho y ese borde inferior como de un par de centímetros a punto musgo no sale. Gracias.
16.12.2020 - 00:06DROPS Design answered:
Hola Magdalena! No entiendo bien tu pregunta, pienso que puede ayudarte el video AQUI. Si no, explica tu problema otra vez. Buen trabajo!
17.12.2020 - 13:12I am confused as to where to measure. It says "just before the first turn, i.e. over M.1". Does that mean just before the first turn or just over the M.1?
09.10.2020 - 15:52DROPS Design answered:
Dear Diane Marie, measure between the M.1 and where you do the first turn. (the measurement just above M.1 and just below the first turn should be the same.) Happy Knitting!
11.10.2020 - 07:00Bonjour J’ai commencé la réalisation du modèle après avoir longtemps hésité, mais j’ai fini par suivre vos bonnes explications et ça a marché, mais je ne trouve pas de boutonnière pourriez-vous m’indiquer comment? Merci beaucoup
24.09.2020 - 05:00DROPS Design answered:
Bonjour Naima, les boutonnières se trouvent tout à la fin, autrement dit, sur le 2ème devant (avant de rabattre les mailles). Bon tricot!
24.09.2020 - 09:52Zählt man bei den verkürzten Reihen die 23 Maschen von M1 mit?
28.06.2020 - 22:19DROPS Design answered:
Liebe Barbara, ja die Maschen von M.1 sind auch mitgezählt, die kommen nicht extra. Viel Spaß beim stricken!
29.06.2020 - 08:52Hej Jeg har strikket kanten, de 8 pinde. Og derefter har jeg tager ud, som skrevet. Jeg skal nu til at strikke mønsteret, her kommer jeg i tvivl. Skal jeg starte med 23 ret masker og derefter mønsteret ?
25.03.2020 - 13:21DROPS Design answered:
Hei Hanne. Nei, de 23 første maskene strikkes etter M.1 (M.1 = 23 masker). Om du ser på bildet, ser du mønstret nederst på jakken. God Fornøyelse!
30.03.2020 - 11:15Hej! Ursäkta min fråga men jag förstår inte riktigt: varför ökas det med 8 m på vänster frams och sedan minskar man med 8 m på höger frams.
07.02.2020 - 09:54DROPS Design answered:
Hej Ljilja, för att kanten inte skall bli för lös och för att ha samma antal maskor på de 2 framstycken :)
11.02.2020 - 10:16Undrar om det är tänkt att göra M1 och förkortade varv på samma varv? Hur? Ska man göra extra omslag när man gör 2 räta tillsammans? Annars stämmer inte maskantalet?
22.01.2020 - 13:47DROPS Design answered:
Hej Kristina, ja fast du stickar M1 oberoende av de forkortade varven. Se här hur du stickar enligt diagrammet
How to turn while knitting the chart in DROPS Baby 20-14 from Garnstudio Drops design on Vimeo.
30.01.2020 - 08:49Is there a printable versions available please
02.12.2019 - 14:06DROPS Design answered:
Dear Mrs Freeman, simply click on the icon to launch printing and choose a virtual printer to save the pattern as a .PDF file. Happy knitting!
02.12.2019 - 15:03Gentilissimi, avrei altra domanda. Il pattern M1 lo si lavora quindi solo una volta? Tutto il resto deve essere lavorato a dritto (come fosse maglia legaccio dunque)?
29.11.2019 - 23:45DROPS Design answered:
Buongiorno Simona. Lavora il diagramma M1 solo sulle prime 23 m; le altre maglie vengono lavorate a legaccio. Nella fotografia, il motivo corrisponde al disegno traforato nella parte in basso del cardigan. Buon lavoro!
30.11.2019 - 06:49Scusate, avrei un'altra domanda. Questa volta sul diagramma. Mi è chiaro che si debba procedere da destra verso sinistra e dal basso verso l'alto. La prima riga corrisponde al primo ferro nel dritto del lavoro, ma il secondo corrisponde al secondo ferro al rovescio giusto (da leggere da sinistra verso destra)? Grazie
29.11.2019 - 17:30DROPS Design answered:
Buongiorno Simona. Sì, la seconda riga corrisponde al secondo ferro, lavorato sul rovescio del lavoro e si legge da sinistra verso destra. Buon lavoro!
29.11.2019 - 22:58