
Popular categories
Looking for a yarn?


|
||||||||||||||||||||||
DROPS Baby 20-12 |
||||||||||||||||||||||
 |
 |
|||||||||||||||||||||
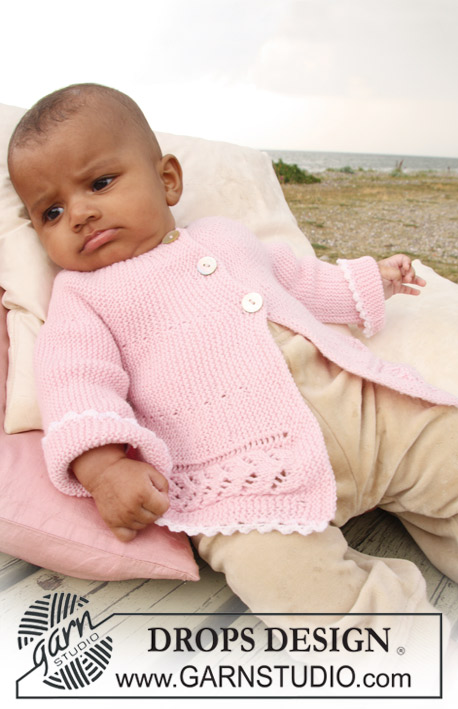
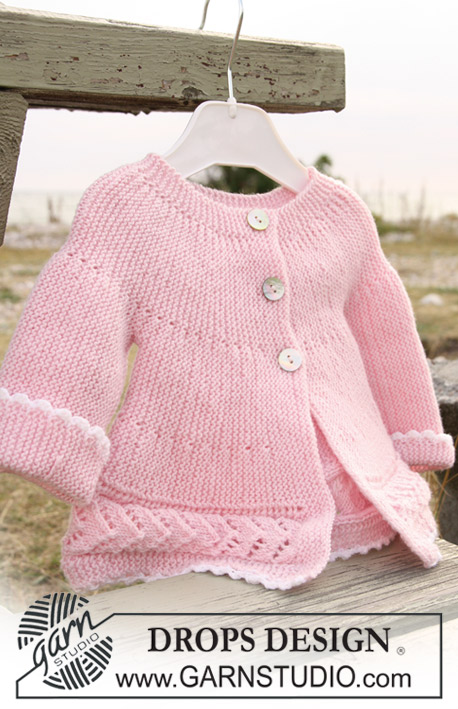
Jacket knitted from side to side in garter st and lace pattern for baby and children in DROPS BabyMerino
DROPS Baby 20-12 |
||||||||||||||||||||||
|
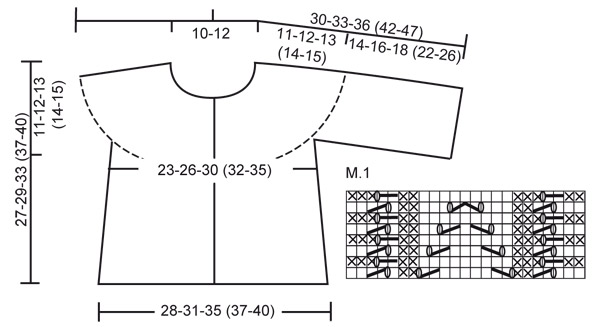
JACKET: PATTERN: See diagram M.1. Diagram shows the pattern from RS. KNITTING TIP: When turning mid piece, slip the first st as if to K, tighten thread and continue as before, do this to avoid a hole in transition. -------------------------------------------------------- -------------------------------------------------------- JACKET: Beg on left front piece, work towards the sleeve, back piece, the other sleeve and finish with right front piece. Loosely cast on 62-68-78 (88-96) sts on needle size 2.5 mm / US 1 with Baby Merino and K 8 rows for front band (first row = RS). Work next row as follows from RS: K the first 15 sts, AT THE SAME TIME inc 8 sts evenly (inc1 st by making 1 YO), K remaining sts on needle = 70-76-86 (96-104) sts. K 1 row from WS on all sts, work YO into back of loop to avoid a hole. Continue as follows: work the first 23 sts on needle in M.1, and K remaining sts on every row. AT THE SAME TIME work shortened rows as follows – see KNITTING TIP: * work the first 30-32-38 (42-47) sts, turn piece and work return row, work the first 46-50-57 (65-70) sts, turn piece and work return row, work the first 64-70-80 (90-98) sts, turn piece and work return row, work all 70-76-86 (96-104) sts, turn and work return row *, repeat from *-* until piece measures approx 16-17.5-19.5 (20.5-22) cm / 6¼"-6⅞"-7¾" (8⅛"-8¾") from cast on row (measured just before the first turn, i.e. over M.1). Cut the thread. Now slip the first 41-45-52 (60-65) sts towards bottom edge on a stitch holder (= the side). Cast on 36-42-46 (60-70) new sts over sts on stitch holder (i.e. before the 29-31-34 (36-39) sts left on needle) for sleeve and now continue as follows (first row = from RS): * work the first 41-47-51 (65-75) sts, turn piece and work return row, work the first 59-67-74 (90-103) sts, turn piece and work return row, work all 65-73-80 (96-109) sts, turn and work return row *. Repeat from *-*. When piece measures 16-17-18 (18-20) cm / 6¼"-6¾"-7" (7"-8") from where sts for sleeve were cast on (measured where widest, i.e. along bottom edge) bind off 36-42-46 (60-70) sts from sleeve edge towards body piece. Cut the thread. Slip the 41-45-52 (60-65) sts from stitch holder at the side back on needle and insert a marker in piece. Continue from bottom of body piece as before from *-* as described for front piece (first row = from RS). When piece measures 28-31-35 (37-40) cm / 11"-12¼"-13¾" (14½"-15¾") from marker (measured just before the first turn, i.e. over M.1) cut the thread. Slip the first 41-45-52 (60-65) sts towards bottom edge on a stitch holder (= the side). Cast on 36-42-46 (60-70) new sts over sts on stitch holder (i.e. before the 29-31-34 (36-39) sts left on needle) for sleeve and continue as before from *-* as described for the other sleeve. When sleeve measures the same as the left sleeve bind off 36-42-46 (60-70) sts from sleeve edge towards body piece. Cut the thread. Slip the 41-45-52 (60-65) sts from stitch holder at the side back on needle and continue from bottom of body piece as before from *-* as described for front piece (first row = RS). When right front piece measures the same as left front piece (less front band) work next row from RS as follows: K the first 23 sts, AT THE SAME TIME dec 8 sts evenly (dec 1 st by K2 tog) and K remaining 47-53-63 (73-81) sts on row = 62-68-78 (88-96) sts. Now work front band as follows (first row = from WS): K 3 rows on all sts, on next row from RS make 3 buttonholes as follows (i.e. from bottom edge towards neckline): K 41-45-53 (61-65) sts, 1 YO, K2 tog, K 7-8-9 (10-12) sts, 1 YO, K2 tog, K 7-8-9 (10-12) sts, 1 YO, K2 tog and finish with K1. Turn and K all sts on return row. Now K 5 rows on all sts and bind off loosely from RS. ASSEMBLY: Sew under arm seams, edge to edge. Sew on buttons. CROCHET BORDER: Crochet a border along bottom edge with crochet hook size 3 mm / C and white as follows: 1 sc, * ch 3, 1 dc in the first of the 3 ch, skip approx 1 cm / ⅜", 1 dc *, repeat from *-*. Crochet a similar border round both sleeves. |
||||||||||||||||||||||
Diagram explanations |
||||||||||||||||||||||
|
||||||||||||||||||||||
|
||||||||||||||||||||||
|
Have you made this or any other of our designs? Tag your pictures in social media with #dropsdesign so we can see them! Do you need help with this pattern?You'll find tutorial videos, a Comments/Questions area and more by visiting the pattern on garnstudio.com. © 1982-2024 DROPS Design A/S. We reserve all rights. This document, including all its sub-sections, has copyrights. Read more about what you can do with our patterns at the bottom of each pattern on our site. |
||||||||||||||||||||||


With over 40 years in knitting and crochet design, DROPS Design offers one of the most extensive collections of free patterns on the internet - translated to 17 languages. As of today we count 304 catalogs and 11422 patterns - 11417 of which are translated into English (US/in).
We work hard to bring you the best knitting and crochet have to offer, inspiration and advice as well as great quality yarns at incredible prices! Would you like to use our patterns for other than personal use? You can read what you are allowed to do in the Copyright text at the bottom of all our patterns. Happy crafting!
Comments / Questions (121)
Just discovered your wonderful website and the 20-12 baby pattern - My question is that I don't think the approx 6/8 stitch band on the bottom of the pattern panel in the photo is mentioned in pattern. Can you advise please. Pattern states start with 23 stitches from M1 . Love knitting with Baby Merino. This is my second baby cardi first one was 33-26. Hope you can help Lillian
30.04.2022 - 02:35DROPS Design answered:
Dear Lillian, the lace pattern at the bottom of the jacket is worked following diagram M.1 - this lesson might help you understanding how to work diagrams. Can this help? Happy knitting!
02.05.2022 - 08:10Ser på bildet at der er en rillekant nederst på jakken. Hvordan får jeg den når det ska begynnes rett på M1 fra kanten?
26.04.2022 - 09:16DROPS Design answered:
Hej Ellen, de første masker i diagrammet bliver til rillerne nederst i jakken :)
26.04.2022 - 15:04Bello il modello ma molto confusa la spiegazione, non ho capito come proseguire dopo aver fatto la prima manica, dopo aver ripreso le 41 maglie lasciate in sospeso, per eseguire il dietro, devo avviare altre maglie per arrivare a 71 maglie? Non riesco ad andare avanti con il lavoro
07.02.2022 - 15:04DROPS Design answered:
Buonasera Manuela, in quel punto deve lavorare a ferri accorciati come ha lavorato in precedenza la parte tra gli asterischi. Buon lavoro!
09.02.2022 - 21:49Do u have a video of this pattern plz.. I'm lost!!!
25.12.2021 - 11:27DROPS Design answered:
Dear Ashreetha, there is no step-by-step video for this pattern; all relevant videos can be found below the pattern. Happy knitting!
31.12.2021 - 19:22Bonjour , si je regarde la photo du modèle, sur le devant gauche , avant de faire les 23 mailles du diagrammes il y a une bordure au point mousse ( entre le diagramme et la bordure au crochet ). Mais je pense comprendre que les explications disent de commencer par le diagrammes ? Ou peut-être doit-on commencer le rang par des points mousse ? Si oui combien ? Merci
20.11.2021 - 23:29DROPS Design answered:
Bonjour Marie-Chantal, sur l'endroit, on commence par le motif ajouré de M.1, le point ajouré après les 3 premières mailles point mousse n'est juste pas bien visible sur la photo, mais il y est bien. Bon tricot!
24.11.2021 - 09:34Hello, I am a bit confused about Inc 8 st at the beginning of pattern . Do I inc 1 st evenly in every row in first 8 rows ( as a part of making a front band or do I inc 8 stitches in row 9 all at once? Why is it necessary to add those st, or can I start the pattern by casting 70 st in firs row? I really love this pattern just not sure about the 8 st
18.09.2021 - 00:46DROPS Design answered:
Dear Mrs Ebiks, you increase 8 sts evenly over the first 15 sts on needle on first row from RS = there are now 70 sts, you don't increase any more, these increases avoid that the pattern will be too tight when you start working M.1. Hpapy knitting!
20.09.2021 - 10:33Hallo, könnte ich die Anleitung auch für ein Garn der Gruppe B haben? Danke für baldige Antwort. Grüßle Andrea
02.09.2021 - 09:32DROPS Design answered:
Liebe Andrea, leider können wir jeder Anleitung nach jedem individuellen Frage anpassen und einzelne Modelle auf individuellen Wunsch hin umrechnen. Wenn sie Hilfe damit brauchen, wenden Sie sich bitte an dem Laden wo Sie die Wolle gekauft haben, dort hilft man Ihnen gerne weiter. Danke im voraus für Ihr Verständnis. Hier finden Sie unsere Anleitungen für BabyJacken mit einem Garn der Gruppe B. Viel Spaß beim stricken!
02.09.2021 - 09:45Kan det passe at ryggen i str 12/18 mdr., skal måle 35 cm, før man slår op til det andet ærme ? Så har jeg nemlig ikke nok garn.
18.08.2021 - 19:11DROPS Design answered:
Hej Jenny, ja det stemmer, strikker du i DROPS Baby Merino og har du 26 masker x 51 pinde retstrik på 10 cm, så skal garnforbruget stemme... Vi har ikke hørt andet.
25.08.2021 - 10:19Bij het baby patroon 20-12 (tel patroon) staat er niet bij wat de symbolen willen zeggen.
16.06.2021 - 09:42Salve, le volevo chiedere una cosa... Sto facendo la misura 2 anni. Sono arrivata a 20,05 cm di altezza per le maniche. Lo schema dice che devo mettere in attesa le 52 maglie del lato corto (quindi le maglie dal collo a scendere credo) ma poi non capisco come devo agg le nuove maglie e il resto a procedere... Mi può aiutare?... La ringrazio anticipatamente Erika
01.02.2021 - 16:42DROPS Design answered:
Buonasera Erika, per la taglia 2 anni deve mettere in sospeso 60 maglie e avviare 60 maglie prima delle 36 maglie rimaste sui ferri e poi lavorare a ferri accorciati come indicato. Buon lavoro!
01.02.2021 - 20:39