
Popular categories
Looking for a yarn?


|
||||||||||||||||||||||
DROPS Baby 20-12 |
||||||||||||||||||||||
 |
 |
|||||||||||||||||||||
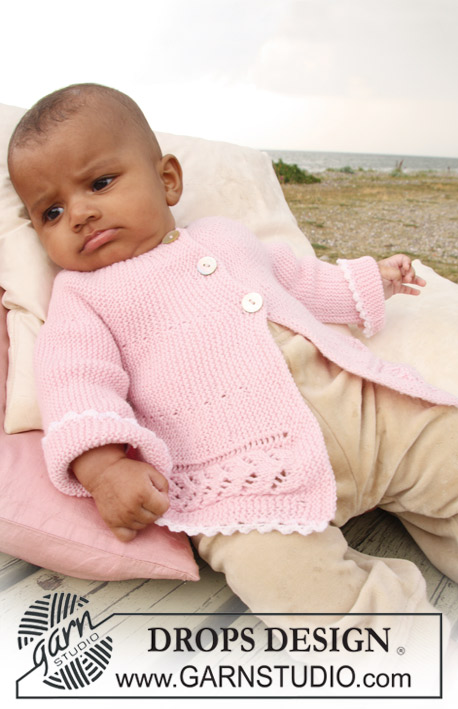
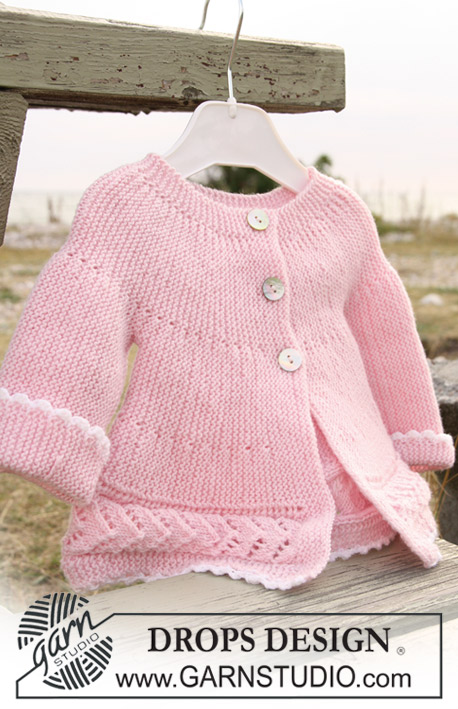
Jacket knitted from side to side in garter st and lace pattern for baby and children in DROPS BabyMerino
DROPS Baby 20-12 |
||||||||||||||||||||||
|
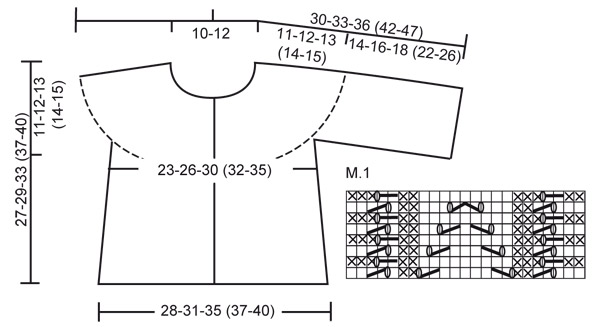
JACKET: PATTERN: See diagram M.1. Diagram shows the pattern from RS. KNITTING TIP: When turning mid piece, slip the first st as if to K, tighten thread and continue as before, do this to avoid a hole in transition. -------------------------------------------------------- -------------------------------------------------------- JACKET: Beg on left front piece, work towards the sleeve, back piece, the other sleeve and finish with right front piece. Loosely cast on 62-68-78 (88-96) sts on needle size 2.5 mm / US 1 with Baby Merino and K 8 rows for front band (first row = RS). Work next row as follows from RS: K the first 15 sts, AT THE SAME TIME inc 8 sts evenly (inc1 st by making 1 YO), K remaining sts on needle = 70-76-86 (96-104) sts. K 1 row from WS on all sts, work YO into back of loop to avoid a hole. Continue as follows: work the first 23 sts on needle in M.1, and K remaining sts on every row. AT THE SAME TIME work shortened rows as follows – see KNITTING TIP: * work the first 30-32-38 (42-47) sts, turn piece and work return row, work the first 46-50-57 (65-70) sts, turn piece and work return row, work the first 64-70-80 (90-98) sts, turn piece and work return row, work all 70-76-86 (96-104) sts, turn and work return row *, repeat from *-* until piece measures approx 16-17.5-19.5 (20.5-22) cm / 6¼"-6⅞"-7¾" (8⅛"-8¾") from cast on row (measured just before the first turn, i.e. over M.1). Cut the thread. Now slip the first 41-45-52 (60-65) sts towards bottom edge on a stitch holder (= the side). Cast on 36-42-46 (60-70) new sts over sts on stitch holder (i.e. before the 29-31-34 (36-39) sts left on needle) for sleeve and now continue as follows (first row = from RS): * work the first 41-47-51 (65-75) sts, turn piece and work return row, work the first 59-67-74 (90-103) sts, turn piece and work return row, work all 65-73-80 (96-109) sts, turn and work return row *. Repeat from *-*. When piece measures 16-17-18 (18-20) cm / 6¼"-6¾"-7" (7"-8") from where sts for sleeve were cast on (measured where widest, i.e. along bottom edge) bind off 36-42-46 (60-70) sts from sleeve edge towards body piece. Cut the thread. Slip the 41-45-52 (60-65) sts from stitch holder at the side back on needle and insert a marker in piece. Continue from bottom of body piece as before from *-* as described for front piece (first row = from RS). When piece measures 28-31-35 (37-40) cm / 11"-12¼"-13¾" (14½"-15¾") from marker (measured just before the first turn, i.e. over M.1) cut the thread. Slip the first 41-45-52 (60-65) sts towards bottom edge on a stitch holder (= the side). Cast on 36-42-46 (60-70) new sts over sts on stitch holder (i.e. before the 29-31-34 (36-39) sts left on needle) for sleeve and continue as before from *-* as described for the other sleeve. When sleeve measures the same as the left sleeve bind off 36-42-46 (60-70) sts from sleeve edge towards body piece. Cut the thread. Slip the 41-45-52 (60-65) sts from stitch holder at the side back on needle and continue from bottom of body piece as before from *-* as described for front piece (first row = RS). When right front piece measures the same as left front piece (less front band) work next row from RS as follows: K the first 23 sts, AT THE SAME TIME dec 8 sts evenly (dec 1 st by K2 tog) and K remaining 47-53-63 (73-81) sts on row = 62-68-78 (88-96) sts. Now work front band as follows (first row = from WS): K 3 rows on all sts, on next row from RS make 3 buttonholes as follows (i.e. from bottom edge towards neckline): K 41-45-53 (61-65) sts, 1 YO, K2 tog, K 7-8-9 (10-12) sts, 1 YO, K2 tog, K 7-8-9 (10-12) sts, 1 YO, K2 tog and finish with K1. Turn and K all sts on return row. Now K 5 rows on all sts and bind off loosely from RS. ASSEMBLY: Sew under arm seams, edge to edge. Sew on buttons. CROCHET BORDER: Crochet a border along bottom edge with crochet hook size 3 mm / C and white as follows: 1 sc, * ch 3, 1 dc in the first of the 3 ch, skip approx 1 cm / ⅜", 1 dc *, repeat from *-*. Crochet a similar border round both sleeves. |
||||||||||||||||||||||
Diagram explanations |
||||||||||||||||||||||
|
||||||||||||||||||||||
|
||||||||||||||||||||||
|
Have you made this or any other of our designs? Tag your pictures in social media with #dropsdesign so we can see them! Do you need help with this pattern?You'll find tutorial videos, a Comments/Questions area and more by visiting the pattern on garnstudio.com. © 1982-2024 DROPS Design A/S. We reserve all rights. This document, including all its sub-sections, has copyrights. Read more about what you can do with our patterns at the bottom of each pattern on our site. |
||||||||||||||||||||||


With over 40 years in knitting and crochet design, DROPS Design offers one of the most extensive collections of free patterns on the internet - translated to 17 languages. As of today we count 304 catalogs and 11422 patterns - 11417 of which are translated into English (US/in).
We work hard to bring you the best knitting and crochet have to offer, inspiration and advice as well as great quality yarns at incredible prices! Would you like to use our patterns for other than personal use? You can read what you are allowed to do in the Copyright text at the bottom of all our patterns. Happy crafting!
Comments / Questions (121)
K the first 15 sts, AT THE SAME TIME inc 8 sts evenly (inc1 st by making 1 YO), K remaining sts on needle = 70-76-86 (96-104) sts. Does this mean I knit the first 15 stitches then I increase the next 8 stitches then knit the remaining stitches I got confused by increase 8 stitches at the same time.
24.02.2023 - 10:28DROPS Design answered:
Dear Karen, work the first 15 stitches increasing evenly 8 stitches over these stitches ( = there are now 23 stitches on the needle), and knit the remaining stitches. Happy knitting!
24.02.2023 - 15:24Hoe brei ik de rand die aan de onderkant zit? Eerst 5 of 6 steken ribbelsteek en dan beginnen met M 1 ?
19.01.2023 - 20:11Hul mønstret til denne søde jakke forstår jeg ikke helt. Er første linje = pind 1 = fra retten anden linje= pind 2 = fra vrangen Jeg forstår det sådan, at mønstret viser både ret og vrang side? Med venlig hilsen Anieli
04.08.2022 - 14:15DROPS Design answered:
Hej Anieli, ja det stemmer diagrammet ser du fra retsiden, 1.pind (nederst) i diagrammet strikkes fra retsiden (fra højre mod venstre), 2.pind strikkes fra vrangen (fra venstre mod højre i diagrammet) Se også den video vi linkede til lidt længere ned i kommentarerne :)
05.08.2022 - 12:05Jag fick ett svar, men det gick inte att förstå, varför förklarar ni inte på svenska. Skall det stickas en kant? Startar M1 från kanten eller en bit in? I så fall var? Och videon ni skickade har inget ljud. Dåligt, tycker jag, era stickbeskrivningar är helt obegripliga.
03.08.2022 - 15:48Hej, hur får jag till M1 mönstret? På bilden det ut som att M1 stickningen är räta maskor mellan hålen, men jag får aviga maskor. Hur skall jag tolka M1? Är det varje varv jag stickar efter? Eller stickar jag ett varv från rätsida och sedan stickar jag ett rät varv tillbaka? Hur gör man, jag fattar inte.
02.08.2022 - 15:10DROPS Design answered:
Hej Ann-Mari, se här hur du stickar diagrammet: Diagram till Baby 20-12
03.08.2022 - 15:16Donc, si je comprends bien, je tricote M1, pour les 30 premières mailles et je poursuis le rang à l'endroit. Je tricote le 2 rang à l'envers et je suis le motif pour les 23 dernières mailles. Lorsque je reviens à l'endroit, je tricote les 46 mailles en suivant le motif et je tourne. C'est donc dire que je fais tout le motif sans jamais aller jusqu'au bout du rang sauf après le 1er rang du motif ? Je vous remercie vraiment beaucoup !!
08.07.2022 - 15:05DROPS Design answered:
Bonjour Line, vous tricoterez M.1 tous les rangs, sur l'endroit et sur l'envers - lisez le diagramme de droite à gauche sur l'endroit et de gauche à droite sur l'envers. Mais il sera tricoté à chaque fois car les rangs raccourcis commencent en bas, là où vous commencez par M.1, en revanche, vous ne tricoterez pas toutes les mailles point mousse à gauche, vu sur l'endroit à chaque fois à cause des rangs raccourcis. Bon tricot!
08.07.2022 - 15:57Quand on nous dit de faire le motif M-1 et en même temps, de faire les rangs raccourcis, est-ce que je suis le motif ? Je ne comprends pas vraiment comment suivre le M-1. Merci
07.07.2022 - 23:07DROPS Design answered:
Bonjour Line, les rangs raccourcis se tricotent en commençant sur l'endroit, en bas du gilet, et vous tricotez M.1 en bas du gilet, autrement dit, vous tricoterez M.1 tous les rangs, même lors des rangs raccourcis. Placez des marqueurs à l'endroit des rangs raccourcis pour mieux vous repérer - le 1er rang raccourci se tricote sur les 30 premières mailles (7 mailles après M.1 dans la 1ère taille). Bon tricot!
08.07.2022 - 10:00Ohjeen mukaan takin alareunasta ei tule sama kuin kuvassa , siinä leveämpi alareuna. Aina oikein kudottuja kerroksia heti kuviokerrosten jälkeen/edellä?\r\nTakki todella kaunis.\r\nYstävällisin terveisin leila
12.06.2022 - 09:51Ohjeen mukaan takin alareunasta ei tule sama kuin kuvassa , siinä leveämpi alareuna. Aina oikein kudottuja kerroksia heti kuviokerrosten jälkeen/edellä?\r\nTakki todella kaunis.\r\nYstävällisin terveisin leila
12.06.2022 - 09:50Hvordan kan modeller med 96 og med 104 m begge måles til 40 cm i længden( se model 14 - 6) i str. 3/4? Der slås nok 8 m op til blonden, men det ser ud til at være for, at den kan passe ind i retstrikningen. Er målene rigtige? Hvordan kan de være det? Buer jakken? Jeg er mystificeret og vil gerne have hjælp.
07.05.2022 - 12:39