
Popular categories
Looking for a yarn?


|
|
DROPS Baby 20-10 |
|
 |
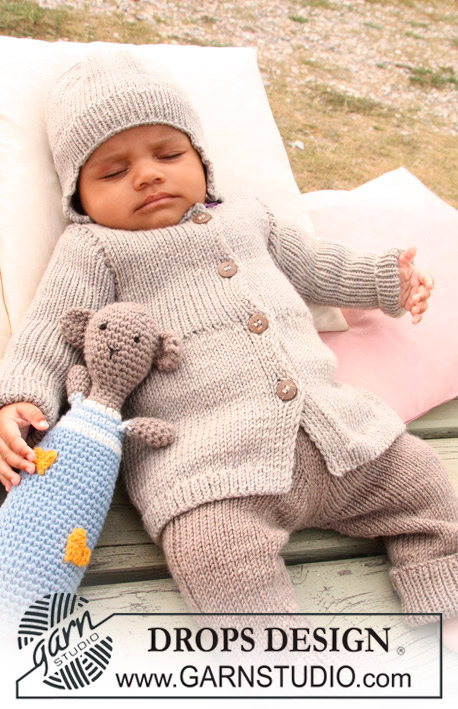 |
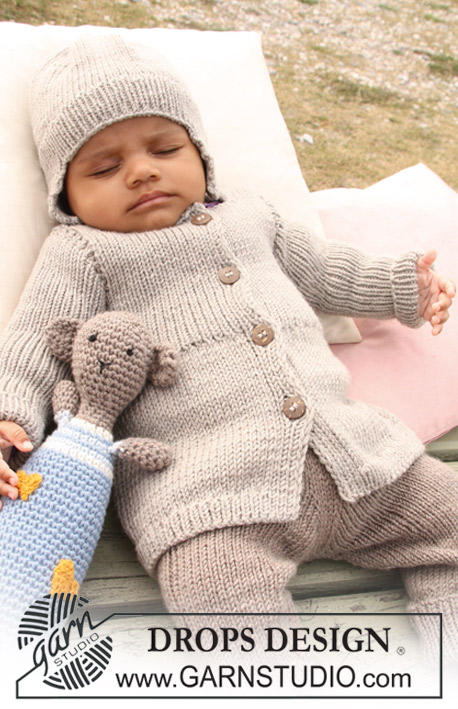
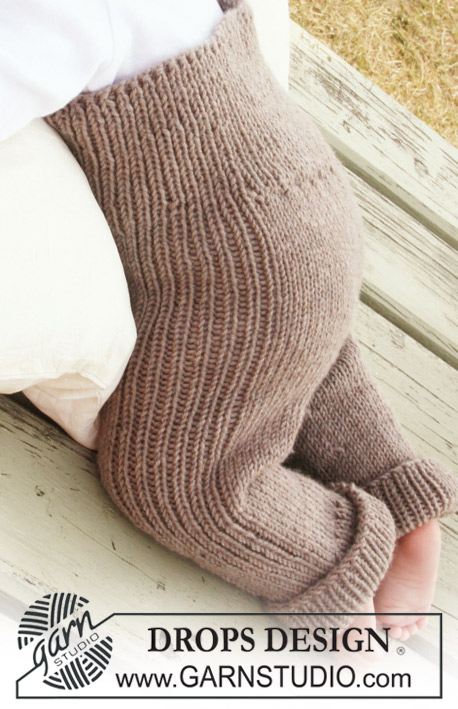
Knitted pants in with rib for baby and children in DROPS Merino Extra Fine
DROPS Baby 20-10 |
|
|
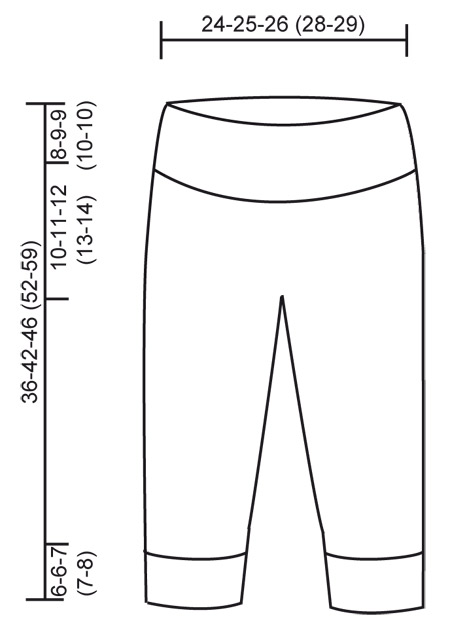
PANTS: DECREASING TIP: Dec as follows before marker: K2 tog. Dec as follows after marker: slip 1 st as if to K, K1, psso. --------------------------------------------------------- --------------------------------------------------------- PANTS: Worked in the round on needle from waist down. Cast on 110-114-118 (130-134) sts on circular needle size 3.5 mm / US 4 with light brown mix. Work rib, K1/P1 for 8-9-9 (10-10) cm / 3⅛"-3½"-3½" (4"-4"). Change to circular needle size 4.5 mm / US 7 and work next round as follows: * K1, P1 *, repeat from *-* a total of 4 times, work stockinette st on the next 39-41-43 (49-51) sts AT THE SAME TIME dec 6-6-6 (8-8) sts evenly = 33-35-37 (41-43) sts stockinette st, * P1, K1 *, repeat from *-* a total of 7 times, P1, stockinette st on the next 41-43-45 (51-53) sts AT THE SAME TIME dec 8-8-8 (10-10) sts evenly = 33-35-37 (41-43) sts stockinette st, * P1, K1 *, repeat from *-* a total of 3 times and finish with P1. There are now 96-100-104 (112-116) sts on needle. Insert 1 marker in the middle st at front and 1 marker in the middle st at back (= 47-49-51 (55-57) sts between sts with markers). Continue in the round in stockinette st and 15 sts in rib each side. REMEMBER THE GAUGE! When piece measures 11-13-14 (16-17) cm / 4⅜"-5⅛"-5½" (6¼"-6¾") inc 1 st each side of the 3 middle sts at front - inc by picking up st from previous round and K this. Repeat the inc on every other round a total of 9-9-9 (10-10) times = 114-118-122 (132-136) sts. After all inc piece measures approx 18-20-21 (23-24) cm / 7"-8"-8¼" (9"-9½"). On next round bind off the 3 middle sts at front and the 3 middle sts at back (i.e. st with marker and 1 st each side of this st) and work each leg separately. Slip the 54-56-58 (63-65) sts for one leg on a stitch holder and the 54-56-58 (63-65) sts for the other leg on double pointed needles size 4.5 mm / US 7. LEG: Continue in stockinette st in the round with 15 sts rib on the outside of leg as before – insert a marker at beg of round = inside of leg. When leg measures 2-2-2 (3-3) cm / ¾"-¾"-¾" (1⅛"-1⅛") dec 1 st on each side of marker – SEE DECREASING TIP! Repeat the dec on every 2-3-3.5 (4-5.5) cm / ¾"-1⅛"-1¼" (1½"-2¼") a total of 5 times = 44-46-48 (53-55) sts. When leg measures 12-16-18 (22-27) cm / 4¾"-6¼"-7" (8¾"-10⅝") change to double pointed needles size 3.5 mm / US 4. Work 1 round stockinette st, AT THE SAME TIME inc 4-4-6 (5-5) sts evenly – NOTE! Do not inc on rib sts at the side = 48-50-54 (58-60) sts. Continue in rib, K1/P1 in the round on all sts (make sure rib fits rib at the side). When leg measures 18-22-25 (29-35) cm / 7"-8¾"-9¾" (11⅜"-13¾") (pants measure a total of 36-42-46 (52-59) cm / 14¼"-16½"-18" (20½"-23¼") from the waist) bind off LOOSELY with K over K and P over P. Work the other leg in the same way. ASSEMBLY: Sew opening between legs. |
|
|
|
|
Have you made this or any other of our designs? Tag your pictures in social media with #dropsdesign so we can see them! Do you need help with this pattern?You'll find tutorial videos, a Comments/Questions area and more by visiting the pattern on garnstudio.com. © 1982-2024 DROPS Design A/S. We reserve all rights. This document, including all its sub-sections, has copyrights. Read more about what you can do with our patterns at the bottom of each pattern on our site. |
|


With over 40 years in knitting and crochet design, DROPS Design offers one of the most extensive collections of free patterns on the internet - translated to 17 languages. As of today we count 304 catalogs and 11422 patterns - 11417 of which are translated into English (US/in).
We work hard to bring you the best knitting and crochet have to offer, inspiration and advice as well as great quality yarns at incredible prices! Would you like to use our patterns for other than personal use? You can read what you are allowed to do in the Copyright text at the bottom of all our patterns. Happy crafting!
Comments / Questions (90)
Für mich ist nicht ganz klar, ob bei der Aufnahme von Maschen in der Mitte von vorn und hinten nur jeweils 1 Masche zugenommen wird oder li. und re. davon jeweils 1 Masche? Denn wenn es jeweils li/re 1 Masche sein soll, stimmt die Endmaschenzahl nicht mehr. Dann habe ich 18 Maschen mehr. Was ist also richtig? MfG Regina Hapka
20.07.2019 - 10:36DROPS Design answered:
Liebe Regina, Sie nehmen nur an der vorderen Mitte zu, hinten nicht (die Markierung an der hinteren Mitte wird erst beim Abketten der mittleren Maschen benötigt). Die Zunahmen erfolgen beidseitig der 3 mittleren Maschen. Sie nehmen also an der vorderen Mitte 2 Maschen zu, an der hinteren Mitte nehmen Sie keine Maschen zu. Wenn Sie dann 9x 2 Maschen zunehmen, haben Sie insgesamt 18 Maschen an der vorderen Mitte zugenommen. Viel Spaß beim Weiterstricken!
20.07.2019 - 14:24Je ne travaille pas avec les aiguilles circullaire et ma fille me demande un pantalon bebe et je suis une mamie
25.06.2019 - 08:59DROPS Design answered:
Bonjour Mme Diaz, vous trouverez ici comment adapter un modèle sur aiguilles droites, votre magasin saura vous assister, même par mail ou téléphone, n'hésitez pas à le contacter. Bon tricot!
25.06.2019 - 11:25Ecco una spiegazione chiarissima!!! Grazie ancora e buone feste!!
22.12.2018 - 23:47Intendo questo. Se il pantalone fosse realizzato solo con m. Rasata si divide il lavoro in due e si mette segnapunti nella m c'entra davanti e in quella dietro. Essendoci anche una parte di m a coste sui due lati in numero dispari, il segnapunti si può mettere nella parte di m. Rasata nel mio caso 41 m., Cioè lavoro 20 m rasata metto segnapunti e lavoro altre 2o m e altro segnapunti nell'altra parte di m rasata. Grazie
22.12.2018 - 20:34DROPS Design answered:
Buonasera Paola. Deve mettere il segnapunti nella maglia centrale delle 41 maglie lavorate a maglia rasata. Quindi lavora 20 m a m rasata, nella maglia successiva mette il segnapunti, altre 20 m a m rasata. Sia per il davanti che per il dietro. Buon lavoro!
22.12.2018 - 22:07Intendo questo. Se il pantalone fosse realizzato solo con m. Rasata si divide il lavoro in due e si mette segnapunti nella m c'entra davanti e in quella dietro. Essendoci anche una parte di m a coste sui due lati in numero dispari, il segnapunti si può mettere nella parte di m. Rasata nel mio caso 41 m., Cioè lavoro 20 m rasata metto segnapunti e lavoro altre 2o m e altro segnapunti nell'altra parte di m rasata. Grazie
22.12.2018 - 20:33Quale è la mia. Centrale sul davanti dove inserire il segnapunti dato che ci sono anche 15 m. A coste x ogni lato. Grazie mille
22.12.2018 - 19:22DROPS Design answered:
Buonasera Paola, può spiegarci meglio il suo problema? Buon lavoro!
22.12.2018 - 20:11Hej Jeg er næsten færdig med model baby 20-10. Jeg strikker den største størrelse 4 år. Til min store overraskelse er der ikke garn nok. Der mangler ca 10 m. Strikkefastheden passer. Det har jeg aldrig oplevet før. Og jeg har strikket i mange år. Hvordan kan det være, at opskriftens garnforbrug ikke passer? Og jeg har ikke lange ender, men økonomiseret med garnet? Nu har jeg måttet købe et ekstra nøgle garn. Det er jo en julegave. Mvh Birthe
20.12.2018 - 10:05DROPS Design answered:
Hej Birthe, der burde være nok garn, og vi har ikke fået kommentarer på det tidligere, så det er svært at svare på. Vi noterer din kommentar og får vi flere så skal vi se på det og lave en rettelse. Tak for information og rigtig god jul :)
20.12.2018 - 10:55Ik kan het patroon niet afdrukken, als ik klik op de pijl boven de foto van de alpacawol springt de pagina dadelijk weer terug zonder dat ik kans krijg om af te drukken
01.12.2018 - 17:50Hi! Ik snap dit gedeelte niet: “Ga verder in de rondte in tricotst met 15 st in boordsteek aan iedere zijkant.” Betekend dit dat ik (voor maat 12-18maanden) de eerste 15 steken boordsteek doe, de tussenliggende 47 steken tricot en tot slot de laatste 15 steken weer in boordsteek? En waarom staat er daarna LET OP STEKENVERHOUDING? Dank!!! Sanne
07.11.2018 - 01:23Ich glaube schon von mir behaupten zu können, dass ich eine erfahrene Strickerin bin und mich erfolgreich durch viele kniffelige Anleitungen gearbeitet habe, aber diese unverständliche Anleitung macht mir zu schaffen. \r\nEs geht doch wesentlicher einfacher! \r\n\"* 1 re., 1 li. *, von *-* total 4 Mal wiederholen\" Warum schreiben Sie nicht 8 Maschen 1 re., 1 li.?\r\nUnd der Zwickel??????? \r\nHoffentlich lohnt sich der Aufwand.\r\nLieben Gruß
29.10.2018 - 09:34