
Popular categories
Looking for a yarn?


|
|
DROPS 78-17 |
|
 |
 |
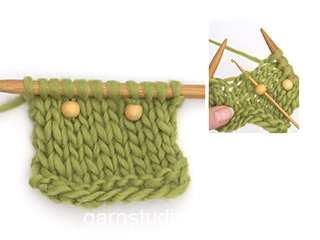
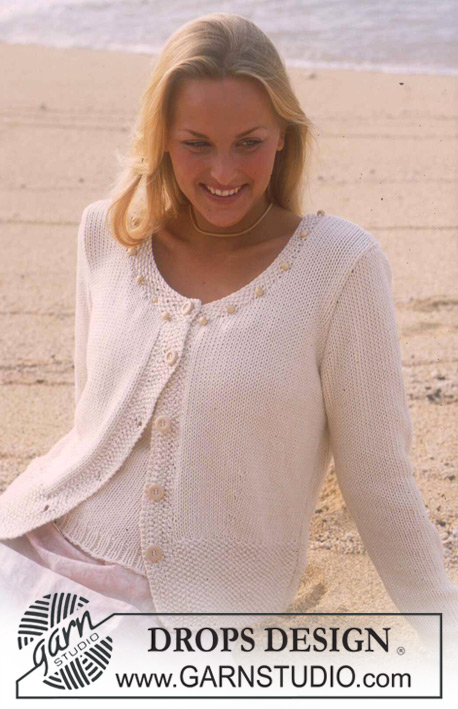
DROPS Cardigan in Paris with beads and seed stitch
DROPS 78-17 |
|
|
CARDIGAN: Gauge: 17 sts x 22 rows = 10 x 10 cm in stockinette st. Seed Stitch (on an even number of sts): Row 1: * K 1, P 1 * Row 2: * P 1, K 1 * Repeat Rows 1-2. Bead pattern: The pattern is knit in seed st with 1 bead knit in every 5 sts. BACK Cast on 72-79-87-96-103 sts and knit seed st. When the piece measures 10-12-12-14-14 cm put a marker 22-25-28-32-35 sts in from each side (= 28-29-31-32-33 sts between markers) and change to stockinette st. At the same time when the piece measures 10-12-14-17-17 cm inc 1 st after 1st marker and 1 st before 2nd marker (seen from the right side) - inc by pulling up sts from previous row. Inc every 6 rows a total of 4-4-3-2-2 times = 80-87-93-100-107 sts. When the piece measures 35-36-37-38-39 cm bind off for armhole at each side every other row: 4 sts 1 time, 3 sts 0-0-1-1-2 times, 2 sts 1-2-2-3-3 times and 1 st 3-4-3-4-4 times = 62-63-65-66-67 sts. When the piece measures 50-52-54-56-58 cm bind off the center 22-23-25-26-27 sts for the neck. Then bind off at each neck edge every other row: 2 sts 2 times and 1 st 2 times = 14 sts remain on each shoulder. Bind off when the piece measures 54-56-58-60-62 cm. LEFT FRONT Cast on 40-44-48-52-56 sts and knit seed st. When the piece measures 10-12-12-14-14 cm put a marker 22-25-28-32-35 sts in from side edge = 18-19-20-20-21 sts at the center front. Work stockinette st, but keep 7 sts at center front edge in seed st for buttonband. At the same time when the piece measures 10-12-14-17-17 cm inc 1 st at center front side of the marker the same as on back. Inc every 6 rows a total of 4-4-3-2-2 times = 44-48-51-54-58 sts. When the piece measures 35-36-37-38-39 cm bind off for armhole at the side as on back = 35-36-37-37-38 sts. When the piece measures 39-40-42-43-45 cm put 11 sts at the center front on a st holder for the neck. Then bind off for the neck every other row: 3 sts 1 time, 2 sts 2 times and 1 st 3-4-5-5-6 times = 14 sts remain on shoulder. Bind off when the piece measures 54-56-58-60-62 cm. RIGHT FRONT Cast on and knit the same as the left, reversing all shaping. Make buttonholes along buttonband. 1 buttonhole = K tog the 3rd and 4th sts from edge, yo. Make buttonhole when the piece measures: Size S: 10, 18, 26 and 34 cm. Size M: 12, 20, 28 and 35 cm. Size L: 12, 20, 28 and 36 cm. Size XL: 14, 22, 30 and 38 cm. Size XXL: 14, 22, 31 and 39 cm. Note: the last buttonhole will be made in neckband. SLEEVE Cast on 42-42-42-47-47 sts and knit seed st. When the piece measures 4 cm cut yarn and thread 8-8-9-9-9 beads on yarn and knit 1 row Bead pattern - see instructions above. Then continue with stockinette st to finished measurements. At the same time when the piece measures 11 cm inc 1 st at each side every 4-3-3-3-2.5 cm a total of 9-11-12-11-13 times = 60-64-66-69-73 sts. When sleeve measures 47-45-45-43-42 cm bind off for sleeve cap at each side every other row: 3 sts 1 time, 2 sts 3-2-2-2-2 times and 1 st 2-5-6-9-12 times, then bind off 2 sts at each side until the piece measures 55-55-56-56-57 cm, then bind off 3 sts at each side 1 time. The piece measures approx. 56-56-57-57-58 cm, bind off the remaining sts. ASSEMBLY Sew shoulder seams. Neckband: Thread in 19 beads – these will not be used until 2nd row, so push back (alternatively, you can cut yarn and thread the beads in after 1st row of seed st). Pick up approx. 95-105 sts (divisible by 5, incl. sts on st holders) around the neck (including over button bands). Knit seed st for 1 row, then knit 1 row Bead pattern - see instructions above. Do not put beads over buttonband – the 1st bead should be placed in the 1st st after the 7 buttonband sts. See that each side matches at center front – use 17-19 beads. Then continue in seed st without beads. At the same time after 2 cm make 1 buttonhole over the others on right buttonband. Bind off in pattern when neckband measures 4 cm. Sew in sleeves. Sew sleeve and side seams using edge sts as a seam allowance. Sew on buttons. ---------------------------------------------------------- TOP – click here: pattern no 78-30 ---------------------------------------------------------- |
|

|
|
|
Have you made this or any other of our designs? Tag your pictures in social media with #dropsdesign so we can see them! Do you need help with this pattern?You'll find tutorial videos, a Comments/Questions area and more by visiting the pattern on garnstudio.com. © 1982-2024 DROPS Design A/S. We reserve all rights. This document, including all its sub-sections, has copyrights. Read more about what you can do with our patterns at the bottom of each pattern on our site. |
|


With over 40 years in knitting and crochet design, DROPS Design offers one of the most extensive collections of free patterns on the internet - translated to 17 languages. As of today we count 304 catalogs and 11422 patterns - 11417 of which are translated into English (US/in).
We work hard to bring you the best knitting and crochet have to offer, inspiration and advice as well as great quality yarns at incredible prices! Would you like to use our patterns for other than personal use? You can read what you are allowed to do in the Copyright text at the bottom of all our patterns. Happy crafting!
Comments / Questions (14)
Hallo , danke für die Info wegen der Perlengröße. Jetzt möchte ich aber gerne noch wissen, was es heißt bei den Ärmeln „ gegen die Schulter abketten“? Musst ich die Maschen auf beiden Seiten des Ärmels abketten? Vielen Dank für die Antwort. Elke
18.09.2023 - 23:24DROPS Design answered:
Liebe Elke, ja genau, jetzt ketten Sie die Maschen am Anfang jeder Reihe (Hin- sowie Rückreihe) ab, damit das Ermetopp symmetrisch wird. Viel Spaß beim stricken!
19.09.2023 - 09:24Hallo, ich hätte gerne gewusst, welchen Durchmesser in mm die Hilzperlen haben. Viele Grüße Elke
30.08.2023 - 22:24DROPS Design answered:
Liebe Elke, die Perlen waren ca 9 x 11 mm. Viel Spaß beim stricken!
31.08.2023 - 09:17Name it Fairy Floss cardigan!
11.06.2021 - 14:27Je voudrais les explications pour le top à bretelles merci
02.05.2021 - 18:32DROPS Design answered:
Bonjour Mme Kraft, vous trouverez les explications du débardeur ici. Bon tricot!
03.05.2021 - 08:51Me encanta sus tejidos 🧶 es mi página favorita
10.04.2019 - 20:50BONJOUR j'ai fait le demi devant comme vous me l'avait explique je ne comprends pas j'ai mis en attente les 11 m cote droit de ces m en att j'ai diminue comme indique mais il me reste qu'une m est ce que c'est normal en regardant le schema cela ne fait pas pareil pouvez vous m'aidez merci
30.04.2016 - 13:55DROPS Design answered:
Bonjour Mme Pautrot, vous trouverez ici un tuto en images expliquant comment faire pour l'encolure, en taille XXL, vous avez 38 m après les dim. de l'emmanchure - 11 m en attente - 1x3 m - 2x2m - 6x1m = il reste 14 m pour l'épaule. Bon tricot!
02.05.2016 - 09:28Bonjour j'ai fait un demi devant comme vous me l'avait explique est ce que c'est normal qu'a la fin il ne reste plus qu'une maille ou j'ai mal compris pouvez vous m"aider merci
30.04.2016 - 13:18Bonjour je ne comprends pas vos explications pour les manches combien il reste de mailles que l'on doit rabattre a la fin de la manches a 57 cm cela n'est pas indiquer merci de me répondre
26.03.2016 - 12:40DROPS Design answered:
Bonjour Mme Pautrot, pour l'arrondi des manches, rabattez de chaque côté tous les 2 rangs: 1 fois 3 m, puis 2 fois 2 m et 12 fois 1 m. Rabattez ensuite 2 m au début de chaque rang de chaque côté jusqu'à ce que la manche mesure 57 cm de hauteur totale (le nbe de rangs/de diminution dépend de votre nbe de rangs nécessaire pour avoir cette hauteur, veillez à bien rabattre le même nombre de mailles de chaque côté - sur l'endroit et sur l'envers), et terminez en rabattant 1 fois 3 m de chaque côté. Bon tricot!
29.03.2016 - 11:51Bonjour pouvez vous m'aider je suis désolée je ne comprends pas pour le dos du gilet qu'elle diminutions dois je faire pour les emmanchures et l'encolure merci bonne journée
15.03.2016 - 09:41DROPS Design answered:
Bonjour Mme Pautrot, pour les emmanchures, on rabat 1 x 4 m, 0-0-1-1-2 x 3 m (et non 4 m, correction faite), 1-2-2-3-3 x 2 m et 3-4-3-4-4 x 1 m de chaque côté tous les 2 rangs pour le dos (= au début de chaque rang de chaque côté). Puis pour l'encolure, rabattez les 23-24-25-26-27 m centrales, continuez chaque épaule séparément en rabattant au début de chaque rang à partir de l'encolure: 2 x 2 m et 2x 1 m= il reste 14 m pour l'épaule. Bon tricot!
15.03.2016 - 10:01Bonjour desolée je ne comprends pas vos explications pourquoi mettre les 11 m du milieu en attente pour les devants et je ne comprends pas non plus les manches pour aug et dim en xxl merci de m'aider
23.02.2016 - 17:46DROPS Design answered:
Bonjour Mme Pautrot, on met en attente 11 m côté encolure pour chaque devant, on rabat ensuite côté encolure tous les 2 rangs : 1 fois 3 m, 2 fois 2 m et 6 fois 1 m - Quand on fera le col, on reprendra ces 11 m de chaque côté + on relève les mailles le long de l'encolure (mailles rabattues et fins de rang) - Pour les manches, augmentez 13 fois 2 m (1 de chaque côté) tous les 2,5 cm et rabattez pour l'arrondi tous les 2 rangs de chaque côté: 1 x 3 m, 2 x 2 m, 12 x 1 m puis 2 m jusqu'à ce que la manche mesure 57 cm de hauteur totale, puis 1 x 3 m.Bon tricot!
24.02.2016 - 10:47