
Popular categories
Looking for a yarn?


|
||||||||||||||||
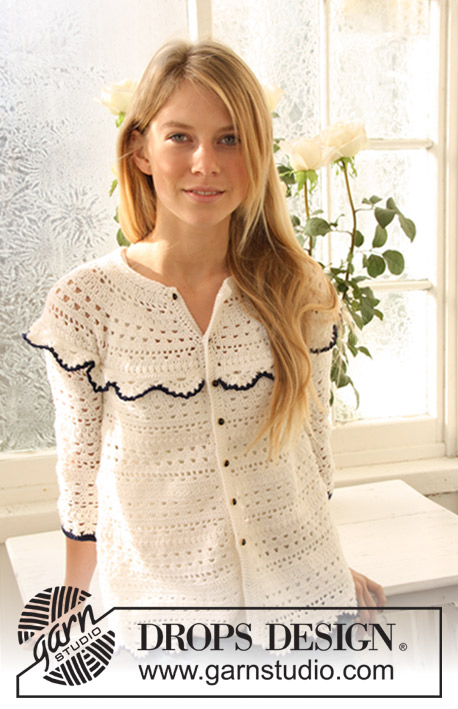
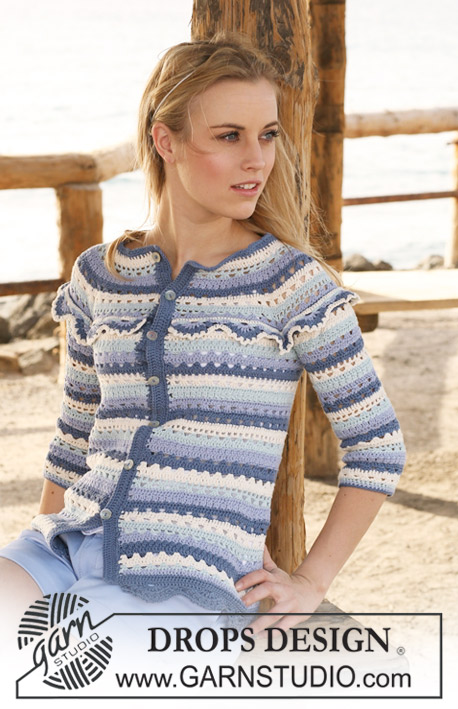
Afternoon Romance |
||||||||||||||||
 |
 |
|||||||||||||||
Crochet DROPS jacket with stripes and lace pattern in ”Safran”. Size XS - XXL.
DROPS 120-60 |
||||||||||||||||
|
PATTERN: See diagram M.1 to M.3. STRIPES: Crochet stripes as follows: * 1 row off-white, 2 rows ice blue, 2 rows light blue/purple, 2 rows denim blue, 1 row off-white *, repeat from *-*. INCREASING TIP-1: Make all inc on rows in diagram with tr only (= row 1, 4, 6 or 8). Inc by working 2 tr in 1 tr. INCREASING TIP-2: Inc 1 dc by working 2 dc in 1 dc. DECREASING TIP: Make all dec on rows in diagram with tr only (= row 1, 4, 6 or 8). Dec 1 tr by working 1 tr but wait with the last pull-through (= 2 sts on hook). Crochet next tr but when doing the last pull-through pull thread through all sts on hook. 1 dec tr. CROCHET TIP: Replace 1 tr with 3 ch and 1 dc with 1 ch at beg of row. -------------------------------------------------------- -------------------------------------------------------- WHITE JACKET: Crochet the jacket the same way as the striped jacket but without stripes. On the sleeves crochet the 2 last rows with dc with navy blue. On lace borders crochet last row in M.3 with navy blue. STRIPED JACKET YOKE: Jacket is crochet from top down, back and forth from mid front. READ ALL OF THIS SECTION BEFORE BEG! Crochet 139-150-160-171-182-192 ch with crochet hook size 3 mm and off-white. Crochet 1 tr in 4th ch from hook and continue as follows: * skip 1 ch, crochet 1 tr in each of the next 3 ch *, repeat from *-* and finish with skip 1 ch and 1 tr in each of the last 2-1-3-2-1-3 ch = 103-111-119-127-135-143 tr. Turn piece. Work next row as follows (beg on row marked 1 in M.1): M.1A, repeat M.1B 12-13-14-15-16-17 times and finish with M.1C. AT THE SAME TIME crochet STRIPES - see above. AT THE SAME TIME on row 1 in diagram inc 32 tr evenly - see INCREASING TIP-1 = 135-143-151-159-167-175 tr. Repeat the inc on row 4 = 167-175-183-191-199-207 tr, on row 6 = 199-207-215-223-231-239 tr and on row 8 = 231-239-247-255-263-271 tr. Continue in M.1 and Stripes. AT THE SAME TIME on row 10 inc 40-48-32-32-32-32 tr evenly = 271-287-279-287-295-303 tr. SIZE XS + S: Continue in M.1 and Stripes until row 13-14 inclusive. Piece now measures approx 12-13 cm. SIZE M: Continue in M.1 and Stripes. AT THE SAME TIME on row 13 inc 32 tr evenly = 311. Continue to row 16 inclusive. Piece now measures approx 14 cm. SIZE L + XL: Continue in M.1 and Stripes. AT THE SAME TIME on row 13 inc 24-32 tr evenly = 311-327 tr, and on row 15 inc 32-40 tr evenly = 343-367 tr. Continue to row 17 inclusive. Piece now measures approx 15-16 cm. Size XXL: Continue in M.1 and Stripes. AT THE SAME TIME on row 13 inc 32 tr evenly = 335 tr, and on row 15 inc 32 tr evenly = 367 tr, and on row 17 inc 40 tr evenly = 407 tr. Continue to row 19 inclusive. Piece now measures approx 17 cm. BODY PIECE: Insert a marker, and now measure piece from here. Continue with Stripes as before and crochet next row as follows (from mid front) – see CROCHET TIP: Crochet 1 tr in each of the first 37-40-43-49-53-59 sts, skip 60-62-68-72-76-84 sts, crochet 16-18-20-20-28-28 ch, crochet 1 tr in each of the next 77-83-89-101-109-121 sts (= back piece), skip 60-62-68-72-76-84 sts, crochet 16-18-20-20-28-28 ch, crochet 1 tr in each of the last 37-40-43-49-53-59 sts. There are now a total of 183-199-215-239-271-295 sts on round. Continue in Stripes and M.2 as follows (NOTE! beg on row 2 in diagram): M.2C, M.2B on the next 176-192-208-232-264-288 sts, M.2A. Continue like this until piece measures approx 15 cm from marker (adjust so that next row in M.2 is a row with tr only). Now inc 8 tr evenly - see INCREASING TIP-1 – and repeat the inc on approx every 6 cm a total of 4 times = 215-231-247-271-303-327 sts. When all inc are complete piece measures approx 33 cm from marker. Continue in M.2 and Stripes until stripe pattern is completed. Now continue in M.2 and crochet the next 3 stripes as follows: 1 row off-white, 1 row ice blue, 1 row light blue/purple. Now crochet 1 row denim blue, AT THE SAME TIME inc 4-5-6-16-1-11 tr evenly = 219-236-253-287-304-338 tr. LACE BORDER: Now crochet a border along bottom edge with denim blue as follows: Crochet M.3 on all sts. NOTE! Beg on row marked 1 in diagram, on the last repeat crochet on the remaining 15 sts to make pattern identical both sides towards mid front. See CROCHET TIP! After M.3 cut and fasten thread. LACE BORDER ON YOKE: Beg mid front with denim blue. Crochet 1 dc in each tr round the last row on yoke = 271-287-311-343-367-407 dc. Continue in M.3, beg on row marked 1 in diagram and AT THE SAME TIME on first row inc 50-51-44-46-56-50 dc evenly - see INCREASING TIP = 321-338-355-389-423-457 dc. NOTE! On the last repeat crochet on the remaining 15 sts to make pattern identical both sides towards mid front. AT THE SAME TIME crochet stripes as follows: row 1: off-white, row 2: ice blue, row 3: light blue/purple, row 4: denim blue, row 5: off-white. After M.3 cut and fasten thread. SLEEVE: Sleeve is worked back and forth under lace border on yoke. Continue with Stripes and M.2 as on body piece. NOTE! Cut the thread for each stripe, thread end to be used when sewing sleeve seam tog. First part of sleeve is sewn to the edge under sleeve on body piece – see ASSEMBLY. Crochet 63-63-71-79-79-87 tr with denim blue on sleeve under lace border in the same sts in which lace border was crochet (i.e. crochet in the 60-62-68-72-76-84 tr skipped on body piece, at the same time inc 3-1-3-7-3-3 tr evenly). Insert a marker, and measure sleeve from here. Continue back and forth in Stripes as follows: M.2A, repeat M.2B on the next 56-56-64-72-72-80 sts, M.2C. AT THE SAME TIME when piece measures approx 7 cm from marker (adjust to a row in M.2 with tr only) dec 4 tr evenly - see DECREASING TIP = 59-59-67-75-75-83 tr. Continue as before. When sleeve measures approx 25 cm from marker (adjust to a row in M.2 with tr only) dec 4 tr evenly = 55-55-63-71-71-79 tr. Continue in Stripes and M.2 until there are 4 vertical repeats of M.2, sleeve now measures approx 33 cm from marker. Now crochet 1 tr in each tr with ice blue, then 1 dc in each tr with light blue/purple, and then 1 row denim blue with 1 dc in each dc. Cut and fasten thread. Crochet the other sleeve in the same way. LEFT FRONT BAND: Beg at the top of left front piece. Crochet with crochet hook size 3 mm and denim blue as follows - see CROCHET TIP: Crochet 1 dc in corner and continue down along front piece as follows * 1 ch, skip approx 0.5 to 1 cm, 1 dc * repeat from *-* and finish with 1 dc at bottom of front piece before lace border. Turn piece. Crochet 1 tr in each dc and in each ch back to neckline. Turn piece. Crochet 1 tr in each tr. Turn piece. Crochet 1 dc in each tr back to neck. Cut and fasten thread. RIGHT FRONT BAND: Crochet like left front band, but mirrored, i.e. beg at bottom edge. NECKLINE: Beg mid front, in corner on right front band. Crochet with crochet hook size 3 mm and denim blue on front band and continue round neck as follows: 1 dc, * 1 ch, skip approx 0.5 to 1 cm, 1 dc *, repeat from *-* and finish with 1 dc in corner on left front piece. Turn piece. Crochet 1 dc in each ch and 1 ch over each dc round neck. Turn piece. Crochet 1 dc in each ch and 1 ch over each dc. Turn piece. Crochet 1 dc in each ch and 1 ch in each dc round neck until 30 sts remain on right front piece (= 15 dc and 15 ch). Turn piece. Crochet 1 dc in each ch and 1 ch over each dc round the neck until 30 sts remain on left front piece. Turn piece. Crochet 1 dc in each ch and 1 ch over each dc round neck until 50 sts remain on right front piece (= 25 dc and 25 ch). Turn piece. Crochet 1 dc in each ch and 1 ch over each dc until 50 sts remain on left front piece. Cut the thread. Beg mid front on right front piece. Crochet 1 dc in each ch and 1 ch over each dc round the whole neck to mid front on left front piece. Cut and fasten thread. ASSEMBLY: Sew under arm seam tog, edge to edge, with thread ends from colour changes. Sew the top 3.5-4-4.5-4.5-6-6 cm to the edge under sleeve on body piece. Sew buttons to left front band. Place the top button approx 1 cm from top of neckline, the bottom one approx 9 to 12 cm from bottom edge and the remaining 5 with approx 6.5-7-7-7-7.5-7.5 cm between each. Use second tr row on right front band as buttonholes |
||||||||||||||||
Diagram explanations |
||||||||||||||||
|
||||||||||||||||

|
||||||||||||||||
|
||||||||||||||||
|
Have you made this or any other of our designs? Tag your pictures in social media with #dropsdesign so we can see them! Do you need help with this pattern?You'll find tutorial videos, a Comments/Questions area and more by visiting the pattern on garnstudio.com. © 1982-2024 DROPS Design A/S. We reserve all rights. This document, including all its sub-sections, has copyrights. Read more about what you can do with our patterns at the bottom of each pattern on our site. |
||||||||||||||||


With over 40 years in knitting and crochet design, DROPS Design offers one of the most extensive collections of free patterns on the internet - translated to 17 languages. As of today we count 304 catalogues and 11422 patterns - 11422 of which are translated into English (UK/cm).
We work hard to bring you the best knitting and crochet have to offer, inspiration and advice as well as great quality yarns at incredible prices! Would you like to use our patterns for other than personal use? You can read what you are allowed to do in the Copyright text at the bottom of all our patterns. Happy crafting!
Comments / Questions (75)
Bonjour Je suis coincée. Comment relever (repiquer) les mailles pour faire la bordure ajourée le long de l'empiècement . Merci pour votre réponse
15.07.2013 - 13:32DROPS Design answered:
Bonjour Josiane, la bordure M.3 se crochète dans les mailles du rang 1 de M.1. Piquez le crochet dans toutes les brides de ce rang, même celles qui ont été crochetées pour l'empiècement (dans certaines brides, vous aurez ainsi 2 brides). Bon crochet !
15.07.2013 - 13:48Sorry, ik voel me een beetje lastig, maar...worden er misschien halve stokjes bedoeld (double crochet), in plaats van stokjes? Dan kom ik namelijk na 12 toeren wel uit op 10 cm. hoogte. Ik heb ook bij de andere proeflapjes strak gehaakt, in verschillende naalddiktes. Ook na het wassen worden dan 12 toeren echt geen 10 cm.!
28.05.2013 - 16:07DROPS Design answered:
Hoi Veerle. Het patroon is correct. Ik heb vanochtend zelf een proeflapje gehaakt en kom uit op de juiste afmetingen. Waarom het bij jouw niet lukt kan ik helaas niet zeggen.
29.05.2013 - 13:29Bedankt voor de snelle reactie! Ik heb inderdaad een proeflapje gemaakt. Ik heb het ook met één en anderhalve naald kleiner gemaakt, maar kom dan steeds op bijna hetzelfde. De breedte klopt wel met 23 steken, maar ik zit op ongeveer een centimeter per toer in de hoogte. Ik heb het proeflapje steeds in het patroon gehaakt. Moet ik misschien alleen gewone 'enkele' steken haken? Bedankt voor uw reactie!
28.05.2013 - 13:15DROPS Design answered:
Hoi Veerle. Je moet het proeflapje haken in het patroon (M.1). En probeer dan de stk wat strakker te haken.
28.05.2013 - 14:57Als ik het aangerade nummer haaknaald en Safran gebruik, kom ik al met 10 toeren in het patroon op 10 cm. hoogte. Wat doe ik verkeerd? Of klopt er misschien iets niet in de omschrijving?
27.05.2013 - 18:39DROPS Design answered:
Hoi Veerle. Het patroon klopt. Het nummer haaknaald is een voorstel. Kies de haaknld, die je nodig hebt voor de juiste stekenverhouding voor het patroon. Haak daarom altijd een proeflapje (ook een goed idee om deze te wassen!) om zeker te zijn van de nld.
28.05.2013 - 11:26Hvad menes der med "på den sidste rapp hækles der over de resterende 15 m så mønsteret bliver symetrisk mod midt foran" under afsnittet blondekant? Jeg forstår ikke, hvad det er for nogle 15 masker, der er tale om. Skal M3 ikke bare hækles over alle masker?
16.04.2013 - 20:17DROPS Design answered:
Det er så at blondekanten bliver ens (spejlvendt) midt foran. Dvs, at når du har 15 m til overs på kanten, da starter du forfra på M.3 (hvis du ikke allerede er der) og hækler de første 15 m af M.3. Så er kanten ens på begge sider af midt foran.
30.04.2013 - 15:49Bonjour, pour la bordure ajourée doit t'on faire motif par motif où travailler rang par rang a l'horizontale ? Merci beaucoup
09.02.2013 - 21:33DROPS Design answered:
Bonjour Madame Ambros, la bordure ajourée se fait en rang, sur toutes les mailles. Bon crochet !
11.02.2013 - 10:16Bonjour, j'ai une question au niveau du "dos et devants", lorsque je crochete les 18 mailles en l'air (taille S), je me retrouve donc avec une "chainette" de 18 mailles et je ne comprends pas comment continuer mon ouvrage en faisant des brides dans les mailles suivantes.... Merci infiniment pour votre aide
03.02.2013 - 21:28DROPS Design answered:
Bonjour Madame Petit, ces 2 chaînettes de 18 ml correspondent aux emmanchures et sont faites entre chacun des devants et le dos : Vous crochetez en B sur les mailles du devant, puis 18 ml, vous crochetez 1 B dans chacune des mailles du dos, puis 18 ml et vous terminez par 1 B dans chacune des mailles du 2ème devant. Bon crochet !
04.02.2013 - 10:15Hvad betyder mellemrummet mellem maskerne, fx på række 2 i M1?
16.01.2013 - 18:05DROPS Design answered:
Det betyder ingenting, det er bare for at faa diagrammet til at blive paent og lige i bredden.
16.01.2013 - 18:20Bonjour, je suis aussi coincée pour l'empiècement et ces 32 brides que l'on doit rajouter à certains rangs du diagramme.Pourriez-vous m'expliquer si ces 32 brides à répartir sur le rang doivent être réparties symétriquement par rapport au centre du rang (donc 16 ml à rajouter au début et 16 à la fin) ou seulement en fin de rang? Merci beaucoup d'avance!
13.12.2012 - 23:31DROPS Design answered:
Bonjour Madame Marteau, on augmente 32 B au 1er rang du diagramme comme indiqué dans le § Augmentations 1, c'est-à-dire, en crochetant 2 B dans une seule à intervalles réguliers, 32 fois au total = on a 32 B en plus. Bon crochet !
14.12.2012 - 09:49When you do the increases, do you just randomly add 32sc in the designated rows. I'm so stuck on the yoke and the increasing, please help.
11.09.2012 - 05:41