
Popular categories
Looking for a yarn?


|
||||||||||||||||
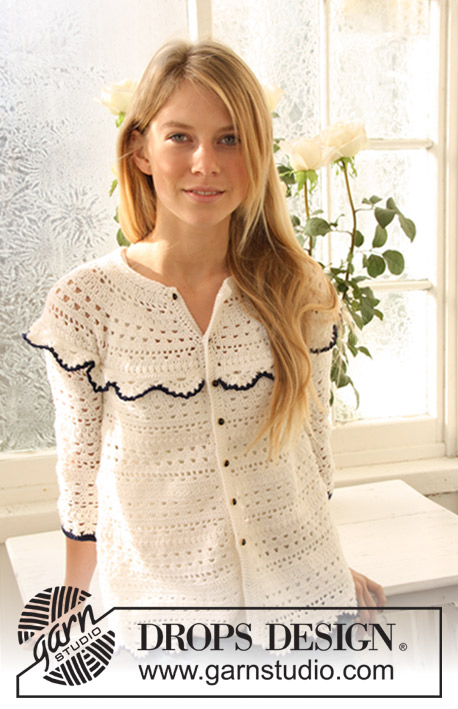
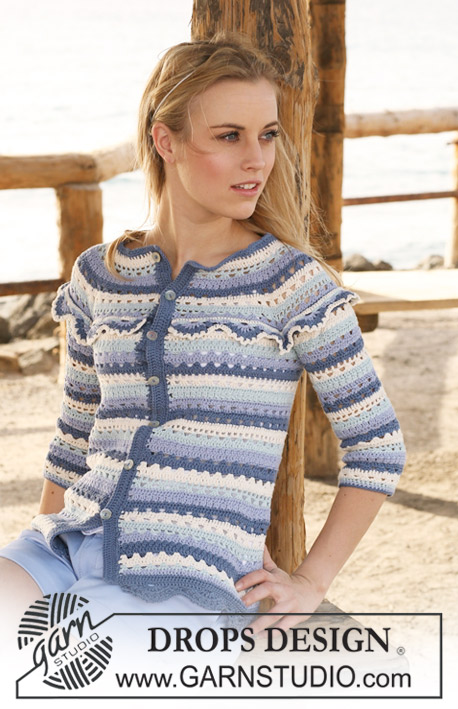
Afternoon Romance |
||||||||||||||||
 |
 |
|||||||||||||||
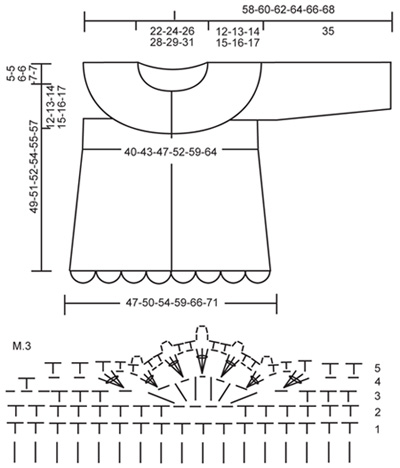
Crochet DROPS jacket with stripes and lace pattern in ”Safran”. Size XS - XXL.
DROPS 120-60 |
||||||||||||||||
|
PATTERN: See diagram M.1 to M.3. STRIPES: Crochet stripes as follows: * 1 row off-white, 2 rows ice blue, 2 rows light blue/purple, 2 rows denim blue, 1 row off-white *, repeat from *-*. INCREASING TIP-1: Make all inc on rows in diagram with tr only (= row 1, 4, 6 or 8). Inc by working 2 tr in 1 tr. INCREASING TIP-2: Inc 1 dc by working 2 dc in 1 dc. DECREASING TIP: Make all dec on rows in diagram with tr only (= row 1, 4, 6 or 8). Dec 1 tr by working 1 tr but wait with the last pull-through (= 2 sts on hook). Crochet next tr but when doing the last pull-through pull thread through all sts on hook. 1 dec tr. CROCHET TIP: Replace 1 tr with 3 ch and 1 dc with 1 ch at beg of row. -------------------------------------------------------- -------------------------------------------------------- WHITE JACKET: Crochet the jacket the same way as the striped jacket but without stripes. On the sleeves crochet the 2 last rows with dc with navy blue. On lace borders crochet last row in M.3 with navy blue. STRIPED JACKET YOKE: Jacket is crochet from top down, back and forth from mid front. READ ALL OF THIS SECTION BEFORE BEG! Crochet 139-150-160-171-182-192 ch with crochet hook size 3 mm and off-white. Crochet 1 tr in 4th ch from hook and continue as follows: * skip 1 ch, crochet 1 tr in each of the next 3 ch *, repeat from *-* and finish with skip 1 ch and 1 tr in each of the last 2-1-3-2-1-3 ch = 103-111-119-127-135-143 tr. Turn piece. Work next row as follows (beg on row marked 1 in M.1): M.1A, repeat M.1B 12-13-14-15-16-17 times and finish with M.1C. AT THE SAME TIME crochet STRIPES - see above. AT THE SAME TIME on row 1 in diagram inc 32 tr evenly - see INCREASING TIP-1 = 135-143-151-159-167-175 tr. Repeat the inc on row 4 = 167-175-183-191-199-207 tr, on row 6 = 199-207-215-223-231-239 tr and on row 8 = 231-239-247-255-263-271 tr. Continue in M.1 and Stripes. AT THE SAME TIME on row 10 inc 40-48-32-32-32-32 tr evenly = 271-287-279-287-295-303 tr. SIZE XS + S: Continue in M.1 and Stripes until row 13-14 inclusive. Piece now measures approx 12-13 cm. SIZE M: Continue in M.1 and Stripes. AT THE SAME TIME on row 13 inc 32 tr evenly = 311. Continue to row 16 inclusive. Piece now measures approx 14 cm. SIZE L + XL: Continue in M.1 and Stripes. AT THE SAME TIME on row 13 inc 24-32 tr evenly = 311-327 tr, and on row 15 inc 32-40 tr evenly = 343-367 tr. Continue to row 17 inclusive. Piece now measures approx 15-16 cm. Size XXL: Continue in M.1 and Stripes. AT THE SAME TIME on row 13 inc 32 tr evenly = 335 tr, and on row 15 inc 32 tr evenly = 367 tr, and on row 17 inc 40 tr evenly = 407 tr. Continue to row 19 inclusive. Piece now measures approx 17 cm. BODY PIECE: Insert a marker, and now measure piece from here. Continue with Stripes as before and crochet next row as follows (from mid front) – see CROCHET TIP: Crochet 1 tr in each of the first 37-40-43-49-53-59 sts, skip 60-62-68-72-76-84 sts, crochet 16-18-20-20-28-28 ch, crochet 1 tr in each of the next 77-83-89-101-109-121 sts (= back piece), skip 60-62-68-72-76-84 sts, crochet 16-18-20-20-28-28 ch, crochet 1 tr in each of the last 37-40-43-49-53-59 sts. There are now a total of 183-199-215-239-271-295 sts on round. Continue in Stripes and M.2 as follows (NOTE! beg on row 2 in diagram): M.2C, M.2B on the next 176-192-208-232-264-288 sts, M.2A. Continue like this until piece measures approx 15 cm from marker (adjust so that next row in M.2 is a row with tr only). Now inc 8 tr evenly - see INCREASING TIP-1 – and repeat the inc on approx every 6 cm a total of 4 times = 215-231-247-271-303-327 sts. When all inc are complete piece measures approx 33 cm from marker. Continue in M.2 and Stripes until stripe pattern is completed. Now continue in M.2 and crochet the next 3 stripes as follows: 1 row off-white, 1 row ice blue, 1 row light blue/purple. Now crochet 1 row denim blue, AT THE SAME TIME inc 4-5-6-16-1-11 tr evenly = 219-236-253-287-304-338 tr. LACE BORDER: Now crochet a border along bottom edge with denim blue as follows: Crochet M.3 on all sts. NOTE! Beg on row marked 1 in diagram, on the last repeat crochet on the remaining 15 sts to make pattern identical both sides towards mid front. See CROCHET TIP! After M.3 cut and fasten thread. LACE BORDER ON YOKE: Beg mid front with denim blue. Crochet 1 dc in each tr round the last row on yoke = 271-287-311-343-367-407 dc. Continue in M.3, beg on row marked 1 in diagram and AT THE SAME TIME on first row inc 50-51-44-46-56-50 dc evenly - see INCREASING TIP = 321-338-355-389-423-457 dc. NOTE! On the last repeat crochet on the remaining 15 sts to make pattern identical both sides towards mid front. AT THE SAME TIME crochet stripes as follows: row 1: off-white, row 2: ice blue, row 3: light blue/purple, row 4: denim blue, row 5: off-white. After M.3 cut and fasten thread. SLEEVE: Sleeve is worked back and forth under lace border on yoke. Continue with Stripes and M.2 as on body piece. NOTE! Cut the thread for each stripe, thread end to be used when sewing sleeve seam tog. First part of sleeve is sewn to the edge under sleeve on body piece – see ASSEMBLY. Crochet 63-63-71-79-79-87 tr with denim blue on sleeve under lace border in the same sts in which lace border was crochet (i.e. crochet in the 60-62-68-72-76-84 tr skipped on body piece, at the same time inc 3-1-3-7-3-3 tr evenly). Insert a marker, and measure sleeve from here. Continue back and forth in Stripes as follows: M.2A, repeat M.2B on the next 56-56-64-72-72-80 sts, M.2C. AT THE SAME TIME when piece measures approx 7 cm from marker (adjust to a row in M.2 with tr only) dec 4 tr evenly - see DECREASING TIP = 59-59-67-75-75-83 tr. Continue as before. When sleeve measures approx 25 cm from marker (adjust to a row in M.2 with tr only) dec 4 tr evenly = 55-55-63-71-71-79 tr. Continue in Stripes and M.2 until there are 4 vertical repeats of M.2, sleeve now measures approx 33 cm from marker. Now crochet 1 tr in each tr with ice blue, then 1 dc in each tr with light blue/purple, and then 1 row denim blue with 1 dc in each dc. Cut and fasten thread. Crochet the other sleeve in the same way. LEFT FRONT BAND: Beg at the top of left front piece. Crochet with crochet hook size 3 mm and denim blue as follows - see CROCHET TIP: Crochet 1 dc in corner and continue down along front piece as follows * 1 ch, skip approx 0.5 to 1 cm, 1 dc * repeat from *-* and finish with 1 dc at bottom of front piece before lace border. Turn piece. Crochet 1 tr in each dc and in each ch back to neckline. Turn piece. Crochet 1 tr in each tr. Turn piece. Crochet 1 dc in each tr back to neck. Cut and fasten thread. RIGHT FRONT BAND: Crochet like left front band, but mirrored, i.e. beg at bottom edge. NECKLINE: Beg mid front, in corner on right front band. Crochet with crochet hook size 3 mm and denim blue on front band and continue round neck as follows: 1 dc, * 1 ch, skip approx 0.5 to 1 cm, 1 dc *, repeat from *-* and finish with 1 dc in corner on left front piece. Turn piece. Crochet 1 dc in each ch and 1 ch over each dc round neck. Turn piece. Crochet 1 dc in each ch and 1 ch over each dc. Turn piece. Crochet 1 dc in each ch and 1 ch in each dc round neck until 30 sts remain on right front piece (= 15 dc and 15 ch). Turn piece. Crochet 1 dc in each ch and 1 ch over each dc round the neck until 30 sts remain on left front piece. Turn piece. Crochet 1 dc in each ch and 1 ch over each dc round neck until 50 sts remain on right front piece (= 25 dc and 25 ch). Turn piece. Crochet 1 dc in each ch and 1 ch over each dc until 50 sts remain on left front piece. Cut the thread. Beg mid front on right front piece. Crochet 1 dc in each ch and 1 ch over each dc round the whole neck to mid front on left front piece. Cut and fasten thread. ASSEMBLY: Sew under arm seam tog, edge to edge, with thread ends from colour changes. Sew the top 3.5-4-4.5-4.5-6-6 cm to the edge under sleeve on body piece. Sew buttons to left front band. Place the top button approx 1 cm from top of neckline, the bottom one approx 9 to 12 cm from bottom edge and the remaining 5 with approx 6.5-7-7-7-7.5-7.5 cm between each. Use second tr row on right front band as buttonholes |
||||||||||||||||
Diagram explanations |
||||||||||||||||
|
||||||||||||||||

|
||||||||||||||||
|
||||||||||||||||
|
Have you made this or any other of our designs? Tag your pictures in social media with #dropsdesign so we can see them! Do you need help with this pattern?You'll find tutorial videos, a Comments/Questions area and more by visiting the pattern on garnstudio.com. © 1982-2024 DROPS Design A/S. We reserve all rights. This document, including all its sub-sections, has copyrights. Read more about what you can do with our patterns at the bottom of each pattern on our site. |
||||||||||||||||


With over 40 years in knitting and crochet design, DROPS Design offers one of the most extensive collections of free patterns on the internet - translated to 17 languages. As of today we count 304 catalogues and 11422 patterns - 11422 of which are translated into English (UK/cm).
We work hard to bring you the best knitting and crochet have to offer, inspiration and advice as well as great quality yarns at incredible prices! Would you like to use our patterns for other than personal use? You can read what you are allowed to do in the Copyright text at the bottom of all our patterns. Happy crafting!
Comments / Questions (75)
Hi Are there two rows of dc in the beginning of yoke? One would be the first row and then the row with increase 32? And then i continue with row no 2 from M1 diagram right? It is very confusing! Thanks
24.04.2015 - 22:31DROPS Design answered:
Dear Mrs Šimíčková, you first crochet 1 row dc, then start M1 with row 1 increasing 32 dc on this row. Continue then working following M1 increasing evenly as stated under written pattern. Happy crocheting!
25.04.2015 - 10:15Hi Are there two rows of dc in the beginning of yoke? One would be the first row and then the row with increase 32? And then i continue with row no 2 from M1 diagram right? It is very confusing! Thanks
23.04.2015 - 14:50DROPS Design answered:
Dear Mrs Šimíčková, first row on yoke is a dc row where you should get less dc than you crocheted ch, then work M1 starting with row marked 1 in M.1 = 2nd row on piece, increasing at the same time 32 dc evenly (and remember stripes too). Happy crocheting!
23.04.2015 - 15:18On each turn do I just continue with the pattern with no extra stitch or chain?
24.03.2015 - 19:55DROPS Design answered:
Dear Linda, replace 1 dc with 3 ch and 1 sc with 1 ch at beg of row (see "crochet tip" at the beg of the pattern). Happy crocheting!
25.03.2015 - 08:57Ik zou graag willen weten hoe ik de steken gelijk verdeeld kan vermeerderen. Ik heb 111 steken en dan 32 meerderen, als ik 111 deel door 32 krijg ik 3,4. Maar ik kan niet in elke 3,4e steek meerderen. Hoe kun je dit oplossen? Alvast bedankt. Gr. Barbara
21.02.2015 - 12:14DROPS Design answered:
Hoi Barbara. Je meerdert dan om en om ongeveer tussen elk 3e en 4e steken.
23.02.2015 - 14:41Je suis entrain de réaliser le modèle "afternoon romance" j'ai fait l'empiècement arrondit et je ne comprends pas comment je doit faire le dos et les devant dois je les prendre sur l'empiècement ? et comment je fais pour laisser l'emplacement des manches. Merci de votre réponse
26.01.2015 - 11:41DROPS Design answered:
Bonjour Mme Berton, sous le paragraphe "Dos & devants", vous trouverez la marche à suivre pour continuer uniquement sur les devants et le dos, en sautant les mailles des manches (qui seront crochetées ensuite) remplacées par des chaînettes sous les bras. Bon crochet!
26.01.2015 - 17:04Kelly wrote:
Hi The instruction states: "AT THE SAME TIME on row 1 in diagram inc 32 tr evenly" I can't figure out how 32 stitches can be added to 103 chain evenly. Should the increases be made in the M.1B part and this applies to all the other increases in other rows? I would really like to give this a try and would appreciate some help please >.
06.10.2014 - 08:01DROPS Design answered:
Dear Kelly, you first cast on 139 ch, then work first row to get 103 tr (UK-English), on next row work row 1 in diagram M.1 inc evenly 32 tr over all sts. These inc are repeated in row 4,6 an 8 ind M.1 = on tr rows. Happy crocheting!
06.10.2014 - 09:51Hi I love this pattern so thank you very much! I'm just having trouble with the M.3 part, so the lacey bit for the yolk and the bottom. I work in American crochet. The 2nd row of M.3 starts with 6 single crochet before the 4 chains for the lacy shell base...but then it goes to 8 single crochet, so as the pattern repeats I'm not sure whether it should be six or eight single crochet between each shell part, if you know I mean - can you help?! Jenny-Lee
14.09.2014 - 18:41DROPS Design answered:
Dear Jenny-Lee, you will repeat diagram, ie after the 8 sc, start again at beg of chart and work 6 sc (= 14 sc between the 4 ch). Happy crocheting!
15.09.2014 - 09:41Håller på att virka den vita koftan. Det står inga kommenter om hur lång den skall vara i de olika lägena, endast att "virka si o så många blåa nyanser, eller virka klart med blått osv. - På spetskanten står det: starta med Jeansblå .... osv. Efterlyser m a o ett mer detaljerat mönster för den vita modellen. Tack för hjälpen
28.08.2014 - 11:30DROPS Design answered:
Om du virkar allt i samma färg så följer du bara M.3 i spetskanten. Du hittar även alla mått i måttskissen nedan.
03.09.2014 - 12:03I am an experienced crocheter,but finding this pattern very difficult to understand. Am I to follow the diagrams to work the pattern into the yoke,and increase as stated. Or is the yoke all just treble crochets with the increases?
25.07.2014 - 21:22DROPS Design answered:
Dear Barbara, you crochet yoke following diagram M.1, at the same time following stripes and at the same time increasing evenly in M1 as stated in pattern. Happy crocheting!
26.07.2014 - 09:28Hallo, folgende beschreibung zu o.g. modell verstehe ich überhaupt nicht. schon der erste satz irritiert: WO wird ein markierungsfaden gezogen? "VORDER- UND RÜCKENTEIL":diese beschreibung verstehe ich überhaupt nicht....! " 1 Stb. in jede der ersten 49 M."???? wie geht das??? danke und gruß. U. Oberle
09.07.2014 - 08:23DROPS Design answered:
Sie sind ja jetzt an der Stelle, an der Sie die Armausschnitte einarbeiten müssen. Die Arbeit wird ab hier weiter gemessen, darum bringen Sie einfach an der 1. R, die Sie nun häkeln, 1 Markierer an. 1 Stb in jedes der ersten 49 Stb heißt einfach, dass Sie in jedes Stb der letzten R 1 Stb häkeln, bis Sie 49 Stb gehäkelt haben, das ist das eine Vorderteil. Dann überspringen Sie für den Armausschnitt die genannte Anzahl Stb und häkeln statt dessen eine Lm-Kette darüber.
09.07.2014 - 22:43