DROPS Fabel
DROPS Fabel
75% Wool, 25% Polyamide
from 2.30 £ /50g
Get the yarn to make this pattern from 11.50£.

The yarn cost is calculated from the pattern’s smallest size and the yarn’s cheapest product type. Looking for an even better price? You might find it on the DROPS Deals!

DROPS SS24

Corner Connection

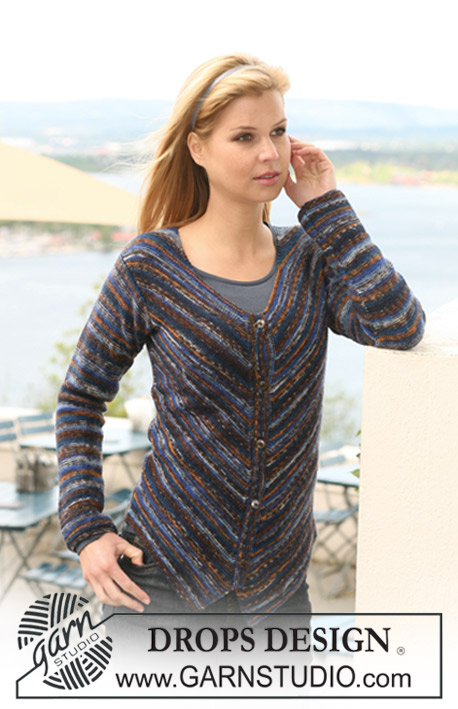
DROPS waistcoat in garter st in ”Fabel” with sloped front pieces. Size S - XXXL.

DROPS 121-31
DROPS design: Pattern no FA-131
--------------------------------------------------------
Size: S - M - L - XL - XXL - XXXL
Materials: DROPS Fabel
250-250-300-300-350-350 g colour no 901, candy mix

DROPS POINTED NEEDLES size 3 mm –
or size needed to get 24 sts x 48 rows in garter st = 10 x 10 cm.
DROPS SHELL BUTTON, no 525:
5-5-5-6-6-6 pcs.

-------------------------------------------------------

Alternative Yarn – See how to change yarns here
Yarn Groups A to F – Use the same pattern and change the yarn here
Yarn usage using an alternative yarn – Use our yarn converter here

-------------------------------------------------------

DROPS Fabel
DROPS Fabel
75% Wool, 25% Polyamide
from 2.30 £ /50g
Get the yarn to make this pattern from 11.50£.

The yarn cost is calculated from the pattern’s smallest size and the yarn’s cheapest product type. Looking for an even better price? You might find it on the DROPS Deals!

Pattern instructions

NOTE: This pattern is written in British English. All measurements in charts are in cm. For conversion from cm to inches - click here. There are different terms for crocheting in British and American English. If this pattern includes crochet, click for "crochet terms" here. For this pattern in American English, please click here.
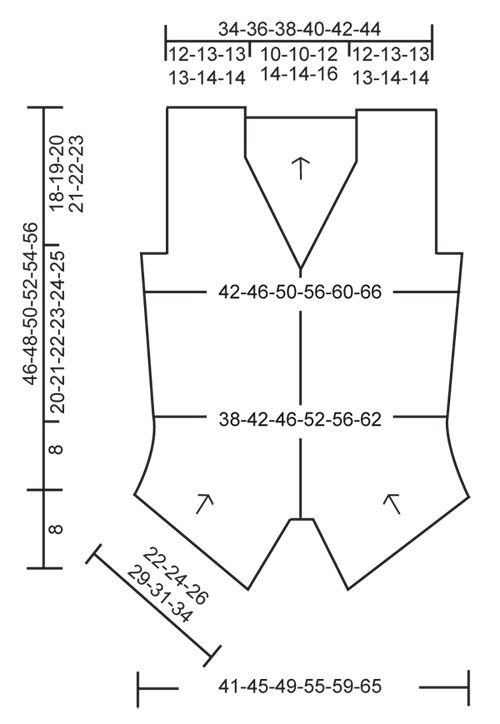
GARTER ST (back and forth on needle):
K all rows.
--------------------------------------------------------

WAISTCOAT:
Worked in parts. The arrows in chart show the knitting direction.

RIGHT FRONT PIECE:
Cast on 54-59-63-71-75-82 sts (includes 1 edge st at the side) on needle size 3 mm with Fabel. Work GARTER ST – see above (row 1 = RS). REMEMBER THE KNITTING TENSION– NOTE. It is important to adhere to the knitting tension, otherwise the shape of the garment will change!
After 6-10-2-10-6-2 rows cast on 1 new st at the end of next row towards the side (= from RS). Repeat this inc towards the side at the end of every 6-4-4-2-2-2 row a total of 6-8-10-14-16-18 times = 60-67-73-85-91-100 sts. When piece measures 8 cm insert a marker at the side – NOW MEASURE PIECE FROM HERE!
Now dec 1 st at the beg of row from mid front (= from RS) by K tog into back of loop the 2 sts inside edge st. AT THE SAME TIME cast on 1 new st at the end of the same row (= towards the side). Repeat this dec mid front and the inc towards the side on every other row (i.e. on every row from RS – number of sts will remain constant). AT THE SAME TIME after 1-2-3-1-1-2 cm from marker at the side cast on 1 more st towards the side (i.e. on this row cast on 2 new sts towards the side). Repeat this inc on every 1.5-1.5-1.5-2.5-2.5-2.5 cm a total of 12-12-12-9-9-9 times = 72-79-85-94-100-109 sts on needle – NOTE: Measure along the side on front piece (not in the knitting direction).
ARMHOLE:
When piece measures 20-21-22-23-24-25 cm from marker at the side (measured along the side) discontinue the inc on every other row at the side (continue dec mid front as before). Now also dec 1 st at the beg of every row from the side (= from WS) a total of 10-12-14-19-22-26 times. After the last dec inc towards the side again as before (i.e. cast on 1 new st at the end of every row towards the armhole), and continue dec mid front as before.
NECKLINE:
When armhole measures 15-16-17-18-19-20 cm measured up along the side (piece now measures approx 35-37-39-41-43-45 cm from marker at the side) cast off the 12-11-13-12-8-9 sts from mid front for neck (cast of from RS) = 40-44-44-44-48-48 sts left on needle. On next row from RS continue dec mid front and inc towards the side as before until armhole measures 18-19-20-21-22-23 cm up along the side (piece now measures approx 38-40-42-44-46-48 cm from marker at the side). Now cast off for shoulder by casting off 1 st at the beg of every row each side (i.e. from RS as well as WS) until all sts have been cast off, cut and fasten thread.

LEFT FRONT PIECE:
Cast on and work like right front piece, but mirrored, i.e. work row 1 from WS (not RS) and make all explanations as described from RS on right front piece from WS on left front piece. Make all dec mid front and the inc at the side on every row from WS (instead of every row from RS).

BACK PIECE:
Cast on 100-110-120-134-144-158 sts (includes 1 edge st each side) on needle size 3 mm with Fabel. Work garter st. When piece measures 2 cm dec 1 st each side and repeat the dec each side on every 2 cm a total of 4 times = 92-102-112-126-136-150 sts. When piece measures 10-10-11-11-11-11 cm inc 1 st each side and repeat the inc each side on every 4-4-4-4.5-4.5-4.5 cm a total of 5 times = 102-112-122-136-146-160 sts. When piece measures 28-29-30-31-32-33 cm cast off 10-13-15-20-23-27 sts at the beg of the next 2 rows for armhole = 82-86-92-96-100-106 sts. Continue in garter st until piece measures 44-46-48-50-52-54 cm. Now cast off the middle 24-24-28-32-34-38 sts for neck and complete each shoulder separately = 29-31-32-32-33-34 sts left on shoulder. Cast off when piece measures the same as front piece.

ASSEMBLY:
Sew shoulder seams. Sew side seams inside 1 edge st.

FRONT BANDS:
Pick up from RS approx 65-90 sts along right front piece on needle size 3 mm with Fabel (pick up 1 st in approx every other garter st row and adjust no of sts on first row to make front band nice and even, ref no of sts above). Work garter st back and forth on needle. After 1 cm make 5-5-5-6-6-6 buttonholes evenly distributed. Place the top buttonhole approx 1.5 cm from the top and the bottom one approx 2 cm from bottom edge. 1 BUTTONHOLE = cast off 1 st and cast on 1 new st on next row. Cast off with K sts from WS when front band measures approx 2-2.5 cm.
Repeat along left front piece, but without buttonholes.
Sew on buttons.

Diagram

diagram measurements
Do you have a question? See a list of frequently asked questions (FAQ)

Knitting tension is what determines the final measurements of your work, and is usually measured per 10 x 10 cm. It is provided like so: number of stitches in width x number of rows in height - eg: 19 stitches x 26 rows = 10 x 10 cm.

The knitting tension is very individual; some people knit/crochet loosely while others work tightly. You adjust the knitting tension with the needle size, which is why the suggested needle size is only meant as a guide! You need to adjust this (up or down) to ensure that YOUR knitting tension matches the knitting tension provided in the pattern. If you work with a different knitting tension than provided you will have a different yarn consumption, and your work will have different measurements than what the pattern suggests.

The knitting tension also determines which yarns can replace each other. As long as you achieve the same knitting tension you can replace one yarn with another.

See DROPS lesson: How to measure your tension/gauge

See DROPS video: How to make a gauge tension swatch

The required amount of yarn is provided in grams, eg: 450 g. To calculate how many balls you’ll need you first need to know how many grams are in 1 ball (25g, 50g or 100g). This information is available if you click on the individual yarn quality on our pages. Divide the amount required with the amount of each ball. For example, if each ball is 50g (the most common amount), the calculation will be as follows: 450 / 50 = 9 balls.

The important thing when changing from one yarn to another is that the knitting/crochet tension remains the same. This is so that the measurements of the finished piece will be the same as on the sketch provided. It is easier to achieve the same knitting tension using yarns from the same yarn group. It is also possible to work with multiple strands of a thinner yarn to achieve the knitting tension of a thicker one. Please try our yarn converter. We recommend you to always work a test swatch.

Please NOTE: when changing yarn the garment might have a different look and feel to the garment in the photo, due to individual properties and qualities of each yarn.

See DROPS lesson: Can I use a different yarn than the one mentioned in the pattern?

All our yarns are categorised into yarn groups (from A to F) according to thickness and knitting tension – group A contains the thinnest yarns and group F the thickest. This makes it easier for you to find alternative yarns to our patterns, should you wish to switch yarn. All yarns within the same group have a similar knitting tension and can easily replace each other. However, different yarn qualities have different structures and properties which will give the finished work a unique look and feel.

Click here for an overview of the yarns in each yarn group

At the top of all our patterns you’ll find a link to our yarn calculator, which is a helpful tool should you wish to use a different yarn than suggested. By filling in the yarn quality you wish to replace, the amount (in your size) and number of strands, the calculator will present good alternative yarns with the same knitting tension. Additionally it will tell you how much you’ll require in the new qualities and whether you’ll need to work with multiple strands. Most skeins are 50g (some are 25g or 100g).

If the pattern is worked with multiple colours, every colour will have to be calculated separately. Similarly, if the pattern is worked with several strands of different yarns (for example 1 strand Alpaca and 1 strand Kid-Silk) you will have to find alternatives for each, individually.

Click here to see our yarn calculator

Since different yarns have different qualities and textures we have chosen to keep the original yarn in our patterns. However, you can easily find options among our available qualities by using our yarn calculator, or simply pick a yarn from the same yarn group.

It is possible that some retailers still have discontinued yarns in stock, or that someone has a few skeins at home that they would like to find patterns for.

The yarn calculator will provide both alternative yarn as well as required amount in the new quality.

If you think it's hard to decide what size to make, it can be a good idea to measure a garment you own already and like the size of. Then you can pick the size by comparing those measures with the ones available in the pattern's size chart.

You'll find the size chart at the bottom of the pattern.

See DROPS lesson: How to read size chart

The needle size provided in the pattern serves only as a guide, the important thing is to follow the knitting tension. And since knitting tension is very individual, you will have to adjust the needle size to ensure that YOUR tension is the same as in the pattern – maybe you’ll have to adjust 1, or even 2 needle sizes, up or down to achieve the correct tension. For this, we recommend that you work test swatches.

Should you work with a different knitting tension than the one provided, the measurements of the finished garment might deviate from the measurement sketch.

See DROPS lesson: How to measure your tension/gauge

See DROPS video: How to make a tension/gauge swatch

Working a garment top-down provides more flexibility and room for personal adjustment. For example it is easier to try the garment on while working, as well as making adjustments to length of yoke and shoulder caps.

The instructions are carefully explaining every step, in the correct order. Diagrams are adjusted to the knitting direction and are worked as usual.

The diagram depicts all rows/rounds, and every stitch seen from the right side. It is read from bottom to top, from right to left. 1 square = 1 stitch.

When working back and forth, every other row is worked from the right side and every other row is worked from the wrong side. When working from the wrong side, the diagram will have to be worked reversed: from left to right, knit stitches are purled, purl stitches are knit etc.

When working in the round every round is worked from the right side and the diagram are worked from right to left on all rounds.

See DROPS lesson: How to read knitting diagrams

The diagram depicts all rows/rounds, and every stitch seen from the right side. It is worked from bottom to top, from right to left.

When working back and forth every other row is worked from the right side: from right to left and every other row is worked from the wrong side: from left to right.

When working in the round, every row in the diagram are worked from the right side, from right to left.

When working a circular diagram you start in the middle and work your way outwards, counter clockwise, row by row.

The rows usually start with a given number of chain stitches (equivalent to the height of the following stitch), this will either be depicted in the diagram or explained in the pattern.

See DROPS lesson: How to read crochet diagrams

Instructions for working several diagrams after each other on the same row/round, will often be written like so: “work A.1, A.2, A.3 a total of 0-0-2-3-4 times". This means you work A.1 once, then A.2 is worked once, and A.3 is repeated (in width) the number of times provided for your size – in this case like so: S = 0 times, M = 0 times, L=2 times, XL= 3 times and XXL = 4 times.

The diagrams are worked as usual: begin with the first row in A.1, then work the first row in A.2 etc.

See DROPS lesson: How to read knitting diagrams

See DROPS lesson: How to read crochet diagrams

The total width of the garment (from wrist-to-wrist) will be larger in the larger sizes, despite the actual sleeves being shorter. The larger sizes have longer sleeve caps and wider shoulders, so there will be a good fit in all sizes.

The measurement sketch/schematic drawing provides information regarding the full length of the garment. If it’s a jumper or a jacket the length is measured from the highest point on the shoulder closest to the neckline, and straight down to the bottom of the garment. It is NOT measured from the tip of shoulder. Similarly, the length of yoke is measured from the highest point on the shoulder and down to where yoke is split into body and sleeves.

On a jacket measures are never taken along bands, unless specifically stated. Always measure inside band stitches when measuring the length.

See DROPS lesson: How to read a schematic drawing

Diagrams are often repeated on the round or in height. 1 repeat is the diagram the way it appears in the pattern. If it says to work 5 repeats of A.1 in the round, then you work A.1 a total of 5 times after/next to each other in the round. If it says to work 2 repeats of A.1 vertically/in height you work the entire diagram once, then begin again at the start and work the entire diagram one more time.

Chain stitches are slightly narrower than other stitches and to avoid working the cast-on edge too tight, we simply chain more stitches to begin with. The stitch count will be adjusted on the following row to fit the pattern and measurement sketch.

The rib edge is more elastic and will contract slightly compared to, for example, stocking stitch. By increasing before the rib edge, you avoid a visible difference in width between the rib edge and the rest of the body.

It’s very easy to cast off too tightly, and by making yarn overs while casting off (and simultaneously casting these off) you avoid a too tight cast off edge.

See DROPS video: How to bind off with yarn overs (yo)

To achieve an even increase (or decrease) you can increase on, for example: every 3rd and 4th row alternately, like so: work 2 rows and increase on the 3rd row, work 3 rows and increase on the 4th. Repeat this until the increase is complete.

See DROPS lesson: Increase or decrease 1 st on every 3rd and 4th row alternately

Should you prefer to work in the round instead of back and forth, you may of course adjust the pattern. You’ll need to add steeks mid-front (usually 5 stitches), and follow the instructions. When you would normally turn and work from the wrong side, simply work across the steek and continue in the round. At the end you’ll cut the piece open, pick up stitches to work bands, and cover the cut edges.

See DROPS video: How to knit steeks and cut open

Should you prefer to work back and forth instead of in the round, you may of course adjust the pattern so you work the pieces separately and then assemble them at the end. Divide the stitches for the body in 2, add 1 edge stitch in each side (for sewing) and work the front and back pieces separately.

See DROPS lesson: Can I adapt a pattern for circular needles into straight needles?

Pattern repeats can vary slightly in the different sizes, in order to get the correct proportions. If you’re not working the exact same size as the garment in the photo, yours might deviate slightly. This has been carefully developed and adjusted so that the complete impression of the garment is the same in all sizes.

Make sure to follow instructions and diagrams for your size!

If you have found a pattern you like which is available in women’s size it’s not very difficult to convert it to men’s size. The biggest difference will be the length of sleeves and body. Start working on the women size that you think would fit across the chest. The additional length will be worked right before you cast off for the armhole/sleeve cap. If the pattern is worked top-down you can add the length right after the armhole or before the first decrease on sleeve.

Regarding additional yarn amount, this will depend on how much length you add, but it is better with a skein too many than too few.

All yarns will have excess fibres (from production) that might come off as lint or shedding. Brushed yarns (ie hairier yarns) have more of these loose, excess fibres, causing more shedding.

Shedding also depends on what is worn under or over the garment, and whether this pulls at the yarn fibres. It’s therefore not possible to guarantee that there will be no shedding

Below are some tips on how to get the best result when working with hairier yarns:

1. When the garment is finished (before you wash it) shake it vigorously so the looser hairs come off. NOTE: do NOT use a lint roller, brush or any method that pulls at the yarn.

2. Place the garment in a plastic bag and put it in your freezer - the temperature will cause the fibres to become less attached to each other, and excess fibres will come off easier.

3. Leave in the freezer for a few hours before taking it out and shaking it again.

4. Wash the garment according to the instructions on the yarn label.

Pilling is a natural process that happens to even the most exclusive of fibers. It's a natural sign of wear and tear that is hard to avoid, and that is most visible in high friction areas of your garment like a sweater's arms and cuffs.

You can make your garment look as new by removing the pilling, using a fabric comb or a pill/lint remover.

Still can't find the answer you need? Then scroll down and leave your question so one of our experts can try to help you. This will be done normally within 5 to 10 working days.
In the meantime, you can read the questions and answers that others have left to this pattern or join the DROPS Workshop on Facebook to get help from fellow knitters/crocheters!

You might also like...

Post a comment to pattern DROPS 121-31

We would love to hear what you have to say about this pattern!

If you want to leave a question, please make sure you select the correct category in the form below, to speed up the answering process. Required fields are marked *.

Comments / Questions (18)

country flag Jette Hoegh wrote:

Hvad betyder det når der står 1 pind strikkes fra vrangen

19.07.2015 - 21:44

DROPS Design answered:

Hej Jette. At den förste pind skal taelles som vaere fra vrangen.

28.07.2015 - 16:06

country flag Sonja Beutler wrote:

Ja, hallo Guten Abend, bin grad dabei hier das rechte Vorderteil zu stricken; es gelingt irgendwie nicht; ich schaffe es nicht, die gewünschte Strickrichtung zu stricken. Was heiß denn, Anschlagen gegen die Seite? Bin für jede Hilfestellung sehr dankbar; dieses Westchen hat sich meine Tochter zu Weihnachten gewünscht. Lieben Gruß aus Bayern, Sonja

02.12.2014 - 19:53

DROPS Design answered:

Die Anschlagkante können Sie in der Skizze gut sehen - es ist der gerade Rand, von dem aus der Pfeil schräg nach rechts bzw. links zeigt. Beim rechten Vorderteil machen Sie die Zunahmen immer in Hin-R und zwar am Ende jeder 6.-4.-4.-2.-2.-2. R, "gegen die Seite" bedeutet, dass die Masche an der Seite der Jacke angeschlagen wird, nicht am vorderen Rand. Die Abnahmen erfolgen dann später am Anfang jeder Hin-R, also am vorderen Rand, gleichzeitig schlagen Sie am Ende jeder Hin-R 1 M neu an.

03.12.2014 - 16:20

country flag Helle wrote:

I forstykkerne er der nævnt et maskeantal, som der skal være tilbage på pinden efter at der er lukket af til hals, men maskeantallet kan jeg ikke få til at passe. Ved sammenligning med billedet ser det ud til, at der enten skal lukkes masker af flere gange, eller at maskeantallet skal være væsentligt større; eks 28 i stedet for 8 i str. xl

04.10.2013 - 12:20

DROPS Design answered:

Hej Helle. Du har i str XL 94 m paa pinden naar du lukker af til aermegab. Naar du lukker af for aermet slutter du ogsaa med udtagningen i siden i hver anden pind + du lukker 1 m i siden totalt 19 gange. Dvs, du har nu 19 x 2 m mindre = 36 totalt. Du lukker da 12 m af for hals = 44 m tilbage.

08.10.2013 - 14:05

country flag Fani wrote:

Superschön!!! das wäre das erste Modell meiner Wahl!

15.07.2010 - 18:52

country flag Inger wrote:

Sidder ikke godt

06.07.2010 - 20:20

country flag Rita Klevjer wrote:

Flott vest, alltid anvendelig. Lekkert med skrå modeller

06.07.2010 - 15:58

country flag Bente wrote:

Rigtig flot og sikkert spændende at strikke

04.07.2010 - 17:26

country flag Brigitte wrote:

Hübsche Weste. Idealer Gebrauch von Fabel.

24.06.2010 - 14:47

country flag Rose wrote:

Superschön, freue mich auf die Anleitung

23.06.2010 - 11:17

country flag Katka wrote:

Pěkná vestička

17.06.2010 - 10:51