
Popular categories
Looking for a yarn?


|
||||||||||||||||
DROPS 78-26 |
||||||||||||||||
|
|
||||||||||||||||
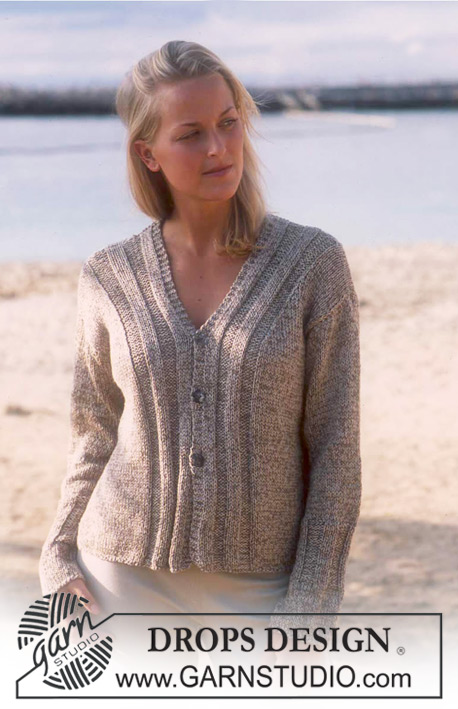
Long DROPS jacket with lace pattern in "Bomull-Lin". Crochet DROPS hat in "Safran".
DROPS 78-26 |
||||||||||||||||
|
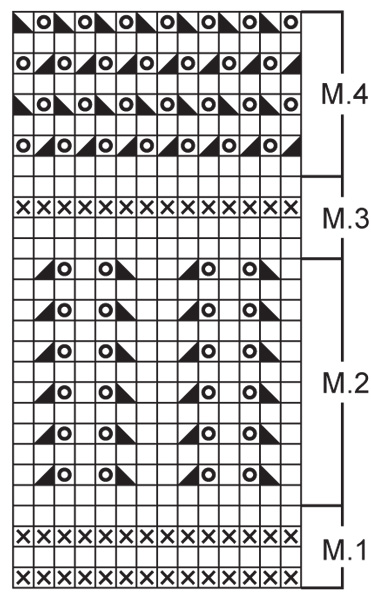
Tension: Stocking st and M.1 to M.3: 18 sts x 24 rows with needle size 5.5 mm = 10 x 10 cm. M.4: approx. 15 sts with needle size 5.5 mm = 10 cm in width. Remember needle size is only a guide! Pattern: See diagram M.1 to M.4. The pattern in the diagram is seen from RS! Ridge (back and forth on needle): 1 ridge = 2 rows: 1st row: K, 2nd row: K. Buttonhole: Cast off for buttonholes on right band. 1 buttonhole = K 3rd and 4th st from mid front tog + 1YO over these sts on next row. Cast off for buttonholes when the piece measures: Size S: 20, 29, 38, 47, 56 and 65 cm. Size M: 22, 31, 40, 49, 58 and 67 cm. Size L: 24, 33, 42, 51, 60 and 69 cm. Size XL: 26, 35, 44, 53, 62 and 71 cm. Size XXL: 28, 37, 46, 55, 64 and 73 cm. Body: The jacket is worked back and forth on the circular needle from mid front. Cast on 185-199-213-227-248 sts (incl 5 band sts in each side mid front) with circular needle size 4.5 mm and brown. Work M.1, 1st row = WS. Change to circular needle size 5.5 mm and continue M.2 - NOTE: 5 band sts in each side towards mid front are worked in ridges until finished length - remember buttonholes on band - see description above. Remember knitting tension! When the piece measures 33-34-35-36-37 cm work M.3 - At the same time on the last row of M.3 dec 29-31-35-37-40 sts evenly on row (do not dec on bands) = 156-168-178-190-208 sts. Continue with M.4 until the piece measures 44-45-46-47-48 cm. Now work M.3 again - at the same time on the 2nd row inc 29-31-35-37-40 m evenly on row (do not inc on bands) = 185-199-213-227-248 sts. After M.3 continue with stocking st to finished length. When the piece measures 55-56-57-58-59 cm work the next row as follows (from RS): 45-48-51-55-60 sts (= right front piece), cast off 6-8-8-8-8 sts for armhole, work 83-87-95-101-112 sts (= back piece), cast off 6-8-8-8-8 sts for armhole, work 45-48-51-55-60 sts (= left front piece). Each piece is finished separately. Left front piece: = 45-48-51-55-60 sts. Continue to cast off for armhole in side every 2nd row: 3 sts 1-1-1-1-2 times, 2 sts 0-1-3-4-5 times and 1 st 4-4-3-3-2 times = 38-39-39-41-42 sts. When the piece measures 66-68-70-72-74 cm put the 8 sts towards mid front on 1 thread for neck. Continue to cast off for neck every 2nd row: 3 sts 1 time, 2 sts 2 times and 1 st 3-4-3-4-4 times = 20-20-21-22-23 sts remain on shoulder. Cast off remaining sts when the piece measures 74-76-78-80-82 cm. Right front piece: = 45-48-51-55-60 sts. Work as for right front piece but reversed - remember buttonholes on band Back piece: = 83-87-95-101-112 sts. Continue to cast off for armholes in each side as for front piece = 69-69-71-73-76 sts remain on needle. When the piece measures 72-74-76-78-80 cm cast off the middle 27-27-27-27-28 sts for neck. Continue to cast off 1 st on next row towards neck = 20-20-21-22-23 sts remain on each shoulder. Cast off remaining sts when the piece measures 74-76-78-80-82 cm. Sleeves: Cast on 42-42-42-49-49 sts with needle size 4.5 mm and brown and work M.1. Change to needle size 5.5 mm and continue with M.2 until the piece measures 15 cm. Now work M.3 before working stocking st to finished length. At the same time when the piece measures 16 cm inc 2 sts mid underarm every 3.5-2.5-2-2-1.5 cm in total 9-11-13-12-14 times = 60-64-68-73-77 sts. When the piece measures 46-44-43-42-40 cm cast off 6sts mid under sleeve, and finish working back and forth on needles. Continue to cast off for the sleeve cap in each side every 2nd row: 2 sts 2-1-1-1-1 times and 1 st 6-9-11-12-14 times, continue to cast off 2 sts in each side until the piece measures 55 cm, then cast off 3 sts 1 time in each side. The piece measures approx. 56 cm, cast off remaining sts. Assembly: Sew shoulder seams. Neck: Pick up approx. 80 to 90 sts around the neck (incl sts from the thread in front) with circular needle size 4.5 mm and brown. Work 3 rows K (1st row = WS), then cast off with K on RS. Sew in sleeves and buttons. Thread 1 leather strap in the upper row of holes on M.4. ________________________________________ HAT Size: one-size Materials: DROPS Safran from Garnstudio 50 g colour no 22, brown. DROPS Crochet hook size 3.5 mm. Tension: 20 sts in width with hook size 3.5 mm = approx. 10 cm. Remember hook size is only a guide! Hat: Crochet 7 ch with hook size 3.5 mm and work them in to a ring with 1 sl st. 1st round: 4 ch, * 1 tr, 1 ch *, repeat from *-* in total 7 times, finish with 1 sl st in 3rd ch from beg of round (= 8 tr). 2nd round: 3 ch, 1 tr in ch-space, * 2 ch, 2 tr in next ch-space *, repeat from *-*, finish with 2 ch and 1 sl st in 3rd ch from beg of round (= 8 tr groups). 3rd round: 6 ch, * 2 tr in next ch-space, 3 ch *, repeat from *-* in total 7 times, finish with 1 tr in the last ch-space and 1 sl st in 3rd ch-space from beg of round. 4th round: 3 ch, 1 tr in ch-space, 1 ch, 2 tr in the same ch-space, * 1 ch in the next ch-space; 2 tr, 1 ch and 2 tr *, repeat from *-* in total 7 times, finish with 1 ch and 1 sl st in 3rd ch from beg of round. 5th round: 5 ch, * 2 tr in the next ch-space, 2 ch *, repeat from *-* in total 15 times, finish with 1 tr in the last ch-space and 1 sl st in 3rd ch from beg of round (= 16 tr groups). 6th round: 3 ch, 1 tr in the ch-space, * 3 ch, 2 tr in the next ch-space *, repeat from *-* in total 15 times, finish with 3 ch and 1 sl st in 3rd ch from beg of round (= 16 tr groups). 7th round: 4 ch, * in the next ch-space work 2 tr, 1 ch, 2 tr and 1 ch *, repeat from *-* in total 15 times, finish in the last ch-space with 2 tr, 1 ch, 1 tr and 1 sl st in the 3rd ch from beg. 8th round: 3 ch, 1 tr in the ch-space, * 2 ch, 2 tr in the next ch-space *, repeat from *-* in total 32 times, finish with 2 ch and 1 sl st in 3rd ch from beg of round. 9th round: 5 ch, * 2 tr in the next ch-space, 2 ch *, repeat from *-*, finish with 1 tr in the last ch-space and 1 sl st in 3rd ch from beg of round. 10th round: 3 ch, 1 tr in the ch-space, * 2 ch, 2 tr in the next ch-space *, repeat from *-* , finish with 2 ch and 1 sl st in 3rd ch from beg of the round. Continue to work the 9th and 10th round alternately upwards until the piece measures 13-14 cm from middle. Then work as follows: 1 dc in each tr and 1 dc in each ch-space from the previous round. Work 3 more rounds dc. Finish as follows: * 3 ch, 1 dc in first ch (= 1 picot), skip 1 dc from previous round and work 1 sl st in the next dc *, repeat from *-* round whole hat, cut the strand and fasten. |
||||||||||||||||
Diagram explanations |
||||||||||||||||
|
||||||||||||||||
|
||||||||||||||||

|
||||||||||||||||
|
Have you made this or any other of our designs? Tag your pictures in social media with #dropsdesign so we can see them! Do you need help with this pattern?You'll find tutorial videos, a Comments/Questions area and more by visiting the pattern on garnstudio.com. © 1982-2024 DROPS Design A/S. We reserve all rights. This document, including all its sub-sections, has copyrights. Read more about what you can do with our patterns at the bottom of each pattern on our site. |
||||||||||||||||


With over 40 years in knitting and crochet design, DROPS Design offers one of the most extensive collections of free patterns on the internet - translated to 17 languages. As of today we count 304 catalogues and 11422 patterns - 11422 of which are translated into English (UK/cm).
We work hard to bring you the best knitting and crochet have to offer, inspiration and advice as well as great quality yarns at incredible prices! Would you like to use our patterns for other than personal use? You can read what you are allowed to do in the Copyright text at the bottom of all our patterns. Happy crafting!
Comments / Questions (15)
Vielen Dank für die Info. Jetzt habe ich noch eine Frage zum Thema Ärmel. Nach 56 cm sollen alle restlichen Maschen abgekettet werden. Wieviel Maschen muss ich nach 56 cm noch auf der Nadel haben, die dann zum Schluss komplett abgekettet werden. Das ist mir leider noch nicht klar. Sorry. Danke 🙏
18.01.2023 - 22:34DROPS Design answered:
Liebe Kirsten, je nach der Maschenprobe in der Höhe könnte diesee Anzahl unterschiedlich sein, so nur Höhe in cm ist hier wichtig, dh 2 Maschen ketten Sie beidseitig ab, bis der Ärmel 55 cm misst, beachten Sie nur, daß Sie dieselebe Maschenanzahl beidseitig abgekettet haben, dann ketten Sie 3 Maschen am Anfang der 2 nächsten Reihe und endlich die restlichen Maschen ab. Viel Spaß beim strickent!
19.01.2023 - 10:46Die Jacke finde ich super toll. Ich habe leider Probleme bei den Ärmeln mit der Aussage „Gegen die Schulter abk.“ Ich habe 6 M unter dem Arm abgekettet und Stricke nun in Reihen weiter. Wo muss ich denn jetzt die Abnahmen vornehmen. Am Anfang und Ende der Reihen? Oder beidseitig in der Mitte der Reihe, so das ich rechts und links von der Mitte getrennt beenden muss? Ich danke 🙏 für Ihre Antwort. Mit lieben Grüßen Kirsten ..
17.01.2023 - 22:51DROPS Design answered:
Liebe Kirsten, hier sollen Sie 2 Maschen beidseitig 2-1-1-1-1 Mal abketten (= 2 Maschen am Anfang der nächsten 4-2-2-2-2 Reihen - Hin- sowie Rückreihen); dann 1 Masche 6-9-11-12-14 Mal beidseitig (= am Anfang der nächsten 12-18-22-24-28 Reihen) und dann 2 Maschen am Anfang jeder Reihe (immer Hin- sowie Rückreihe)) bis der Ärmel 55 cm misst (beachten Sie, daß genausoviele Maschen am Anfang beidseitig abgekettet wurde), dann ketten Sie 3 Maschen am Anfang jeder 2 nächsten Reihe ab. Viel Spaß beim stricken!
18.01.2023 - 09:37Die beidseitigen 5 Bordmaschen der Jacke 78-26 inkl. Randmasche = 4 Bordmaschen, 1 Randmasche oder 1 Randmasche, 5 Bordmaschen Vielen Dank im Voraus
18.08.2022 - 13:50DROPS Design answered:
Liebe Frau Hintze, die 5 Blenden Maschen werden alle kraus-rechts gestrickt, es gibt hier keine extra Randmaschen. Viel Spaß beim stricken!
18.08.2022 - 15:06Como averiguo mi talla?? En los patrones no especifica cuantos cm. Corresponde a cada talla. Por ejemplo: la talla XXl. Cuantos centímetros de contorno de busto hay que tener??.. Gracias.
07.06.2022 - 18:19DROPS Design answered:
Hola Pilar. Todos los patrones, bajo las explicaciones de la labor, tienen un esquema con las medidas en cm. Para la talla XXL el contorno del pecho es 132 cm ( el diagrama muestra la medida de la mitad del pecho).
08.06.2022 - 19:48Hej garnstudio. Jeg har tænkt mig at strikke jakken i en merino superwash - 10X10 cm = 16 m/20 p på pind 5. Er der et trick til hvordan jeg omregner opskriften til den ændrede garn (garnet er kraftigt og bliver for 'stift' hvis jeg går længere ned i pind). VH Alberte
03.12.2021 - 15:56DROPS Design answered:
Hei Alberte. Om du ser til høyre for bildet under materialer på den modellen du ønsker å strikke eller under bildet. Og der det står "Garnforbrug ved alternativt garn" og klikk på "Brug vores garn-omregner her". Så kan du enkelt se hvilket garn du kan bytte til. mvh DROPS Design
07.12.2021 - 09:42Hey, ik snap niet goed met die panden. Zoveel steken opzetten ? En dan zie je weer staan achterland zoveel, linker en rechterhand zoveel. Grts
05.11.2020 - 15:19DROPS Design answered:
Dag Chantal,
De voor en achterpanden worden in één keer gebreid en staan samen op de naald. Je breit dus steeds heen en weer van midden voor via het achterpand weer naar midden voor.
18.11.2020 - 13:33WHAT DOES ' M 1 2 3 & 4'. MEAN l can't find it on the pattern !! l have the wool so l'm ready to start.....
15.10.2020 - 17:48DROPS Design answered:
Hi Jacquie, The M.1, 2, 3 and 4 refer to the diagrams at the bottom of the pattern. Happy knitting!
16.10.2020 - 08:27Bonjour, je suis au devant gauche , juste à cet endroit : A 74 cm de hauteur totale, mettre en attente les 8 m du milieu devant pour l'encolure, puis tous les 2 rangs côté encolure : 1 fois 3 m, 2 fois 2 m et 4 fois 1 m = 23 m pour l'épaule. Mettre 8 ms en attente?? et rabattre les ms après les ms en attente?? pour former l'encolure j'aurais rabattu les 8 m et continué..J'arrive pas à visualiser ce que vous demandez de faire à cette endroit. merci de votre aide
20.01.2016 - 18:54DROPS Design answered:
Bonjour Michelle, on met d'abord les 8 premières m de l'encolure en attente puis on rabat les mailles suivantes pour l'encolure. On reprendra ensuite ces 8 m à la fin quand on va tricoter les mailles du col: on reprend les 8 m en attente du devant droit, on relève les mailles le long de l'encolure et on reprend les 8 m en attente du devant gauche. Bon tricot!
21.01.2016 - 10:11Bonjour, pouvez vous me dire ce que veut dire ( tel : 38-39-39-41-42) après chaque calcul de mailles ? Je ne comprend pas le sigle "tel" Est-t-il possible de le faire en 3 partie ? Merci d'avance
06.08.2015 - 19:09DROPS Design answered:
Bonjour Mme Bordeau, le sigle "=" (égal) devant le nombre de mailles comme pour le devant gauche par ex: "= 38-39-39-41-42 m" signifie que lorsque vous avez rabattu les mailles pour l'emmanchure il vous reste 38-39-39-41-42 m (cf taille). Pour réaliser le dos et les devants séparément, répartissez le nombre de m pour chaque pièce et ajoutez 1 m lis pour les coutures. Pensez également à bien adapter le point fantaisie. Ou consultez nos vidéos vous expliquant comment tricoter en allers retours sur aiguille circulaire. Bon tricot!
07.08.2015 - 09:21Bei dem Ärmel soll laut dt. Anleitung das Muster 2 bis zu einer Länge von 5 cm gestrickt werden. Es müßte aber 15 cm lauten.
05.02.2014 - 09:54DROPS Design answered:
Liebe Pheline, vielen Dank für den Hinweis, es ist nun korrigiert.
05.02.2014 - 10:05