
Popular categories
Looking for a yarn?


|
|||||||||||||
A Kiss For Midwinter |
|||||||||||||
 |
 |
||||||||||||
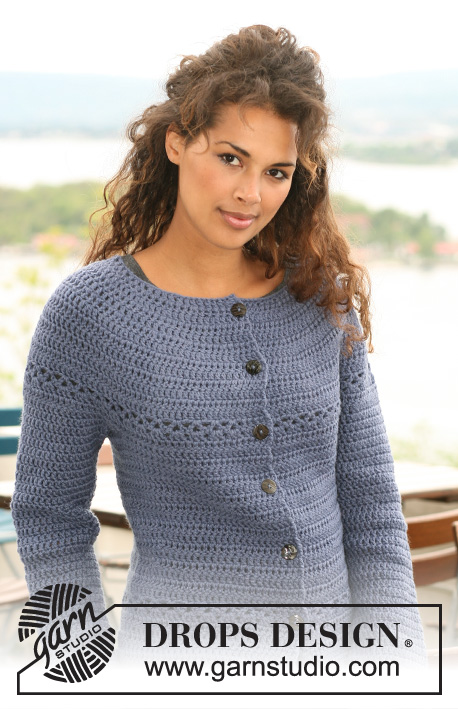
Crochet DROPS jacket in ”Nepal”. Size XS to XXXL.
DROPS 121-33 |
|||||||||||||
|
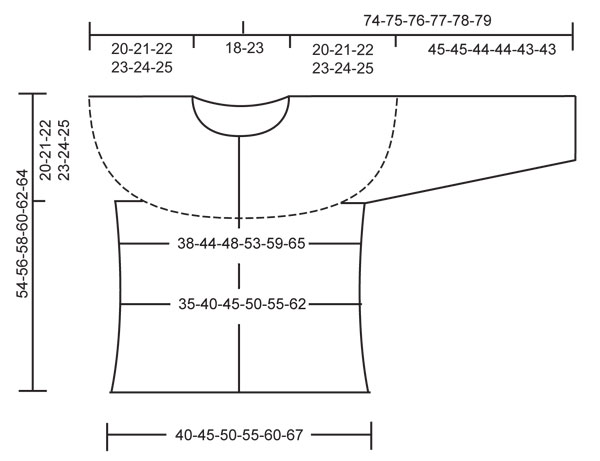
CROCHET INFO: Replace first dc on each round/row with ch 3. Finish each round with 1 sl st in 3rd ch from beg of round/beg of previous row. PATTERN: See diagram M.1 and M.2. Diagram shows the pattern from RS. DECREASING TIP: Work 1 dc, but wait with last pull-through (= 2 sts on hook), work next dc, but when doing the last pull-through pull thread through all sts on hook – 1 dec dc. ---------------------------------------------------------- BODY PIECE: Worked from top down, back and forth from mid front. Ch 91-99-107-115-123-131 (includes 3 ch to turn with) with hook size 4.5 mm/US 7 and Nepal. Work next row as follows: 1 dc in 4th ch, * skip ch 1, 1 dc in each of the next 3 ch *, repeat from *-*, skip 1 ch and finish with 1 dc in the last 2 ch = 67-73-79-85-91-97 dc – see CROCHET INFO. Now work 10 rows acc to M.1 (5 dc each side = front band, work 1 dc in each dc – not included in diagram). After M.1 there are 162-178-194-210-226-242 dc on row. Continue with 1 dc in each dc. When piece measures 16-17-18-19-20-21 cm / 6¼"-6¾"-7"-7½"-8"-8¼" continue as follows: 5 dc on front band, 1-0-2-1-0-2 dc, repeat M.2 until 6-5-7-6-5-7 dc remain, finish with 1-0-2-1-0-2 dc and 5 dc on front band. Continue with 1 dc in each dc until piece measures 20-21-22-23-24-25 cm / 8"-8¼"-8¾"-9"-9½"-9¾". Work next row as follows: 24-27-30-33-36-40 dc (front piece), 8 ch (under sleeve/armhole), skip 38-40-42-44-46-46 dc from previous round (to be used later for sleeve), 38-44-50-56-62-70 dc (back piece), 8 ch (under sleeve/armhole), skip 38-40-42-44-46-46 dc from previous row (to be used later for sleeve) and 24-27-30-33-36-40 dc (front piece). Continue with 1 dc in each dc/ch = 102-114-126-138-150-166 dc. Insert a marker in the middle of the 8 ch under sleeve each side (back piece = 46-52-58-64-70-78 dc, front piece = 28-31-34-37-40-44 dc). Continue with 1 dc in each dc. When piece measures 34-36-38-40-42-44 cm / 13⅜"-14¼"-15"-15¾"-16½"-17¼" dec 8 sts evenly (do not dec on front band) - see DECREASING TIP = 94-106-118-130-142-158 dc. When piece measures 40-42-44-46-48-50 cm / 15¾"-16½"-17¼"-18"-19"-19¾" inc 12-12-12-12-12-14 dc evenly (do not inc on front band) = 106-118-130-142-154-172 dc. When piece measures 43-45-47-49-51-53 cm / 17"-17¾"-18½"-19¼"-20"-21" continue as follows: 5 dc on front band, repeat M.2, finish with 5 dc on front band. Continue with 1 dc in each dc until piece measures 54-56-58-60-62-64 cm / 21¼"-22"-22¾"-23⅝"-24⅜"-25¼", cut and fasten thread. SLEEVE: Worked from top down. Beg mid under sleeve as follows: 1 sc in the 5th of the 8 ch under sleeve/on armhole. Ch 3 (= 1 dc) and continue with 1 dc in each ch. NOTE: Before continuing over armhole work 1 dc in transition (to avoid a hole). Continue with 1 dc in each dc over armhole, work 1 dc in transition and work 1 dc in each of the remaining ch under sleeve = 48-50-52-54-56-56 dc. Insert a marker mid under sleeve. NOW MEASURE PIECE FROM HERE. Work 1 dc in each dc. When piece measures 4 cm / 1½" dec 1 dc each side of marker, see DECREASING TIP, and repeat the dec on every 4.5-4.5-4-4-4-4 cm / 1¾"-1¾"-1½"-1½"-1½"-1½", a total of 8-8-9-9-9-9 times = 32-34-34-36-38-38 dc. Cut and fasten thread when sleeve measures 45-45-44-44-43-43 cm / 17¾"-17¾"-17¼"-17¼"-17"-17" – NOTE: less for the larger sizes because of wider neck and shoulder. ASSEMBLY: Sew buttons on left front piece – place the top one 1 cm / ½" from neckline, then the remaining with approx 8 cm / 3" between each. Use gap between 2 dc on front band as buttonhole. |
|||||||||||||
Diagram explanations |
|||||||||||||
|
|||||||||||||

|
|||||||||||||
|
|||||||||||||
|
Have you made this or any other of our designs? Tag your pictures in social media with #dropsdesign so we can see them! Do you need help with this pattern?You'll find tutorial videos, a Comments/Questions area and more by visiting the pattern on garnstudio.com. © 1982-2024 DROPS Design A/S. We reserve all rights. This document, including all its sub-sections, has copyrights. Read more about what you can do with our patterns at the bottom of each pattern on our site. |
|||||||||||||


With over 40 years in knitting and crochet design, DROPS Design offers one of the most extensive collections of free patterns on the internet - translated to 17 languages. As of today we count 304 catalogs and 11422 patterns - 11417 of which are translated into English (US/in).
We work hard to bring you the best knitting and crochet have to offer, inspiration and advice as well as great quality yarns at incredible prices! Would you like to use our patterns for other than personal use? You can read what you are allowed to do in the Copyright text at the bottom of all our patterns. Happy crafting!
Comments / Questions (130)
Jeg oplevede desværre også at jakken var meget bred foroven og meget smal forneden. Jakken blev så uproportioneret, at jeg måtte trevle op og opgive.
12.03.2014 - 00:39I love the tyle of your Drops jacket "Nepal" . Thank you for your free pattern. Please tell us why the number of the chains to start is greater than the number of second row ? For example : for size Med. beginning ch 107, second row is 79 dc. And what is 1-0-2-1-0-2. I have a hard time to figure it out. Thank you for your replying. Michelle
11.03.2014 - 15:42DROPS Design answered:
Dear Mrs Turner, the fundation ch is often tighter than the next rows, to avoid a difference of width, you cast on more ch, but then skip some ch evenly distributed to get the correct number of sts at the end of 1st row. All numbers are given in the order of sizes, eg, 1 for size S, 0 for size M, 2 for size L etc. Happy crocheting!
11.03.2014 - 16:37Zoals ik kan bekijken is m1 de 5 steken van de bies. Maar na M1 heb ik veel te weinig steken en heb geen idee waar ik de fout in ga. ik haak maat M met naald 4,5.
17.02.2014 - 21:28DROPS Design answered:
Hoi Fenna. M.1 is niet de voorbies. Je hebt 73 stk en haakt 10 toeren volgens M.1 (Voorbiezen: 5 stk aan iedere kant = voorbies, haak 1 stk in ieder stk – staan niet in het telpatroon), dus je haakt over de resterende 63 stk = 3 stk per herhaling = 21 herhalingen van M.1 en eindigt met 8 stk per herhaling = 168 + 10 voorbiesstk.
19.02.2014 - 14:34Ik ben met dit patroon begonnen. Maar, na de eerste 10 toeren M1 zou ik volgens patroon beschrijving 100 steken meer moeten hebben en dat klopt niet. mvg Fenna
17.02.2014 - 11:51DROPS Design answered:
Hoi Fenna. Welke maat haak je en hoeveel stk heb je nu en wat had je moeten hebben? Dan kan ik het bekijken en eventueel laten weten hoe je moet haken.
17.02.2014 - 13:06Just finished making this for my granddaughter. It made up very easily. I read the entire pattern first and then wrote it up for ease in working with. I love the finished product! So happy I found your website!
04.02.2014 - 23:46Es steht gleich zu Anfang, dass man 10 R in M1 häkeln soll. Weiterhin steht, dass man 5 Stb auf beiden Seiten für die Blende häkeln soll. Häkel ich dann 5 Stäbchen und häkel dann gemäß M1 weiter und dann am Ende der Reihe wieder 5 Stäbchen oder aber häkel ich in die erste Masche 5 Stäbchen und beginne dann ab der nächsten Masche gemäß M1 zu häkeln? Bitte helft mir kurz. Vielen Dank!
29.01.2014 - 13:42DROPS Design answered:
Liebe Anja, an der Blende wird je 1 Stb in 1 M gehäkelt und dann beginnt man mit M.1.
30.01.2014 - 07:56Beste meneer,mevrouw Kunt u mij uitleggen hoe ik van af toer 2(115 steken) meerder zodat ik bij toet 10 tot 210 steken ben gekomen. Dat is mij niet duidelijk. Groet, Krista
22.01.2014 - 11:55DROPS Design answered:
Hoi Krista. Volg je teltekening M.1 en haakt deze 1 keer in de hoogte (zie teltekening onderaan), dan eindig je automatisch op de 210 stk vanwege de meerderingen (rij 1, 2, 5, 7 en 10)
22.01.2014 - 12:34Thanks for sizing info, this is my first crochet pattern for a garment - and I am looking forward to it!
02.01.2014 - 20:39PLease could you tell me what chest sizes apply to the sizes for the crochet DROPS jacket in Nepal? I don't seem to be able to find them anywhere. Thanks.
31.12.2013 - 20:36DROPS Design answered:
Dear Anne-Marie, you will find all finished measurements in the measurement chart at the bottom of the pattern. The measures are taken flat, from side to side. Happy crocheting!
02.01.2014 - 10:53Als ik 5 stokjes doe en dan 2st en dan m2 doe dan kom ik niet uit hou ik ong 5 st over
02.09.2013 - 13:02DROPS Design answered:
Hoi. Haakt u maat L of XXXL? Voor maat L bijvoorbeeld geldt: 194 stk op de toer: 5 stk voorbies (= 10 st), 2 st net na en net voor de voorbies (= 4 stk) = 180. 1 herhaling van M.2 loopt over 6 stk = 30 herhalingen van M.2. Houdt u dit aan, dan gaat het niet fout. Voor XXXL heeft u dan 38 herhalingen van M.2.
03.09.2013 - 12:02