The yarn cost is calculated from the pattern’s smallest size and the yarn’s cheapest product type. Looking for an even better price? You might find it on the DROPS Deals!
-------------------------------------------------------
Alternative Yarn – See how to change yarns here
Yarn Groups A to F – Use the same pattern and change the yarn here
Yarn usage using an alternative yarn – Use our yarn converter here
-------------------------------------------------------
The yarn cost is calculated from the pattern’s smallest size and the yarn’s cheapest product type. Looking for an even better price? You might find it on the DROPS Deals!
All measurements in charts are in cm.
= 1 dc in dc | |
= 1 dc in ch space | |
= ch | |
= 2 dc in the same dc |
Each of our patterns has specific tutorial videos to help you.
These step-by-step tutorials might also help you:
Why is the knitting/crochet tension so important?
Knitting tension is what determines the final measurements of your work, and is usually measured per 10 x 10 cm. It is provided like so: number of stitches in width x number of rows in height - eg: 19 stitches x 26 rows = 10 x 10 cm.
The knitting tension is very individual; some people knit/crochet loosely while others work tightly. You adjust the knitting tension with the needle size, which is why the suggested needle size only serve as a guide! You need to adjust this (up or down) to ensure that YOUR knitting tension matches the knitting tension provided in the pattern. If you work with a different knitting tension than provided you will have a different yarn consumption, and your work will have different measurements than what the pattern suggests.
The knitting tension also determines which yarns can replace each other. As long as you achieve the same knitting tension you can replace one yarn with another.
See DROPS lesson: How to measure your tension/gauge
See DROPS video: How to make a gauge tension swatch
How do I know how many balls of yarn I need?
The required amount of yarn is provided in grams, eg: 450 g. To calculate how many balls you’ll need you first need to know how many grams are in 1 ball (25g, 50g or 100g). This information is available if you click on the individual yarn quality on our pages. Divide the amount required with the amount of each ball. For example, if each ball is 50g (the most common amount), the calculation will be as follows: 450 / 50 = 9 balls.
Can I use a different yarn than what the pattern suggests?
The important thing when changing from one yarn to another is that the knitting/crochet tension remains the same. This is so that the measurements of the finished piece will be the same as on the sketch provided. It is easier to achieve the same knitting tension using yarns from the same yarn group. It is also possible to work with multiple strands of a thinner yarn to achieve the knitting tension of a thicker one. Please try our yarn converter. We recommend you to always work a test swatch.
Please NOTE: when changing yarn the garment might have a different look and feel to the garment in the photo, due to individual properties and qualities of each yarn.
See DROPS lesson: Can I use a different yarn than the one mentioned in the pattern?
What are the yarn groups?
All our yarns are categorised into yarn groups (from A to F) according to thickness and knitting tension – group A contains the thinnest yarns and group F the thickest. This makes it easier for you to find alternative yarns to our patterns, should you wish to switch yarn. All yarns within the same group have a similar knitting tension and can easily replace each other. However, different yarn qualities have different structures and properties which will give the finished work a unique look and feel.
How do I use the yarn converter?
At the top of all our patterns you’ll find a link to our yarn converter, which is a helpful tool should you wish to use a different yarn than suggested. By filling in the yarn quality you wish to replace, the amount (in your size) and number of strands, the converter will present good alternative yarns with the same knitting tension. Additionally it will tell you how much you’ll require in the new qualities and whether you’ll need to work with multiple strands. Most skeins are 50g (some are 25g or 100g).
If the pattern is worked with multiple colours, every colour will have to be converted separately. Similarly, if the pattern is worked with several strands of different yarns (for example 1 strand Alpaca and 1 strand Kid-Silk) you will have to find alternatives for each, individually.
Why do you show discontinued yarns in the patterns?
Since different yarns have different qualities and textures we have chosen to keep the original yarn in our patterns. However, you can easily find options among our available qualities by using our yarn converter, or simply pick a yarn from the same yarn group.
It is possible that some retailers still have discontinued yarns in stock, or that someone has a few skeins at home that they would like to find patterns for.
The yarn converter will provide both alternative yarn as well as required amount in the new quality.
What size should I knit?
If you think it's hard to decide what size to make, it can be a good idea to measure a garment you own already and like the size of. Then you can pick the size by comparing those measures with the ones available in the pattern's size chart.
You'll find the size chart at the bottom of the pattern.
See DROPS lesson: How to read size chart
Why do I get the wrong knitting tension with the suggested needle size?
The needle size provided in the pattern serves only as a guide, the important thing is to follow the knitting tension. And since knitting tension is very individual, you will have to adjust the needle size to ensure that YOUR tension is the same as in the pattern – maybe you’ll have to adjust 1, or even 2 needle sizes, up or down to achieve the correct tension. For this, we recommend that you work test swatches.
Should you work with a different knitting tension than the one provided, the measurements of the finished garment might deviate from the measurement sketch.
See DROPS lesson: How to measure your tension/gauge
See DROPS video: How to make a gauge tension swatch
Why is the pattern worked top-down?
Working a garment top-down provides more flexibility and room for personal adjustment. For example it is easier to try the garment on while working, as well as making adjustments to length of yoke and shoulder caps.
The instructions are carefully explaining every step, in the correct order. Diagrams are adjusted to the knitting direction and are worked as usual.
How do I work according to a knitting diagram?
The diagram depicts all rows/rounds, and every stitch seen from the right side. It is read from bottom to top, from right to left. 1 square = 1 stitch.
When working back and forth, every other row is worked from the right side and every other row is worked from the wrong side. When working from the wrong side, the diagram will have to be worked reversed: from left to right, knit stitches are purled, purl stitches are knit etc.
When working in the round every round is worked from the right side and the diagram are worked from right to left on all rounds.
See DROPS lesson: How to read knitting diagrams
How do I work according to a crochet diagram?
The diagram depicts all rows/rounds, and every stitch seen from the right side. It is worked from bottom to top, from right to left.
When working back and forth every other row is worked from the right side: from right to left and every other row is worked from the wrong side: from left to right.
When working in the round, every row in the diagram are worked from the right side, from right to left.
When working a circular diagram you start in the middle and work your way outwards, counter clockwise, row by row.
The rows usually start with a given number of chain stitches (equivalent to the height of the following stitch), this will either be depicted in the diagram or explained in the pattern.
See DROPS lesson: How to read crochet diagrams
How do I work several diagrams simultaneously on the same row/round?
Instructions for working several diagrams after each other on the same row/round, will often be written like so: “work A.1, A.2, A.3 a total of 0-0-2-3-4 times". This means you work A.1 once, then A.2 is worked once, and A.3 is repeated (in width) the number of times provided for your size – in this case like so: S = 0 times, M = 0 times, L=2 times, XL= 3 times and XXL = 4 times.
The diagrams are worked as usual: begin with the first row in A.1, then work the first row in A.2 etc.
See DROPS lesson: How to read knitting diagrams
See DROPS lesson: How to read crochet diagrams
Why are the sleeves shorter in larger sizes?
The total width of the garment (from wrist-to-wrist) will be larger in the larger sizes, despite the actual sleeves being shorter. The larger sizes have longer sleeve caps and wider shoulders, so there will be a good fit in all sizes.
Where on the garment is the length measured?
The measurement sketch/schematic drawing provides information regarding the full length of the garment. If it’s a jumper or a jacket the length is measured from the highest point on the shoulder (usually closest to the neckline), and straight down to the bottom of the garment. It is NOT measured from the tip of shoulder. Similarly, the length of yoke is measured from the highest point on the shoulder and down to where yoke is split into body and sleeves.
See DROPS lesson: How to read a schematic drawing
What is a repeat?
Diagrams are often repeated on the round or in height. 1 repeat is the diagram the way it appears in the pattern. If it says to work 5 repeats of A.1 in the round, then you work A.1 a total of 5 times after/next to each other in the round. If it says to work 2 repeats of A.1 vertically/in height you work the entire diagram once, then begin again at the start and work the entire diagram one more time.
Why does the piece start with more chain stitches than it’s worked with?
Chain stitches are slightly narrower than other stitches and to avoid working the cast-on edge too tight, we simply chain more stitches to begin with. The stitch count will be adjusted on the following row to fit the pattern and measurement sketch.
Why increase before the rib edge when the piece is worked top-down?
The rib edge is more elastic and will contract slightly compared to, for example, stocking stitch. By increasing before the rib edge, you avoid a visible difference in width between the rib edge and the rest of the body.
Why increase in the cast-off edge?
It’s very easy to cast off too tightly, and by making yarn overs while casting off (and simultaneously casting these off) you avoid a too tight cast off edge.
See DROPS video: How to bind off with yarn overs (yo)
How do I increase/decrease on every 3rd and 4th row/round alternately?
To achieve an even increase (or decrease) you can increase on, for example: every 3rd and 4th row alternately, like so: work 2 rows and increase on the 3rd row, work 3 rows and increase on the 4th. Repeat this until the increase is complete.
See DROPS lesson: Increase or decrease 1 st on every 3rd and 4th row alternately
How can I work a jacket in the round instead of back and forth?
Should you prefer to work in the round instead of back and forth, you may of course adjust the pattern. You’ll need to add steeks mid-front (usually 5 stitches), and follow the instructions. When you would normally turn and work from the wrong side, simply work across the steek and continue in the round. At the end you’ll cut the piece open, pick up stitches to work bands, and cover the cut edges.
See DROPS video: How to knit steeks and cut open
Can I work a jumper back and forth instead of in the round?
Should you prefer to work back and forth instead of in the round, you may of course adjust the pattern so you work the pieces separately and then assemble them at the end. Divide the stitches for the body in 2, add 1 edge stitch in each side (for sewing) and work the front and back pieces separately.
See DROPS lesson: Can I adapt a pattern for circular needles into straight needles?
Why is the pattern slightly different than what I see in the photo?
Pattern repeats can vary slightly in the different sizes, in order to get the correct proportions. If you’re not working the exact same size as the garment in the photo, yours might deviate slightly. This has been carefully developed and adjusted so that the complete impression of the garment is the same in all sizes.
Make sure to follow instructions and diagrams for your size!
How do I make a women’s size garment into a men’s size one?
If you have found a pattern you like which is available in women’s size it’s not very difficult to convert it to men’s size. The biggest difference will be the length of sleeves and body. Start working on the women size that you think would fit across the chest. The additional length will be worked right before you cast off for the armhole/sleeve cap. If the pattern is worked top-down you can add the length right after the armhole or before the first decrease on sleeve.
Regarding additional yarn amount, this will depend on how much length you add, but it is better with a skein too many than too few.
How do I prevent a hairy garment from shedding?
All yarns will have excess fibres (from production) that might come off as lint or shedding. Brushed yarns (ie hairier yarns) have more of these loose, excess fibres, causing more shedding.
Shedding also depends on what is worn under or over the garment, and whether this pulls at the yarn fibres. It’s therefore not possible to guarantee that there will be no shedding
Below are some tips on how to get the best result when working with hairier yarns:
1. When the garment is finished (before you wash it) shake it vigorously so the looser hairs come off. NOTE: do NOT use a lint roller, brush or any method that pulls at the yarn.
2. Place the garment in a plastic bag and put it in your freezer - the temperature will cause the fibres to become less attached to each other, and excess fibres will come off easier.
3. Leave in the freezer for a few hours before taking it out and shaking it again.
4. Wash the garment according to the instructions on the yarn label.
Why does my garment pill?
Pilling is a natural process that happens to even the most exclusive of fibers. It's a natural sign of wear and tear that is hard to avoid, and that is most visible in high friction areas of your garment like a sweater's arms and cuffs.
You can make your garment look as new by removing the pilling, using a fabric comb or a pill/lint remover.
A Kiss For Midwinter |
|||||||||||||
|
|
||||||||||||
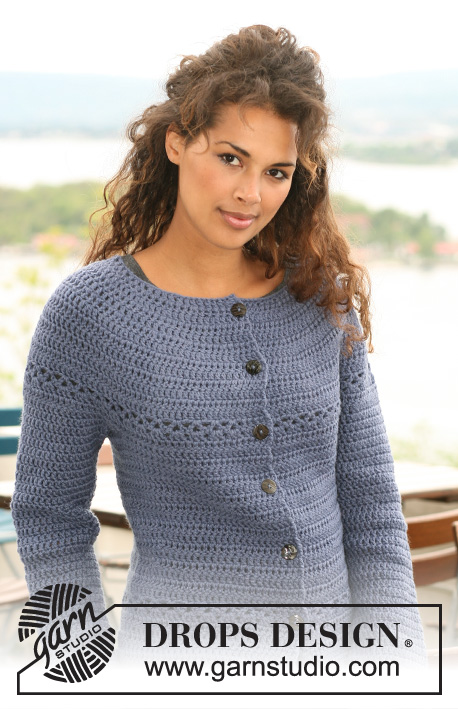
Crochet DROPS jacket in ”Nepal”. Size XS to XXXL.
DROPS 121-33 |
|||||||||||||
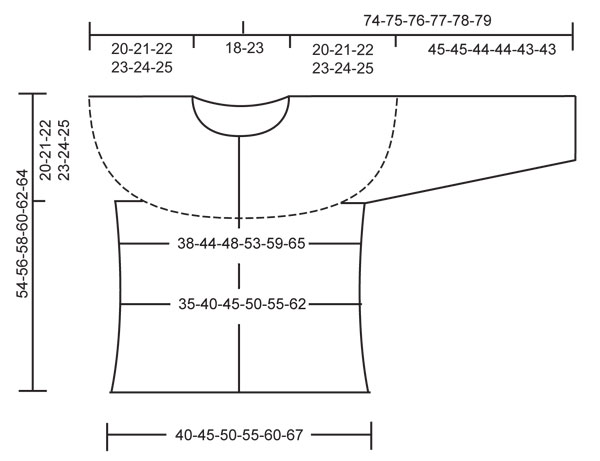
CROCHET INFO: Replace first dc on each round/row with ch 3. Finish each round with 1 sl st in 3rd ch from beg of round/beg of previous row. PATTERN: See diagram M.1 and M.2. Diagram shows the pattern from RS. DECREASING TIP: Work 1 dc, but wait with last pull-through (= 2 sts on hook), work next dc, but when doing the last pull-through pull thread through all sts on hook – 1 dec dc. ---------------------------------------------------------- BODY PIECE: Worked from top down, back and forth from mid front. Ch 91-99-107-115-123-131 (includes 3 ch to turn with) with hook size 4.5 mm/US 7 and Nepal. Work next row as follows: 1 dc in 4th ch, * skip ch 1, 1 dc in each of the next 3 ch *, repeat from *-*, skip 1 ch and finish with 1 dc in the last 2 ch = 67-73-79-85-91-97 dc – see CROCHET INFO. Now work 10 rows acc to M.1 (5 dc each side = front band, work 1 dc in each dc – not included in diagram). After M.1 there are 162-178-194-210-226-242 dc on row. Continue with 1 dc in each dc. When piece measures 16-17-18-19-20-21 cm / 6¼"-6¾"-7"-7½"-8"-8¼" continue as follows: 5 dc on front band, 1-0-2-1-0-2 dc, repeat M.2 until 6-5-7-6-5-7 dc remain, finish with 1-0-2-1-0-2 dc and 5 dc on front band. Continue with 1 dc in each dc until piece measures 20-21-22-23-24-25 cm / 8"-8¼"-8¾"-9"-9½"-9¾". Work next row as follows: 24-27-30-33-36-40 dc (front piece), 8 ch (under sleeve/armhole), skip 38-40-42-44-46-46 dc from previous round (to be used later for sleeve), 38-44-50-56-62-70 dc (back piece), 8 ch (under sleeve/armhole), skip 38-40-42-44-46-46 dc from previous row (to be used later for sleeve) and 24-27-30-33-36-40 dc (front piece). Continue with 1 dc in each dc/ch = 102-114-126-138-150-166 dc. Insert a marker in the middle of the 8 ch under sleeve each side (back piece = 46-52-58-64-70-78 dc, front piece = 28-31-34-37-40-44 dc). Continue with 1 dc in each dc. When piece measures 34-36-38-40-42-44 cm / 13⅜"-14¼"-15"-15¾"-16½"-17¼" dec 8 sts evenly (do not dec on front band) - see DECREASING TIP = 94-106-118-130-142-158 dc. When piece measures 40-42-44-46-48-50 cm / 15¾"-16½"-17¼"-18"-19"-19¾" inc 12-12-12-12-12-14 dc evenly (do not inc on front band) = 106-118-130-142-154-172 dc. When piece measures 43-45-47-49-51-53 cm / 17"-17¾"-18½"-19¼"-20"-21" continue as follows: 5 dc on front band, repeat M.2, finish with 5 dc on front band. Continue with 1 dc in each dc until piece measures 54-56-58-60-62-64 cm / 21¼"-22"-22¾"-23⅝"-24⅜"-25¼", cut and fasten thread. SLEEVE: Worked from top down. Beg mid under sleeve as follows: 1 sc in the 5th of the 8 ch under sleeve/on armhole. Ch 3 (= 1 dc) and continue with 1 dc in each ch. NOTE: Before continuing over armhole work 1 dc in transition (to avoid a hole). Continue with 1 dc in each dc over armhole, work 1 dc in transition and work 1 dc in each of the remaining ch under sleeve = 48-50-52-54-56-56 dc. Insert a marker mid under sleeve. NOW MEASURE PIECE FROM HERE. Work 1 dc in each dc. When piece measures 4 cm / 1½" dec 1 dc each side of marker, see DECREASING TIP, and repeat the dec on every 4.5-4.5-4-4-4-4 cm / 1¾"-1¾"-1½"-1½"-1½"-1½", a total of 8-8-9-9-9-9 times = 32-34-34-36-38-38 dc. Cut and fasten thread when sleeve measures 45-45-44-44-43-43 cm / 17¾"-17¾"-17¼"-17¼"-17"-17" – NOTE: less for the larger sizes because of wider neck and shoulder. ASSEMBLY: Sew buttons on left front piece – place the top one 1 cm / ½" from neckline, then the remaining with approx 8 cm / 3" between each. Use gap between 2 dc on front band as buttonhole. |
|||||||||||||
Diagram explanations |
|||||||||||||
|
|||||||||||||
Have you made this or any other of our designs? Tag your pictures in social media with #dropsdesign so we can see them! Do you need help with this pattern?You'll find tutorial videos, a Comments/Questions area and more by visiting the pattern on garnstudio.com. © 1982-2024 DROPS Design A/S. We reserve all rights. This document, including all its sub-sections, has copyrights. Read more about what you can do with our patterns at the bottom of each pattern on our site. |
With over 40 years in knitting and crochet design, DROPS Design offers one of the most extensive collections of free patterns on the internet - translated to 17 languages. As of today we count 304 catalogs and 11422 patterns - 11417 of which are translated into English (US/in).
We work hard to bring you the best knitting and crochet have to offer, inspiration and advice as well as great quality yarns at incredible prices! Would you like to use our patterns for other than personal use? You can read what you are allowed to do in the Copyright text at the bottom of all our patterns. Happy crafting!
Comments / Questions (130)
Annette Lohse wrote:
Hej Vil gerne i gang med denne flotte jakke, men er i tvivl om str. Der er ingen brystvidde angivet. Har ledt på siden efter generel størrelsesguide, men kan ingen finde. Kan i hjælpe? På forhånd tak. Mvh Annette
17.02.2015 - 16:52DROPS Design answered:
Hej Annette. Nederst paa mönstret er der en maalskitse med alle maal i cm per störrelse.
18.02.2015 - 12:54Hilary wrote:
Hi. Following the pattern, it says that after M1 continue till piece measures 18cm. But after the 10 rows of M1, my piece measures 23 cm. Will this be a problem?
07.02.2015 - 02:20DROPS Design answered:
Dear Hilary, remember to check your tension, you should get and keep 12 tr x 7 rows = 10 x 10 cm. Happy crocheting!
07.02.2015 - 09:21Kari wrote:
When reading the pattern, I know that you start at the bottom right corner. When moving on to the second and so on rows do you continue to read it right to left or do you switch to left to right?
01.02.2015 - 19:51DROPS Design answered:
Dear Kari, you read 1st row in diagram and every other row from the right towards the left, and 2nd row and every other row from the left towards the right. Happy crocheting!
02.02.2015 - 12:58Hilary wrote:
Hi. This is the first time I am attempting one of your patterns. Your sizes are listed as XS/S M, L etc. Is it possible to know the exact measurements in inches or cm please?
28.01.2015 - 16:19DROPS Design answered:
Hi Hilary. The measurements are listed on the schematic drawing at the bottom of the pattern. The measurements are in cm per size.
28.01.2015 - 16:31Sunny wrote:
Hello again, Could you pls list the number of chains after each row during M.1? I keep getting wrong number of chains after 10 rows.
24.01.2015 - 21:31DROPS Design answered:
Dear Sunny, I'm sorry I'm not sure which chains you are wondering - you crochet 3 turning ch at the end of each row and work 5 dc, repeat diag M.1, 5 dc. Diag. M.1 starts at the bottom corner on the right side and read towards the left (row 1 and every other row), then read from the left towards the right (row 2 and every other row). Row 1 is worked over 3 sts (and becomes 4 sts in each repeat), last row is worked over 7 sts (and becomes 8 sts in each repeat). Happy crocheting!
26.01.2015 - 09:57Sunny wrote:
The cardigan is beautiful! At the row 2, we need to do 10 rows of M1 where the diagram is shown below the pattern. By the way, it starts with 3+1 DC till it becomes 7+1 with after 10 rows. I suppose this is a step to increase total number of chains. Can you explain how to achieve to from ch 67 to ch 162 (small size here). Thank you in advance.
22.01.2015 - 04:14DROPS Design answered:
Dear Sunny, you will work M.1 as follows, starting at the bottom corner on the right side reading towards the left from RS, and from the left towards the right from WS: 5 dc, repeat M.1 (= 2 dc in next st, 1 dc in each of the next 2 sts) until 5 sts remains at the end of row, 1 dc in each of the last 5 sts. Continue upwards until the 10 rows of M.1 has been made, you will have 162 dc when M.1 has been worked 1 time in height over all sts. Happy crocheting!
22.01.2015 - 10:29Kate wrote:
In body piece - M.2., repeat M2 until 7 tr remain. Question, 7 stitches remain where? Can't be 7 stitches left to be worked. Sorry but I can't understand this one. Thank you. Doing well until this point, now I'm stuck!
19.01.2015 - 01:48DROPS Design answered:
Dear Kate, you repeat M2 until 7 sts remain before the end of row, then work over the last 7 sts on row as follows: 2 tr in next st, 1 tr in each of the next 5 tr. Happy crocheting!
19.01.2015 - 14:08Monika wrote:
Ich verstehe den Abschnitt nach der Reihe mit den Luftmaschen für den Ärmeleinsatz nicht. Wenn ich die Maschenzahl für die Ärmelreihe addiere, komme ich in Größe L auf 194 Maschen. "Weiter je ein Stb/jede fM=126 Maschen" Wie komme ich von 194 auf 216 Maschen? Wieso fM?
16.01.2015 - 21:49DROPS Design answered:
Sie haben ja eine bestimmte Anzahl M für die Ärmel übersprungen und dafür nur 8 Lm gehäkelt. Nun häkeln Sie also 30 Stb für das Vorderteil, 8 Stb für den Armausschnitt (in jede Lm 1 Stb), 50 Stb für das Rückenteil, 8 Stb für den anderen Armausschnitt und 30 Stb für das Vorderteil = 126 M. Die Angabe "fM" war ein Fehler, der gerade korrigiert wurde, es muss "Lm" heißen.
17.01.2015 - 18:26Bettina wrote:
Buonasera,complimenti per questo modello facile e elegante!Quale taglia porta la modella nella foto? Non sono sicura di aver capito bene la misura da fare per me. La ringrazio
04.09.2014 - 21:34DROPS Design answered:
Buonasera Bettina. Nel diagramma in basso, alla fine delle spiegazioni del modello, trova le taglie espresse in cm. Confrontando queste misure con quelle di un suo indumento analogo, dovrebbe riuscire ad individuare la taglia corretta da seguire. Buon lavoro!
04.09.2014 - 22:47Michelle Turner wrote:
Thank you for answering me. But I still don't understand 1-0-2-1-0-2 dc. Please explain more specificly, or can I contact Sue L since she has finished her jacket for her grand daughter. Thank you.
13.03.2014 - 00:26DROPS Design answered:
Dear Mrs Turner, when it says : "5 dc on front band, 1-0-2-1-0-2 dc, repeat M.2 ..", if you work size S or XL, work 5 dc on front band, then 1 dc in next st - if you work size M or XXL, start M.2 - if you work size L or XXXL, work 5 dc on front band then 1 dc in next 2 sts, then M.2. Happy crocheting!
13.03.2014 - 09:09