
Popular categories
Looking for a yarn?


|
|||||||||||||
A Kiss For Midwinter |
|||||||||||||
 |
 |
||||||||||||
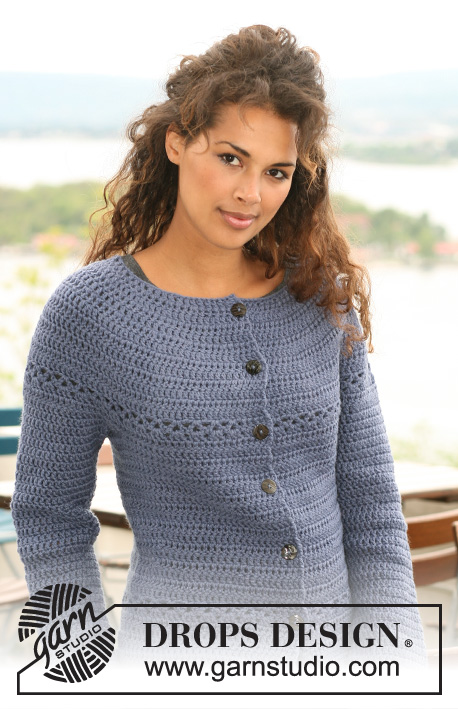
Crochet DROPS jacket in ”Nepal”. Size XS to XXXL.
DROPS 121-33 |
|||||||||||||
|
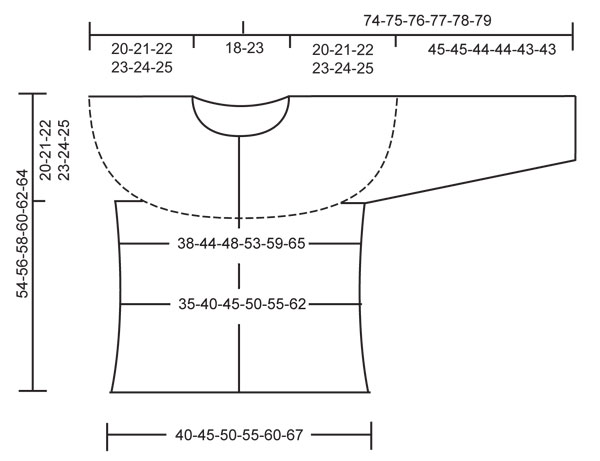
CROCHET INFO: Replace first dc on each round/row with ch 3. Finish each round with 1 sl st in 3rd ch from beg of round/beg of previous row. PATTERN: See diagram M.1 and M.2. Diagram shows the pattern from RS. DECREASING TIP: Work 1 dc, but wait with last pull-through (= 2 sts on hook), work next dc, but when doing the last pull-through pull thread through all sts on hook – 1 dec dc. ---------------------------------------------------------- BODY PIECE: Worked from top down, back and forth from mid front. Ch 91-99-107-115-123-131 (includes 3 ch to turn with) with hook size 4.5 mm/US 7 and Nepal. Work next row as follows: 1 dc in 4th ch, * skip ch 1, 1 dc in each of the next 3 ch *, repeat from *-*, skip 1 ch and finish with 1 dc in the last 2 ch = 67-73-79-85-91-97 dc – see CROCHET INFO. Now work 10 rows acc to M.1 (5 dc each side = front band, work 1 dc in each dc – not included in diagram). After M.1 there are 162-178-194-210-226-242 dc on row. Continue with 1 dc in each dc. When piece measures 16-17-18-19-20-21 cm / 6¼''-6¾''-7''-7½''-8''-8¼'' continue as follows: 5 dc on front band, 1-0-2-1-0-2 dc, repeat M.2 until 6-5-7-6-5-7 dc remain, finish with 1-0-2-1-0-2 dc and 5 dc on front band. Continue with 1 dc in each dc until piece measures 20-21-22-23-24-25 cm / 8''-8¼''-8¾''-9''-9½''-9¾''. Work next row as follows: 24-27-30-33-36-40 dc (front piece), 8 ch (under sleeve/armhole), skip 38-40-42-44-46-46 dc from previous round (to be used later for sleeve), 38-44-50-56-62-70 dc (back piece), 8 ch (under sleeve/armhole), skip 38-40-42-44-46-46 dc from previous row (to be used later for sleeve) and 24-27-30-33-36-40 dc (front piece). Continue with 1 dc in each dc/ch = 102-114-126-138-150-166 dc. Insert a marker in the middle of the 8 ch under sleeve each side (back piece = 46-52-58-64-70-78 dc, front piece = 28-31-34-37-40-44 dc). Continue with 1 dc in each dc. When piece measures 34-36-38-40-42-44 cm / 13 3/8''-14¼''-15''-15¾''-16½''-17¼'' dec 8 sts evenly (do not dec on front band) - see DECREASING TIP = 94-106-118-130-142-158 dc. When piece measures 40-42-44-46-48-50 cm / 15¾''-16½''-17¼''-18''-19''-19¾'' inc 12-12-12-12-12-14 dc evenly (do not inc on front band) = 106-118-130-142-154-172 dc. When piece measures 43-45-47-49-51-53 cm / 17"-17 3/4"-18½"-19 1/4"-20"-21" continue as follows: 5 dc on front band, repeat M.2, finish with 5 dc on front band. Continue with 1 dc in each dc until piece measures 54-56-58-60-62-64 cm / 21¼''-22''-22¾''-23 5/8''-24 3/8''-25¼'', cut and fasten thread. SLEEVE: Worked from top down. Beg mid under sleeve as follows: 1 sc in the 5th of the 8 ch under sleeve/on armhole. Ch 3 (= 1 dc) and continue with 1 dc in each ch. NOTE: Before continuing over armhole work 1 dc in transition (to avoid a hole). Continue with 1 dc in each dc over armhole, work 1 dc in transition and work 1 dc in each of the remaining ch under sleeve = 48-50-52-54-56-56 dc. Insert a marker mid under sleeve. NOW MEASURE PIECE FROM HERE. Work 1 dc in each dc. When piece measures 4 cm / 1½'' dec 1 dc each side of marker, see DECREASING TIP, and repeat the dec on every 4.5-4.5-4-4-4-4 cm / 1 3/4"-1 3/4"-1½"-1½"-1½"-1½", a total of 8-8-9-9-9-9 times = 32-34-34-36-38-38 dc. Cut and fasten thread when sleeve measures 45-45-44-44-43-43 cm / 17 3/4"-17 3/4"-17 1/4"-17 1/4"-17"-17" – NOTE: less for the larger sizes because of wider neck and shoulder. ASSEMBLY: Sew buttons on left front piece – place the top one 1 cm / ½'' from neckline, then the remaining with approx 8 cm / 3'' between each. Use gap between 2 dc on front band as buttonhole. |
|||||||||||||
Diagram explanations |
|||||||||||||
|
|||||||||||||

|
|||||||||||||
|
|||||||||||||
|
Have you made this or any other of our designs? Tag your pictures in social media with #dropsdesign so we can see them! Do you need help with this pattern?You'll find tutorial videos, a Comments/Questions area and more by visiting the pattern on garnstudio.com. © 1982-2024 DROPS Design A/S. We reserve all rights. This document, including all its sub-sections, has copyrights. Read more about what you can do with our patterns at the bottom of each pattern on our site. |
|||||||||||||


With over 40 years in knitting and crochet design, DROPS Design offers one of the most extensive collections of free patterns on the internet - translated to 17 languages. As of today we count 304 catalogs and 11422 patterns - 11417 of which are translated into English (US/in).
We work hard to bring you the best knitting and crochet have to offer, inspiration and advice as well as great quality yarns at incredible prices! Would you like to use our patterns for other than personal use? You can read what you are allowed to do in the Copyright text at the bottom of all our patterns. Happy crafting!
Comments / Questions (130)
Hola, me dirijo a vosotros porque he comprado lana para hacerme una chaqueta de las vuestras, que me encanta (DROPS 121-33) me he puesto a leer el patron y hay un punto en el que me he quedado estancada y es la parte en la que explica como pasar la labor de tener 73 puntos ( que son los que creo que necesito por mi talla) a 178. No lo entiendo. si me pudierais ayudar os lo agradeceria. Hasta pronto, Merche
06.11.2015 - 10:02DROPS Design answered:
Hola Mercedes, el diagrama M.1 como podrás ver lleva aumentos. Hay que trabajar 10 filas del patrón. En cada fila con aumentos se aumentan 21 pts, ya que son varias repeticiones en la misma fila. Son 5 filas con aumentos = 5 x 21 = 105; 73 + 105 = 178
09.11.2015 - 11:08Hi! I'm a beginner and I need some help on M2. In the second line, I read "chain 3, dc x 4 and then, is it 2dc in the back loop? I'm not sure about these symbols. Thanks in advance.
10.10.2015 - 06:18DROPS Design answered:
Dear Janique, M.2 is worked over 6 sts: skip 1 dc, 1 dc in next dc, ch 2, 1 dc in same st, skip 2 sts, 1 dc in next dc, ch2, 1 dc in nect dc, skip 1 dc. Happy crocheting!
12.10.2015 - 09:20Ik lees uw antwoord van 15-10-2012= M2 2x haken, maar dit staat niet zo in het patroon. Zoals het beschreven is zou het eenmaal gehaakt moeten worden, terwijl op de foto lijkt alsof M2 inderdaad herhaald moet worden.
27.09.2015 - 11:59DROPS Design answered:
Hoi Conny. Je haakt M.2 bij een hoogte van 16-17-18-19-20-21 cm en nogmaals bij 43-45-47-49-51-53 cm op de lijf = 2 keer gehaakt.
05.11.2015 - 11:48Hallo, ich bin mir nicht ganz sicher, ob ich die Anleitung betreffend des Muster 1 richtig verstehe. Heißt das, dass ich nach der 1. Reihe Stb, mit dem Muster 1 beginne? Also am Anfang und am Ende jeder folgenden 10 Reihen 5 Stb (=Blende) und dazwischen immer die angegeben Stb verdoppeln? Also in Reihe 1 jedes 7.Stb verdoppeln, in R 2 und 3 in jedes Stb ein Stb, in R 4 jedes 6. Stb verdoppeln und so weiter? Ich hoffe ich habe mich verständlich ausgedrückt. Vielen Dank!
23.09.2015 - 22:35DROPS Design answered:
Sie müssen das Muster M1 von unten nach oben lesen, nicht von oben nach unten, das ist grundsätzlich bei Strick- und Häkelschriften immer so. Ansonsten haben Sie es aber richtig verstanden. D.h. nach der 1. R mit Stäbchen beginnen Sie mit M.1, d.h. Sie häkeln die Blenden-M, dann die 1. R von M.1 (d.h. jedes 3. Stb verdoppeln), mit den Blenden-M enden usw.
28.09.2015 - 10:41Ik ben er al uit������ dank voor de hulp!
13.09.2015 - 00:11Met de draden afhechten, dacht ik als ik steeds aan de zijkant aanhecht, dan hou ik zoveel katoen over en soms zit er in de draad van het katoen ook een knoopje, het zal wel sterk zijn, maar ook dat ga ik dan weer af- en aanhechten, omdat zo'n aangeknoopt draadje niet mooi staat in het haakwerk.
04.09.2015 - 16:51Die 25 herhalingen kloppen, maar de 25e herhaling heb ik 2 stokjes in 1 stokje en dan 2 stokjes, daarna de 5 stokjes voor de bies, dus dan heb ik 7 stokjes op een rij na de laatste 2 stokjes in 1 stokje. Naderhand krijg ik meer stokjes tussen de 2 stokjes in 1 stokje, dus dan ook meer stokjes voor de 5 stokjes beginnen voor de bies. Ik vond het zoveel stokjes naast elkaar bij de linkerbies t.o.v. de rechterbies, want daar begin ik na de 5 stokjes voor de bies met 2 stokjes in 1 stokje.
04.09.2015 - 16:49DROPS Design answered:
Hoi Nicky. Ik kan je moeilijk volgen, maar nogmaals ;-) Met 85 stk incl. 5 stk aan beide zijkanten haak je M.1 over de overige 75 stk = 25 herhalingen van M.1. Je meerdert tijdens het haken van M.1 van 3 naar 4 stk per herhaling = na eerste toer heb je dus 110 stk op de toer enzovoort. Keer en dan haak je toer 2 van links naar rechts; 5 voorbiesst, 3 stk in elk stk, 2 stk in volgende st, herhaal tot er 5 stk over zijn = voorbiesst, dus na toer 2 heb je 135 stk op de toer enzovoort. Kom je niet uit, dan misschien een idee om naar een winkel of haakgroep te gaan voor persoonlijke hulp?
08.09.2015 - 15:53Wat is het beste om een nieuwe draad aan te hechten, aan het begin van de toer of kan dat ook in het midden van een toer, dan kost het wel minder katoen.
04.09.2015 - 11:44DROPS Design answered:
Hoi Nicky. Er zijn meerdere manieren om van draad te wisselen - zowel aan het begin van een toer of in het midden. Het is een beetje wat je zelf het prettigst - en het mooiste vindt.
04.09.2015 - 13:03Maat Xl, ik moest 115 lossen opzetten
03.09.2015 - 18:31DROPS Design answered:
Hoi Nicky. Je hebt dan in totaal 85 stk op de toer. Je haakt M.1 over 75 stk (5 stk aan elke zijkant voor de biezen): 1e herhaling gaat over 3 stk = 25 herhalingen. Je zou niet stk over hebben als je bij de bies komt.
04.09.2015 - 13:09Ik bedoelde Ik heb aan het einde van de eerste toer van M1 7 stokjes op een rij... Klopt dat? aan de rechterkant heb ik 5 stokjes en dan 2 stokjes in 1 stokje...
03.09.2015 - 15:46DROPS Design answered:
Hoi Nicky. Welke maat maak je? Dan kan ik het natellen.
03.09.2015 - 16:39