
Popular categories
Looking for a yarn?


|
|
Evening Diamond |
|
|
|
|
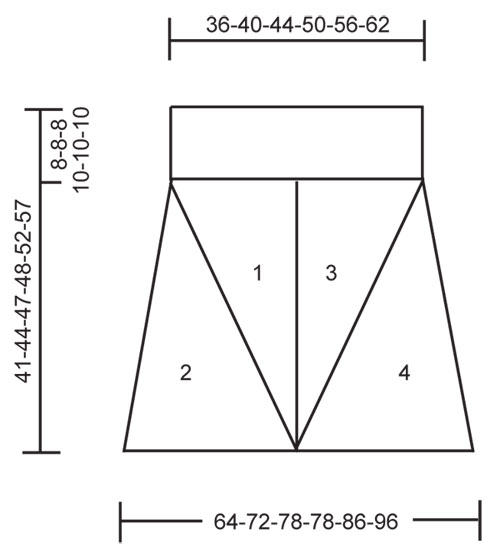
DROPS skirt in garter st in ”Delight”. Size S - XXXL.
DROPS 121-4 |
|
|
INCREASING TIP: Inc by making 1 YO, on next row K YO into back of loop to avoid a hole. BUTTONHOLES: Make buttonholes on button band. 1 buttonhole = cast off 3rd and 4th button band st and cast on 2 new sts on next row. Make buttonholes when button band measures: SIZE S + M + L: 1, 4 and 7 cm. SIZE XL + XXL + XXXL: 1, 4, 6 and 9 cm. -------------------------------------------------------- SKIRT: Worked in garter st, i.e. K all rows. The skirt is worked in 8 parts, back and forth on needle, and the parts are sewn tog afterwards. PART 1: Cast on 2 sts on circular needle size 3 mm with Delight. K 1 row from WS. Insert a marker in the 2nd st from RS. Continue back and forth on needle, AT THE SAME TIME inc as follows before marker - See INCREASING TIP: SIZE S + M + L: inc 1 st on every 3rd and 4th row alternately. SIZE XL + XXL + XXXL: inc 1 st on every 3rd row. Continue like this until there are a total of 47-52-56-63-69-77 sts on needle. Slip sts on a stitch holder. PART 2: Cast on 2 sts on circular needle size 3 mm with Delight. K 1 row from WS. Insert a marker in the first st from RS. Continue back and forth AT THE SAME TIME inc after marker: 1 st on every other row. Continue like this until there are a total of 78-87-94-94-103-115 sts on needle. Slip sts on another stitch holder. Sew part 1 to part 2, edge to edge in outer loops of sts to avoid a chunky seam. PART 3: Like part 1 but mirrored. PART 4: Like part 2, but mirrored. Sew part 3 to part 4, edge to edge in outer loops of sts to avoid a chunky seam PART 5, 6, 7 and 8: Iike part 1, 2, 3 and 4. ASSEMBLY: Sew tog part 1 / 2 and part 3 / 4 (= mid front) and part 5 / 6 and part 7 / 8 (= mid back). Sew edge to edge in outer loops of sts to avoid a chunky seam. Graft tog from WS sts on stitch holders each side. WAIST BAND: Beg on left side of piece in the middle of seam. Work all sts from stitch holders back on needle, and pick up 1-2 sts in each seam between all parts. K 1 row from WS and K 1 row from RS, AT THE SAME TIME adjust no of sts to 182-202-224-250-274-302 sts and AT THE SAME TIME cast on 6 new sts at the end of this row for button band = 188-208-230-256-280-308 sts. Continue back and forth on all sts. AT THE SAME TIME when button band measures approx 1 cm make BUTTONHOLES - see above. AT THE SAME TIME when waist band measures approx 7-7-7-8-8-8 cm dec 10-10-10-10-5-5 sts evenly (do not dec on button band) = 178-198-220-246-275-303 sts. Continue until button band measures 8-8-8-10-10-10 cm. Cast off. Sew on buttons. |
|
|
|
|
Have you made this or any other of our designs? Tag your pictures in social media with #dropsdesign so we can see them! Do you need help with this pattern?You'll find tutorial videos, a Comments/Questions area and more by visiting the pattern on garnstudio.com. © 1982-2024 DROPS Design A/S. We reserve all rights. This document, including all its sub-sections, has copyrights. Read more about what you can do with our patterns at the bottom of each pattern on our site. |


With over 40 years in knitting and crochet design, DROPS Design offers one of the most extensive collections of free patterns on the internet - translated to 17 languages. As of today we count 304 catalogues and 11422 patterns - 11422 of which are translated into English (UK/cm).
We work hard to bring you the best knitting and crochet have to offer, inspiration and advice as well as great quality yarns at incredible prices! Would you like to use our patterns for other than personal use? You can read what you are allowed to do in the Copyright text at the bottom of all our patterns. Happy crafting!
Comments / Questions (37)
Jeg kunne tenke meg å lage dette skjørtet lengre uten å samtidig måtte gå opp i størrelse. Vil den meste måten å gjøre dette på være å forlenge linningen?
12.11.2014 - 00:24DROPS Design answered:
Hej Elisabeth. Det kan du forsöge - eller strik flere pinde imellem ökningerne paa trekanterne, saa de bliver laengere - men ikke bredere.
12.11.2014 - 11:52Bonjour, je ne comprends pas bien la nécessité de mettre les mailles de la 2eme partie en attente étant donné qu'elles ne servent pas pour la taille. Ne peut-on pas simplement finir le triangle et conserver le nombre de mailles ? Merci.
09.11.2014 - 11:42DROPS Design answered:
Bonjour Mme Leary, les mailles en attente de chaque côté (parties 2 et 4) sont ensuite assemblées entre elles en grafting (dos & devant). Bon tricot!
10.11.2014 - 09:44(Forsat) Hvis man ser på skitsen så er del 2 ikke retvinklet, men ser derimod ud til at der er lukket af for masker over flere pinde til sidst for at få den skrå side søm?
30.01.2014 - 21:13Hej igen. Beklager, men din forklaring besvarer ikke rigtigt problemet. De mål du henviser til giver højden på skørtet, som jo gerne skulle være ens for at kjolen ikke bliver skæv forneden. Men da de to trekanter har forskellig bredde hhv 20cm for del1 og 36cm for del 2, så vil de skrå sider have en forskel i længden på ca 9 cm. Dette findes ved alm matematisk udregning. Og ses altså også i praksis.
30.01.2014 - 21:09DROPS Design answered:
Kaere Mette. Vi har kontrolleret mönstret og det er efter vores mening korrekt. Du kan ogsaa se her og se faerdige projekter af nederdelen.
03.02.2014 - 14:35Hej igen. Jeg forstår det stadig ikke. Hvis man udfra antal masker, antal udtagninger og strikkefasthed beregner længden på de skrå sider vil del 2 være ca 9cm længere end del 1! Hvis jeg monterer som i skriver i svaret så vil farvestriberne fra garnet ikke blive som på billedet, som har lodrette striber på del2. Yderligere forklaring ønskes.
29.01.2014 - 22:31DROPS Design answered:
Hej Mette. Del 2 strikkes ogsaa nedefra og ud mod venstre (det skrev jeg forkert sidst, sorry), men siden med udtagninger på del 1 og siden med udtagninger på 2 skal syes sammen. Del 1 strikkes over ca 173 pinde for at komme op i 52 m = ca 36 cm. Del 2 strikkes over ca 170 pinde for at komme op i 87 m = ca 36 cm.
30.01.2014 - 15:04Jeg forstår ikke mønstret. Diagrammet viser hvordan delene skal syes sammen, men del 2 er også en retvinklet trekant, da udtagning er hver 2.pind, derfor kan det ikke lade sig gøre at få en lige kant forneden. Den skrå side på del 2 og 4 er for lang i forhold til den skrå side på del 1 og 3. Så hvordan monteres trekanterne korrekt? Vejledning ønskes venligst. Til orientering strikker jeg i Delight i str M.
28.01.2014 - 10:41DROPS Design answered:
Hej Mette. Pröv at laegge dine dele fladt paa et bord og tag 1 del af gangen. Del 1 og 3 skal vaere ca lige saa höj paa den skraa del som del 2 og 4 (med den rette strikkefasthed). Starten af del 1 (3 m) er for neden paa del 1 og starten paa del 2 er for oven paa billedet.
28.01.2014 - 15:49Hallo, Vraagje: ik ben gestart met deel 2 te breien. Mijn vraag is moet ik nu iedere 2e nld. meerderen of niet om tot 115 steken te komen (bij deel 1 moest er in iedere 3e nld. gemeerder worden, maar als ik dat doe dan wordt deel 2 qua lengte een stuk groter dan deel 1). Dus hoe moet er gemeerderd worden in deel 2? In afwachting van uw reactie teken ik, met vriendelijke breigroetjes,
07.10.2012 - 14:18DROPS Design answered:
Er staat in het patroon: Brei verder heen en weer en meerder TEGELIJKERTIJD na de markeerdraad: 1 st om de nld. Dwz, je meerdert in elke 2e nld. Deel 2 moet ook groter worden dan deel 1 - zie schematekenening.
11.10.2012 - 12:10Bonjour Pourriez vous me traduire les questions/reponses de ce modele car je pense que c'est la reponse à mon probleme sauf que les traducteurs automatiques ne sont pas compréhensibles ! Merci d'avance
28.09.2012 - 16:31DROPS Design answered:
Bonjour Madame Dechassat. Pour toute question sur ce modèle, vous pouvez aussi directement prendre contact avec le magasin où vous avez acheté votre laine, ou également demander de l'aide sur le forum DROPS. Bon tricot !
01.10.2012 - 09:17Et andet problem er målene: Jeg har strikket del 1 i Alpaca i str. S. Færdigt mål skulle være 41 cm højt og 18 cm bredt, men er på 30 cm højt og 20 cm bredt. Er der nogen, som har erfaring med denne opskrift?
10.05.2012 - 21:51DROPS Design answered:
41 er målet på målskiss som inkluderer 8 cm linning. Dina mål er ok, ska vara 33x19. 18 er målet oppe efter delerne er sydd sammen.
10.05.2012 - 23:05Jeg tror der er en fejl: man skal tage ud før mærketråden på skiftevis hver 3. og hver 4. pind, altså: udtagningerne kommer skiftevis på hver sin side af mærketråden, hvorved mærketråden kommer til at ligge midt op gennem trekanten. Derfor er det misvisende, at del 1 og del 2 skal sys sammen ved at sy masken med mærketråd på del 1 sammen med masken med mærketråd på del 2?
10.05.2012 - 21:49DROPS Design answered:
Du tager ud på samme side av mærketråden hver gang. Se også skissen nede för rigtig form. Det ska tas ud før mærketråden sett fra retten. Når du er på vrangen så tages det så ud etter mærketråden.
11.05.2012 - 00:10