DROPS Delight
DROPS Delight
75% Wool, 25% Polyamide
Discontinued
find alternatives
DROPS SS24

Blue Serenade

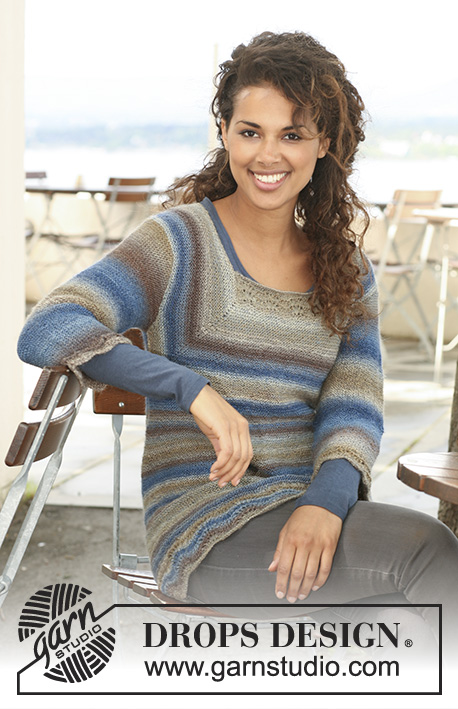
Knitted DROPS tunic with ¾ sleeves in garter st and wavy pattern in ”Delight”. Size S - XXL.

DROPS 121-12
DROPS design: Pattern no DE-033
--------------------------------------------------------
Size: S - M - L - XL - XXL
Materials: DROPS DELIGHT from Garnstudio
350-400-400-450-500 g colour no 07, beige/blue mix

DROPS DOUBLE POINTED NEEDLES and CIRCULAR NEEDLE (40 and 80 cm) size 3 mm - or size needed to get 24 sts x 48 rows in garter st = 10 x 10 cm and 28 sts in wavy pattern = width 10 cm.

-------------------------------------------------------

Alternative Yarn – See how to change yarns here
Yarn Groups A to F – Use the same pattern and change the yarn here
Yarn usage using an alternative yarn – Use our yarn converter here

-------------------------------------------------------

DROPS Delight
DROPS Delight
75% Wool, 25% Polyamide
Discontinued
find alternatives

Pattern instructions

NOTE: This pattern is written in British English. All measurements in charts are in cm. For conversion from cm to inches - click here. There are different terms for crocheting in British and American English. If this pattern includes crochet, click for "crochet terms" here. For this pattern in American English, please click here.
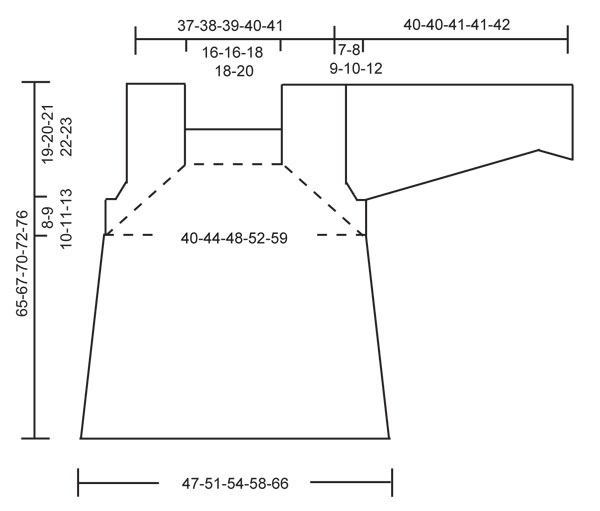
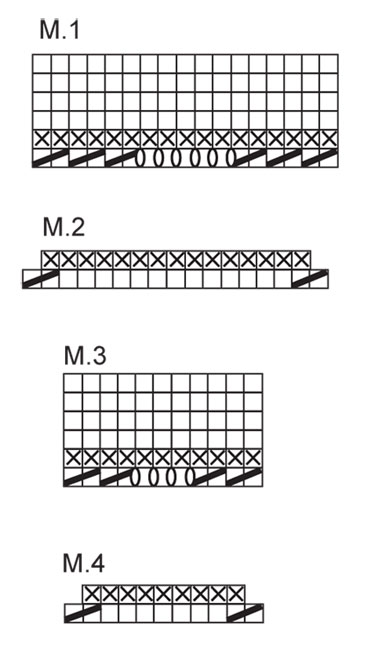
PATTERN:
See diagrams M.1 to M.4. Diagrams show the pattern from RS.
GARTER ST (back and forth on needle):
K all rows.
GARTER ST (in the round): K 1 round, P 1 round.
DECREASING TIP:
Make all dec on K rounds. Dec as follows before and after marker: K2 tog.
INCREASING TIP:
Make all inc on P rounds.
Inc 1 st by making 1 YO, on next round K YO into back of loop to avoid a hole.
--------------------------------------------------------

BODY PIECE:
Worked in the round.
Cast on 288-306-324-360-396 sts on circular needle size 3 mm with Delight. K 1 round and P 1 round, AT THE SAME TIME dec 6-17-18-20-22 sts evenly on last round = 272-289-306-340-374 sts. Continue in M.1 on all sts (16-17-18-20-22 repeats across the round) until piece measures approx 8-8-9-9-10 cm (finish after a full vertical repeat). Now work M.2 on all sts = 240-255-270-300-330 sts. After 1 vertical repeat of M.2, K 1 round, AT THE SAME TIME dec 16-11-10-20-14 sts evenly = 224-244-260-280-316 sts. P 1 round. Insert 1 marker at beg of round and 1 marker after 112-122-130-140-158 sts (= to mark the sides). Now measure piece from here. Continue in GARTER ST - see above.
When piece measures 6 cm from markers insert 4 new markers, marker-1 after 32-35-37-41-48 sts, marker-2 after 80-87-93-99-110 sts (= 48-52-56-58-62 sts between markers on front piece), marker-3 after 144-157-167-181-206 sts and marker-4 after 192-209-223-239-268 sts (= 48-52-56-58-62 sts between markers on back piece). Continue in garter st, AT THE SAME TIME dec for darts as follows: Dec 1 st before and after each marker on front and back piece (= 8 dec) - See DECREASING TIP! Repeat the dec on every 7 cm a total of 4 times = 192-212-228-248-284 sts.
When piece measures 30 cm from markers at the side divide piece and complete front and back piece separately. Piece measures a total of approx 38-38-39-39-40 cm.

BACK PIECE:
= 96-106-114-124-142 sts. Continue back and forth on needle in GARTER ST - see above - AT THE SAME TIME on first row inc 1 st each side (= edge st) = 98-108-116-126-144 sts. When piece measures 8-9-10-11-13 cm from dividing it cast off 3 sts each side for armhole and cast off to shape the armhole at beg of every row each side: 2 sts 1-2-3-5-9 times and 1 st 0-1-2-2-2 times = 88-92-94-96-98 sts. Continue until piece measures 25-27-29-31-34 cm from dividing it and now work the middle 42-42-46-46-52 sts as follows (= from RS): 1 YO, * K2 tog, 1 YO *, repeat from *-* and finish with K2 tog – work remaining sts as before. On next row cast off the middle 38-38-42-42-48 sts for neck = 25-27-26-27-25 sts left on each shoulder.
RIGHT SHOULDER:
Continue with 1 YO and K2 tog at the end of every row from RS towards the neck, from WS K all sts. When piece measures 27-29-31-33-36 cm from dividing it cast off loosely. Piece measures a total of approx 65-67-70-72-76 cm.
LEFT SHOULDER:
Continue with K2 tog and 1 YO at the beg of every row from RS from the neck, from WS K all sts. Cast off as described for left shoulder. Piece measures a total of approx 65-67-70-72-76 cm.

FRONT PIECE:
= 96-106-114-124-142 sts. Cast on 20-22-24-26-31 sts at beg of row, K sts on needle and cast on 20-22-24-26-31 sts at the end of row = 136-150-162-176-204 sts. Insert a marker 20-22-24-26-31 sts in from each side. K 1 row from WS on all sts. On next row from RS dec 1 st each side of st with marker (= 4 dec), and repeat on every other row a total of 29-34-36-41-47 times.
AT THE SAME TIME after approx 1 cm cast on new sts at the end of every row each side: 2 sts 1-2-2-3-4 times and 1 st 0-2-5-8-14 times. Now cast on 43-42-41-39-33 sts each side. Continue back and forth with dec each side of markers as before. When dec are complete there are a total of 110-110-118-118-126 sts on needle, 38-38-42-42-48 sts mid front between markers and 36-36-38-38-39 sts each side. Cut the thread. Keep the 38-38-42-42-48 sts mid front on needle, slip sts each side on separate stitch holders.
PIECE MIDT FRONT:
K 1 row from RS on the 38-38-42-42-48 sts AT THE SAME TIME inc 8-8-4-4-9 sts evenly = 46-46-46-46-57 sts. K 1 row from WS and continue in M.3 (= 4-4-4-4-5 repeats across the row) with 1 edge st each side. Continue in M.3 for approx 5 cm (adjust to a full vertical repeat). Cast off loosely.
LEFT SHOULDER:
Slip sts from stitch holder on left side of piece back on needle = 36-36-38-38-39 sts. Continue as follows (from RS): * K2 tog, 1 YO *, repeat from *-* on the first 24-24-26-26-28 sts, then K remaining sts on row. On next row cast off loosely (cast off YO as sts).
RIGHT SHOULDER:
Slip sts from stitch holder on right side of piece back on needle = 36-36-38-38-39 sts. Continue as follows (from RS): K 12-12-12-12-11 sts, * 1 YO, K2 tog *, repeat from *-* to end. On next row cast off all sts, incl all YO, loosely.

SLEEVE:
Worked in the round. Cast on 96-96-108-108-108 sts on double pointed needles size 3 mm with Delight. K 1 round, and P 1 round, AT THE SAME TIME dec 8-8-9-9-9 sts evenly = 88-88-99-99-99 sts. Continue in M.3 on all sts (= 8-8-9-9-9 repeats) until piece measures approx 4-4-5-5-6 cm (finish after a full vertical repeat). Now work M.4 on all sts = 72-72-81-81-81 sts. After 1 vertical repeat of M.4 K 1 round AT THE SAME TIME dec 8-4-11-9-7 sts evenly = 64-68-70-72-74 sts. Insert a marker in st at beg of round (= mid under sleeve). Now measure piece from here. P 1 round and continue in GARTER ST - see above. AT THE SAME TIME when piece measures 3 cm from marker inc 1 st each side of st with marker - See INCREASING TIP! Repeat the inc on every 3-3-2-1.5-1 cm a total of 8-8-10-12-15 times = 80-84-90-96-104 sts. When piece measures 29-28-27-26-24 cm from marker (less for the larger sizes because of shorter sleeve cap and wider shoulder) cast off 7 sts mid under sleeve and complete piece back and forth on needle. Continue in garter st, AT THE SAME TIME cast off for sleeve cap at beg of every row each side: 2 sts 3-2-2-2-1 times and 1 st 9-12-16-18-25 times, then 2 sts each side until piece measures 35 cm from marker. Now cast off 3 sts each side 1 time and cast off remaining sts. Piece measures approx 36 cm from marker and 40-40-41-41-42 cm in total.

ASSEMBLY:
Sew seam each side inside 1 edge st. Sew shoulder seams. Set in sleeves. Sew the piece mid front to the sides of neck inside 1 edge st, sew up to where the lace border beg.

Diagram

symbols = K from RS, P from WS
symbols = 2 K tog
symbols = 1 YO between 2 sts
symbols = P from RS, K from WS
diagram
diagram

Each of our patterns has specific tutorial videos to help you.

Do you have a question? See a list of frequently asked questions (FAQ)

Knitting tension is what determines the final measurements of your work, and is usually measured per 10 x 10 cm. It is provided like so: number of stitches in width x number of rows in height - eg: 19 stitches x 26 rows = 10 x 10 cm.

The knitting tension is very individual; some people knit/crochet loosely while others work tightly. You adjust the knitting tension with the needle size, which is why the suggested needle size is only meant as a guide! You need to adjust this (up or down) to ensure that YOUR knitting tension matches the knitting tension provided in the pattern. If you work with a different knitting tension than provided you will have a different yarn consumption, and your work will have different measurements than what the pattern suggests.

The knitting tension also determines which yarns can replace each other. As long as you achieve the same knitting tension you can replace one yarn with another.

See DROPS lesson: How to measure your tension/gauge

See DROPS video: How to make a gauge tension swatch

The required amount of yarn is provided in grams, eg: 450 g. To calculate how many balls you’ll need you first need to know how many grams are in 1 ball (25g, 50g or 100g). This information is available if you click on the individual yarn quality on our pages. Divide the amount required with the amount of each ball. For example, if each ball is 50g (the most common amount), the calculation will be as follows: 450 / 50 = 9 balls.

The important thing when changing from one yarn to another is that the knitting/crochet tension remains the same. This is so that the measurements of the finished piece will be the same as on the sketch provided. It is easier to achieve the same knitting tension using yarns from the same yarn group. It is also possible to work with multiple strands of a thinner yarn to achieve the knitting tension of a thicker one. Please try our yarn converter. We recommend you to always work a test swatch.

Please NOTE: when changing yarn the garment might have a different look and feel to the garment in the photo, due to individual properties and qualities of each yarn.

See DROPS lesson: Can I use a different yarn than the one mentioned in the pattern?

All our yarns are categorised into yarn groups (from A to F) according to thickness and knitting tension – group A contains the thinnest yarns and group F the thickest. This makes it easier for you to find alternative yarns to our patterns, should you wish to switch yarn. All yarns within the same group have a similar knitting tension and can easily replace each other. However, different yarn qualities have different structures and properties which will give the finished work a unique look and feel.

Click here for an overview of the yarns in each yarn group

At the top of all our patterns you’ll find a link to our yarn calculator, which is a helpful tool should you wish to use a different yarn than suggested. By filling in the yarn quality you wish to replace, the amount (in your size) and number of strands, the calculator will present good alternative yarns with the same knitting tension. Additionally it will tell you how much you’ll require in the new qualities and whether you’ll need to work with multiple strands. Most skeins are 50g (some are 25g or 100g).

If the pattern is worked with multiple colours, every colour will have to be calculated separately. Similarly, if the pattern is worked with several strands of different yarns (for example 1 strand Alpaca and 1 strand Kid-Silk) you will have to find alternatives for each, individually.

Click here to see our yarn calculator

Since different yarns have different qualities and textures we have chosen to keep the original yarn in our patterns. However, you can easily find options among our available qualities by using our yarn calculator, or simply pick a yarn from the same yarn group.

It is possible that some retailers still have discontinued yarns in stock, or that someone has a few skeins at home that they would like to find patterns for.

The yarn calculator will provide both alternative yarn as well as required amount in the new quality.

If you think it's hard to decide what size to make, it can be a good idea to measure a garment you own already and like the size of. Then you can pick the size by comparing those measures with the ones available in the pattern's size chart.

You'll find the size chart at the bottom of the pattern.

See DROPS lesson: How to read size chart

The needle size provided in the pattern serves only as a guide, the important thing is to follow the knitting tension. And since knitting tension is very individual, you will have to adjust the needle size to ensure that YOUR tension is the same as in the pattern – maybe you’ll have to adjust 1, or even 2 needle sizes, up or down to achieve the correct tension. For this, we recommend that you work test swatches.

Should you work with a different knitting tension than the one provided, the measurements of the finished garment might deviate from the measurement sketch.

See DROPS lesson: How to measure your tension/gauge

See DROPS video: How to make a tension/gauge swatch

Working a garment top-down provides more flexibility and room for personal adjustment. For example it is easier to try the garment on while working, as well as making adjustments to length of yoke and shoulder caps.

The instructions are carefully explaining every step, in the correct order. Diagrams are adjusted to the knitting direction and are worked as usual.

The diagram depicts all rows/rounds, and every stitch seen from the right side. It is read from bottom to top, from right to left. 1 square = 1 stitch.

When working back and forth, every other row is worked from the right side and every other row is worked from the wrong side. When working from the wrong side, the diagram will have to be worked reversed: from left to right, knit stitches are purled, purl stitches are knit etc.

When working in the round every round is worked from the right side and the diagram are worked from right to left on all rounds.

See DROPS lesson: How to read knitting diagrams

The diagram depicts all rows/rounds, and every stitch seen from the right side. It is worked from bottom to top, from right to left.

When working back and forth every other row is worked from the right side: from right to left and every other row is worked from the wrong side: from left to right.

When working in the round, every row in the diagram are worked from the right side, from right to left.

When working a circular diagram you start in the middle and work your way outwards, counter clockwise, row by row.

The rows usually start with a given number of chain stitches (equivalent to the height of the following stitch), this will either be depicted in the diagram or explained in the pattern.

See DROPS lesson: How to read crochet diagrams

Instructions for working several diagrams after each other on the same row/round, will often be written like so: “work A.1, A.2, A.3 a total of 0-0-2-3-4 times". This means you work A.1 once, then A.2 is worked once, and A.3 is repeated (in width) the number of times provided for your size – in this case like so: S = 0 times, M = 0 times, L=2 times, XL= 3 times and XXL = 4 times.

The diagrams are worked as usual: begin with the first row in A.1, then work the first row in A.2 etc.

See DROPS lesson: How to read knitting diagrams

See DROPS lesson: How to read crochet diagrams

The total width of the garment (from wrist-to-wrist) will be larger in the larger sizes, despite the actual sleeves being shorter. The larger sizes have longer sleeve caps and wider shoulders, so there will be a good fit in all sizes.

The measurement sketch/schematic drawing provides information regarding the full length of the garment. If it’s a jumper or a jacket the length is measured from the highest point on the shoulder closest to the neckline, and straight down to the bottom of the garment. It is NOT measured from the tip of shoulder. Similarly, the length of yoke is measured from the highest point on the shoulder and down to where yoke is split into body and sleeves.

On a jacket measures are never taken along bands, unless specifically stated. Always measure inside band stitches when measuring the length.

See DROPS lesson: How to read a schematic drawing

Diagrams are often repeated on the round or in height. 1 repeat is the diagram the way it appears in the pattern. If it says to work 5 repeats of A.1 in the round, then you work A.1 a total of 5 times after/next to each other in the round. If it says to work 2 repeats of A.1 vertically/in height you work the entire diagram once, then begin again at the start and work the entire diagram one more time.

Chain stitches are slightly narrower than other stitches and to avoid working the cast-on edge too tight, we simply chain more stitches to begin with. The stitch count will be adjusted on the following row to fit the pattern and measurement sketch.

The rib edge is more elastic and will contract slightly compared to, for example, stocking stitch. By increasing before the rib edge, you avoid a visible difference in width between the rib edge and the rest of the body.

It’s very easy to cast off too tightly, and by making yarn overs while casting off (and simultaneously casting these off) you avoid a too tight cast off edge.

See DROPS video: How to bind off with yarn overs (yo)

To achieve an even increase (or decrease) you can increase on, for example: every 3rd and 4th row alternately, like so: work 2 rows and increase on the 3rd row, work 3 rows and increase on the 4th. Repeat this until the increase is complete.

See DROPS lesson: Increase or decrease 1 st on every 3rd and 4th row alternately

Should you prefer to work in the round instead of back and forth, you may of course adjust the pattern. You’ll need to add steeks mid-front (usually 5 stitches), and follow the instructions. When you would normally turn and work from the wrong side, simply work across the steek and continue in the round. At the end you’ll cut the piece open, pick up stitches to work bands, and cover the cut edges.

See DROPS video: How to knit steeks and cut open

Should you prefer to work back and forth instead of in the round, you may of course adjust the pattern so you work the pieces separately and then assemble them at the end. Divide the stitches for the body in 2, add 1 edge stitch in each side (for sewing) and work the front and back pieces separately.

See DROPS lesson: Can I adapt a pattern for circular needles into straight needles?

Pattern repeats can vary slightly in the different sizes, in order to get the correct proportions. If you’re not working the exact same size as the garment in the photo, yours might deviate slightly. This has been carefully developed and adjusted so that the complete impression of the garment is the same in all sizes.

Make sure to follow instructions and diagrams for your size!

If you have found a pattern you like which is available in women’s size it’s not very difficult to convert it to men’s size. The biggest difference will be the length of sleeves and body. Start working on the women size that you think would fit across the chest. The additional length will be worked right before you cast off for the armhole/sleeve cap. If the pattern is worked top-down you can add the length right after the armhole or before the first decrease on sleeve.

Regarding additional yarn amount, this will depend on how much length you add, but it is better with a skein too many than too few.

All yarns will have excess fibres (from production) that might come off as lint or shedding. Brushed yarns (ie hairier yarns) have more of these loose, excess fibres, causing more shedding.

Shedding also depends on what is worn under or over the garment, and whether this pulls at the yarn fibres. It’s therefore not possible to guarantee that there will be no shedding

Below are some tips on how to get the best result when working with hairier yarns:

1. When the garment is finished (before you wash it) shake it vigorously so the looser hairs come off. NOTE: do NOT use a lint roller, brush or any method that pulls at the yarn.

2. Place the garment in a plastic bag and put it in your freezer - the temperature will cause the fibres to become less attached to each other, and excess fibres will come off easier.

3. Leave in the freezer for a few hours before taking it out and shaking it again.

4. Wash the garment according to the instructions on the yarn label.

Pilling is a natural process that happens to even the most exclusive of fibers. It's a natural sign of wear and tear that is hard to avoid, and that is most visible in high friction areas of your garment like a sweater's arms and cuffs.

You can make your garment look as new by removing the pilling, using a fabric comb or a pill/lint remover.

Still can't find the answer you need? Then scroll down and leave your question so one of our experts can try to help you. This will be done normally within 5 to 10 working days.
In the meantime, you can read the questions and answers that others have left to this pattern or join the DROPS Workshop on Facebook to get help from fellow knitters/crocheters!

Post a comment to pattern DROPS 121-12

We would love to hear what you have to say about this pattern!

If you want to leave a question, please make sure you select the correct category in the form below, to speed up the answering process. Required fields are marked *.

Comments / Questions (26)

country flag Inger wrote:

Kedelig også farverne

06.07.2010 - 19:57

country flag Rita Klevjer wrote:

Artig modell, veldig anvendelig, lekkert garn

06.07.2010 - 16:02

country flag Malou wrote:

Härlig tröja fina färger.

01.07.2010 - 18:43

country flag Stephanie wrote:

Very beautiful pattern!!

26.06.2010 - 19:21

Mimi wrote:

Encore un à réaliser!

24.06.2010 - 19:14

country flag Inger Landström wrote:

Att sticka en tröja är ett stort arbete. Det ska vara värt jobbet och det är det med denna tröja.

19.06.2010 - 08:52

Françoise wrote:

Très élégant,j'ai déjà la Delight... vite les explications ! Merci

17.06.2010 - 15:18

country flag Jelena wrote:

Flott fasong og god utnyttelse av det lekre garnet. Strikker i dette garnet nu og det blir veldig vakkert, men det tar sin tid!

14.06.2010 - 19:24

country flag Lene Herbrandsen wrote:

Nydelig :o))

14.06.2010 - 11:29

country flag Joan wrote:

Very nice use of multi stripe yarn

12.06.2010 - 06:58