
Popular categories
Looking for a yarn?


|
|
DROPS 79-26 |
|
|
|
|
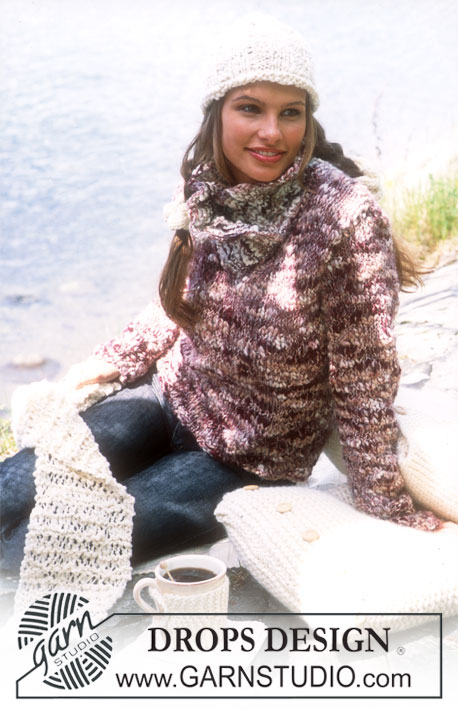
DROPS Cardigan in Alaska and Vienna; Hat in Alaska and Scarf in Snow
DROPS 79-26 |
|
|
CARDIGAN: Gauge: 16 sts x 20 rows on larger needles in stockinette st = 10 x 10 cm Rib: * K 4, P 4 *, repeat from * - *. Increasing tips (for the collar): Inc 1 st inside of 24 sts rib by knitting 2 sts in the same st – knit the increased sts in rib (= K 4, P 4) as you go along. Back: Cast on 78-86-94-102-110 sts on smaller needles with Alaska. Knit rib as follows: Row 1 (right side): Sizes S, L and XXL: K1 (edge st knit in garter st), * K 4, P 4 *, repeat from * - *, finish with K 4 and K 1 (edge st knit in garter st). Sizes M and XL: K 1 (edge st knit in garter st), * P 4, K 4 *, repeat from * - *, finish with P 4 and K 1 (edge st knit in garter st). Row 2 (wrong side): Sizes S, L and XXL: K 1 (edge st knit in garter st), * P 4, K 4 *, repeat from * - *, finish with P 4 and K 1 (edge st knit in garter st). Sizes M and XL: K1 (edge st knit in garter st), * K 4, P 4 *, repeat from * - *, finish with K 4 and K 1 (edge st knit in garter st). When the piece measures 6 cm change to larger needles and stockinette st. When the piece measures 11-12-13-14-15 cm dec 1 st at each side every 5 cm 5 times = 68-76-84-92-100 sts. When the piece measures 37-38-39-40-41 cm inc 1 st at each side every 5 cm a total of 3 times = 74-82-90-98-106 sts. When the piece measures 54-55-56-57-58 cm bind off for armhole at each side every other row: 4 sts 1 time, 3 sts 0-0-1-1-2 times, 2 sts 1-2-2-3-3 times and 1 st 2-3-4-5-4 times = 58-60-60-62-66 sts. When the piece measures 72-74-76-78-80 cm bind off the center 14-16-16-16-18 sts for the neck. On the next row dec 1 st at each neck edge = 21-21-21-22-23 sts remain on each shoulder. Bind off when the piece measures 74-76-78-80-82 cm. Left front: Cast on 57-61-65-69-73 sts on smaller needles with Alaska. Knit rib as follows (beginning of row is the side): Row 1 (right side): Sizes S, L and XXL: K 1 (edge st knit in garter st), * P 4, K 4 *, repeat from * - *, finish with P 4 and 4 sts garter st. Sizes M and XL: K 1 (edge st knit in garter st), * K 4, P 4 *, repeat from * - *, finish with 4 sts garter st. Row 2 (wrong side): Sizes S, L and XXL: 4 sts garter st, K 4, * P 4, K 4 *, finish with K 1 (edge st knit in garter st) Sizes M and XL: 4 sts garter st, * K4, P 4*, finish with K 1 (edge st knit in garter st) Knit rib for 6 cm, then change to larger needles and stockinette st but keep 24 sts at the center front in rib and garter st as established. On the 1st row dec 2-3-3-3-4 sts evenly distributed over the sts in stockinette st = 55-58-62-66-69 sts. When the piece measures 11-12-13-14-15 cm dec at the side as on back and when the piece measures 37-38-39-40-41 cm inc at the side as on back = 53-56-60-64-67 sts. Read the entire section before knitting: Collar: When the piece measures 50-52-54-55-56 cm inc 1 st inside of the 24 sts at the center front for collar - see Increasing tips: 16 times on alternately every other and every 4th row. Armhole: When the piece measures 54-55-56-57-58 cm bind off for armhole at the side as on back. Neckband: When the piece measures 74-76-78-80-82 cm bind off the outermost 21-21-21-22-23 sts for shoulder and put the remaining 40 collar sts on a st holder. Right front: Cast on and knit the same as the left, reversing all shaping. Sleeve: Cast on 42-42-50-50-50 sts on smaller needles with Vienna. Knit 2 rows garter st, change to Alaska. Knit rib as follows: Row 1 (right side): K 1 (edge st knit in garter st), P 2, * K 4, P 4 *, repeat from * - *, finish with K 4, P 2, K 1 (edge st knit in garter st). Row 2 (wrong side): K 1 (edge st knit in garter st), K 2, * P 4, K 4 *, repeat from * - *, finish with P 4, K 2, K 1 (edge st knit in garter st). When the piece measures 10 cm knit 2 rows garter st with Vienna. Then change to larger needles and Alaska and continue the rib as follows - seen from the right side: K 1 (edge st), K 2, * P 4, K 4 *, repeat from * - *, finish with P 4, K 2, K 1 (edge st). When the piece measures 12 cm inc 1 st at each side every 5-3.5-4.5-3-2.5 cm a total of 8-10-8-10-12 times – knit the increased sts in stockinette st = 58-62-66-70-74 sts. When sleeve measures 49-48-46-44-43 cm bind off for sleeve cap at each side every other row: 4 sts 1 time, 2 sts 3-2-2-2-2 times and 1 st 1-5-6-8-9 times, then bind off 2 sts at each side until the piece measures 57 cm, then bind off 3 sts 1 time at each side. Bind off the remaining sts, the piece measures approx. 58 cm. Assembly: Sew shoulder seams. Collar: Pick up from wrong side as follows: put collar sts from left front on larger needles, pick up 20-22-22-22-24 sts around back neck and put collar sts from right front on needles = 100-102-102-102-104 sts. Knit 2 rows garter st over all sts, increasing 16-14-14-14-12 sts on the 1st row evenly distributed over the 20-22-22-22-24 sts picked up at back neck = 116 sts. Then knit rib over all sts (keeping 4 sts at each front edge in garter st) for 4 cm, then K 1 row from wrong side, then K another row and bind off. Sew in sleeves. Sew sleeve and side seams using edge sts as a seam allowance. Fringe: Fasten fringe tufts along the collar and along button bands to 20 cm from lower edge on both fronts, at 5 cm intervals. 1 fringe tuft = cut 2 strands Vienna and 4 strands Alaska 35 cm long, hold together, fold in half and pull loop through outermost st, pull ends through loop. Belt: Cast on 16 sts on smaller needles with Alaska. Knit all rows as follows (both right side and wrong side rows): sl 1, K 1, * P 2, K 2 *, repeat from * - *, finish with P 2. Bind off in rib when belt measures approx. 120-130 cm. HAT: Sizes: S/M - M/L Materials: Garnstudio ALASKA, 100% pure new wool, 50 g/75 m./82 yards 150-150 gr nr 02, natural DROPS 5 mm [US 8] straight and double-pointed needles, or size needed to obtain correct gauge. Gauge: 17 sts x 22 rows in stockinette st = 10 x 10 cm Earflap: Cast on 5-5 sts and knit garter st. After 1 row inc 1 st at each side every other row 4-4 times and then every 4 rows 4-5 times = 21-23 sts – make incs by making a yo inside of 1 st at each side, on the next row twist and knit the yo so that there will not be a hole. The earflap measures approx. 8-9 cm. Set piece aside and knit a second earflap. Hat: Put one earflap on needle, cast on 18-19 new sts (= back) and put the other earflap on the same needle = 60-65 sts. Knit 4 rows garter st back and forth over all sts, and inc 1 st at each side every other row a total of 2 times. On the next row cast on 26-27 sts between earflaps for the front and join = 90-96 sts. Then knit hat in the round on double-pointed needles starting at center back - measure the work from here. Knit 6 rows garter st over all sts, then change to stockinette st. When hat measures 9 cm P 1 row, K 3 rows and P 1 row, then continue in stockinette st to finished measurements. After the last P row (the piece measures approx. 11 cm) put 6 markers in work with 15-16 sts between each marker. Then dec 1 st on the right side of each marker by K 2 tog every other row: 11-12 times and then every 4 rows: 3-3 times = 6 sts remain. Knit 2 more rows, cut yarn and pull through the remaining sts, fasten neatly. Hat measures approx. 27-28 cm at front. Braids: Fasten 1 braid at lower edge of each earflap and 1 at the top of hat. 1 braid = cut 12 strands 70 cm long. Fold strands double and pull loop through over 2 rows at lower edge of earflap, pull ends through loop. Divide strands into 3 bundles of 8 strands and braid together loosely, make a knot at end. Repeat on the other earflap and at the top of hat – at the top of the hat pull loop through the top row. SCARF: Measurements: approx. 16 x 110 cm Materials: Garnstudio SNOW, 100% wool, 50 g./50 m 150 gr nr 17, beige/blue variegated DROPS 10 mm needles, or size needed to obtain correct gauge. Gauge: 9 sts x 18 rows garter st = 10 x 10 cm. Scarf: Cast on 14 sts loosely. Knit garter st until the piece measures 110 cm, bind off. |
|

|
|
|
Have you made this or any other of our designs? Tag your pictures in social media with #dropsdesign so we can see them! Do you need help with this pattern?You'll find tutorial videos, a Comments/Questions area and more by visiting the pattern on garnstudio.com. © 1982-2024 DROPS Design A/S. We reserve all rights. This document, including all its sub-sections, has copyrights. Read more about what you can do with our patterns at the bottom of each pattern on our site. |


With over 40 years in knitting and crochet design, DROPS Design offers one of the most extensive collections of free patterns on the internet - translated to 17 languages. As of today we count 304 catalogues and 11422 patterns - 11422 of which are translated into English (UK/cm).
We work hard to bring you the best knitting and crochet have to offer, inspiration and advice as well as great quality yarns at incredible prices! Would you like to use our patterns for other than personal use? You can read what you are allowed to do in the Copyright text at the bottom of all our patterns. Happy crafting!
Comments / Questions (13)
Hallo nochmal, ich stricke in Masche 25 eine rechts und eine rechts verschränkt, richtig ? LG
06.03.2021 - 07:48DROPS Design answered:
Liebe Biggi, ja genau, dieses Video zeigt, wie man 2 Mal die selbe Masche strickt. Viel Spaß beim stricken!
08.03.2021 - 07:35Hallo ihr lieben. Welche Masche genau muss ich für den Kragen aufnehmen ? Ich kann ja nicht im Wechsel vier rechts ist links bleiben wenn ich irgendwo innerhalb der 24 maschen zwei maschen in eine stricke. Hilfe bitte, ich steh auf dem Schlauch
06.03.2021 - 07:15DROPS Design answered:
Liebe Biggi, die Zunahmen für den Kragen stricken Sie innerhalb die 24 Maschen = die 25. Masche wird zweimal gestrickt (bei der nächsten Zunahmen wird die 26. Masche zweimal gestrickt usw) und diese Zunahmen werden fortlaufend ins Bündchen gestrickt - also nach und nach wird sich das Bündchen 4 M re, 4 M li weiter gestrickt, wenn die 16 Zunahmen fertig sind, haben Sie 4 Mal mehr das Bündchen gestrickt . Viel Spaß beim stricken!
08.03.2021 - 07:34Sono arrivata a fare le maniche e mi chiedo se 58 cm di manica, considerato che se ne risvoltano 10, non sia troppo corto. Se volessi allungarla devo aggiungere dei ferri prima o dopo la serie di aumenti? Grazie
30.11.2016 - 15:50DROPS Design answered:
Buongiorno Monica, se vuole fare le maniche più lunghe, aggiunga dei ferri prima degli aumenti. Buon lavoro!
30.11.2016 - 16:05Lo spazio per scrivere i commenti e/o domande è troppo corto: si possono digitare solo un certo numero di caratteri, e diventa difficile porre le domande con queste limitazioni.
05.11.2016 - 16:59Per le maniche. Tutte le m. di aum le faccio tutte sul lato del dir, ma aumentando di tot volte, 8 volte,ad un certo punto mi ritrovo tipo: 1 viv a leg, 4 m di aum a dir, lavorazione coste, 4 m aum dir, 1 viv leg. La parte finale della manica, su entrambi i lati, a m rasata, diventa molto più grossa di larghezza di una costa (quando andrò a cucire i due bordi della manica avrò due lati a dritto grandi come la costa e quindi non ci sarà l'alternanza). E' giusto?
05.11.2016 - 16:58DROPS Design answered:
Buongiorno Paola. Sì è corretto come ha scritto: le m aumentate vengono lavorate a maglia rasata. Buon lavoro!
05.11.2016 - 18:32Sono al 12 cm della manica, quando bisogna iniziare a fare gli aumenti. Ma mi domando: visto che siamo partiti con la maglia di vivagno , la maglia di aumento, dove la metto? Per esempio, partendo con il ferro, se faccio: maglia vivagno legaccio, maglia di aumento, lavorazione ferro a coste, maglia di aumento, maglia di vivagno a legaccio, sbaglio? Grazie mille.
23.10.2016 - 08:18DROPS Design answered:
Buongiorno Paola. È corretto. Aumenta dopo / prima le m vivagno. Buon lavoro!
23.10.2016 - 08:30Het is mij niet duidelijk aan welke kant van de 24 boord steken, ik moet gaan meerderen voor de kraag. Moet ik voor de vier ribbel steken meerderen of voor de boord steken? Mvg
24.11.2015 - 14:24DROPS Design answered:
Hoi Petra. Je meerdert naast de 24 boordsteken. Niet middenvoor maar naast de boordsteken.
25.11.2015 - 14:48Diane wrote:
Est-ce que la grosseur des aiguilles proposées pour vos patron sont en mm
16.02.2014 - 21:06DROPS Design answered:
Bonjour Diane, tout à fait, la taille des aiguilles est indiquée en mm, système métrique habituel pour la taille des aiguilles en France. Bon tricot!
17.02.2014 - 10:17Céline wrote:
Bonjour je suis rendu a la fin de mon bonnet et lorsque vous dite de 1 maille a toute les 4 rangs 3 foir et cela égale 6maille, est ce que cela veux dire 6 mailles entre marqueur ou 6 maille en tout merci
26.10.2012 - 16:51DROPS Design answered:
Bonjour Céline, à la fin du bonnet, vous placez 6 marqueurs et vous diminuez 1 m à droite de chaque marqueur 11-12 fois tous les 2 rangs, puis 3 fois tous les 4 rangs. vous avez 6 marqueurs, donc vous diminuez 6 m à chaque tour de diminutions. Bon tricot !
30.10.2012 - 12:01Céline wrote:
Merci beaucoup j ai tres bien compris
23.10.2012 - 01:19