At Midnight

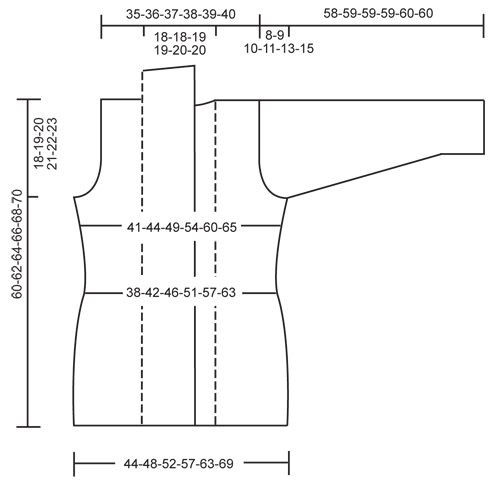
DROPS jacket in stockinette st with wide front bands in rib in ”Delight”. Size S-XXXL.

DROPS 121-6
DROPS design: Pattern no DE-020.
--------------------------------------------------------
Size: S - M - L - XL - XXL - XXXL
Finished measurements:
Bust: 82-88-98-108-120-130 cm / 32¼"-34⅝"-38½"-42½"-47¼"-51"
Full length: 60-62-64-66-68-70 cm /23⅝"-24⅜"-25¼"-26"-26¾"-27½"

Materials: DROPS DELIGHT
300-300-350-350-400-450 g color no 03, blue mix

DROPS CIRCULAR NEEDLE size 3.5 mm / US 4 (60 cm / 24") – or size needed to get 23 sts x 30 rows in stockinette st = 10 x 10 cm / 4" x 4".
DROPS CIRCULAR NEEDLE (80 cm / 32") size 3 mm / US 2½ - for rib.

DROPS BUFFALO HORN BUTTON NO 535: 3 pcs for all sizes.

-------------------------------------------------------

Alternative Yarn – See how to change yarns here
Yarn Groups A to F – Use the same pattern and change the yarn here
Yarn usage using an alternative yarn – Use our yarn converter here

-------------------------------------------------------

Pattern instructions

NOTE: This pattern is written in American English. All measurements in charts are in cm. For conversion from inches to cm - click here. There are different terms for crocheting in American and British English. If this pattern includes crochet, click for "crochet terms" here. For this pattern in British English, please click here.
GARTER ST (back and forth on needle): K all rows.

INCREASING TIP: Inc with 1 YO from RS. On next row work YO into back of loop to avoid a hole). Inc on the right and left side alternately of each P/K section.
--------------------------------------------------------

BACK PIECE:
Worked back and forth on circular needle. Cast on 104-112-122-134-148-160 sts (includes 1 edge st each side) on circular needle size 3.5 mm / US 4 with Delight.
Work 4 rows GARTER ST – see above! Continue in stockinette st with 1 edge st in garter st each side.
When piece measures 8 cm / 3⅛" dec 1 st each side and repeat the dec on every 2 cm / ¾" a total of 7 times = 90-98-108-120-134-146 sts.
When piece measures 26 cm / 10¼" inc 1 st each side. Repeat the inc on every 6-6.5-7-7.5-8-8.5 cm / 2⅜"-2½"-2¾"-2⅞"-3⅛"-3¼" a total of 3 times = 96-104-114-126-140-152 sts. When piece measures 42-43-44-45-46-47 cm / 16½"-17"-17¼"-17¾"-18"-18½" bind off for armhole at beg of every row each side as follows: 3 sts 1 time, 2 sts 2-3-4-6-9-11 times and 1 st 1-2-3-4-4-5 times = 80-82-86-88-90-92 sts.
When piece measures 58-60-62-64-66-68 cm / 22¾"-23⅝"-24⅜"-25¼"-26"-26¾" bind off the middle 40-40-42-42-44-44 sts for neck and complete each shoulder separately. Bind off 1 st on neckline on next row = 19-20-21-22-22-23 sts left on shoulder.
Bind off when piece measures 60-62-64-66-68-70 cm / 23⅝"-24⅜"-25¼"-26"-26¾"-27½".

LEFT FRONT PIECE:
Worked back and forth on circular needle. Cast on 33-37-41-47-53-59 sts (includes 1 edge st at the side and 2 edge sts towards front edge) on circular needle size 3.5 mm / US 4 with Delight.
Work 4 rows garter st and continue in stockinette st with 1 edge st at the side and 2 edge sts towards the front in garter st.
When piece measures 8 cm / 3⅛" dec at the side as described for back piece = 26-30-34-40-46-52 sts.
When piece measures 26 cm / 10¼" inc at the side as described for back piece = 29-33-37-43-49-55 sts.
When piece measures 42-43-44-45-46-47 cm / 16½"-17"-17¼"-17¾"-18"-18½" bind off for armhole at the side as described for back piece = 21-22-23-24-24-25 sts (includes 2 edge sts towards front edge).
Bind off when piece measures 60-62-64-66-68-70 cm / 23⅝"-24⅜"-25¼"-26"-26¾"-27½".

RIGHT FRONT PIECE:
Like left front piece, but mirrored.

SLEEVE:
Worked back and forth on circular needle. Cast on 74-74-80-80-80-86 sts (includes 1 edge st each side) on circular needle size 3 mm / US 2½.
Work rib K3/P3 with 1 edge st in garter st each side.
When piece measures 4 cm / 1½" K 1 row from RS, AT THE SAME TIME dec 16-14-18-16-14-18 sts evenly = 58-60-62-64-66-68 sts. K 1 row from WS. Change to circular needle size 3.5 mm / US 4 and continue in stockinette st.
When piece measures 8 cm / 3⅛" inc 1 st each side. Repeat the inc on every 6-4.5-3.5-3-2.5-2 cm / 2⅜"-1¾"-1¼"-1⅛"-⅞"-¾" a total of 7-9-11-13-15-17 times = 72-78-84-90-96-102 sts.
When piece measures 50-50-49-48-47-45 cm / 19¾"-19¾"-19¼"-19"-18½"-17¾" (NOTE! less for the larger sizes because of longer sleeve cap and wider shoulder) bind off for sleeve cap at beg of row each side as follows: 3 sts 1 time, 2 sts 3-3-4-4-4-4 times, 1 st 4-5-5-6-9-12 times, then 2 sts each side until piece measures 57-58-58-58-59-59 cm / 22½"-22¾"-22¾"-22¾"-23¼"-23¼". Now bind off 3 sts 1 time each side and bind off remaining sts.

ASSEMBLY:
Sew shoulder seams (do not sew tog the 2 edge sts towards front edge each side).

LEFT FRONT BAND/NECKLINE:
Pick up 170-175-182-187-193-198 sts inside 2 edge sts on circular needle size 3 mm / US 2½ with Delight (beg mid back on neck). K 1 row from WS, AT THE SAME TIME inc 46-47-52-53-53-54 sts evenly = 216-222-234-240-246-252 sts. Work next row from RS as follows: 1 edge st, rib K3/P3 until 5 sts remain, finish with K3 and 2 garter sts. Continue in rib like this. When front band measures 3 cm / 1" insert 1 marker after 49-49-55-55-61-61 sts (count from mid back).
Continue the rib as before, AT THE SAME TIME inc 1 st in each P-section (as seen from RS) between mid back and marker – See INCREASING TIP! = 8-8-9-9-10-10 inc sts.
When front band measures 6 cm / 2½" inc 1 st in each K-section (as seen from RS) between mid back and marker. Repeat the inc in each P-section when front band measures 9 cm / 3½" and in each K-section when front band measures 12 cm / 4¾". Bind off with K over K and P over P when front band measures 13-13-14-14-15-15 cm / 5⅛"-5⅛"-5½"-5½"-6"-6".

RIGHT FRONT BAND/NECKLINE:
Pick up as for the left side, but mirrored. When piece measures 13-13-14-14-15-15 cm / 5⅛"-5⅛"-5½"-5½"-6"-6" cast on sts for buttonhole loops on the last row from WS as follows: Work rib as before, but AT THE SAME TIME when piece measures 32-34-36-38-40-42 cm / 12½"-13⅜"-14¼"-15"-15¾"-16½" (measured from mid back) cast on 10 new sts for buttonhole loop. Continue in rib until piece measures 39-41-43-46-48-50 cm / 15¼"-16⅛"-17"-18"-19"-19¾", cast on 10 new sts to buttonhole loop, and when piece measures 46-48-50-54-56-58 cm / 18"-19"-19¾"-21¼"-22"-22¾", cast on 10 new sts for buttonhole loop, work remaining sts in rib. Bind off with K over K and P over P on next row from RS (bind off new sts for buttonhole loops with K sts).

FURTHER ASSEMBLY:
Sew front bands tog mid back inside 1 edge st. Set in sleeves. Sew sleeve and side seams inside 1 edge st. Sew buttons on left front band.

Diagram

All measurements in charts are in cm.

diagram measurements
Do you have a question? See a list of frequently asked questions (FAQ)

Knitting tension is what determines the final measurements of your work, and is usually measured per 10 x 10 cm. It is provided like so: number of stitches in width x number of rows in height - eg: 19 stitches x 26 rows = 10 x 10 cm.

The knitting tension is very individual; some people knit/crochet loosely while others work tightly. You adjust the knitting tension with the needle size, which is why the suggested needle size only serve as a guide! You need to adjust this (up or down) to ensure that YOUR knitting tension matches the knitting tension provided in the pattern. If you work with a different knitting tension than provided you will have a different yarn consumption, and your work will have different measurements than what the pattern suggests.

The knitting tension also determines which yarns can replace each other. As long as you achieve the same knitting tension you can replace one yarn with another.

See DROPS lesson: How to measure your tension/gauge

See DROPS video: How to make a gauge tension swatch

The required amount of yarn is provided in grams, eg: 450 g. To calculate how many balls you’ll need you first need to know how many grams are in 1 ball (25g, 50g or 100g). This information is available if you click on the individual yarn quality on our pages. Divide the amount required with the amount of each ball. For example, if each ball is 50g (the most common amount), the calculation will be as follows: 450 / 50 = 9 balls.

The important thing when changing from one yarn to another is that the knitting/crochet tension remains the same. This is so that the measurements of the finished piece will be the same as on the sketch provided. It is easier to achieve the same knitting tension using yarns from the same yarn group. It is also possible to work with multiple strands of a thinner yarn to achieve the knitting tension of a thicker one. Please try our yarn converter. We recommend you to always work a test swatch.

Please NOTE: when changing yarn the garment might have a different look and feel to the garment in the photo, due to individual properties and qualities of each yarn.

See DROPS lesson: Can I use a different yarn than the one mentioned in the pattern?

All our yarns are categorised into yarn groups (from A to F) according to thickness and knitting tension – group A contains the thinnest yarns and group F the thickest. This makes it easier for you to find alternative yarns to our patterns, should you wish to switch yarn. All yarns within the same group have a similar knitting tension and can easily replace each other. However, different yarn qualities have different structures and properties which will give the finished work a unique look and feel.

Click here for an overview of the yarns in each yarn group

At the top of all our patterns you’ll find a link to our yarn converter, which is a helpful tool should you wish to use a different yarn than suggested. By filling in the yarn quality you wish to replace, the amount (in your size) and number of strands, the converter will present good alternative yarns with the same knitting tension. Additionally it will tell you how much you’ll require in the new qualities and whether you’ll need to work with multiple strands. Most skeins are 50g (some are 25g or 100g).

If the pattern is worked with multiple colours, every colour will have to be converted separately. Similarly, if the pattern is worked with several strands of different yarns (for example 1 strand Alpaca and 1 strand Kid-Silk) you will have to find alternatives for each, individually.

Click here to see our yarn converter

Since different yarns have different qualities and textures we have chosen to keep the original yarn in our patterns. However, you can easily find options among our available qualities by using our yarn converter, or simply pick a yarn from the same yarn group.

It is possible that some retailers still have discontinued yarns in stock, or that someone has a few skeins at home that they would like to find patterns for.

The yarn converter will provide both alternative yarn as well as required amount in the new quality.

If you think it's hard to decide what size to make, it can be a good idea to measure a garment you own already and like the size of. Then you can pick the size by comparing those measures with the ones available in the pattern's size chart.

You'll find the size chart at the bottom of the pattern.

See DROPS lesson: How to read size chart

The needle size provided in the pattern serves only as a guide, the important thing is to follow the knitting tension. And since knitting tension is very individual, you will have to adjust the needle size to ensure that YOUR tension is the same as in the pattern – maybe you’ll have to adjust 1, or even 2 needle sizes, up or down to achieve the correct tension. For this, we recommend that you work test swatches.

Should you work with a different knitting tension than the one provided, the measurements of the finished garment might deviate from the measurement sketch.

See DROPS lesson: How to measure your tension/gauge

See DROPS video: How to make a gauge tension swatch

Working a garment top-down provides more flexibility and room for personal adjustment. For example it is easier to try the garment on while working, as well as making adjustments to length of yoke and shoulder caps.

The instructions are carefully explaining every step, in the correct order. Diagrams are adjusted to the knitting direction and are worked as usual.

The diagram depicts all rows/rounds, and every stitch seen from the right side. It is read from bottom to top, from right to left. 1 square = 1 stitch.

When working back and forth, every other row is worked from the right side and every other row is worked from the wrong side. When working from the wrong side, the diagram will have to be worked reversed: from left to right, knit stitches are purled, purl stitches are knit etc.

When working in the round every round is worked from the right side and the diagram are worked from right to left on all rounds.

See DROPS lesson: How to read knitting diagrams

The diagram depicts all rows/rounds, and every stitch seen from the right side. It is worked from bottom to top, from right to left.

When working back and forth every other row is worked from the right side: from right to left and every other row is worked from the wrong side: from left to right.

When working in the round, every row in the diagram are worked from the right side, from right to left.

When working a circular diagram you start in the middle and work your way outwards, counter clockwise, row by row.

The rows usually start with a given number of chain stitches (equivalent to the height of the following stitch), this will either be depicted in the diagram or explained in the pattern.

See DROPS lesson: How to read crochet diagrams

Instructions for working several diagrams after each other on the same row/round, will often be written like so: “work A.1, A.2, A.3 a total of 0-0-2-3-4 times". This means you work A.1 once, then A.2 is worked once, and A.3 is repeated (in width) the number of times provided for your size – in this case like so: S = 0 times, M = 0 times, L=2 times, XL= 3 times and XXL = 4 times.

The diagrams are worked as usual: begin with the first row in A.1, then work the first row in A.2 etc.

See DROPS lesson: How to read knitting diagrams

See DROPS lesson: How to read crochet diagrams

The total width of the garment (from wrist-to-wrist) will be larger in the larger sizes, despite the actual sleeves being shorter. The larger sizes have longer sleeve caps and wider shoulders, so there will be a good fit in all sizes.

The measurement sketch/schematic drawing provides information regarding the full length of the garment. If it’s a jumper or a jacket the length is measured from the highest point on the shoulder (usually closest to the neckline), and straight down to the bottom of the garment. It is NOT measured from the tip of shoulder. Similarly, the length of yoke is measured from the highest point on the shoulder and down to where yoke is split into body and sleeves.

See DROPS lesson: How to read a schematic drawing

Diagrams are often repeated on the round or in height. 1 repeat is the diagram the way it appears in the pattern. If it says to work 5 repeats of A.1 in the round, then you work A.1 a total of 5 times after/next to each other in the round. If it says to work 2 repeats of A.1 vertically/in height you work the entire diagram once, then begin again at the start and work the entire diagram one more time.

Chain stitches are slightly narrower than other stitches and to avoid working the cast-on edge too tight, we simply chain more stitches to begin with. The stitch count will be adjusted on the following row to fit the pattern and measurement sketch.

The rib edge is more elastic and will contract slightly compared to, for example, stocking stitch. By increasing before the rib edge, you avoid a visible difference in width between the rib edge and the rest of the body.

It’s very easy to cast off too tightly, and by making yarn overs while casting off (and simultaneously casting these off) you avoid a too tight cast off edge.

See DROPS video: How to bind off with yarn overs (yo)

To achieve an even increase (or decrease) you can increase on, for example: every 3rd and 4th row alternately, like so: work 2 rows and increase on the 3rd row, work 3 rows and increase on the 4th. Repeat this until the increase is complete.

See DROPS lesson: Increase or decrease 1 st on every 3rd and 4th row alternately

Should you prefer to work in the round instead of back and forth, you may of course adjust the pattern. You’ll need to add steeks mid-front (usually 5 stitches), and follow the instructions. When you would normally turn and work from the wrong side, simply work across the steek and continue in the round. At the end you’ll cut the piece open, pick up stitches to work bands, and cover the cut edges.

See DROPS video: How to knit steeks and cut open

Should you prefer to work back and forth instead of in the round, you may of course adjust the pattern so you work the pieces separately and then assemble them at the end. Divide the stitches for the body in 2, add 1 edge stitch in each side (for sewing) and work the front and back pieces separately.

See DROPS lesson: Can I adapt a pattern for circular needles into straight needles?

Pattern repeats can vary slightly in the different sizes, in order to get the correct proportions. If you’re not working the exact same size as the garment in the photo, yours might deviate slightly. This has been carefully developed and adjusted so that the complete impression of the garment is the same in all sizes.

Make sure to follow instructions and diagrams for your size!

If you have found a pattern you like which is available in women’s size it’s not very difficult to convert it to men’s size. The biggest difference will be the length of sleeves and body. Start working on the women size that you think would fit across the chest. The additional length will be worked right before you cast off for the armhole/sleeve cap. If the pattern is worked top-down you can add the length right after the armhole or before the first decrease on sleeve.

Regarding additional yarn amount, this will depend on how much length you add, but it is better with a skein too many than too few.

All yarns will have excess fibres (from production) that might come off as lint or shedding. Brushed yarns (ie hairier yarns) have more of these loose, excess fibres, causing more shedding.

Shedding also depends on what is worn under or over the garment, and whether this pulls at the yarn fibres. It’s therefore not possible to guarantee that there will be no shedding

Below are some tips on how to get the best result when working with hairier yarns:

1. When the garment is finished (before you wash it) shake it vigorously so the looser hairs come off. NOTE: do NOT use a lint roller, brush or any method that pulls at the yarn.

2. Place the garment in a plastic bag and put it in your freezer - the temperature will cause the fibres to become less attached to each other, and excess fibres will come off easier.

3. Leave in the freezer for a few hours before taking it out and shaking it again.

4. Wash the garment according to the instructions on the yarn label.

Pilling is a natural process that happens to even the most exclusive of fibers. It's a natural sign of wear and tear that is hard to avoid, and that is most visible in high friction areas of your garment like a sweater's arms and cuffs.

You can make your garment look as new by removing the pilling, using a fabric comb or a pill/lint remover.

Still can't find the answer you need? Then scroll down and leave your question so one of our experts can try to help you. This will be done normally within 5 to 10 working days.
In the meantime, you can read the questions and answers that others have left to this pattern or join the DROPS Workshop on Facebook to get help from fellow knitters/crocheters!

Post a comment to pattern DROPS 121-6

We would love to hear what you have to say about this pattern!

If you want to leave a question, please make sure you select the correct category in the form below, to speed up the answering process. Required fields are marked *.

Comments / Questions (46)

country flag Carmen wrote:

Hola. Tengo que empezar con la cenefa izquierda. Veo que tengo que recoger puntos, pero no sé sobre dónde... ¿Es sobre el delantero izquierdo? Cuando dice terminación, coser hombros, tengo que coser los hombros de la pieza de la espalda con los delanteros, no? Gracias

25.04.2022 - 18:24

DROPS Design answered:

Hola Carmen, hemos cerrado puntos para el hombro en la espalda y cada delantero. Estos son los puntos sobre los que se cosen la espalda. Para la cenefa izquierda se recogen puntos sobre el delantero izquierdo y hasta la mitad de la espalda. Después de terminar esa cenefa, se hace lo mismo para la cenefa derecha (por el delantero derecho y la segunda mitad de la espalda).

25.04.2022 - 21:38

country flag Brigitte wrote:

Bonjour, Pour le devant droit fait il également relever les mailles à partir du milieu dos ? Et que faire avec les 2m restantes des épaules ? Merci d'avance.

08.02.2022 - 17:13

DROPS Design answered:

Bonjour Brigitte, pour le devant gauche, on relève les mailles sur l'endroit, à partir du milieu dos jusqu'en bas du devant gauche - pour le devant droit, on commence par le bas du devant droit en remontant jusqu'au milieu dos, pour que les mailles soient relevées sur l'endroit. Relevez les mailles à 2 mailles du bord le long des devants = les 2 mailles de différence entre les épaules vont ainsi "disparaître". Bon tricot!

08.02.2022 - 17:25

country flag Nonotricotin wrote:

Bonjour et merci pour ce très joli modèle ;) J'aimerais savoir combien de cm mesure le poignet en côtes 3/3 pour la taille L. Je réalise ce modèle avec des aiguilles 3,5 pour les côtes et en 4 pour le jersey, j'ai donc besoin de cette information pour le montage des mailles en fonction de mon échantillon !! Merci d'avance pour votre réponse. Bonne année à toute l'équipe drops design garnstudio 😉

01.01.2022 - 14:30

DROPS Design answered:

Bonjour Nonotricotin et merci; nous n'avons pas cette mesure, toutefois, si votre échantillon est juste avec les aiguilles 4, alors les côtes devraient avoir la circonférence correcte avec les aiguilles plus fines; Bon tricot!

03.01.2022 - 11:21

country flag Teji wrote:

Hi. I now have to do the front bands. Not sure what you mean by pick up stitches “ inside the 2 edge stitches” Ple are advise. Many thanks.

02.02.2021 - 19:15

DROPS Design answered:

Dear Teji, when working the front pieces you worked with 1 edge stitch at the side and 2 edge stitches towards front edge. You will now pick up the stitches the bands inside these 2 stitches - this video shows inside 1 edge stitch, just pick up the same way but inside the 2 edge stitches. Hope this will help. Happy knitting!

03.02.2021 - 09:17

country flag Aga wrote:

Hello, I have just finshed the left front band and wanted to start the right one (mirrored) but I ran into a problem. The left band starts (at the mid back) and ends (at the bottom of front piece) with a K section. If I make the right band the same, I will end up sewing together two K sections at the neck. Is that correct? Or should I start and end the right band with a P section?

05.04.2019 - 11:35

DROPS Design answered:

Dear Aga, yes that's correct, when sewing the 2 edge stitches on mid back, this will create a difference between the both K3 from right and left edge. Happy knitting!

05.04.2019 - 12:20

country flag Sable wrote:

Bonjour lorsqu'on augmente dans la bande de bordure cela ne fait plus des cotes 3/3 mais 5/5 a la fin ? je ne comprend pas trop ces augmentations. merci d'avance de votre réponse

10.02.2019 - 19:50

DROPS Design answered:

Bonsoir Sable. Oui, vous avez bien compris. Vous augmentez la première fois dans les section envers; les côtes deviennent côtes: 4 m env, 3 m end. Puis, vous augmentez dans les sections endroit et les côtes deviennent: 4 m env, 4 m end. À la fin des augmentations les côtes seront: 5 m env, 5 m end. Bon tricot!

10.02.2019 - 23:12

country flag Kim Swanson wrote:

What is the purpose of the two edge stitches along the front pieces?

09.12.2018 - 01:35

DROPS Design answered:

Hi Kim! Stitches for front bands are picked next to the edge stitches later.

09.12.2018 - 19:13

Monika wrote:

Hi! I have one question. When I am knitting front left band, when band is 9 and 12 cm, should I increase sts in each P and when 12 cm in each K section for whole front band, or do you mean only p and k sections from mid back and marker as earlier? Thank you in advance.

12.01.2017 - 11:43

DROPS Design answered:

Dear Monika, after 9 cm inc P1 in each P-section and then after 12 cm K1 in each K section, ie along whole band. Happy knitting!

12.01.2017 - 17:04

country flag Kirsten Møller wrote:

Højre forkant, strikkes som venstre, men modsat. ok. forstår jeg. men så kommer jeg ned til " der slåes m op til strop på den sidstre pind, fra vrangen således: der strikkes rib som før, men samtidig når arbejdet måler 34 cm målt fra nakken slåes der 10 nye masker op til knaphul. igen når arbejdet måler 48 cm fra nakken. skal dette forståes, som at arbejdet skal have samme bredde som venstre forkant eller skal det være 34 cm bredt og derefter 41 og 46 cm bredt. det lyder forkert

31.05.2015 - 18:03

DROPS Design answered:

Hej Kirsten, Nej det betyder at du laver stropperne til knaphul på samme pind, det ene når du er 34 cm fra kanten i nakken, det andet når du er 41 cm fra kanten i nakken og det tredje når du er 48 cm fra kanten i nakken. God fornøjelse!

04.06.2015 - 11:37

country flag Lisette Du Maine wrote:

Ik ben nu met de 2e bol bezig. Erg fijne wok, lekker zacht. De 2e bol is echter veel dunner van draad waardoor er een fors verschil is in dikte van het breiwerk met het eerste deel. Ik kijk er nu gewoon doorheen. Klopt dat wel?

11.01.2015 - 20:45

DROPS Design answered:

Hoi Lisette. Ja, dat is correct. DROPS Delight heeft een "handgesponnen" structuur. Dit betekent dat delen van de draad dikker of dunner kan zijn. Zie ook op het kleurenkaart.

12.01.2015 - 16:20