DROPS Alpaca
DROPS Alpaca
100% Alpaca
from 6.75 CAD /50g
DROPS Kid-Silk
DROPS Kid-Silk
75% Mohair, 25% Silk
from 9.40 CAD /25g
DROPS Cotton Viscose
54% Cotton, 46% Viscose
Discontinued
find alternatives
DROPS SS24

Blooming Iris

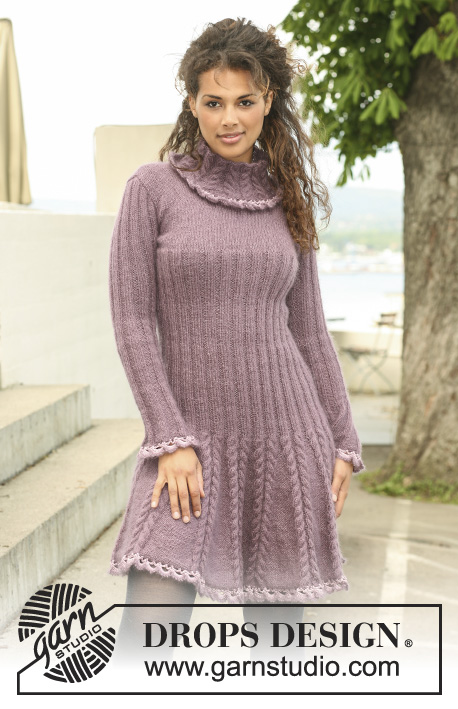
Knitted DROPS dress in ”Alpaca” and ”Kid-Silk” with crochet borders in ”Cotton Viscose”. Size XS to XXL

DROPS 123-40
DROPS design: Pattern no Z-521
--------------------------------------------------------
Size: XS - S - M - L - XL - XXL
Finished measurements:
Bust: 76-88-94-106-118-130 cm / 30"-34½"-37"-41¾"-46½"-51"
Full length: 92-94-96-98-100-102 cm / 36¼"-37"-37¾"-38½"-39⅜"-40"
Because of the pattern the dress will seem smaller than measurements in chart and because of the weight of the yarn the dress will be slightly longer when worn.

Materials: DROPS ALPACA from Garnstudio
color no 3800, medium purple: 450-500-550-600-700-750 g
And use: DROPS KID-SILK from Garnstudio
color no 05, heather: 200-200-225-250-275-300 g
And use: DROPS COTTON VISCOSE from Garnstudio
color no 27, lilac: 100-100-100-100-150-150 g

DROPS DOUBLE POINTED NEEDLES and CIRCULAR NEEDLE (40 and 80 cm / 16" and 32") size 4.5 mm/US 7 - or size needed to get 18 sts x 24 rows in stockinette st with 1 strand Alpaca + 1 strand Kid-Silk = 10 x 10 cm / 4" x 4".

DROPS CIRCULAR NEEDLE (80 cm / 32") size 5 mm/US 8 – or size needed to get 17 sts x 22 rows in stockinette st with 1 strand Alpaca + 1 strand Kid-Silk = 10 x 10 cm / 4" x 4".

DROPS CROCHET HOOK size 3 mm / C - for borders.

-------------------------------------------------------

Alternative Yarn – See how to change yarns here
Yarn Groups A to F – Use the same pattern and change the yarn here
Yarn usage using an alternative yarn – Use our yarn converter here

-------------------------------------------------------

DROPS Alpaca
DROPS Alpaca
100% Alpaca
from 6.75 CAD /50g
DROPS Kid-Silk
DROPS Kid-Silk
75% Mohair, 25% Silk
from 9.40 CAD /25g
DROPS Cotton Viscose
54% Cotton, 46% Viscose
Discontinued
find alternatives

Pattern instructions

NOTE: This pattern is written in American English. All measurements in charts are in cm. For conversion from inches to cm - click here. There are different terms for crocheting in American and British English. If this pattern includes crochet, click for "crochet terms" here. For this pattern in British English, please click here.
MEASUREMENT TIP:
Make all measurements when piece is lying flat.

PATTERN:
See diagram M.1 and M.2 - diagram is seen from RS.

DECREASING TIP:
To make the pleats even dec at the beg and at the end of each P-section alternately.

INCREASING TIP:
Inc 1 st each side of the 3 K sts mid under sleeve by making 1 YO, on next round K YO into back of loop to avoid a hole. Incorporate inc sts in K3/ P3 as you go along.
After the first inc there will be K5 mid under sleeve. After 2nd inc there will be K7 mid under sleeve. After 3rd inc there will be K9 mid under sleeve. After 4th inc there will be K3, P1, K3, P1, K3. After 5th inc there will be K3, P2, K3, P2, K3. After 6th inc there will be K3, P3, K3, P3, K3.
Repeat the 6 inc 1 more time.

--------------------------------------------------------

BODY PIECE:
Worked in the round. See MEASUREMENT TIP!
Cast on 494-570-608-684-760-836 sts on circular needle size 4.5 mm / US 7 with 1 strand Alpaca + 1 strand Kid-Silk. K 1 round. Continue as follows: * M.1 (= 15 sts), P23 *, repeat from *-* to end (= 13-15-16-18-20-22 repeats with 38 sts each). When piece measures 3 cm / 1⅛" dec 1 st in all the large P-sections (i.e. all P23 become P22), dec by P tog the first 2 sts = 481-555-592-666-740-814 sts. Repeat the dec in all the large P-sections on every 4th round – SEE DECREASING TIP – until there are P3 left in all P-sections = 234-270-288-324-360-396 sts. Piece now measures approx 35 cm / 13¾", complete the repeat of M.1 over each cable, then work M.2 = 156-180-192-216-240-264 sts. Continue with K3 / P3. When piece measures 52 cm / 20½" for all sizes dec all P3 to P2 = 130-150-160-180-200-220 sts. When piece measures 62 cm / 24½" for all sizes inc all P2 back to P3 by making 1 YO between the 2 P sts - on next round work YO into back of loop to avoid a hole = 156-180-192-216-240-264 sts. When piece measures 71 cm / 28" for all sizes K 1 round on all sts, at the same time dec 1 st in each P-section = 130-150-160-180-200-220 sts. Change to circular needle size 5 mm / US 8 and continue in stockinette st – NOW MEASURE PIECE FROM HERE! When piece measures 3-4-5-6-7-8 cm / 1⅛"-1½"-2"-2⅜"-2¾"-3⅛" work next round as follows: K 59-69-74-84-94-104 sts (= front piece), bind off 6 sts for armhole, K 59-69-74-84-94-104 sts (= back piece) and bind off 6 sts for armhole. Complete front and back pieces separately.

FRONT PIECE:
= 59-69-74-84-94-104 sts. Continue in stockinette st – AT THE SAME TIME bind off for armhole at the beg of every row each side: 2 sts 0-1-2-3-5-6 times and 1 st 1-2-2-4-4-6 time = 57-61-62-64-66-68 sts. Continue until piece measures 13-15-16-18-19-21 cm / 5⅛"-6"-6¼"-7"-7½"-8¼". Now slip the middle 15-15-16-16-18-18 sts on a stitch holder for neck and complete each shoulder separately. Bind off to shape the neckline at beg of every row from mid front: 3 sts 1 time, 2 sts 1 time and 1 st 2 times = 14-16-16-17-17-18 sts left on shoulder. Bind off when piece measures 21-23-25-27-29-31 cm / 8¼"-9"-9¾"-10⅝"-11⅜"-12¼" (the dress measures a total of approx 92-94-96-98-100-102 cm / 36¼"-37"-37¾"-38½"-39⅜"-40").

BACK PIECE:
= 59-69-74-84-94-104 sts. Bind off for armhole each side as described for front piece = 57-61-62-64-66-68 sts. When piece measures 19-21-23-25-27-29 cm / 7½"-8¼"-9"-9¾"-10⅝"-11⅜" bind off the middle 25-25-26-26-28-28 sts for neck and complete each shoulder separately. Bind off 2 sts on neckline on next row = 14-16-16-17-17-18 sts left on shoulder. Bind off when piece measures 21-23-25-27-29-31 cm / 8¼"-9"-9¾"-10⅝"-11⅜"-12¼".

SLEEVE:
Worked in the round. Cast on 63-63-72-72-81-81 sts with 1 strand Alpaca + 1 strand Kid-Silk on double pointed needles size 4.5 mm / US 7. K 1 round, Continue as follows:
* K3, P6 *, repeat from *-* 7-7-8-8-9-9 times. Insert a marker in the middle of the first 3 K sts (= mid under sleeve). When piece measures 4 cm / 1½" dec all P6 to P5 by P tog the first 2 sts in each P-section = 56-56-64-64-72-72 sts. Continue with K3/P5. When piece measures 8 cm / 3⅛" dec all P5 to P4 - SEE DECREASING TIP = 49-49-56-56-63-63 sts. Continue with K3/P4. When piece measures 12 cm / 4¾" dec all P4 to P3 = 42-42-48-48-54-54 sts. Continue with K3/P3. When piece measures 15 cm / 6" inc 1 st each side of the 3 K sts mid under sleeve – SEE INCREASING TIP! Repeat the inc on every 6th round a total of 12 times = 66-66-72-72-78-78 sts. When piece measures 48-47-46-44-43-41 cm / 19"-18½"-18"-17¼"-17"-16⅛" (less for the larger sizes because of longer sleeve cap and wider shoulder) bind off 7 sts mid under sleeve and complete piece back and forth on needle. Bind off for sleeve cap at the beg of every row each side: 2 sts 3 times and 1 st 1-2-3-5-6-9 times, then 2 sts each side until piece measures 54 cm / 21¼", now bind off 3 sts 1 time each side and bind off remaining sts. Piece measures approx 55 cm / 21⅝".

ASSEMBLY:
Sew shoulder seams.

NECK:
Pick up approx 80 to 90 sts (includes sts on stitch holder at front) round the neck on small circular needle size 4.5 mm / US 7 with 1 strand Alpaca + 1 strand Kid-Silk. P 1 round – AT THE SAME TIME adjust no of sts to 84-90-90-96-96-102 sts. K 1 round. Work next round as follows: * K 2 sts in each of the first 3 sts, P3 *, repeat from *-* to end = 126-135-135-144-144-153 sts. Continue in M.1 on all sts. When neck measures 10 cm / 4" – adjust after a full repeat - work M.2, then bind off LOOSELY with K over K and P over P.

CROCHET BORDER:
Crochet round bottom edge of dress and round sleeves edges with 1 strand Cotton Viscose and hook size 3 mm / C as follows:
ROUND 1: 1 sc in first st, * ch 5, skip approx 1-1.5 cm / ⅜"-½", 1 sc in next st *, repeat from *-*, finish with ch 5 and 1 sl st in first sc from beg of round. NOTE: Adjust to an even no of ch spaces.
ROUND 2: Crochet sl sts to the middle of first ch space, 1 sc in ch space, * ch 7, 1 sc in next ch space, ch 1, 1 sc in next ch space *, repeat from *-* to end, but replace last sc with 1 sl st in first sc on round.
ROUND 3: Crochet as follows in each of the large ch spaces: 1 sc, 7 dc, 1 sc and crochet 1 sc in each of the small ch spaces, finish with 1 sl st in first sc from beg of round.
ROUND 4: Change to 1 strand Kid-Silk. Crochet 1 sc in first sc and 1 sc in first dc, * [ ch 3, 1 sc in first ch (= 1 picot), 1 sc in next dc], repeat from [-] - a total of 6 times, 1 sc in each of the next 4 sts *, repeat from *-* all the way round, i.e. 6 picots in each of the large ch spaces, finish with 1 sl st in first sc.

Crochet in the same way in the P-round at the bottom of neck – hold the dress with neck towards you and the rest of the dress away from you – to make the border sit nicely work the first round as follows: 1 sc in first st, * ch 5, 1 sc in next st, ch 5, skip 1 st, 1 sc in next st *, repeat from *-* - make sure to have an equal no of ch spaces. Continue with round 2 to 4 as above.

FURTHER ASSEMBLY:
Set in sleeves.

Diagram

symbols = K
symbols = P
symbols = slip 3 sts on cable needle behind piece, K3, K3 from cable needle
symbols = slip 3 sts on cable needle in front of piece, K3, K3 from cable needle
symbols = slip 3 sts on cable needle behind piece, K tog first st on needle with first st on cable needle, K tog next st on needle with next st on cable needle, K tog the last st on needle with last st on cable needle (3 sts dec over cable)
symbols = slip 3 sts on cable needle in front of piece, K tog first st on cable needle with first st on needle, K tog next st on cable needle with next st on needle, K tog last st on cable needle with last st on needle (3 sts dec over cable)
diagram
Do you have a question? See a list of frequently asked questions (FAQ)

Knitting tension is what determines the final measurements of your work, and is usually measured per 10 x 10 cm. It is provided like so: number of stitches in width x number of rows in height - eg: 19 stitches x 26 rows = 10 x 10 cm.

The knitting tension is very individual; some people knit/crochet loosely while others work tightly. You adjust the knitting tension with the needle size, which is why the suggested needle size only serve as a guide! You need to adjust this (up or down) to ensure that YOUR knitting tension matches the knitting tension provided in the pattern. If you work with a different knitting tension than provided you will have a different yarn consumption, and your work will have different measurements than what the pattern suggests.

The knitting tension also determines which yarns can replace each other. As long as you achieve the same knitting tension you can replace one yarn with another.

See DROPS lesson: How to measure your tension/gauge

See DROPS video: How to make a gauge tension swatch

The required amount of yarn is provided in grams, eg: 450 g. To calculate how many balls you’ll need you first need to know how many grams are in 1 ball (25g, 50g or 100g). This information is available if you click on the individual yarn quality on our pages. Divide the amount required with the amount of each ball. For example, if each ball is 50g (the most common amount), the calculation will be as follows: 450 / 50 = 9 balls.

The important thing when changing from one yarn to another is that the knitting/crochet tension remains the same. This is so that the measurements of the finished piece will be the same as on the sketch provided. It is easier to achieve the same knitting tension using yarns from the same yarn group. It is also possible to work with multiple strands of a thinner yarn to achieve the knitting tension of a thicker one. Please try our yarn converter. We recommend you to always work a test swatch.

Please NOTE: when changing yarn the garment might have a different look and feel to the garment in the photo, due to individual properties and qualities of each yarn.

See DROPS lesson: Can I use a different yarn than the one mentioned in the pattern?

All our yarns are categorised into yarn groups (from A to F) according to thickness and knitting tension – group A contains the thinnest yarns and group F the thickest. This makes it easier for you to find alternative yarns to our patterns, should you wish to switch yarn. All yarns within the same group have a similar knitting tension and can easily replace each other. However, different yarn qualities have different structures and properties which will give the finished work a unique look and feel.

Click here for an overview of the yarns in each yarn group

At the top of all our patterns you’ll find a link to our yarn converter, which is a helpful tool should you wish to use a different yarn than suggested. By filling in the yarn quality you wish to replace, the amount (in your size) and number of strands, the converter will present good alternative yarns with the same knitting tension. Additionally it will tell you how much you’ll require in the new qualities and whether you’ll need to work with multiple strands. Most skeins are 50g (some are 25g or 100g).

If the pattern is worked with multiple colours, every colour will have to be converted separately. Similarly, if the pattern is worked with several strands of different yarns (for example 1 strand Alpaca and 1 strand Kid-Silk) you will have to find alternatives for each, individually.

Click here to see our yarn converter

Since different yarns have different qualities and textures we have chosen to keep the original yarn in our patterns. However, you can easily find options among our available qualities by using our yarn converter, or simply pick a yarn from the same yarn group.

It is possible that some retailers still have discontinued yarns in stock, or that someone has a few skeins at home that they would like to find patterns for.

The yarn converter will provide both alternative yarn as well as required amount in the new quality.

If you think it's hard to decide what size to make, it can be a good idea to measure a garment you own already and like the size of. Then you can pick the size by comparing those measures with the ones available in the pattern's size chart.

You'll find the size chart at the bottom of the pattern.

See DROPS lesson: How to read size chart

The needle size provided in the pattern serves only as a guide, the important thing is to follow the knitting tension. And since knitting tension is very individual, you will have to adjust the needle size to ensure that YOUR tension is the same as in the pattern – maybe you’ll have to adjust 1, or even 2 needle sizes, up or down to achieve the correct tension. For this, we recommend that you work test swatches.

Should you work with a different knitting tension than the one provided, the measurements of the finished garment might deviate from the measurement sketch.

See DROPS lesson: How to measure your tension/gauge

See DROPS video: How to make a gauge tension swatch

Working a garment top-down provides more flexibility and room for personal adjustment. For example it is easier to try the garment on while working, as well as making adjustments to length of yoke and shoulder caps.

The instructions are carefully explaining every step, in the correct order. Diagrams are adjusted to the knitting direction and are worked as usual.

The diagram depicts all rows/rounds, and every stitch seen from the right side. It is read from bottom to top, from right to left. 1 square = 1 stitch.

When working back and forth, every other row is worked from the right side and every other row is worked from the wrong side. When working from the wrong side, the diagram will have to be worked reversed: from left to right, knit stitches are purled, purl stitches are knit etc.

When working in the round every round is worked from the right side and the diagram are worked from right to left on all rounds.

See DROPS lesson: How to read knitting diagrams

The diagram depicts all rows/rounds, and every stitch seen from the right side. It is worked from bottom to top, from right to left.

When working back and forth every other row is worked from the right side: from right to left and every other row is worked from the wrong side: from left to right.

When working in the round, every row in the diagram are worked from the right side, from right to left.

When working a circular diagram you start in the middle and work your way outwards, counter clockwise, row by row.

The rows usually start with a given number of chain stitches (equivalent to the height of the following stitch), this will either be depicted in the diagram or explained in the pattern.

See DROPS lesson: How to read crochet diagrams

Instructions for working several diagrams after each other on the same row/round, will often be written like so: “work A.1, A.2, A.3 a total of 0-0-2-3-4 times". This means you work A.1 once, then A.2 is worked once, and A.3 is repeated (in width) the number of times provided for your size – in this case like so: S = 0 times, M = 0 times, L=2 times, XL= 3 times and XXL = 4 times.

The diagrams are worked as usual: begin with the first row in A.1, then work the first row in A.2 etc.

See DROPS lesson: How to read knitting diagrams

See DROPS lesson: How to read crochet diagrams

The total width of the garment (from wrist-to-wrist) will be larger in the larger sizes, despite the actual sleeves being shorter. The larger sizes have longer sleeve caps and wider shoulders, so there will be a good fit in all sizes.

The measurement sketch/schematic drawing provides information regarding the full length of the garment. If it’s a jumper or a jacket the length is measured from the highest point on the shoulder (usually closest to the neckline), and straight down to the bottom of the garment. It is NOT measured from the tip of shoulder. Similarly, the length of yoke is measured from the highest point on the shoulder and down to where yoke is split into body and sleeves.

See DROPS lesson: How to read a schematic drawing

Diagrams are often repeated on the round or in height. 1 repeat is the diagram the way it appears in the pattern. If it says to work 5 repeats of A.1 in the round, then you work A.1 a total of 5 times after/next to each other in the round. If it says to work 2 repeats of A.1 vertically/in height you work the entire diagram once, then begin again at the start and work the entire diagram one more time.

Chain stitches are slightly narrower than other stitches and to avoid working the cast-on edge too tight, we simply chain more stitches to begin with. The stitch count will be adjusted on the following row to fit the pattern and measurement sketch.

The rib edge is more elastic and will contract slightly compared to, for example, stocking stitch. By increasing before the rib edge, you avoid a visible difference in width between the rib edge and the rest of the body.

It’s very easy to cast off too tightly, and by making yarn overs while casting off (and simultaneously casting these off) you avoid a too tight cast off edge.

See DROPS video: How to bind off with yarn overs (yo)

To achieve an even increase (or decrease) you can increase on, for example: every 3rd and 4th row alternately, like so: work 2 rows and increase on the 3rd row, work 3 rows and increase on the 4th. Repeat this until the increase is complete.

See DROPS lesson: Increase or decrease 1 st on every 3rd and 4th row alternately

Should you prefer to work in the round instead of back and forth, you may of course adjust the pattern. You’ll need to add steeks mid-front (usually 5 stitches), and follow the instructions. When you would normally turn and work from the wrong side, simply work across the steek and continue in the round. At the end you’ll cut the piece open, pick up stitches to work bands, and cover the cut edges.

See DROPS video: How to knit steeks and cut open

Should you prefer to work back and forth instead of in the round, you may of course adjust the pattern so you work the pieces separately and then assemble them at the end. Divide the stitches for the body in 2, add 1 edge stitch in each side (for sewing) and work the front and back pieces separately.

See DROPS lesson: Can I adapt a pattern for circular needles into straight needles?

Pattern repeats can vary slightly in the different sizes, in order to get the correct proportions. If you’re not working the exact same size as the garment in the photo, yours might deviate slightly. This has been carefully developed and adjusted so that the complete impression of the garment is the same in all sizes.

Make sure to follow instructions and diagrams for your size!

If you have found a pattern you like which is available in women’s size it’s not very difficult to convert it to men’s size. The biggest difference will be the length of sleeves and body. Start working on the women size that you think would fit across the chest. The additional length will be worked right before you cast off for the armhole/sleeve cap. If the pattern is worked top-down you can add the length right after the armhole or before the first decrease on sleeve.

Regarding additional yarn amount, this will depend on how much length you add, but it is better with a skein too many than too few.

All yarns will have excess fibres (from production) that might come off as lint or shedding. Brushed yarns (ie hairier yarns) have more of these loose, excess fibres, causing more shedding.

Shedding also depends on what is worn under or over the garment, and whether this pulls at the yarn fibres. It’s therefore not possible to guarantee that there will be no shedding

Below are some tips on how to get the best result when working with hairier yarns:

1. When the garment is finished (before you wash it) shake it vigorously so the looser hairs come off. NOTE: do NOT use a lint roller, brush or any method that pulls at the yarn.

2. Place the garment in a plastic bag and put it in your freezer - the temperature will cause the fibres to become less attached to each other, and excess fibres will come off easier.

3. Leave in the freezer for a few hours before taking it out and shaking it again.

4. Wash the garment according to the instructions on the yarn label.

Pilling is a natural process that happens to even the most exclusive of fibers. It's a natural sign of wear and tear that is hard to avoid, and that is most visible in high friction areas of your garment like a sweater's arms and cuffs.

You can make your garment look as new by removing the pilling, using a fabric comb or a pill/lint remover.

Still can't find the answer you need? Then scroll down and leave your question so one of our experts can try to help you. This will be done normally within 5 to 10 working days.
In the meantime, you can read the questions and answers that others have left to this pattern or join the DROPS Workshop on Facebook to get help from fellow knitters/crocheters!

Post a comment to pattern DROPS 123-40

We would love to hear what you have to say about this pattern!

If you want to leave a question, please make sure you select the correct category in the form below, to speed up the answering process. Required fields are marked *.

Comments / Questions (57)

country flag Mona Jacobsen wrote:

På heklekanten skal det brukes Cotton Viskose. Den er utgått og da lurer jeg på hvilket garn det skal brukes istedenfor.

18.03.2024 - 16:39

DROPS Design answered:

Hei Mona, Cotton Viscose tilhørte garngruppe A. Du kan velge hvem som helst garn fra Gruppe A og bruke samme pinne størrelse, når du skal erstatte Cotton Viscose. For eksempel, Drops Loves You 7 og 9, eller Drops Safran er bomullsgarn. I garngruppe B har du Drops Belle som har Viskose i tillegg til Bomull, men det er et tykkere garn, så da må du minske pinnestørrelsen for å få til riktige strikkefasthet. God fornøyelse!

19.03.2024 - 06:57

country flag Zahra wrote:

Hej, jag undrar om ärmkullar, när man börjar miska för ärmkullar, vet inte hur lång är det efter. Man når 54 cm snart efter de första minskningar. Det står att minska 2 m i varje sidan medan min är 54cm och det går inte och göra som beskrivningen. Jag vill veta hur många cm ska vara från ärmkulle tills när man avm alla maskor i ärmar. Tack/ zahra

13.03.2024 - 14:24

DROPS Design answered:

Hej Zahra, du finder alle mål i måleskitsen nederst i opskriften. Ärmkullen måler 7 cm i den mindste størrelse og 14 i den største :)

19.03.2024 - 12:16

country flag Christelle wrote:

Bonjour, Pouvez vous mettre un onglet sous chaque commentaire afin d obtenir une traduction automatiques des commentaires en langues étrangères ? afin de nous permettre de pouvoir lire tous les commentaires qui doivent être intéressants et utiles. Merci à vous et votre site est super. Cordialement, Christelle

14.11.2023 - 20:59

DROPS Design answered:

Bonjour Christelle, nous ne sommes malheureusement pas en mesure de pouvoir proposer ce service, vous pouvez vous aider d'un traducteur en ligne (attention toutefois aux erreurs d'interprétation possibles), ou bien simplement poser votre question ici. Bon tricot!

15.11.2023 - 08:10

country flag Muriel De Stercke wrote:

Pourquoi faut-il des aiguilles n° 5 alors qu'elles sont mentionnées nulle part . Merci . Cordialement

06.10.2022 - 10:57

DROPS Design answered:

Bonjour Mme De Stercke, l'aiguille circulaire 5 sert pour la partie jersey, je cite DOS & DEVANT :... À 71 cm de hauteur totale, pour toutes les tailles, tricoter 1 tour end sur toutes les mailles, en même temps, diminuer 1 m dans chaque section envers = 130-150-160-180-200-220 m. Continuer avec l'aiguille circulaire 5 en jersey –. Bon tricot!

06.10.2022 - 11:37

country flag Cora Meijer-Lammerse wrote:

Moer je de tel M1 en M2 van links naar rechts lezen of van rechts naar links? Ik heb al een eindje gebreid en omdat er staat dat het is wat je aan de goede kant ziet, dacht ik dus eerst 3 st achter en daarna 3 st voor op de kabelnaald, dus van links naar rechts gelezen, maar nu kijk ik op de foto en ben ik bang dat het toch andersom moet.

25.09.2020 - 16:03

DROPS Design answered:

Dag Cora,

Je moet de telpatronen inderdaad van rechts naar links lezen, en van onder naar boven. Bij de veel gestelde vragen kun je ook antwoorden vinden over hoe je een telpatroon leest. Hoop dat het nu lukt. Veel breiplezier!

10.10.2020 - 11:07

country flag Sisko Ylönen wrote:

Teen mekkoa 124-40. Onko oikein, että helmasta tulee 380 cm. Neuletiheys on oikein 17s=10cm. Silmukoita ohjeessa 684 M-koossa. Mittakuvassakaan helma ei ole 190cm.

16.01.2020 - 01:29

DROPS Design answered:

Helmaan luodaan paljon silmukoita, mutta niitä kavennetaan koko ajan pois työstä. Palmikoiden vuoksi työstä tulee kapeampi kuin mitä silmukkamäärän perusteella uskoisi.

20.01.2020 - 17:47

country flag Sisko Ylönen wrote:

Olen aloittanut työn. Teen L-kokoa. Neuletiheys on oikea. Onko totta, että helmasta tulee aivan valtava, 380cm ? Silmukoita 684. Neuletiheys 18s=10 cm.

16.01.2020 - 01:24

country flag Yvonne wrote:

Hallo ik had jullie een tijd geleden nog wat gevraagd graag antwoord erop

23.03.2019 - 09:00

country flag Yvonne wrote:

Als ik nu met akryl doe kan ik hem dan met 1 van de andere bollen doen zodat wat dikker word. Moet het proeflapje dan met m1 of m2 doen voor te zien of het gaat?

11.03.2019 - 19:48

country flag Yvonne wrote:

Kan ik deze jurk met 100% akryll breien?

02.03.2019 - 09:35

DROPS Design answered:

Dag Yvonne,

Dat zou kunnen, maar het kan wel een wat ander effect hebben, doordat acryl lichter is. Maak altijd even een proeflapje,

05.03.2019 - 20:31