DROPS Alpaca
DROPS Alpaca
100% Alpaca
from 3.40 £ /50g
Get the yarn to make this pattern from 6.80£.

The yarn cost is calculated from the pattern’s smallest size and the yarn’s cheapest product type. Looking for an even better price? You might find it on the DROPS Deals!

DROPS SS24
DROPS 123-18
DROPS design: Pattern no Z-523
--------------------------------------------------------
GLOVES:
Size: One-size
Materials: DROPS ALPACA from Garnstudio
100 g colour no 9020m, light pearl grey

DROPS DOUBLE POINTED NEEDLES size 2.5 mm – or size needed to get 26 sts x 34 rows in stocking st = 10 x 10 cm. 1 repeat of M.2 = height approx 8 cm.

-------------------------------------------------------

Alternative Yarn – See how to change yarns here
Yarn Groups A to F – Use the same pattern and change the yarn here
Yarn usage using an alternative yarn – Use our yarn converter here

-------------------------------------------------------

DROPS Alpaca
DROPS Alpaca
100% Alpaca
from 3.40 £ /50g
Get the yarn to make this pattern from 6.80£.

The yarn cost is calculated from the pattern’s smallest size and the yarn’s cheapest product type. Looking for an even better price? You might find it on the DROPS Deals!

Pattern instructions

NOTE: This pattern is written in British English. All measurements in charts are in cm. For conversion from cm to inches - click here. There are different terms for crocheting in British and American English. If this pattern includes crochet, click for "crochet terms" here. For this pattern in American English, please click here.
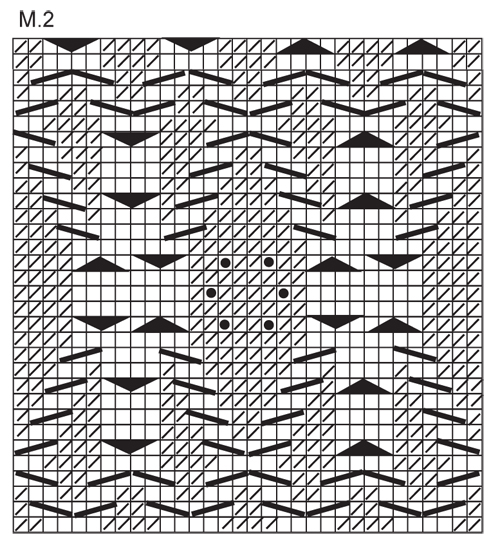
PATTERN: See diagram M.1 to M.5 - diagram is seen form RS.

GARTER ST (back and forth on needle): K all rows.

--------------------------------------------------------

LEFT GLOVE:
Worked in the round.
Cast on 60 sts on double pointed needles size 2.5 mm with Alpaca. K 1 round, and continue in rib as follows: P2, * K2, P4 *, repeat from *-*, finish with P2. When piece measures 10 cm continue as follows: P2, K2, * P4, K2 in each of the next 2 sts *, repeat from *-* a total of 3 times, P4, K2, P2, * K2 tog, K4 *, repeat from *-* to end = 61 sts. NOW MEASURE PIECE FROM HERE! Continue as follows: P2, M.1 on the next 32 sts (= upper hand), P2 and stocking st on the remaining 25 sts (= palm of hand). REMEMBER THE KNITTING TENSION! Insert a marker in the last but one stocking st in palm of hand (= thumb st). After M.1 (piece now measures approx 1.5 cm after the rib) continue in M.2 on these sts – AT THE SAME TIME on round 1 of M.2 inc for thumb gusset as follows: Inc 1 st each side of st with marker - inc by making 1 YO, on next round K YO into back of loop to avoid a hole. Repeat the inc (2 more sts between the 2 YO per inc) on every 3rd round a total of 7 times = 15 thumb sts.
When piece measures 6.5 cm slip the 15 thumb sts on a stitch holder. On next round cast on 1 new st behind thumb sts = 61 sts in total. Continue as before in pattern and stocking st until M.2 is completed - piece now measures approx 9 cm.
Slip the first 26 sts on a stitch holder (upper hand), keep the next 15 sts on needle and slip the last 20 sts on a stitch holder (= palm of hand).

LITTLE FINGER:
= 15 sts, cast on 1 new st towards the hand = 16 sts. Continue in the round as follows: M.5 on the 8 sts mid upper finger, P2 on left side of pattern (i.e. continue the P2 at the side as before), P1 on right side of pattern (i.e. on the st cast on towards the hand) and the remaining 5 sts in stocking st. When finger measures 6 cm K2 tog across the round = 8 sts. Cut the thread and pull it through remaining 8 sts, tighten tog.

HAND:
Slip sts from stitch holders back on needle, pick up 2 sts towards little finger = 48 sts. Work K over K and P over P for 2 rounds – P the 2 new sts. Now keep the 2 sts picked up towards little finger + 8 sts on upper hand and 6 sts from palm of hand on needle. Slip the remaining 32 sts back on stitch holders.

RING FINGER:
= 16 sts, Cast on 2 new sts towards sts on stitch holder = 18 sts. Continue in the round in M.5 – beg on round 3 in diagram – on the 8 sts mid upper finger, P2 each side of these and stocking st on the remaining 6 sts. When finger measures 7.5 cm K2 tog across the round = 9 sts. Cut the thread and pull it through remaining 9 sts, tighten tog.

MIDDLE FINGER:
Slip 8 sts from stitch holder on upper hand and 7 sts from stitch holder in palm of hand back on needle, pick up 3 sts towards ring finger and cast on 2 new sts towards sts on stitch holders = 20 sts. Continue in the round in M.4 - start on round 3 in diagram – on the 8 sts mid upper finger, P2 each side of these and stocking st on the remaining 8 sts. When finger measures 8 cm K2 tog across the round = 10 sts. Cut the thread and pull it through remaining 10 sts, tighten tog.

INDEX FINGER:
Slip the remaining 17 sts from stitch holders back on needle, pick up 3 sts towards middle finger = 20 sts. Continue in the round in M.4 – beg on round 3 in diagram – on the 8 sts mid upper finger, P2 each side of these and stocking st on the remaining 8 sts. When finger measures 7 cm K2 tog across the round = 10 sts. Cut the thread and pull it through remaining 10 sts, tighten tog.

THUMB:
Slip sts over thumb gusset on needle and pick up 3 sts in the edge behind these = 18 sts. Work stocking st in the round for 6 cm, then K2 tog across the round. Cut the thread and pull it through remaining 9 sts, tighten tog.

RIGHT GLOVE:
Like left glove, but mirrored, i.e. after the rib continue as follows: * K4, K2 tog *, repeat from *-* 5 times, P2, K2, ** P4, K2 in each of the next 2 sts **, repeat from **-** a total of 3 times, K2, P2 = 61 sts.
Work little finger as follows:
Slip the first 20 sts on a stitch holder (= palm of hand), keep the next 15 sts on needle and slip the last 26 sts on a stitch holder (= upper hand). Continue in M.4 on little finger and ring finger and M.5 on middle finger and index finger.

Head band, see pattern 123-17

Diagram

symbols = K from RS, P from WS
symbols = P from RS, K from WS
symbols = slip 2 sts on cable needle in front of piece, P1, K2 from cable needle.
symbols = slip 1 st on cable needle behind piece, K2, P1 from cable needle.
symbols = slip 2 sts on cable needle behind piece, K2, K2 from cable needle
symbols = slip 2 sts on cable needle in front of piece, K2, K2 from cable needle.
symbols = BOBBLE: Work 5 sts in 1 st as follows: K1, 1 YO, K1, 1 YO, K1, work 4 rows stocking st back and forth on these 5 sts, then pass 2nd st over first st, 3rd st over first st, 4th st over first st and 5th st over first st = 1 st left.
diagram
diagram

Each of our patterns has specific tutorial videos to help you.

Do you have a question? See a list of frequently asked questions (FAQ)

Knitting tension is what determines the final measurements of your work, and is usually measured per 10 x 10 cm. It is provided like so: number of stitches in width x number of rows in height - eg: 19 stitches x 26 rows = 10 x 10 cm.

The knitting tension is very individual; some people knit/crochet loosely while others work tightly. You adjust the knitting tension with the needle size, which is why the suggested needle size is only meant as a guide! You need to adjust this (up or down) to ensure that YOUR knitting tension matches the knitting tension provided in the pattern. If you work with a different knitting tension than provided you will have a different yarn consumption, and your work will have different measurements than what the pattern suggests.

The knitting tension also determines which yarns can replace each other. As long as you achieve the same knitting tension you can replace one yarn with another.

See DROPS lesson: How to measure your tension/gauge

See DROPS video: How to make a gauge tension swatch

The required amount of yarn is provided in grams, eg: 450 g. To calculate how many balls you’ll need you first need to know how many grams are in 1 ball (25g, 50g or 100g). This information is available if you click on the individual yarn quality on our pages. Divide the amount required with the amount of each ball. For example, if each ball is 50g (the most common amount), the calculation will be as follows: 450 / 50 = 9 balls.

The important thing when changing from one yarn to another is that the knitting/crochet tension remains the same. This is so that the measurements of the finished piece will be the same as on the sketch provided. It is easier to achieve the same knitting tension using yarns from the same yarn group. It is also possible to work with multiple strands of a thinner yarn to achieve the knitting tension of a thicker one. Please try our yarn converter. We recommend you to always work a test swatch.

Please NOTE: when changing yarn the garment might have a different look and feel to the garment in the photo, due to individual properties and qualities of each yarn.

See DROPS lesson: Can I use a different yarn than the one mentioned in the pattern?

All our yarns are categorised into yarn groups (from A to F) according to thickness and knitting tension – group A contains the thinnest yarns and group F the thickest. This makes it easier for you to find alternative yarns to our patterns, should you wish to switch yarn. All yarns within the same group have a similar knitting tension and can easily replace each other. However, different yarn qualities have different structures and properties which will give the finished work a unique look and feel.

Click here for an overview of the yarns in each yarn group

At the top of all our patterns you’ll find a link to our yarn calculator, which is a helpful tool should you wish to use a different yarn than suggested. By filling in the yarn quality you wish to replace, the amount (in your size) and number of strands, the calculator will present good alternative yarns with the same knitting tension. Additionally it will tell you how much you’ll require in the new qualities and whether you’ll need to work with multiple strands. Most skeins are 50g (some are 25g or 100g).

If the pattern is worked with multiple colours, every colour will have to be calculated separately. Similarly, if the pattern is worked with several strands of different yarns (for example 1 strand Alpaca and 1 strand Kid-Silk) you will have to find alternatives for each, individually.

Click here to see our yarn calculator

Since different yarns have different qualities and textures we have chosen to keep the original yarn in our patterns. However, you can easily find options among our available qualities by using our yarn calculator, or simply pick a yarn from the same yarn group.

It is possible that some retailers still have discontinued yarns in stock, or that someone has a few skeins at home that they would like to find patterns for.

The yarn calculator will provide both alternative yarn as well as required amount in the new quality.

If you think it's hard to decide what size to make, it can be a good idea to measure a garment you own already and like the size of. Then you can pick the size by comparing those measures with the ones available in the pattern's size chart.

You'll find the size chart at the bottom of the pattern.

See DROPS lesson: How to read size chart

The needle size provided in the pattern serves only as a guide, the important thing is to follow the knitting tension. And since knitting tension is very individual, you will have to adjust the needle size to ensure that YOUR tension is the same as in the pattern – maybe you’ll have to adjust 1, or even 2 needle sizes, up or down to achieve the correct tension. For this, we recommend that you work test swatches.

Should you work with a different knitting tension than the one provided, the measurements of the finished garment might deviate from the measurement sketch.

See DROPS lesson: How to measure your tension/gauge

See DROPS video: How to make a tension/gauge swatch

Working a garment top-down provides more flexibility and room for personal adjustment. For example it is easier to try the garment on while working, as well as making adjustments to length of yoke and shoulder caps.

The instructions are carefully explaining every step, in the correct order. Diagrams are adjusted to the knitting direction and are worked as usual.

The diagram depicts all rows/rounds, and every stitch seen from the right side. It is read from bottom to top, from right to left. 1 square = 1 stitch.

When working back and forth, every other row is worked from the right side and every other row is worked from the wrong side. When working from the wrong side, the diagram will have to be worked reversed: from left to right, knit stitches are purled, purl stitches are knit etc.

When working in the round every round is worked from the right side and the diagram are worked from right to left on all rounds.

See DROPS lesson: How to read knitting diagrams

The diagram depicts all rows/rounds, and every stitch seen from the right side. It is worked from bottom to top, from right to left.

When working back and forth every other row is worked from the right side: from right to left and every other row is worked from the wrong side: from left to right.

When working in the round, every row in the diagram are worked from the right side, from right to left.

When working a circular diagram you start in the middle and work your way outwards, counter clockwise, row by row.

The rows usually start with a given number of chain stitches (equivalent to the height of the following stitch), this will either be depicted in the diagram or explained in the pattern.

See DROPS lesson: How to read crochet diagrams

Instructions for working several diagrams after each other on the same row/round, will often be written like so: “work A.1, A.2, A.3 a total of 0-0-2-3-4 times". This means you work A.1 once, then A.2 is worked once, and A.3 is repeated (in width) the number of times provided for your size – in this case like so: S = 0 times, M = 0 times, L=2 times, XL= 3 times and XXL = 4 times.

The diagrams are worked as usual: begin with the first row in A.1, then work the first row in A.2 etc.

See DROPS lesson: How to read knitting diagrams

See DROPS lesson: How to read crochet diagrams

The total width of the garment (from wrist-to-wrist) will be larger in the larger sizes, despite the actual sleeves being shorter. The larger sizes have longer sleeve caps and wider shoulders, so there will be a good fit in all sizes.

The measurement sketch/schematic drawing provides information regarding the full length of the garment. If it’s a jumper or a jacket the length is measured from the highest point on the shoulder closest to the neckline, and straight down to the bottom of the garment. It is NOT measured from the tip of shoulder. Similarly, the length of yoke is measured from the highest point on the shoulder and down to where yoke is split into body and sleeves.

On a jacket measures are never taken along bands, unless specifically stated. Always measure inside band stitches when measuring the length.

See DROPS lesson: How to read a schematic drawing

Diagrams are often repeated on the round or in height. 1 repeat is the diagram the way it appears in the pattern. If it says to work 5 repeats of A.1 in the round, then you work A.1 a total of 5 times after/next to each other in the round. If it says to work 2 repeats of A.1 vertically/in height you work the entire diagram once, then begin again at the start and work the entire diagram one more time.

Chain stitches are slightly narrower than other stitches and to avoid working the cast-on edge too tight, we simply chain more stitches to begin with. The stitch count will be adjusted on the following row to fit the pattern and measurement sketch.

The rib edge is more elastic and will contract slightly compared to, for example, stocking stitch. By increasing before the rib edge, you avoid a visible difference in width between the rib edge and the rest of the body.

It’s very easy to cast off too tightly, and by making yarn overs while casting off (and simultaneously casting these off) you avoid a too tight cast off edge.

See DROPS video: How to bind off with yarn overs (yo)

To achieve an even increase (or decrease) you can increase on, for example: every 3rd and 4th row alternately, like so: work 2 rows and increase on the 3rd row, work 3 rows and increase on the 4th. Repeat this until the increase is complete.

See DROPS lesson: Increase or decrease 1 st on every 3rd and 4th row alternately

Should you prefer to work in the round instead of back and forth, you may of course adjust the pattern. You’ll need to add steeks mid-front (usually 5 stitches), and follow the instructions. When you would normally turn and work from the wrong side, simply work across the steek and continue in the round. At the end you’ll cut the piece open, pick up stitches to work bands, and cover the cut edges.

See DROPS video: How to knit steeks and cut open

Should you prefer to work back and forth instead of in the round, you may of course adjust the pattern so you work the pieces separately and then assemble them at the end. Divide the stitches for the body in 2, add 1 edge stitch in each side (for sewing) and work the front and back pieces separately.

See DROPS lesson: Can I adapt a pattern for circular needles into straight needles?

Pattern repeats can vary slightly in the different sizes, in order to get the correct proportions. If you’re not working the exact same size as the garment in the photo, yours might deviate slightly. This has been carefully developed and adjusted so that the complete impression of the garment is the same in all sizes.

Make sure to follow instructions and diagrams for your size!

If you have found a pattern you like which is available in women’s size it’s not very difficult to convert it to men’s size. The biggest difference will be the length of sleeves and body. Start working on the women size that you think would fit across the chest. The additional length will be worked right before you cast off for the armhole/sleeve cap. If the pattern is worked top-down you can add the length right after the armhole or before the first decrease on sleeve.

Regarding additional yarn amount, this will depend on how much length you add, but it is better with a skein too many than too few.

All yarns will have excess fibres (from production) that might come off as lint or shedding. Brushed yarns (ie hairier yarns) have more of these loose, excess fibres, causing more shedding.

Shedding also depends on what is worn under or over the garment, and whether this pulls at the yarn fibres. It’s therefore not possible to guarantee that there will be no shedding

Below are some tips on how to get the best result when working with hairier yarns:

1. When the garment is finished (before you wash it) shake it vigorously so the looser hairs come off. NOTE: do NOT use a lint roller, brush or any method that pulls at the yarn.

2. Place the garment in a plastic bag and put it in your freezer - the temperature will cause the fibres to become less attached to each other, and excess fibres will come off easier.

3. Leave in the freezer for a few hours before taking it out and shaking it again.

4. Wash the garment according to the instructions on the yarn label.

Pilling is a natural process that happens to even the most exclusive of fibers. It's a natural sign of wear and tear that is hard to avoid, and that is most visible in high friction areas of your garment like a sweater's arms and cuffs.

You can make your garment look as new by removing the pilling, using a fabric comb or a pill/lint remover.

Still can't find the answer you need? Then scroll down and leave your question so one of our experts can try to help you. This will be done normally within 5 to 10 working days.
In the meantime, you can read the questions and answers that others have left to this pattern or join the DROPS Workshop on Facebook to get help from fellow knitters/crocheters!

You might also like...

Post a comment to pattern DROPS 123-18

We would love to hear what you have to say about this pattern!

If you want to leave a question, please make sure you select the correct category in the form below, to speed up the answering process. Required fields are marked *.

Comments / Questions (8)

country flag Ys wrote:

Bonjour,\r\nJ\'ai du mal à interprèter le diagramme M.1, premier rang.\r\nQue dois-je faire quand je rencontre quatre cases consécutives barrées chacune d\'un trait en diagonale du coin gauche en bas vers le coin droit en haut? Votre légendre n\'offre pas exactement ce cas de figure, seulement trois cases barrées ainsi d\'un SEUL trait sur ces trois cases. \r\nMerci!

09.01.2022 - 13:16

DROPS Design answered:

Bonjour Ys, ces mailles correspondent à une maille envers (la correction sera faite prochainement, merci pour votre retour). Autrement dit, au 1er rang de M.1, tricotez: 2 m end, 3 m env, 4 m end, 4 m env, 4 m end, 4 m env, 4 m end, 4 m env, 2 m end. Bon tricot!

10.01.2022 - 08:52

country flag Sarah wrote:

Hello, I believe I found what was not working. The right instructions should be this, as there were 4 sts missing after the P2, K2: *K4 , K2tog *, repeat from *-* 5 times, P2, K2, P4,** K2 in each of the next 2 sts, P4**, repeat from **-** 3 times, K2, P2 = 61 sts.

05.09.2018 - 15:42

country flag Sarah wrote:

Hello, When knitting the right glove, the instructions after the ribs do not lead to the knitted stitches lining up with the ribs, or maybe the instructions are not clear enough for me. And if I knit the M1 pattern afterward, it definitely does not line up with the ribs as it did for the left glove. Can you please help? I have been trying to solve this issue for the past few days and cannot seem to get it right. Thanks

04.09.2018 - 20:28

DROPS Design answered:

Dear Sarah, it looks like you should work one more time (K4, K2 tog) ie 6 times in total to get the number of sts matching in the round and get M.1 working over rib pattern. Our Designteam will check this. Happy knitting!

05.09.2018 - 08:35

country flag Lena wrote:

Hello, could you please tell me when to knit the pattern M.3? I can see the diagram, but when I read the text, I can't find when to do it. Thank you!

17.07.2017 - 22:15

DROPS Design answered:

Dear Lena, M.3 is not worked for the gloves, only for the matching headband. Happy knitting!

18.07.2017 - 08:38

country flag Maria wrote:

Kuinka tehdä tällä ohjeella lapaset?

16.12.2015 - 11:24

DROPS Design answered:

Hei! Voit aina kysyä neuvoa liikkeestä, josta ostit DROPS-lankojasi.

17.12.2015 - 17:09

Christine Kelly wrote:

Can a pattern be downloaded to a Samsung tablet rather than print? If so, how is it done? Pattern 123-17 and 123-18.

02.11.2015 - 02:40

DROPS Design answered:

Dear Mrs Kelly, you cannot download our patterns. You need to either see them online or print them. The only alternative you have is to print as .PDF - so if you can print as .PDF from your phone, a file will be created, instead of a print, that you can store. Happy knitting!

02.11.2015 - 10:14

Emma wrote:

How does m1 line up with the ribs? thanks!!

27.01.2015 - 17:58

DROPS Design answered:

Dear Emma, when piece measures 10 cm and just before starting M1 you will work that round : P2, K2, * P4, K2 in each of the next 2 sts *, repeat from *-* a total of 3 times, P4, K2, P2, * K2 tog, K4 *, repeat from *-* to end. On next round, work P2, then M1 over the next 32 sts (M1 will now match over the ribs), P2 and stocking over the remaining 25 sts. Happy knitting!

28.01.2015 - 10:32

country flag Johanna wrote:

I just finished these in Baby Merino. I love them!

27.03.2014 - 11:19