
Popular categories
Looking for a yarn?


|
|||||||||||||
DROPS 79-16 |
|||||||||||||
 |
 |
||||||||||||
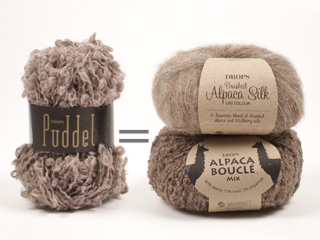
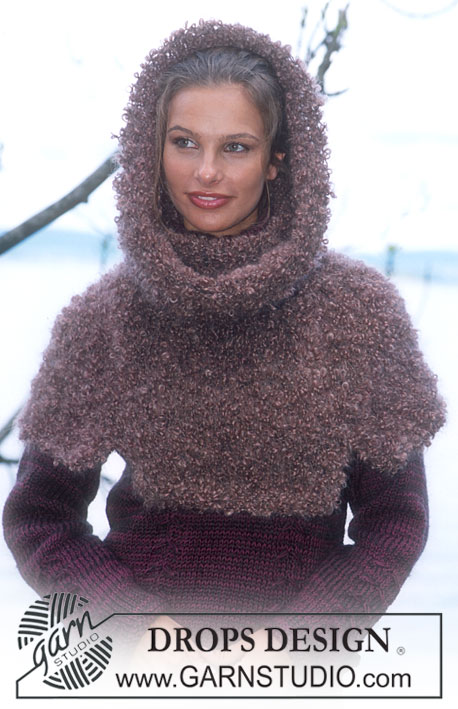
DROPS Pullover in Karisma Superwash and Vivaldi; Shoulder Warmer in Puddel
DROPS 79-16 |
|||||||||||||
|
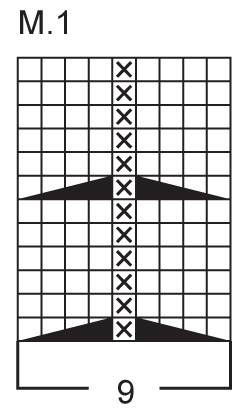
PULLOVER: Gauge: 14 sts x 17 rows on larger needles with 1 strand each Karisma Superwash and Vivaldi in stockinette st = 10 x 10 cm. Pattern: See chart. The pattern is seen from the right side. Rib: * K 4, P 4 *, repeat from * - *. Front: Cast on 60-65-71-78-84 sts on smaller needles with 1 strand Karisma Superwash + 1 strand Vivaldi. Knit 4 rows garter st, change to larger needles and stockinette st. When the piece measures 5 cm knit the next row as follows (right side row): 13-15-17-20-22 sts stockinette st, Pattern 1 (= 9 sts), 16-17-19-20-22 sts stockinette st, Pattern 1 (= 9 sts) and 13-15-17-20-22 sts stockinette st. Continue Pattern 1 until the piece measures 23 cm (or as long as you want to have cables) and finish with row 1 of Pattern 1 (cable row), then knit stockinette st over all sts. At the same time when the piece measures 12 cm inc 1 st at each side every 8 cm a total of 3 times = 66-71-77-84-90 sts. When the piece measures 34-35-36-37-38 cm bind off for armhole at each side every other row: 3 sts 1-1-1-2-2 times, 2 sts 1-2-3-3-4 times and 1 st 3-2-2-2-3 times = 50-53-55-56-56 sts. When the piece measures 47-49-51-53-55 cm bind off the center 16-17-17-18-18 sts for the neck. Then bind off at each neck edge every other row: 2 sts 1 time and 1 st 2 times = 13-14-15-15-15 sts remain on each shoulder. Bind off when the piece measures 54-56-58-60-62 cm. Back: Cast on and knit the same as the front but do not knit the Pattern on back. Bind off for armhole as on front. When the piece measures 52-54-56-58-60 cm bind off the center 22-23-23-24-24 sts for the neck. On the next row dec 1 st at each neck edge = 13-14-15-15-15 sts remain each shoulder. Bind off when the piece measures 54-56-58-60-62 cm. Left sleeve: Cast on 37-37-37-42-42 sts on smaller needles with 1 strand Karisma + 1 strand Vivaldi. Knit 4 rows garter st, change to larger needles and stockinette st. When the piece measures 3 cm knit the next row as follows (right side row): 17-17-17-20-20 sts stockinette st, Pattern 1 (= 9 sts) and 11-11-11-13-13 sts stockinette st. Continue Pattern 1 as follows until the piece measures 21 cm (or as long as you want cables) and finish with row 1 of Pattern 1 (= 1 cable), then knit stockinette st over all sts. When the piece measures 10 cm inc 1 st at each side every 5-4.5-3.5-4-3 cm a total of 8-9-10-9-11 times = 53-55-57-60-64 sts. When sleeve measures 49-48-46-44-42 cm bind off for sleeve cap at each side every other row: 3 sts 1 time, 2 sts 2 times and 1 st 1-2-3-4-7 times, then bind off 2 sts at each side until the piece measures 57 cm, then bind off 3 sts 1 time at each side. Bind off the remaining sts, the piece measures approx. 58 cm. Right sleeve: Knit the same as the left, but with Pattern 1 at opposite side. Assembly: Sew shoulder seams. Collar: Pick up approx. 60-70 sts around the neck on smaller short circular needles with 1 strand Karisma + strand Vivaldi. P 1 row, then K 1 row, increasing evenly distributed to 112 sts. Then knit rib until the collar measures 22 cm, bind off in rib. Sew in sleeves - make sure the sleeves are correctly placed, right and left. Sew sleeve and side seams using edge sts as a seam allowance. SHOULDER WARMER: Sizes: S/M - M/L - XL/XXL Materials: DROPS PUDDEL from Garnstudio 350-400-400 gr nr 03, brown DROPS 7 mm [US 10½] circular needles, or size needed to obtain correct gauge. Gauge: 10 sts x 14 rows in stockinette st = 10 x 10 cm. Pieces are started separately, then joined and knit in the round. Arm sections: Cast on 27-30-33 sts and knit 4 rows garter st. Change to stockinette st, keeping 2 sts in garter st at each side. When the piece measures 6-6-7 cm, put sts on a st holder. Knit a second arm section. Body sections: Cast on 31-34-37 sts and knit 4 rows garter st. Change to stockinette st, keeping 2 sts in garter st at each side. When the piece measures 6-6-7 cm, put sts on a st holder. Knit a second body section. Shoulders: Put all pieces in on the same circular needles as follows: arm section, front, arm section, back = 116-128-140 sts. Put a marker in each transition (4 markers). Continue in stockinette st over all sts. When the piece measures 21-23-25 cm dec 9-10-10 sts evenly distributed on front and 9-10-10 sts evenly distributed on back = 98-108-120 sts. When the piece measures 23-25-27 cm dec 12-14-16 sts evenly distributed over the entire row every 4 rows 4 times = 50-52-56 sts. Put a new marker in work and measure the work from here. Start collar: When the piece measures 10 cm from new marker inc 10-11-11 sts evenly distributed on the row. Repeat inc when the piece measures 14 and 18 cm = 80-85-89 sts. When the collar measures 38-40-42 cm knit 4 rows garter st, then bind off all sts with 2 strands Puddel. The Shoulder warmer measures approx. 72-76-80 cm from lower edge to top of the collar/hood. |
|||||||||||||
Diagram explanations |
|||||||||||||
|
|||||||||||||
|
|||||||||||||

|
|||||||||||||
|
Have you made this or any other of our designs? Tag your pictures in social media with #dropsdesign so we can see them! Do you need help with this pattern?You'll find tutorial videos, a Comments/Questions area and more by visiting the pattern on garnstudio.com. © 1982-2024 DROPS Design A/S. We reserve all rights. This document, including all its sub-sections, has copyrights. Read more about what you can do with our patterns at the bottom of each pattern on our site. |
|||||||||||||


With over 40 years in knitting and crochet design, DROPS Design offers one of the most extensive collections of free patterns on the internet - translated to 17 languages. As of today we count 304 catalogs and 11422 patterns - 11417 of which are translated into English (US/in).
We work hard to bring you the best knitting and crochet have to offer, inspiration and advice as well as great quality yarns at incredible prices! Would you like to use our patterns for other than personal use? You can read what you are allowed to do in the Copyright text at the bottom of all our patterns. Happy crafting!
Comments / Questions (10)
Hello! In hungarian translation there is a mistake at the Pattern-Explanation. Instead of "csúsztassunk 1 szemet a segédtűre, tegyük a munka mögé, 3 sima, 1 sima a segédtűről." please use this one: "csúsztassunk 1 szemet a segédtűre, tegyük a munka elé, 3 sima, 1 sima a segédtűről." It is at the first twist in the row, the single stich on the cable needle shoould be in front of the work, not in the back of the work. Great homepage! Thank you! Gabi
27.09.2021 - 07:33DROPS Design answered:
Kedves Gabi! Köszönjük a jelzést, a hibát javítottuk. Sikeres kézimunkázást!
28.09.2021 - 20:49Dans vos explications je remarque que la longueur des manches avant les diminutions est plus grande pour les petites tailles que pour les grandes. Deuxième remarque : pour le haut de la manche vous écrivez 1 fois 3m, 2fois 2m et 12-3-4-7 fois une m. De plus dans vos explications , toujours de la manche, je m’étonne que pour n’importe quelle taille la longueur totale de la manche 58 cm..... pourriez-vous m’aider?
07.10.2019 - 00:12DROPS Design answered:
Bonjour Mme Dolphens, les manches - avant l'arrondi- sont plus courtes dans les grandes tailles car les épaules s ont plus larges et l'arrondi de la manche sera plus long - cf mesures du schéma. Bon tricot!
07.10.2019 - 10:16Bonjour, Pour quelle raison on tricote 17 m au début et 11 mailles a la fin, le dessin sera pas centré. merci d'avance
11.02.2019 - 12:56DROPS Design answered:
Bonjour Nathy, il ne sera effectivement pas centré mais visible davantage sur le devant (de face). Bon tricot!
11.02.2019 - 15:48Bonjour, Dans l'explication de la manche droite c'est indiqué tricoter comme pour la manche gauche, mais en tricotant M1 de l'autre côté; cela veut dire que Je tricote a l'identique le diagramme M1pour la manche gauche merci par avance Nathy
01.02.2019 - 13:00DROPS Design answered:
Bonjour Nathy, pour la manche gauche, vous avez tricoté 17-17-17-20-20 m jersey, M1 (=9 m), et 11-11-11-13-13 m jersey. Pour la manche droite, vous tricotez 11-11-11-13-13 m jersey, M1 (=9 m) et 17-17-17-20-20 m jersey. Bon tricot!
01.02.2019 - 15:13Mi scusi, come potrei realizzare questo bel modello ai ferri 3.5/ 4 .?? Grazie per l'interessamento!
21.01.2019 - 19:12DROPS Design answered:
Buonasera Guilaine. Dovrebbe ricalcolare tutte le maglie in base al campione che ottiene con il filato scelto. Per un aiuto così personalizzato, può rivolgersi al suo rivenditore Drops di fiducia. Buon lavoro!
21.01.2019 - 19:55Hej, jag upplevde det väldigt opraktiskt att det på både framstycket står Fortsätt M.1 så här till arb mäter 23 cm (eller så långt du önskar flätorna) och avsluta med varv 1 i M.1 (= 1 fläta), sedan stickas det slätst över alla m. Samtidigt när arb mäter 12 cm ökas det 1 m i varje sida, då hade jag ju redan stickat 23 cm, den infon borde kommit tidigare. Står likadant på ärmen. Mvh Eva
23.01.2018 - 11:12The translations for the Diagrams for all Garnstudio patterns are included within the text of the Pattern itself. If you look at the top of the pattern description, you will find lines starting with an = sign. These are the translations, and they are given in the same vertical order as the chart symbols within the diagram.
27.08.2007 - 17:46Could you please translate the pattern chart into American English? Thank you
27.08.2007 - 11:46The chart is translated in the pattern - just under Pattern - see chart. The = symbols follow the order of the Scandinavian symbols, i.e. the first symbol means K from right side, P from wrong side, etc. Karen Scandinavian Knitting Design
31.05.2006 - 23:28The graph is not in English!
29.05.2006 - 01:39