DROPS Kid-Silk uni colour 75% Mohair, 25% Silk |
9.40 CAD /25g |
Order |
Clicking the ORDER button will redirect you to Wool Warehouse Direct Ltd website
-------------------------------------------------------
Alternative Yarn – See how to change yarns here
Yarn Groups A to F – Use the same pattern and change the yarn here
Yarn usage using an alternative yarn – Use our yarn converter here
-------------------------------------------------------
DROPS Kid-Silk uni colour 75% Mohair, 25% Silk 9.40 CAD /25g Order |
Clicking the ORDER button will redirect you to Wool Warehouse Direct Ltd website
= K | |
= P | |
= slip 2 sts on cable needle behind piece, K2, P2 from cable needle | |
= slip 2 sts on cable needle in front of piece, P2, K2 from cable needle | |
= slip 2 sts on cable needle behind piece, K2, K2 from cable needle | |
= slip 2 sts on cable needle in front of piece, K2, K2 from cable needle | |
= K2 tog, 1 YO | |
= 1 YO, slip 1 st as if to K, K1, psso |
Each of our patterns has specific tutorial videos to help you.
These step-by-step tutorials might also help you:
Why is the knitting/crochet tension so important?
Knitting tension is what determines the final measurements of your work, and is usually measured per 10 x 10 cm. It is provided like so: number of stitches in width x number of rows in height - eg: 19 stitches x 26 rows = 10 x 10 cm.
The knitting tension is very individual; some people knit/crochet loosely while others work tightly. You adjust the knitting tension with the needle size, which is why the suggested needle size only serve as a guide! You need to adjust this (up or down) to ensure that YOUR knitting tension matches the knitting tension provided in the pattern. If you work with a different knitting tension than provided you will have a different yarn consumption, and your work will have different measurements than what the pattern suggests.
The knitting tension also determines which yarns can replace each other. As long as you achieve the same knitting tension you can replace one yarn with another.
See DROPS lesson: How to measure your tension/gauge
See DROPS video: How to make a gauge tension swatch
How do I know how many balls of yarn I need?
The required amount of yarn is provided in grams, eg: 450 g. To calculate how many balls you’ll need you first need to know how many grams are in 1 ball (25g, 50g or 100g). This information is available if you click on the individual yarn quality on our pages. Divide the amount required with the amount of each ball. For example, if each ball is 50g (the most common amount), the calculation will be as follows: 450 / 50 = 9 balls.
Can I use a different yarn than what the pattern suggests?
The important thing when changing from one yarn to another is that the knitting/crochet tension remains the same. This is so that the measurements of the finished piece will be the same as on the sketch provided. It is easier to achieve the same knitting tension using yarns from the same yarn group. It is also possible to work with multiple strands of a thinner yarn to achieve the knitting tension of a thicker one. Please try our yarn converter. We recommend you to always work a test swatch.
Please NOTE: when changing yarn the garment might have a different look and feel to the garment in the photo, due to individual properties and qualities of each yarn.
See DROPS lesson: Can I use a different yarn than the one mentioned in the pattern?
What are the yarn groups?
All our yarns are categorised into yarn groups (from A to F) according to thickness and knitting tension – group A contains the thinnest yarns and group F the thickest. This makes it easier for you to find alternative yarns to our patterns, should you wish to switch yarn. All yarns within the same group have a similar knitting tension and can easily replace each other. However, different yarn qualities have different structures and properties which will give the finished work a unique look and feel.
How do I use the yarn converter?
At the top of all our patterns you’ll find a link to our yarn converter, which is a helpful tool should you wish to use a different yarn than suggested. By filling in the yarn quality you wish to replace, the amount (in your size) and number of strands, the converter will present good alternative yarns with the same knitting tension. Additionally it will tell you how much you’ll require in the new qualities and whether you’ll need to work with multiple strands. Most skeins are 50g (some are 25g or 100g).
If the pattern is worked with multiple colours, every colour will have to be converted separately. Similarly, if the pattern is worked with several strands of different yarns (for example 1 strand Alpaca and 1 strand Kid-Silk) you will have to find alternatives for each, individually.
Why do you show discontinued yarns in the patterns?
Since different yarns have different qualities and textures we have chosen to keep the original yarn in our patterns. However, you can easily find options among our available qualities by using our yarn converter, or simply pick a yarn from the same yarn group.
It is possible that some retailers still have discontinued yarns in stock, or that someone has a few skeins at home that they would like to find patterns for.
The yarn converter will provide both alternative yarn as well as required amount in the new quality.
What size should I knit?
If you think it's hard to decide what size to make, it can be a good idea to measure a garment you own already and like the size of. Then you can pick the size by comparing those measures with the ones available in the pattern's size chart.
You'll find the size chart at the bottom of the pattern.
See DROPS lesson: How to read size chart
Why do I get the wrong knitting tension with the suggested needle size?
The needle size provided in the pattern serves only as a guide, the important thing is to follow the knitting tension. And since knitting tension is very individual, you will have to adjust the needle size to ensure that YOUR tension is the same as in the pattern – maybe you’ll have to adjust 1, or even 2 needle sizes, up or down to achieve the correct tension. For this, we recommend that you work test swatches.
Should you work with a different knitting tension than the one provided, the measurements of the finished garment might deviate from the measurement sketch.
See DROPS lesson: How to measure your tension/gauge
See DROPS video: How to make a gauge tension swatch
Why is the pattern worked top-down?
Working a garment top-down provides more flexibility and room for personal adjustment. For example it is easier to try the garment on while working, as well as making adjustments to length of yoke and shoulder caps.
The instructions are carefully explaining every step, in the correct order. Diagrams are adjusted to the knitting direction and are worked as usual.
How do I work according to a knitting diagram?
The diagram depicts all rows/rounds, and every stitch seen from the right side. It is read from bottom to top, from right to left. 1 square = 1 stitch.
When working back and forth, every other row is worked from the right side and every other row is worked from the wrong side. When working from the wrong side, the diagram will have to be worked reversed: from left to right, knit stitches are purled, purl stitches are knit etc.
When working in the round every round is worked from the right side and the diagram are worked from right to left on all rounds.
See DROPS lesson: How to read knitting diagrams
How do I work according to a crochet diagram?
The diagram depicts all rows/rounds, and every stitch seen from the right side. It is worked from bottom to top, from right to left.
When working back and forth every other row is worked from the right side: from right to left and every other row is worked from the wrong side: from left to right.
When working in the round, every row in the diagram are worked from the right side, from right to left.
When working a circular diagram you start in the middle and work your way outwards, counter clockwise, row by row.
The rows usually start with a given number of chain stitches (equivalent to the height of the following stitch), this will either be depicted in the diagram or explained in the pattern.
See DROPS lesson: How to read crochet diagrams
How do I work several diagrams simultaneously on the same row/round?
Instructions for working several diagrams after each other on the same row/round, will often be written like so: “work A.1, A.2, A.3 a total of 0-0-2-3-4 times". This means you work A.1 once, then A.2 is worked once, and A.3 is repeated (in width) the number of times provided for your size – in this case like so: S = 0 times, M = 0 times, L=2 times, XL= 3 times and XXL = 4 times.
The diagrams are worked as usual: begin with the first row in A.1, then work the first row in A.2 etc.
See DROPS lesson: How to read knitting diagrams
See DROPS lesson: How to read crochet diagrams
Why are the sleeves shorter in larger sizes?
The total width of the garment (from wrist-to-wrist) will be larger in the larger sizes, despite the actual sleeves being shorter. The larger sizes have longer sleeve caps and wider shoulders, so there will be a good fit in all sizes.
Where on the garment is the length measured?
The measurement sketch/schematic drawing provides information regarding the full length of the garment. If it’s a jumper or a jacket the length is measured from the highest point on the shoulder (usually closest to the neckline), and straight down to the bottom of the garment. It is NOT measured from the tip of shoulder. Similarly, the length of yoke is measured from the highest point on the shoulder and down to where yoke is split into body and sleeves.
See DROPS lesson: How to read a schematic drawing
What is a repeat?
Diagrams are often repeated on the round or in height. 1 repeat is the diagram the way it appears in the pattern. If it says to work 5 repeats of A.1 in the round, then you work A.1 a total of 5 times after/next to each other in the round. If it says to work 2 repeats of A.1 vertically/in height you work the entire diagram once, then begin again at the start and work the entire diagram one more time.
Why does the piece start with more chain stitches than it’s worked with?
Chain stitches are slightly narrower than other stitches and to avoid working the cast-on edge too tight, we simply chain more stitches to begin with. The stitch count will be adjusted on the following row to fit the pattern and measurement sketch.
Why increase before the rib edge when the piece is worked top-down?
The rib edge is more elastic and will contract slightly compared to, for example, stocking stitch. By increasing before the rib edge, you avoid a visible difference in width between the rib edge and the rest of the body.
Why increase in the cast-off edge?
It’s very easy to cast off too tightly, and by making yarn overs while casting off (and simultaneously casting these off) you avoid a too tight cast off edge.
See DROPS video: How to bind off with yarn overs (yo)
How do I increase/decrease on every 3rd and 4th row/round alternately?
To achieve an even increase (or decrease) you can increase on, for example: every 3rd and 4th row alternately, like so: work 2 rows and increase on the 3rd row, work 3 rows and increase on the 4th. Repeat this until the increase is complete.
See DROPS lesson: Increase or decrease 1 st on every 3rd and 4th row alternately
How can I work a jacket in the round instead of back and forth?
Should you prefer to work in the round instead of back and forth, you may of course adjust the pattern. You’ll need to add steeks mid-front (usually 5 stitches), and follow the instructions. When you would normally turn and work from the wrong side, simply work across the steek and continue in the round. At the end you’ll cut the piece open, pick up stitches to work bands, and cover the cut edges.
See DROPS video: How to knit steeks and cut open
Can I work a jumper back and forth instead of in the round?
Should you prefer to work back and forth instead of in the round, you may of course adjust the pattern so you work the pieces separately and then assemble them at the end. Divide the stitches for the body in 2, add 1 edge stitch in each side (for sewing) and work the front and back pieces separately.
See DROPS lesson: Can I adapt a pattern for circular needles into straight needles?
Why is the pattern slightly different than what I see in the photo?
Pattern repeats can vary slightly in the different sizes, in order to get the correct proportions. If you’re not working the exact same size as the garment in the photo, yours might deviate slightly. This has been carefully developed and adjusted so that the complete impression of the garment is the same in all sizes.
Make sure to follow instructions and diagrams for your size!
How do I make a women’s size garment into a men’s size one?
If you have found a pattern you like which is available in women’s size it’s not very difficult to convert it to men’s size. The biggest difference will be the length of sleeves and body. Start working on the women size that you think would fit across the chest. The additional length will be worked right before you cast off for the armhole/sleeve cap. If the pattern is worked top-down you can add the length right after the armhole or before the first decrease on sleeve.
Regarding additional yarn amount, this will depend on how much length you add, but it is better with a skein too many than too few.
How do I prevent a hairy garment from shedding?
All yarns will have excess fibres (from production) that might come off as lint or shedding. Brushed yarns (ie hairier yarns) have more of these loose, excess fibres, causing more shedding.
Shedding also depends on what is worn under or over the garment, and whether this pulls at the yarn fibres. It’s therefore not possible to guarantee that there will be no shedding
Below are some tips on how to get the best result when working with hairier yarns:
1. When the garment is finished (before you wash it) shake it vigorously so the looser hairs come off. NOTE: do NOT use a lint roller, brush or any method that pulls at the yarn.
2. Place the garment in a plastic bag and put it in your freezer - the temperature will cause the fibres to become less attached to each other, and excess fibres will come off easier.
3. Leave in the freezer for a few hours before taking it out and shaking it again.
4. Wash the garment according to the instructions on the yarn label.
Why does my garment pill?
Pilling is a natural process that happens to even the most exclusive of fibers. It's a natural sign of wear and tear that is hard to avoid, and that is most visible in high friction areas of your garment like a sweater's arms and cuffs.
You can make your garment look as new by removing the pilling, using a fabric comb or a pill/lint remover.
I Love Lucy |
|||||||||||||||||||||||||
|
|||||||||||||||||||||||||
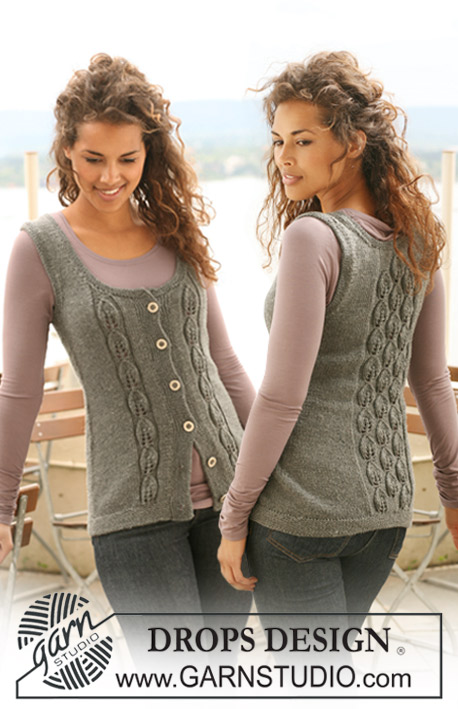
Knitted DROPS dress in ”Delight”, ”Kid-Silk” and ”Cotton Viscose” with a heart on the yoke. Size XS to XXXL
DROPS 125-1 |
|||||||||||||||||||||||||
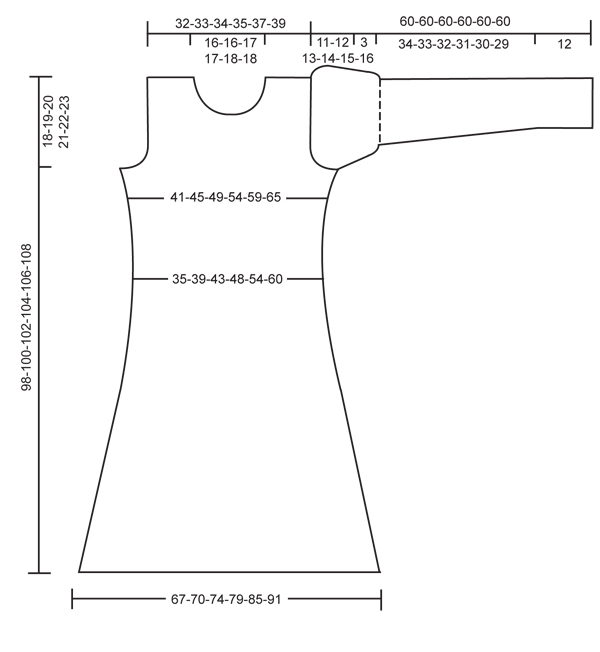
GARTER ST (in the round): K 1 round, P 1 round DECREASING TIP (applies to body piece): Dec each side of the 4 markers as follows: Work row until 2 sts before marker, slip 1 st as if to K, K1, psso, (marker) K2 tog. INCREASING TIP (applies to sleeves): Inc 1 st each side of the 2 K sts mid under sleeve by making 1 YO, on next round work YO into back of loop to avoid a hole. Incorporate the inc sts in K2/P2 as you go along. After 1 inc: K4 mid under sleeve. After 2 inc: K6 mid under sleeve. After 3 inc: K2, P1, K2, P1, K2. After 4 inc: K2, P2, K2, P2, K2. Repeat the 4 inc a total of 3 times. -------------------------------------------------------- BODY PIECE: Worked in the round. Cast on 240-252-266-284-306-328 sts on circular needle size 4 mm / US 6 with 1 strand Delight + 1 strand black Kid-Silk. Work 6 rounds GARTER ST – see above! Change to circular needle size 4.5 mm / US 7 and continue in stockinette st. REMEMBER THE GAUGE! When piece measures 20 cm / 8" insert 4 markers in piece as follows (round beg at the side): Work 30-32-34-36-38-40 sts, insert a marker, work 60-62-65-70-77-84 sts, insert a marker, work 60-64-68-72-76-80 sts, insert a marker, work 60-62-65-70-77-84 sts, insert a marker and work round to end (= 30-32-34-36-38-40 sts). On next round dec 1 st each side of all markers – SEE DECREASING TIP. Repeat the dec on every 7th round a total of 14 times = 128-140-154-172-194-216 sts. Remove markers. Continue until piece measures 62 cm / 24¾" for all sizes. Change to circular needle size 3 mm / US 2or3 and 1 strand dark gray Cotton Viscose. K 1 round, AT THE SAME TIME inc 40-46-50-56-64-72 sts evenly (inc by working 2 sts in 1 st) = 168-186-204-228-258-288 sts. P 1 round and K 1 round and work next round as follows: * P2, K2 in each of the next 2 sts, P2 *, repeat from *-* to end of round = 224-248-272-304-344-384 sts. Now work 1 vertical repeat of M.1 as follows: M.1A on the first 4 sts, then M.1B until 4 sts remain, work these in M.1C. After M.1 work next round as follows: * K2 tog, K4, K2 tog *, repeat from *-* = 168-186-204-228-258-288 sts. P 1 round. Piece now measures approx 68 cm / 26¾". Change to circular needle size 4.5 mm / US 7 and 1 strand pearl gray Cotton Viscose + 1 strand gray Kid-Silk. K 1 round, at the same time dec 38-40-42-50-60-70 sts evenly = 130-146-162-178-198-218 sts. NOW MEASURE PIECE FROM HERE! Insert a marker at beg of round and one after 65-73-81-89-99-109 sts (to mark the sides). READ ALL OF THE FOLLOWING SECTION BEFORE CONTINUING! Continue in stockinette st – AT THE SAME TIME after 2 cm / ¾" inc 1 st each side of markers at the sides, repeat the inc on every 6-6-7-7-8-8 round a total of 4 times - AT THE SAME TIME when piece measures 3-4-4-5-5-6 cm / 1⅛"-1½"-1½"-2"-2"-2⅜" work M.2 on front piece – count out in order to have the st marked with an arrow in diagram mid front. ARMHOLE: At the same time when piece measures 12-13-14-15-16-17 cm / 4¾"-5⅛"-5½"-6"-6¼"-6¾" bind off 8 sts each side for armhole (i.e. 4 sts each side of marker) and complete front and back piece separately. FRONT PIECE: = 65-73-81-89-99-109 sts. Continue in stockinette st and M.2 on the middle sts – AT THE SAME TIME bind off for armhole at the beg of every row each side: 3 sts 0-0-1-1-2-3 times, 2 sts 1-2-2-3-3-3 times and 1 st 2-3-3-4-4-4 times = 57-59-61-63-67-71 sts. After M.2 continue in stockinette st on all sts. When piece measures 21-23-24-26-27-28 cm / 8¼"-9"-9½"-10¼"-10⅝"-11" slip the middle 15-15-17-17-19-19 sts on a stitch holder for neck and complete each shoulder separately. Bind off to shape the neckline at the beg of every row from mid front: 3 sts 1 time, 2 sts 1 time and 1 st 2 times = 14-15-15-16-17-19 sts left on shoulder. Bind off when piece measures 30-32-34-36-38-40 cm / 11¾"-12½"-13⅜"-14¼"-15"-15¾ (dress measures now a total of approx 98-100-102-104-106-108 cm / 38½"-39⅜"-40"-41"-41¾"-42½"). BACK PIECE: = 65-73-81-89-99-109 sts. Continue in stockinette st, AT THE SAME TIME bind off for armhole each side as described for front piece = 57-59-61-63-67-71 sts. When piece measures 28-30-32-34-36-38 cm / 11"-11¾"-12½"-13⅜"-14¼"-15" bind off the middle 25-25-27-27-29-29 sts for neck and complete each shoulder separately. Bind off 2 sts on neckline on next row = 14-15-15-16-17-19 sts left on each shoulder. Bind off when piece measures 30-32-34-36-38-40 cm / 11¾"-12½"-13⅜"-14¼"-15"-15¾ – adjust to front piece. SLEEVE: Worked in the round. Cast on 56-60-64-68-72-76 sts with 1 strand Delight on double pointed needles size 3 mm / US 2or3. K 2 rounds and continue in rib, K2/P2. Insert a marker between the first 2 K sts (= mid under sleeve). When piece measures 12 cm / 4¾" inc 1 st each side of the 2 K sts mid under sleeve – SEE INCREASING TIP! Repeat the inc on every 9-9-8-8-8-7 round a total of 12 times = 80-84-88-92-96-100 sts. When piece measures 46-45-44-43-42-41 cm / 18"-17¾"-17¼"-17"-16½"-16⅛" (less for the larger sizes because of longer sleeve cap and wider shoulder) change to small circular needle size 4.5 mm / US 7 and 1 strand gray Kid-Silk. Work next round as follows: * K4, 1 YO *, repeat from *-* = 100-105-110-115-120-125 sts. Continue in stockinette and on first round K all YO into back of loop to avoid holes. After 3 cm / 1⅛" with Kid-Silk bind off 8 sts mid under sleeve and complete piece back and forth on needle. Bind off for sleeve cap at the beg of every row each side: 2 sts 1 time each side and then 1 st each side until the part in Kid-Silk measures 12-13-14-15-16-17 cm / 4¾"-5⅛"-5½"-6"-6¼"-6¾", now bind off 2 sts 1 time each side and then 3 sts 1 time each side. On next row K3 tog on the middle 42-39-42-39-42-45 sts (= puff at the top of sleeve), then bind off remaining sts. Sleeve now measures approx 60 cm / 23⅝" for all sizes. ASSEMBLY: Sew shoulder seams. NECK: Pick up approx 80 to 90 sts (includes sts on stitch holder at front) round the neck on small circular needle size 4.5 mm / US 7 with 1 strand Delight + 1 strand gray Kid-Silk. P 1 round, K 1 round, P 1 round and then bind off with K sts. Set in sleeves. |
|||||||||||||||||||||||||
Diagram explanations |
|||||||||||||||||||||||||
|
|||||||||||||||||||||||||
Have you made this or any other of our designs? Tag your pictures in social media with #dropsdesign so we can see them! Do you need help with this pattern?You'll find tutorial videos, a Comments/Questions area and more by visiting the pattern on garnstudio.com. © 1982-2024 DROPS Design A/S. We reserve all rights. This document, including all its sub-sections, has copyrights. Read more about what you can do with our patterns at the bottom of each pattern on our site. |
With over 40 years in knitting and crochet design, DROPS Design offers one of the most extensive collections of free patterns on the internet - translated to 17 languages. As of today we count 304 catalogs and 11422 patterns - 11417 of which are translated into English (US/in).
We work hard to bring you the best knitting and crochet have to offer, inspiration and advice as well as great quality yarns at incredible prices! Would you like to use our patterns for other than personal use? You can read what you are allowed to do in the Copyright text at the bottom of all our patterns. Happy crafting!
Comments / Questions (135)
Britta wrote:
Nach dem Abketten der 8M. für den Ärmel: Weiter wie folgt abk.: 2 M. 1 Mal und danach 1 M. auf beiden Seiten bis der in Kid-Silk gestrickte Teil 12-13-14-15-16-17 cm misst. Heißt das, ich kette beidseitig 1x2M. ab und dann in jeder Reihe beidseitig 1M. Bis die Arbeit die genannte Höhe erreicht hat? Oder Kette ich dann nur 1x1M. beidseitig ab?
11.02.2024 - 20:59DROPS Design answered:
Liebe Britta, in S ketten Sie 2 Maschen am Anfang der 2 nächsten Reihe (= 2 M beidseitig), dann 1 Masche am Anfang der 4 nächsten Reihen (1 Masche 2 Mal beidseitig) = es sind noch 57 M übrig. Gleichzeitig stricken Sie M.2 und glatt rechts wie zuvor, dann wenn M.2 fertig ist, stricken Sie alle Maschen glatt rechts. Viel Spaß beim stricken!
12.02.2024 - 09:16Béatrice wrote:
Hello, I'd like to make this model with the same yarl from bottom to top, how should I adapt the section between 62cm & 68 cm ?
16.12.2022 - 21:27DROPS Design answered:
Dear Béatrice, if you don't change colors: keep the same needle and don't work the increases done after changing needles. If you want to work M.1 in the center of the body (which will look bigger than in the photo, due to the different number of stitches and the needle size), you will need to adapt it to the new number of stitches. Happy knitting!
18.12.2022 - 17:51Mieke wrote:
Drops cotton viscose is niet meer beschikbaar. Door welke draad kan ik die vervangen die ook met nld 3 kan gebreid worden en die ook wat glanst? De garenvervanger noemt o.a. Baby alpaca silk. Of neem ik gewoon extra delight om M1 en M2 mee te breien?
04.08.2022 - 17:35DROPS Design answered:
Dag Mieke,
Helaas is er niet een glansgaren als vervanging. Wat het meest is de buurt komt is DROPS Safran, echter deze glanst dus niet. Je zou een van onze verkooppunten kunnen bellen of mailen om te vragen of ze nog wat Cotton Viscose op voorraad hebben.
06.08.2022 - 10:06Tina wrote:
Thanks for the reply, yes I see that it changes to 4.5mm Circular Needles after 43cm is completed - to start on the puff sleeve top with Kid-Silk. I meant do we actually use the 4.5mm Double Pointed Needles (which the pattern says to buy) for the Delight yarn part of the sleeve.
02.11.2021 - 21:33DROPS Design answered:
Dear Tina, the 4.5 mm Double Pointed Needles are used when it's not comfortable to work with a small circular needle, due to the small amount of stitches. Happy knitting!
07.11.2021 - 14:13Tina wrote:
Hi, I'm just starting on the sleeves, and it only mentions to use the 3mm Double Pointed Needles. In the materials list, 4.5mm Double Pointed Needles are required as well. At which point do we switch to the 4.5mm Double Pointed Needles please? Or are the sleeves knitted with the 3mm all the way... Thanks
02.11.2021 - 16:54DROPS Design answered:
Dear Tina, the pattern actually does tell you to change to 4,5 mm needles ("When piece measures 46-45-44-43-42-41 cm (less for the larger sizes because of longer sleeve cap and wider shoulder) change to small circular needle size 4.5 mm and 1 strand grey Kid-Silk.") on the sleeve. Happy Stitching!
02.11.2021 - 21:03Anne Katrine Vilhelm wrote:
Hej Jeg har lavet et prøvestrik på M1, og kan slet ikke få det til at ligne midterstykket på billedet. I først række skal der strikkes to vrang og fire ret. Har jeg ret i, at symbolet står for vrang? Andre steder står symbolet for strik to masker sammen. Hvis de skal strikkes på vrang, giver den vrang indeni ruderne. På billedet er de ret. Er der nogen, som kan hjælpe?
30.10.2021 - 21:59DROPS Design answered:
Hej Anne Katrine, når du strikker prøven skal du strikke første pind fra vrangen (for at få snoningerne på retpinden). Det vil sige at du starter nederst i venstre side af diagrammet med 2 ret (fra vrangsiden), 4vrang, 4ret, 4vrang, 2ret. 2.pind er snoninger som strikkes fra retsiden. 3.pind strikkes således fra vrangen: 2vrang, 4ret, 4vrang, 4ret, 2vrang... Når du strikker bærestykket rundt skal alle pinde jo strikkes fra retsiden, da bliver den blanke rude til ret og den med / bliver til vrang. Nederst i opskriften finder du en video og en lektion om hvordan man strikker efter diagram :)
01.11.2021 - 11:23Tina wrote:
Hello again, alll is well, I figured out my last question to you. You/ve been very helpful, thank you :)) I found a local online store and bought the Drops double pointed needles. As for my confusion to the instructions, I went to look at the pattern in Italian and translated from there. Got a better picture from that. YaY!!
23.10.2021 - 13:11Tina wrote:
Hi, there's this part of the instruction for the Body Piece, after changing to the Cotton Viscose and 3mm circular needles: "P2, K2 in each of the next 2 sts, " Do I work 2 Purls in one stitch and 2 Knits in the next stitch, like an increase instead of yarn over, please?
22.10.2021 - 21:53DROPS Design answered:
Dear Tina, you purl 2 sitches, and then knit 2 stitches into 1 stitch (make one stitches by knitting into the front and the back of the stitch). Happy Stitching!
24.10.2021 - 02:55Tina wrote:
Hi, I'm new to double pointed needles. For this project should I buy the 20cm or 40cm long double pointed needles please? Regards, Tina
12.10.2021 - 10:26DROPS Design answered:
Dear Tina, we always use 20 cm double pointed needles - see here. Happy knitting!
12.10.2021 - 15:42Cecilia wrote:
Jag förstår inte mönstret på M1. Det som krånglar till det är om man ska sticka 2 ggr på raken när man ska sätta 2 maskor på hjälpsticka bakom sticket eller är det 1ggr.
20.05.2021 - 12:47DROPS Design answered:
Hej Cecilia, På varv 2 i M.1 A stickar du: sätt 2 m på hj.st bakom arb, 2 rm, 2 am från hj.st NU M.1B- sätt 2 m på hj.st framför arb, 2 am, 2 rm från hj.st - sätt 2 m på hj.st bakom arb, 2 rm, 2 am från hj.st - fortsätt med det varvet runt och sluta med M.1C: sätt 2 m på hj.st framför arb, 2 am, 2 rm från hj.st :)
20.05.2021 - 15:08