Dreams Of Heather

DROPS knitted jumper with yoke in seed st in ”Classic Alpaca” or DROPS ♥ You #3 or "Belle". Size S-XXXL. Size S-XXXL.

DROPS 123-3
DROPS design: Pattern no AC-016
--------------------------------------------------------
Size: S - M - L - XL - XXL - XXXL
Finished measurements:
Bust: 80-88-96-106-118-130 cm / 31½''-34 5/8''-37¾''-41¾''-46½''-51''
Full length: 66-68-70-72-74-76 cm / 26"-26 3/4"-27½"-28 3/8"-29 1/8"-30"

Materials: DROPS CLASSIC ALPACA from Garnstudio
500-550-600-650-700-800 g color no 4434m, purple/violet mix

Or use:
DROPS BELLE from Garnstudio
400-450-450-500-550-600g colour no 19, dark violet

Or use:
DROPS ♥ You #3 from Garnstudio
Colour no 07, royal blue
300-350-400-400-450-500 g

DROPS DOUBLE POINTED NEEDLES and CIRCULAR NEEDLE (80 cm / 32'') size 4 mm/US 6 - or size needed to get 21 sts x 28 rows in stockinette st = 10 x 10 cm / 4'' x 4''.
DROPS DOUBLE POINTED NEEDLES and CIRCULAR NEEDLE (80 cm / 32'') size 3.5 mm/US 4 - for rib.

-------------------------------------------------------

Alternative Yarn – See how to change yarns here
Yarn Groups A to F – Use the same pattern and change the yarn here
Yarn usage using an alternative yarn – Use our yarn converter here

-------------------------------------------------------

Pattern instructions

NOTE: This pattern is written in American English. All measurements in charts are in cm. For conversion from inches to cm - click here. There are different terms for crocheting in American and British English. If this pattern includes crochet, click for "crochet terms" here. For this pattern in British English, please click here.
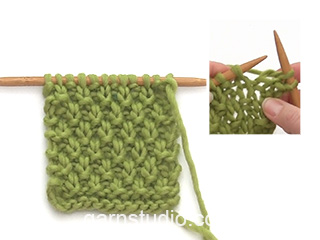
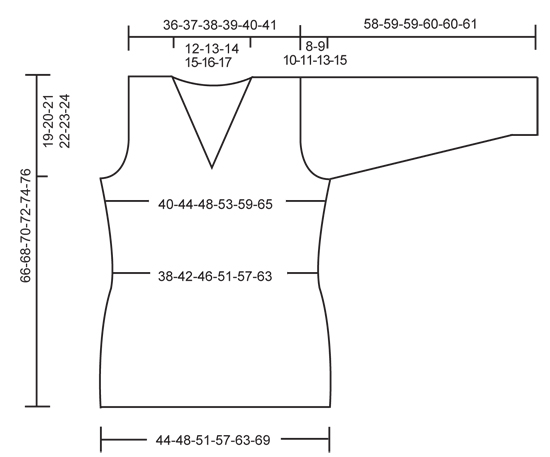
DOUBLE SEED ST:
Row 1 (= RS): *1 K, P1 *, repeat from *-*.
Row 2 (= WS): K over K and P over P.
Row 3 (= RS): *P1, 1 K *, repeat from *-*.
Row 4 (= WS): P over P and K over K.
Repeat row 1-4.
--------------------------------------------------------

BODY PIECE:
Worked in the round. Cast on 243-264-288-318-351-384 sts on circular needle size 3.5 mm / US 4 with Classic Alpaca. Work rib K1/P2. When piece measures 4 cm / 1½'' work 1 round stockinette st, AT THE SAME TIME dec 59-64-72-78-87-96 sts evenly (dec by K tog approx every 3rd and 4th st) = 184-200-216-240-264-288 sts. Insert 2 markers in piece, at beg of round and after 92-100-108-120-132-144 sts (to mark the sides). Change to circular needle size 4 mm / US 6. Continue in the round in stockinette st. REMEMBER THE GAUGE!
When piece measures 8 cm / 3 1/8'' dec 1 st each side of both markers. Repeat the dec on every 3.5 cm / 1 1/4'' a total of 6 times = 160-176-192-216-240-264 sts. When piece measures 31 cm / 12 1/4'' inc 1 st each side of both markers (inc with 1 YO, on next round K YO into back of loop). Repeat the inc when piece measures 41-42-43-44-45-46 cm / 16 1/8''-16½''-17''-17¼''-17¾''-18'' = 168-184-200-224-248-272 sts. When piece measures 47-48-49-50-51-52 cm / 18½''-19''-19¼''-19¾''-20''-20½'' work DOUBLE SEED ST – see above – AT THE SAME TIME bind off 6 sts each side for armhole (3 sts each side of marker).
Now complete each piece separately.

BACK PIECE:
= 78-86-94-106-118-130 sts (Row 1 = WS). Continue in double seed st AT THE SAME TIME bind off for armhole at beg of every row each side as follows: 2 sts 0-1-2-4-6-8 times and 1 st 1-2-3-4-5-6 times = 76-78-80-82-84-86 sts. When piece measures 64-66-68-70-72-74 cm / 25¼''-26''-26¾''-27½''-28 3/8''-29 1/8'' bind off the middle 24-26-28-30-32-34 sts for neck and complete each shoulder separately.
Dec 1 st on neckline on next row (dec by working the 2 outermost sts tog) = 25 sts left on shoulder for all sizes. Bind off when piece measures 66-68-70-72-74-76 cm / 26''-26¾''-27½''-28 3/8''-29 1/8''-30''.

FRONT PIECE:
= 78-86-94-106-118-130 sts (Row 1 = WS). Continue in double seed st and bind off for armhole as described for back piece, AT THE SAME TIME after 4 rows of pattern (= 1 pattern repeat) bind off the middle 2 sts for neck from RS and complete each shoulder separately.
Now bind off to shape the neckline by working 2 sts tog on neckline (work them tog to fit pattern) at the beg of every row from neck a total of 12-13-14-15-16-17 times.
When all dec are complete there are 25 sts left on shoulder for all sizes. Bind off when piece measures 66-68-70-72-74-76 cm / 26''-26¾''-27½''-28 3/8''-29 1/8''-30''.

SLEEVE:
Worked in the round. Cast on 63-66-69-72-75-78 sts on double pointed needles size 3.5 mm / US 4 with Classic Alpaca. Work rib K1/P2. When piece measures 4 cm / 1½'' K 1 round, AT THE SAME TIME dec 15-16-17-18-19-20 sts evenly (dec by working approx every 3rd and 4th st tog) = 48-50-52-54-56-58 sts. Change to double pointed needles size 4 mm / US 6 and insert a marker at beg of round. Continue in stockinette st.
When piece measures 8 cm / 3 1/8'' inc 1 st each side of marker. Repeat the inc on every 4-3.5-3-2.5-2-2 cm / 1½''-1¼''-1 1/8''-7/8''-3/4''-3/4'' a total of 10-11-13-15-17-18 times = 68-72-78-84-90-94 sts. When piece measures 50-50-49-49-47-46 cm / 19 3/4"-19 3/4"-19 1/4"-19 1/4"-18½"-18" (NOTE! Less for the larger sizes because of longer sleeve cap and wider shoulder) continue in double seed st on all sts, AT THE SAME TIME bind off 6 sts mid under sleeve (3 sts each side of marker). Now continue back and forth on needle. Continue to bind off for sleeve cap at beg of row each side as follows: 2 sts 3-3-4-4-4-3 times and 1 st 3-4-4-5-8-13 times, then bind off 2 sts each side until piece measures 57-58-58-59-59-60 cm / 22½''-22¾''-22¾''-23¼''-23¼''-23 5/8'', now bind off 3 sts 1 time each side. Bind off remaining sts.

ASSEMBLY:
Sew shoulder seams. Set in sleeves.

Diagram

All measurements in charts are in cm.

diagram measurements
Do you have a question? See a list of frequently asked questions (FAQ)

Knitting tension is what determines the final measurements of your work, and is usually measured per 10 x 10 cm. It is provided like so: number of stitches in width x number of rows in height - eg: 19 stitches x 26 rows = 10 x 10 cm.

The knitting tension is very individual; some people knit/crochet loosely while others work tightly. You adjust the knitting tension with the needle size, which is why the suggested needle size only serve as a guide! You need to adjust this (up or down) to ensure that YOUR knitting tension matches the knitting tension provided in the pattern. If you work with a different knitting tension than provided you will have a different yarn consumption, and your work will have different measurements than what the pattern suggests.

The knitting tension also determines which yarns can replace each other. As long as you achieve the same knitting tension you can replace one yarn with another.

See DROPS lesson: How to measure your tension/gauge

See DROPS video: How to make a gauge tension swatch

The required amount of yarn is provided in grams, eg: 450 g. To calculate how many balls you’ll need you first need to know how many grams are in 1 ball (25g, 50g or 100g). This information is available if you click on the individual yarn quality on our pages. Divide the amount required with the amount of each ball. For example, if each ball is 50g (the most common amount), the calculation will be as follows: 450 / 50 = 9 balls.

The important thing when changing from one yarn to another is that the knitting/crochet tension remains the same. This is so that the measurements of the finished piece will be the same as on the sketch provided. It is easier to achieve the same knitting tension using yarns from the same yarn group. It is also possible to work with multiple strands of a thinner yarn to achieve the knitting tension of a thicker one. Please try our yarn converter. We recommend you to always work a test swatch.

Please NOTE: when changing yarn the garment might have a different look and feel to the garment in the photo, due to individual properties and qualities of each yarn.

See DROPS lesson: Can I use a different yarn than the one mentioned in the pattern?

All our yarns are categorised into yarn groups (from A to F) according to thickness and knitting tension – group A contains the thinnest yarns and group F the thickest. This makes it easier for you to find alternative yarns to our patterns, should you wish to switch yarn. All yarns within the same group have a similar knitting tension and can easily replace each other. However, different yarn qualities have different structures and properties which will give the finished work a unique look and feel.

Click here for an overview of the yarns in each yarn group

At the top of all our patterns you’ll find a link to our yarn converter, which is a helpful tool should you wish to use a different yarn than suggested. By filling in the yarn quality you wish to replace, the amount (in your size) and number of strands, the converter will present good alternative yarns with the same knitting tension. Additionally it will tell you how much you’ll require in the new qualities and whether you’ll need to work with multiple strands. Most skeins are 50g (some are 25g or 100g).

If the pattern is worked with multiple colours, every colour will have to be converted separately. Similarly, if the pattern is worked with several strands of different yarns (for example 1 strand Alpaca and 1 strand Kid-Silk) you will have to find alternatives for each, individually.

Click here to see our yarn converter

Since different yarns have different qualities and textures we have chosen to keep the original yarn in our patterns. However, you can easily find options among our available qualities by using our yarn converter, or simply pick a yarn from the same yarn group.

It is possible that some retailers still have discontinued yarns in stock, or that someone has a few skeins at home that they would like to find patterns for.

The yarn converter will provide both alternative yarn as well as required amount in the new quality.

If you think it's hard to decide what size to make, it can be a good idea to measure a garment you own already and like the size of. Then you can pick the size by comparing those measures with the ones available in the pattern's size chart.

You'll find the size chart at the bottom of the pattern.

See DROPS lesson: How to read size chart

The needle size provided in the pattern serves only as a guide, the important thing is to follow the knitting tension. And since knitting tension is very individual, you will have to adjust the needle size to ensure that YOUR tension is the same as in the pattern – maybe you’ll have to adjust 1, or even 2 needle sizes, up or down to achieve the correct tension. For this, we recommend that you work test swatches.

Should you work with a different knitting tension than the one provided, the measurements of the finished garment might deviate from the measurement sketch.

See DROPS lesson: How to measure your tension/gauge

See DROPS video: How to make a gauge tension swatch

Working a garment top-down provides more flexibility and room for personal adjustment. For example it is easier to try the garment on while working, as well as making adjustments to length of yoke and shoulder caps.

The instructions are carefully explaining every step, in the correct order. Diagrams are adjusted to the knitting direction and are worked as usual.

The diagram depicts all rows/rounds, and every stitch seen from the right side. It is read from bottom to top, from right to left. 1 square = 1 stitch.

When working back and forth, every other row is worked from the right side and every other row is worked from the wrong side. When working from the wrong side, the diagram will have to be worked reversed: from left to right, knit stitches are purled, purl stitches are knit etc.

When working in the round every round is worked from the right side and the diagram are worked from right to left on all rounds.

See DROPS lesson: How to read knitting diagrams

The diagram depicts all rows/rounds, and every stitch seen from the right side. It is worked from bottom to top, from right to left.

When working back and forth every other row is worked from the right side: from right to left and every other row is worked from the wrong side: from left to right.

When working in the round, every row in the diagram are worked from the right side, from right to left.

When working a circular diagram you start in the middle and work your way outwards, counter clockwise, row by row.

The rows usually start with a given number of chain stitches (equivalent to the height of the following stitch), this will either be depicted in the diagram or explained in the pattern.

See DROPS lesson: How to read crochet diagrams

Instructions for working several diagrams after each other on the same row/round, will often be written like so: “work A.1, A.2, A.3 a total of 0-0-2-3-4 times". This means you work A.1 once, then A.2 is worked once, and A.3 is repeated (in width) the number of times provided for your size – in this case like so: S = 0 times, M = 0 times, L=2 times, XL= 3 times and XXL = 4 times.

The diagrams are worked as usual: begin with the first row in A.1, then work the first row in A.2 etc.

See DROPS lesson: How to read knitting diagrams

See DROPS lesson: How to read crochet diagrams

The total width of the garment (from wrist-to-wrist) will be larger in the larger sizes, despite the actual sleeves being shorter. The larger sizes have longer sleeve caps and wider shoulders, so there will be a good fit in all sizes.

The measurement sketch/schematic drawing provides information regarding the full length of the garment. If it’s a jumper or a jacket the length is measured from the highest point on the shoulder (usually closest to the neckline), and straight down to the bottom of the garment. It is NOT measured from the tip of shoulder. Similarly, the length of yoke is measured from the highest point on the shoulder and down to where yoke is split into body and sleeves.

See DROPS lesson: How to read a schematic drawing

Diagrams are often repeated on the round or in height. 1 repeat is the diagram the way it appears in the pattern. If it says to work 5 repeats of A.1 in the round, then you work A.1 a total of 5 times after/next to each other in the round. If it says to work 2 repeats of A.1 vertically/in height you work the entire diagram once, then begin again at the start and work the entire diagram one more time.

Chain stitches are slightly narrower than other stitches and to avoid working the cast-on edge too tight, we simply chain more stitches to begin with. The stitch count will be adjusted on the following row to fit the pattern and measurement sketch.

The rib edge is more elastic and will contract slightly compared to, for example, stocking stitch. By increasing before the rib edge, you avoid a visible difference in width between the rib edge and the rest of the body.

It’s very easy to cast off too tightly, and by making yarn overs while casting off (and simultaneously casting these off) you avoid a too tight cast off edge.

See DROPS video: How to bind off with yarn overs (yo)

To achieve an even increase (or decrease) you can increase on, for example: every 3rd and 4th row alternately, like so: work 2 rows and increase on the 3rd row, work 3 rows and increase on the 4th. Repeat this until the increase is complete.

See DROPS lesson: Increase or decrease 1 st on every 3rd and 4th row alternately

Should you prefer to work in the round instead of back and forth, you may of course adjust the pattern. You’ll need to add steeks mid-front (usually 5 stitches), and follow the instructions. When you would normally turn and work from the wrong side, simply work across the steek and continue in the round. At the end you’ll cut the piece open, pick up stitches to work bands, and cover the cut edges.

See DROPS video: How to knit steeks and cut open

Should you prefer to work back and forth instead of in the round, you may of course adjust the pattern so you work the pieces separately and then assemble them at the end. Divide the stitches for the body in 2, add 1 edge stitch in each side (for sewing) and work the front and back pieces separately.

See DROPS lesson: Can I adapt a pattern for circular needles into straight needles?

Pattern repeats can vary slightly in the different sizes, in order to get the correct proportions. If you’re not working the exact same size as the garment in the photo, yours might deviate slightly. This has been carefully developed and adjusted so that the complete impression of the garment is the same in all sizes.

Make sure to follow instructions and diagrams for your size!

If you have found a pattern you like which is available in women’s size it’s not very difficult to convert it to men’s size. The biggest difference will be the length of sleeves and body. Start working on the women size that you think would fit across the chest. The additional length will be worked right before you cast off for the armhole/sleeve cap. If the pattern is worked top-down you can add the length right after the armhole or before the first decrease on sleeve.

Regarding additional yarn amount, this will depend on how much length you add, but it is better with a skein too many than too few.

All yarns will have excess fibres (from production) that might come off as lint or shedding. Brushed yarns (ie hairier yarns) have more of these loose, excess fibres, causing more shedding.

Shedding also depends on what is worn under or over the garment, and whether this pulls at the yarn fibres. It’s therefore not possible to guarantee that there will be no shedding

Below are some tips on how to get the best result when working with hairier yarns:

1. When the garment is finished (before you wash it) shake it vigorously so the looser hairs come off. NOTE: do NOT use a lint roller, brush or any method that pulls at the yarn.

2. Place the garment in a plastic bag and put it in your freezer - the temperature will cause the fibres to become less attached to each other, and excess fibres will come off easier.

3. Leave in the freezer for a few hours before taking it out and shaking it again.

4. Wash the garment according to the instructions on the yarn label.

Pilling is a natural process that happens to even the most exclusive of fibers. It's a natural sign of wear and tear that is hard to avoid, and that is most visible in high friction areas of your garment like a sweater's arms and cuffs.

You can make your garment look as new by removing the pilling, using a fabric comb or a pill/lint remover.

Still can't find the answer you need? Then scroll down and leave your question so one of our experts can try to help you. This will be done normally within 5 to 10 working days.
In the meantime, you can read the questions and answers that others have left to this pattern or join the DROPS Workshop on Facebook to get help from fellow knitters/crocheters!

Post a comment to pattern DROPS 123-3

We would love to hear what you have to say about this pattern!

If you want to leave a question, please make sure you select the correct category in the form below, to speed up the answering process. Required fields are marked *.

Comments / Questions (86)

country flag Silvia wrote:

Guten Tag, meine Frage bezieht sich auf den Anfang des Strickstückes. Und zwar strickt man 4 cm Bündchen und dann heißt es, nach 8cm muss man auf beiden Seiten der Markierung abnehmen. Wann fange ich mit den Abnahmen an? Wenn das Gestrickte 8cm insgesamt hat oder wenn 4 cm Bündchen plus 8cm glatt rechts Gestricktem habe?

23.04.2018 - 08:40

DROPS Design answered:

Liebe Silvia, die 8 cm werden von der Anschlagskante gemessen. Viel Spaß beim stricken!

23.04.2018 - 10:12

country flag Francesca Roques wrote:

Hi!..... I thought of knitting size L width 57cms ... But 318 stitch’s ????? ?...175 for just one side sounds enormous!!!!! Please help me ...usually when I knit with size 4 kneedles it’s Around 80 stitches for one side ... I’m impatient for your reply as I want to get started!... My wool is Drops Belle uni color Many thanks in advance Francesca

05.03.2018 - 23:23

DROPS Design answered:

Dear Mrs Roques, size L is 96 cm bust ie 37¾" - see finished measurements in inches under Materials and convert into inches here. Happy knitting!

06.03.2018 - 09:20

country flag Nathalie wrote:

Oups ! Je viens de relire et de comprendre. Toutes mes excuses, vous avez raison bien sûr.

27.11.2017 - 20:39

country flag Nathalie wrote:

Merci beaucoup de votre réponse mais ce n est pas ce qui est écrit dans les explications ;-) Voyez plutôt : DOS : = 78-86-94-106-118-130 m (1er rang = envers). Continuer au point de blé, EN MÊME TEMPS, rabattre pour les emmanchures en début de rang de chaque côté ainsi: 0-1-2-4-6-8 fois 2 m et 1-2-3-4-5-6 fois 1 m = 76-78-80-82-84-86 m. Cordialement !

27.11.2017 - 20:35

country flag Nathalie wrote:

Bonjour, quelque chose m'échappe pour la réalisation du dos de ce modèle. On part de 78m, desquelles on enlève de chaque côté 2 fois 2m puis 3 fois 1m, donc 7m x 2 = 14m, restent donc 78 -14 = 64m. Or vous annoncez qu'il doit en rester 76 ! Pouvez vous éclaircir ce point ? Merci !

24.11.2017 - 14:22

DROPS Design answered:

Bonjour Nathalie, en taille S (= 78 m), on rabat pour les emmanchures de chaque côté 1 x 1 m soit 2 m au total, il reste ainsi 76 m. Bon tricot!

24.11.2017 - 15:13

country flag Päivi Lindberg wrote:

Miten ihmeessä nuo kädentien kavennukset menevät? Pitäisi kaventaa joka toisella eli 01246 kerroksilla x2 ja 1234...1s. Alussa 78 silmukkaa ja kavennusten jälkeen 76 s.!?!?!! Tämä kohdan takakappale alusta.

01.11.2017 - 17:49

country flag Brigitte wrote:

Liebes Drops-Team! Beim Stricken des V-Ausschnittes komme ich fast zur Verzweifelung. Beide Seiten gleich zu stricken gelingt mir nicht. Werden Randmaschen gestrickt?Wann wird in Hin- oder Rückreihe abgenommen?Werden an einer Seite zwei zusammen und an der anderen mit Überzug gestrickt?Wenn ja,an welcher? Ich freue mich über jeden Tipp. L.G.Brigitte

23.07.2017 - 13:06

DROPS Design answered:

Liebe Brigitte, es gibt keine Randmaschen gegen Hals, die Abnahmen werden im doppeltem Perlmuster gestrickt. Abnahmen entstehen in jede 2. Reihe gegen den Hals (= Anfang einer Hinreihe beim rechten Vorderteil, Ende einer Rückreihe beim linken Vorderteil). Viel Spaß beim stricken!

24.07.2017 - 09:38

country flag Maria wrote:

Buongiorno,vorrei sapere se é possibile eseguire questo modello con i ferri dritti.Grazie

28.09.2016 - 13:17

DROPS Design answered:

Buongiorno Maria. Al seguente link trova alcune informazioni utili che possono aiutarla a lavorare con i ferri dritti un modello presentato per essere lavorato in tondo con i ferri circolari. Buon lavoro!

28.09.2016 - 14:34

country flag Jenny wrote:

Hello, this is my 1st knitted jumper. I have reached 47cm on my body piece and am now stuck. Not sure what to do now. As I am working on circular needles I didn't think there was a WS in the moss pattern. Also when it says to complete each piece separately do I need to slip half my stitches on to a stitch holder when working the front or back piece? Thanks

30.10.2015 - 11:50

DROPS Design answered:

Dear Jenny, when your piece measure 47 cm, work 1st row double moss st (= in the round = first row from RS), casting off the sts for armholes on this round. Then slip sts for front piece onto a stitch holder or a thread and work back piece to the end back and forth on circular needle. Slip then sts from front piece back on needle and work front piece to the end. Happy knitting!

30.10.2015 - 14:28

country flag Katia wrote:

Est-il possible de tricoter les manches avec des aiguilles circulaires en utilisant le "magic loop" plutôt qu'avec des aiguilles doubles-pointes ?

06.10.2015 - 11:51

DROPS Design answered:

Bonjour Katia, tout à fait, vous pouvez toujours utiliser la technique du magic loop au lieu des doubles pointes - bon tricot!

06.10.2015 - 13:35