DROPS Merino Extra Fine
100% Wool
from 3.50 £ /50g
Get the yarn to make this pattern from 7.00£.

The yarn cost is calculated from the pattern’s smallest size and the yarn’s cheapest product type. Looking for an even better price? You might find it on the DROPS Deals!

DROPS SS24

Lille Mille

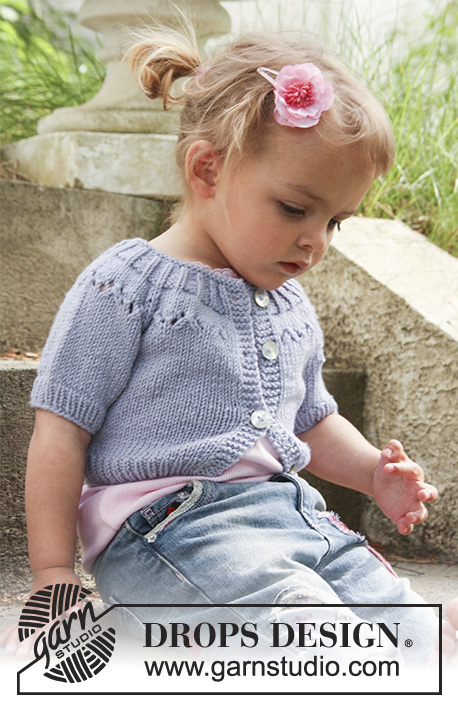
Knitted DROPS short jacket with short or long sleeve, raglan and lace pattern on yoke in ”Merino Extra Fine”.

DROPS Extra 0-684
DROPS design: Pattern no ME-038-by
---------------------------------------------------------
Size: 1/3 - 6/9 - 12/18 months (2 - 3/4) years
Size in cm: 50/56-62/68-74/80 (86/92-98/104)
Materials: DROPS MERINO EXTRA FINE
JACKET WITH SHORT SLEEVE:
100-150-150 (150-150) g colour no 14, steel blue
JACKET WITH LONG SLEEVE:
150-150-200 (200-200) g colour no 14, steel blue

DROPS DOUBLE POINTED NEEDLES and CIRCULAR NEEDLE (60 cm) size 4.5 mm – or size needed to get 20 sts x 26 rows in stocking st = 10 x 10 cm.
DROPS DOUBLE POINTED NEEDLES and CIRCULAR NEEDLE (60 cm) size 3.5 mm (for rib).
DROPS MOTHER OF PEARL BUTTON no 521: 4-4-4 (5-5) pcs.

-------------------------------------------------------

Alternative Yarn – See how to change yarns here
Yarn Groups A to F – Use the same pattern and change the yarn here
Yarn usage using an alternative yarn – Use our yarn converter here

-------------------------------------------------------

DROPS Merino Extra Fine
100% Wool
from 3.50 £ /50g
Get the yarn to make this pattern from 7.00£.

The yarn cost is calculated from the pattern’s smallest size and the yarn’s cheapest product type. Looking for an even better price? You might find it on the DROPS Deals!

Pattern instructions

NOTE: This pattern is written in British English. All measurements in charts are in cm. For conversion from cm to inches - click here. There are different terms for crocheting in British and American English. If this pattern includes crochet, click for "crochet terms" here. For this pattern in American English, please click here.
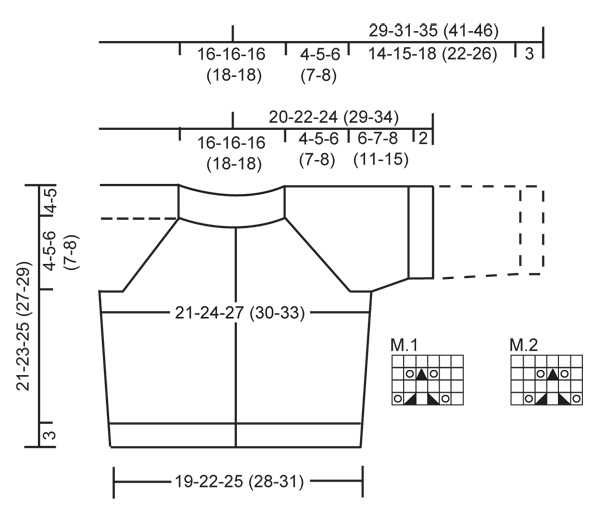
JACKET:

GARTER ST (back and forth on needle): K all rows.
PATTERN:
See diagram M.1 and M.2. Diagrams show the pattern from RS – first row = RS.
DECREASING TIP (applies to raglan):
Make all dec from RS.
Dec as follows in each transition between sleeve and body piece, beg 2 sts before marker: K2 tog, slip 1 st as if to K, K1, psso.
BUTTONHOLES:
Make buttonholes on right front band by K tog 2nd and 3rd st from edge and make 1 YO.
Make buttonholes when piece measures:
SIZE 1/3 months: 2, 8 and 13 cm
SIZE 6/9 months: 2, 8 and 14 cm
SIZE 12/18 months: 2, 8 and 14 cm
SIZE 2 years: 2, 7, 13 and 18 cm
SIZE 3/4 years: 2, 8, 14 and 20 cm
The last buttonhole is made on neckline.
---------------------------------------------------------
---------------------------------------------------------
BODY PIECE:
Worked back and forth on circular needle from mid front. Cast on 85-97-109 (121-133) sts (includes 4 front band sts each side towards mid front) on circular needle size 3.5 mm with Merino Extra Fine. P 1 row from WS and continue in rib as follows from RS: 4 front band sts in GARTER ST – see above, * K1/P1 *, repeat from *-* and finish with K1 and 4 front band sts in GARTER ST. Continue in rib like this. REMEMBER buttonholes on right front band – SEE ABOVE. When piece measures 3 cm change to circular needle size 4.5 mm. Insert a marker 23-26-29 (32-35) sts in from each side (= 39-45-51 (57-63) sts between markers on back piece). Now continue in stocking st with front bands in garter st as before. When piece measures 4-5-5 (5-6) cm inc 1 st each side of both markers (= 4 inc sts per row) and repeat the inc when piece measures 8-10-10 (10-11) cm = 93-105-117 (129-141) sts. When piece measures 13-14-14 (15-16) cm work next row as follows from RS: 22-25-28 (30-33) sts (= right front piece), cast off 6-6-6 (8-8) sts for armhole, 37-43-49 (53-59) sts (= back piece), cast off 6-6-6 (8-8) sts for armhole, 22-25-28 (30-33) sts (= left front piece). Put piece aside and knit the sleeves.

SHORT SLEEVE:
Worked in the round on double pointed needles.
Cast on 30-34-38 (40-44) sts on double pointed needles size 3.5 mm with Merino Extra Fine – beg of round = mid under sleeve. K 1 round and continue in rib, K1/P1. When piece measures 2 cm change to double pointed needles size 4.5 mm and continue in stocking st. When piece measures 4-4-4 (5-5) cm inc 2 sts mid under sleeve and repeat the inc in SIZE 2 years + 3/4 years when piece measures 10 cm = 32-36-40 (44-48) sts. When piece measures 8-9-10 (13-17) cm cast off 6-6-6 (8-8) sts mid under sleeve = 26-30-34 (36-40) sts. Put piece aside and knit the other sleeve.

LONG SLEEVE:
Worked in the round on double pointed needles.
Cast on 28-30-32 (34-34) sts on double pointed needles size 3.5 mm with Merino Extra Fine – beg of round = mid under sleeve. K 1 round and continue in rib, K1/P1. When rib measures 3 cm change to double pointed needles size 4.5 mm and continue in stocking st. When piece measures 5 cm inc 2 sts mid under sleeve and repeat the inc on every 8-5-4 (4-3.5) cm a total of 2-3-4 (5-7) times = 32-36-40 (44-48) sts. When piece measures 17-18-21 (25-29) cm cast off 6-6-6 (8-8) sts mid under sleeve = 26-30-34 (36-40) sts. Put piece aside and knit the other sleeve to.

YOKE:
Slip sleeves on the same circular needle as body piece where cast off for armhole = 133-153-173 (185-205) sts. Insert a marker in all transitions between body piece and sleeves = 4 markers. P 1 row from WS with front bands in garter st as before.
NOW READ ALL OF THE FOLLOWING SECTION BEFORE CONTINUING!
Continue in stocking st with front bands in garter st as before back and forth on circular needle, AT THE SAME TIME on first row (= RS) dec 1 st each side of all markers for raglan – See DECREASING TIP. Repeat the dec on every other row (i.e. on every row from RS) a total of 5-7-8 (9-10) times = 93-97-109 (113-125) sts.
AT THE SAME TIME on row 3-3-5 (5-7) (i.e. on the 2-2-3 (3-4) row with raglan dec) work lace pattern as follows from RS: 4 front band sts in garter st, M.1 on the next 12-18-18 (18-24) sts, 3-0-2 (4-0) stocking sts, dec 2 sts for raglan as before, 0-0-0 (2-0) stocking sts, M.1 on the next 18-24-24 (24-30) sts, 2-0-2 (2-0) stocking sts, dec 2 sts for raglan as before, 0-0-2 (1-0) stocking sts, M.1 on the next 30-36-36 (42-48) sts, 1-1-3 (2-1) stocking sts, dec 2 sts for raglan as before, 2-0-2 (2-0) stocking sts, M.2 on the next 18-24-24 (24-30) sts, 0-0-0 (2-0) stocking sts, dec 2 sts for raglan as before, 3-0-2 (4-0) stocking sts, M.2 on the next 12-18-18 (18-24) sts and finish with 4 front band sts in garter st. NOTE: Make sure to keep no of sts in M.1/M.2 the same when next decreasing for raglan. After 1 vertical repeat of M.1 and M.2 continue in stocking st as before, at the same time continue dec for raglan. After the last dec for raglan piece measures approx 21-23-25 (27-29) cm up to the shoulder. P 1 row from WS.

NECKLINE:
= 93-97-109 (113-125) sts. Change to circular needle size 3.5 mm and work rib as follows from RS: 4 front band sts in garter st, * K1/P3 *, repeat from *-* and finish with K1 and 4 front band sts garter st. When rib measures 1-1-1 (2-2) cm dec all P3 to P2 = 72-75-84 (87-96) sts. AT THE SAME TIME when rib measures 1.5-1.5-1.5 (2-2) cm make 1 buttonhole in line with the others on right front band. When rib measures 3-3-3 (4-4) cm dec every 3rd Psection from P2 to P1 = 65-68-76 (79-87) sts. On next row from RS K 2 rows on all sts and cast off.

ASSEMBLY: Sew openings under sleeves. Sew on buttons.

Diagram

symbols = K from RS, P from WS
symbols = 1 YO
symbols = slip 1 st as fi to K, K1, psso
symbols = K2 tog
symbols = slip 1 st as if to K, K2 tog, psso
diagram

Each of our patterns has specific tutorial videos to help you.

Do you have a question? See a list of frequently asked questions (FAQ)

Knitting tension is what determines the final measurements of your work, and is usually measured per 10 x 10 cm. It is provided like so: number of stitches in width x number of rows in height - eg: 19 stitches x 26 rows = 10 x 10 cm.

The knitting tension is very individual; some people knit/crochet loosely while others work tightly. You adjust the knitting tension with the needle size, which is why the suggested needle size is only meant as a guide! You need to adjust this (up or down) to ensure that YOUR knitting tension matches the knitting tension provided in the pattern. If you work with a different knitting tension than provided you will have a different yarn consumption, and your work will have different measurements than what the pattern suggests.

The knitting tension also determines which yarns can replace each other. As long as you achieve the same knitting tension you can replace one yarn with another.

See DROPS lesson: How to measure your tension/gauge

See DROPS video: How to make a gauge tension swatch

The required amount of yarn is provided in grams, eg: 450 g. To calculate how many balls you’ll need you first need to know how many grams are in 1 ball (25g, 50g or 100g). This information is available if you click on the individual yarn quality on our pages. Divide the amount required with the amount of each ball. For example, if each ball is 50g (the most common amount), the calculation will be as follows: 450 / 50 = 9 balls.

The important thing when changing from one yarn to another is that the knitting/crochet tension remains the same. This is so that the measurements of the finished piece will be the same as on the sketch provided. It is easier to achieve the same knitting tension using yarns from the same yarn group. It is also possible to work with multiple strands of a thinner yarn to achieve the knitting tension of a thicker one. Please try our yarn converter. We recommend you to always work a test swatch.

Please NOTE: when changing yarn the garment might have a different look and feel to the garment in the photo, due to individual properties and qualities of each yarn.

See DROPS lesson: Can I use a different yarn than the one mentioned in the pattern?

All our yarns are categorised into yarn groups (from A to F) according to thickness and knitting tension – group A contains the thinnest yarns and group F the thickest. This makes it easier for you to find alternative yarns to our patterns, should you wish to switch yarn. All yarns within the same group have a similar knitting tension and can easily replace each other. However, different yarn qualities have different structures and properties which will give the finished work a unique look and feel.

Click here for an overview of the yarns in each yarn group

At the top of all our patterns you’ll find a link to our yarn calculator, which is a helpful tool should you wish to use a different yarn than suggested. By filling in the yarn quality you wish to replace, the amount (in your size) and number of strands, the calculator will present good alternative yarns with the same knitting tension. Additionally it will tell you how much you’ll require in the new qualities and whether you’ll need to work with multiple strands. Most skeins are 50g (some are 25g or 100g).

If the pattern is worked with multiple colours, every colour will have to be calculated separately. Similarly, if the pattern is worked with several strands of different yarns (for example 1 strand Alpaca and 1 strand Kid-Silk) you will have to find alternatives for each, individually.

Click here to see our yarn calculator

Since different yarns have different qualities and textures we have chosen to keep the original yarn in our patterns. However, you can easily find options among our available qualities by using our yarn calculator, or simply pick a yarn from the same yarn group.

It is possible that some retailers still have discontinued yarns in stock, or that someone has a few skeins at home that they would like to find patterns for.

The yarn calculator will provide both alternative yarn as well as required amount in the new quality.

If you think it's hard to decide what size to make, it can be a good idea to measure a garment you own already and like the size of. Then you can pick the size by comparing those measures with the ones available in the pattern's size chart.

You'll find the size chart at the bottom of the pattern.

See DROPS lesson: How to read size chart

The needle size provided in the pattern serves only as a guide, the important thing is to follow the knitting tension. And since knitting tension is very individual, you will have to adjust the needle size to ensure that YOUR tension is the same as in the pattern – maybe you’ll have to adjust 1, or even 2 needle sizes, up or down to achieve the correct tension. For this, we recommend that you work test swatches.

Should you work with a different knitting tension than the one provided, the measurements of the finished garment might deviate from the measurement sketch.

See DROPS lesson: How to measure your tension/gauge

See DROPS video: How to make a tension/gauge swatch

Working a garment top-down provides more flexibility and room for personal adjustment. For example it is easier to try the garment on while working, as well as making adjustments to length of yoke and shoulder caps.

The instructions are carefully explaining every step, in the correct order. Diagrams are adjusted to the knitting direction and are worked as usual.

The diagram depicts all rows/rounds, and every stitch seen from the right side. It is read from bottom to top, from right to left. 1 square = 1 stitch.

When working back and forth, every other row is worked from the right side and every other row is worked from the wrong side. When working from the wrong side, the diagram will have to be worked reversed: from left to right, knit stitches are purled, purl stitches are knit etc.

When working in the round every round is worked from the right side and the diagram are worked from right to left on all rounds.

See DROPS lesson: How to read knitting diagrams

The diagram depicts all rows/rounds, and every stitch seen from the right side. It is worked from bottom to top, from right to left.

When working back and forth every other row is worked from the right side: from right to left and every other row is worked from the wrong side: from left to right.

When working in the round, every row in the diagram are worked from the right side, from right to left.

When working a circular diagram you start in the middle and work your way outwards, counter clockwise, row by row.

The rows usually start with a given number of chain stitches (equivalent to the height of the following stitch), this will either be depicted in the diagram or explained in the pattern.

See DROPS lesson: How to read crochet diagrams

Instructions for working several diagrams after each other on the same row/round, will often be written like so: “work A.1, A.2, A.3 a total of 0-0-2-3-4 times". This means you work A.1 once, then A.2 is worked once, and A.3 is repeated (in width) the number of times provided for your size – in this case like so: S = 0 times, M = 0 times, L=2 times, XL= 3 times and XXL = 4 times.

The diagrams are worked as usual: begin with the first row in A.1, then work the first row in A.2 etc.

See DROPS lesson: How to read knitting diagrams

See DROPS lesson: How to read crochet diagrams

The total width of the garment (from wrist-to-wrist) will be larger in the larger sizes, despite the actual sleeves being shorter. The larger sizes have longer sleeve caps and wider shoulders, so there will be a good fit in all sizes.

The measurement sketch/schematic drawing provides information regarding the full length of the garment. If it’s a jumper or a jacket the length is measured from the highest point on the shoulder closest to the neckline, and straight down to the bottom of the garment. It is NOT measured from the tip of shoulder. Similarly, the length of yoke is measured from the highest point on the shoulder and down to where yoke is split into body and sleeves.

On a jacket measures are never taken along bands, unless specifically stated. Always measure inside band stitches when measuring the length.

See DROPS lesson: How to read a schematic drawing

Diagrams are often repeated on the round or in height. 1 repeat is the diagram the way it appears in the pattern. If it says to work 5 repeats of A.1 in the round, then you work A.1 a total of 5 times after/next to each other in the round. If it says to work 2 repeats of A.1 vertically/in height you work the entire diagram once, then begin again at the start and work the entire diagram one more time.

Chain stitches are slightly narrower than other stitches and to avoid working the cast-on edge too tight, we simply chain more stitches to begin with. The stitch count will be adjusted on the following row to fit the pattern and measurement sketch.

The rib edge is more elastic and will contract slightly compared to, for example, stocking stitch. By increasing before the rib edge, you avoid a visible difference in width between the rib edge and the rest of the body.

It’s very easy to cast off too tightly, and by making yarn overs while casting off (and simultaneously casting these off) you avoid a too tight cast off edge.

See DROPS video: How to bind off with yarn overs (yo)

To achieve an even increase (or decrease) you can increase on, for example: every 3rd and 4th row alternately, like so: work 2 rows and increase on the 3rd row, work 3 rows and increase on the 4th. Repeat this until the increase is complete.

See DROPS lesson: Increase or decrease 1 st on every 3rd and 4th row alternately

Should you prefer to work in the round instead of back and forth, you may of course adjust the pattern. You’ll need to add steeks mid-front (usually 5 stitches), and follow the instructions. When you would normally turn and work from the wrong side, simply work across the steek and continue in the round. At the end you’ll cut the piece open, pick up stitches to work bands, and cover the cut edges.

See DROPS video: How to knit steeks and cut open

Should you prefer to work back and forth instead of in the round, you may of course adjust the pattern so you work the pieces separately and then assemble them at the end. Divide the stitches for the body in 2, add 1 edge stitch in each side (for sewing) and work the front and back pieces separately.

See DROPS lesson: Can I adapt a pattern for circular needles into straight needles?

Pattern repeats can vary slightly in the different sizes, in order to get the correct proportions. If you’re not working the exact same size as the garment in the photo, yours might deviate slightly. This has been carefully developed and adjusted so that the complete impression of the garment is the same in all sizes.

Make sure to follow instructions and diagrams for your size!

If you have found a pattern you like which is available in women’s size it’s not very difficult to convert it to men’s size. The biggest difference will be the length of sleeves and body. Start working on the women size that you think would fit across the chest. The additional length will be worked right before you cast off for the armhole/sleeve cap. If the pattern is worked top-down you can add the length right after the armhole or before the first decrease on sleeve.

Regarding additional yarn amount, this will depend on how much length you add, but it is better with a skein too many than too few.

All yarns will have excess fibres (from production) that might come off as lint or shedding. Brushed yarns (ie hairier yarns) have more of these loose, excess fibres, causing more shedding.

Shedding also depends on what is worn under or over the garment, and whether this pulls at the yarn fibres. It’s therefore not possible to guarantee that there will be no shedding

Below are some tips on how to get the best result when working with hairier yarns:

1. When the garment is finished (before you wash it) shake it vigorously so the looser hairs come off. NOTE: do NOT use a lint roller, brush or any method that pulls at the yarn.

2. Place the garment in a plastic bag and put it in your freezer - the temperature will cause the fibres to become less attached to each other, and excess fibres will come off easier.

3. Leave in the freezer for a few hours before taking it out and shaking it again.

4. Wash the garment according to the instructions on the yarn label.

Pilling is a natural process that happens to even the most exclusive of fibers. It's a natural sign of wear and tear that is hard to avoid, and that is most visible in high friction areas of your garment like a sweater's arms and cuffs.

You can make your garment look as new by removing the pilling, using a fabric comb or a pill/lint remover.

Still can't find the answer you need? Then scroll down and leave your question so one of our experts can try to help you. This will be done normally within 5 to 10 working days.
In the meantime, you can read the questions and answers that others have left to this pattern or join the DROPS Workshop on Facebook to get help from fellow knitters/crocheters!

You might also like...

Lille Mille

Joej5, France

0-684 Lille Mille

JoeJ5, France

0-684 Lille Mille

Valeria, Italy

DROPS Extra 0-684

Agnieszka, Poland

Post a comment to pattern DROPS Extra 0-684

We would love to hear what you have to say about this pattern!

If you want to leave a question, please make sure you select the correct category in the form below, to speed up the answering process. Required fields are marked *.

Comments / Questions (79)

country flag Laila Øvrebø wrote:

Kort og langt erme. På kort erme står det at en skal strikke til 17 cm og så felle midt under erme. På lang arm står det at en skal felle til erme når ermet måler 29 cm . Dette er jo like langt som ferdig jakke. dette må vel være feil ? Etterfelling skal jo armene inn på bolen som bare er 16 cm ( i str. 3/4 )

08.05.2018 - 13:35

DROPS Design answered:

Hej Laila, jo det stemmer, du finder målene i måleskitsen nederst i opskriften. God fornøjelse!

09.05.2018 - 13:18

country flag Anna Maria wrote:

Buona sera Posso farlo anche di cotone?

05.04.2018 - 20:57

DROPS Design answered:

Buonasera Anna Maria. Può usare un cotone del gruppo B, come p.es Muskat, Cotton Light, Belle. Buon lavoro!

05.04.2018 - 21:33

country flag Michele wrote:

Bonjour? Mon premier gilet est terminé et je suis ravie! Il est superbe!!! (grace à votre aide!!!) Maintenant je voudrais le refaire en taille 8 ans.... Si je prend de la grosse laine et des aiguilles 6 et que je fais le 4 ans (en augmentant les longueurs) est ce que ca ira, est ce que ca ne va pas cafouiller au niveau de l'encolure (trop grand ou trop petit???) merci de votre réponse. cordialement

16.02.2018 - 19:49

DROPS Design answered:

Bonjour Michelle, ravie que vous ayez pu terminer le gilet. Nous ne sommes malheureusement pas en mesure de pouvoir ajuster chaque modèle à chaque demande individuelle, mais vous pouvez vous aider de votre échantillon, des mesures adéquates à la taille pour tout recalculer. Bon tricot!

19.02.2018 - 08:42

country flag Michele wrote:

Oups! Ma question est sans objet. Il faut déduire 80 mailles aux 205 et non 40! Désolée. Ca fait bien 125.

23.01.2018 - 17:38

country flag Michele wrote:

Décidément c'est encore moi! J'ai du mal. Je ne comprends pas comment on peut passer de 205 mailles (taille 3/4 ans) à 125 en ne faisant que 10 diminutions raglan (40 mailles au total). J'ai raté quelque chose? Désolée de vous embeter autant mais j'ai relu 4 fois et je ne comprends pas. Merci d'avance.

23.01.2018 - 17:29

DROPS Design answered:

Bonjour Michele, on diminue 8 mailles pour le raglan (= 1 m de chaque côté de chacun des 4 marqueurs) x 10 = 80 diminutions, vous aviez 205 m - 80, il en reste 125. Bon tricot!

23.01.2018 - 18:03

country flag Michele wrote:

Bonjour, Je fais la taille 3/4 ans. J'ai fait le 1er rang M1 M2 sans probleme, j'ai fait le rang envers mais je ne comprends pas comment faire le 3eme rang pour que ca tombe bien. je ne sais pas ou faire des mailles jersey. je suis perdue. Pouvez-vous m'aider? Merci d'avance

21.01.2018 - 19:03

DROPS Design answered:

Bonjour Michelle, au 3ème rang de M1 et M2, continuez bien le motif comme avant et diminuez pour le raglan en même temps, pensez à bien aligner les motifs les uns au-dessus des autres quand vous diminuez pour le raglan (s'il n'y a pas assez de mailles dans M1/M2 pour tricoter un motif ajouré, tricotez ces mailles en jersey pour que le nombre de mailles reste juste). Bon tricot!

22.01.2018 - 10:17

country flag Michele wrote:

Bonjour. j'ai un souci dès le début : apres avoir monté les mailles du dos, il est noté de faire un rang envers sur l'envers avant de commencer les cotes. Or on est sur l'endroit. Dois je faite un rang endroit sur l'endroit avant les cotes??? merci

13.01.2018 - 09:07

DROPS Design answered:

Bonjour Michele, dans ce modèle, le 1er rang après le montage des mailles sera l'envers de l'ouvrage, on tricote toutes les mailles à l'envers et on commence les côtes au rang suivant, le 1er rang des côtes sera l'endroit du gilet et on aura un rang jersey endroit avant les côtes. Bon tricot!

15.01.2018 - 08:48

country flag LENOIR Marie France wrote:

Je suis bloquée au niveau de l'empiècement au niveau du point à trous le demi devant est impeccable mais les manhes et le dos rien ne va pouvez vous me guider SVP

07.06.2017 - 17:23

DROPS Design answered:

Bonjour Mme Lenoir, vous devez tricoter les diagrammes sur toutes les mailles indiquées, avec ou sans m jersey entre les diagrammes en fonction de la taille. Les rangs des diagrammes doivent bien s'aligner les uns au-dessus des autres, comme dans les diagrammes et ne doivent pas être décalés. Bon tricot!

08.06.2017 - 09:12

country flag Grietje De Weerd wrote:

In het patroon staat, dat je 2x het telpatroon moet breien, boven elkaar. Ik heb het vestje inmiddels een aantal keren gebreid en dat steeds gedaan, maar dan ziet het er anders uit dan op de foto. Nu ben ik het weer aan het breien en heb het telpatroon 1x gebreid. En nu is het, zoals op de foto. Ik denk dus, dat het er fout staat.

23.03.2017 - 16:55

country flag Katja Müller wrote:

Hallo! Ich bin am verzweifeln! Mein Muster stimmt hinten und vorne nicht! Meine Frage: Muss ich M1 nach jedem Abschnitt also Vorderteil, Armteil, Rücken fließend stricken mit den Abnahmen dazwischen oder bei jedem Abschnitt und jeder Abnahme M1 wieder von vorn anfangen und Stricke ich nur M1 oder auch M2? L.G. K. Müller

25.12.2016 - 00:14

DROPS Design answered:

Liebe Frau Müller, M1/M2 muss wie beschrieben 1 x in der Höhe gestrickt werden, beachten Sie nur daß die beiden Muster nicht verschiebt sind wenn Sie für den Raglan abnehmen. Viel Spaß beim stricken!

29.12.2016 - 13:47