
Popular categories
Looking for a yarn?


|
|
DROPS Baby 10-25 |
|
 |
 |
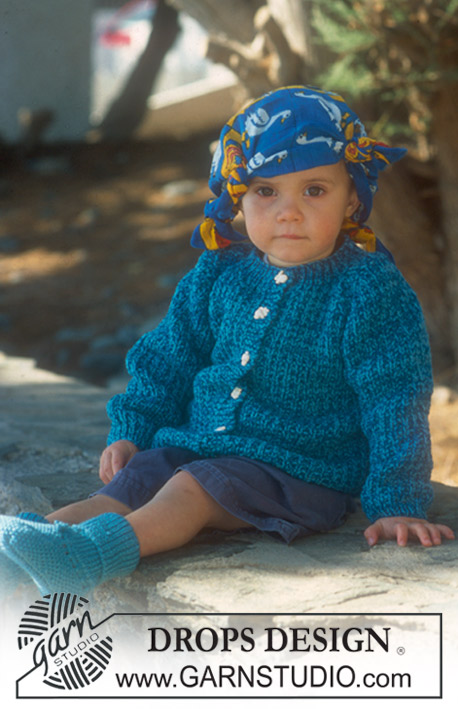
DROPS raglan jumper and socks
DROPS Baby 10-25 |
|
|
Knitting tension: 17 sts x 22 in stocking st with double thread on needle size 5 mm = 10 x 10 cm. Garter st (back and forth): knit all rows. Rib: *K1, P1*, repeat from *-*. Pattern: Row 1: *K1, P1*, repeat from *-*. Row 2: Stocking sts. Repeat row 1 and 2. Buttonhole: 1 buttonhole = cast off 3rd st from edge and make a yo over cast off st on return row Decreasing tip (apply to raglan): Dec as follows from RS: Before 4 (1) edge st: K2 tog. After 4 (1) edge sts: slip 1 st as if to knit, K1, psso. Dec as follows from WS: Before 4 (1) edge st: P2 tog into back of st. After 4 (1) edge sts: P2 tog. ------------------------------------------------------------------ Back piece (jacket and sweater): Cast on 46-50-56-62-66 sts (incl 1 edge st each side) on needle size 3.5 mm with 1 thread Alpaca and 1 thread Silketweed (double thread) and knit 2 cm Rib. Change to needle size 5 mm and continue in pattern. Remember the knitting tension! When piece measures 19-20-22-23-25 cm cast off 3 sts each side for armhole and dec for raglan inside 4 edge sts (4 edge sts in garter sts (blue jacket) or 1 edge sts in garter sts, k2, 1 sts in garter sts (green sweater)) - see decreasing tip above: 1 st on every 4th row a total of 6-6-4-3-3 times and 1 st on every other row a total of 0-1-6-9-10 times. At the same time when piece measures 28-30-33-35-38 cm put the middle 16-18-18-20-20 sts on a thread for neck and dec 1 st towards neckline on next row = 5 sts left on each shoulder. Cast off when piece measures 30-32-35-37-40 cm. Front piece (sweater): Cast on and knit as back piece. Cast off for armhole and dec for raglan as described for back piece, but after 3-4-3-4-4 cm cast off for buttonhole on the 4 edge sts towards the right raglan. Make another 2 buttonholes on every 3-3-4-4-4 cm. At the same time when piece measures 26-28-31-32-35 cm put the middle 12-14-14-16-18 on a thread for neck and dec to shape the neckline on every other row: 2 sts 1 time and 1 st 1 time = 5 sts left on each shoulder. Cast off when piece measures 30-32-35-37-40 cm. Left front piece (jacket): cast on 27-29-32-35-37 sts (incl 1 edge sts in side and 4 edge sts towards mid front) on needle 3,5 mm with 1 thread Alpaca and 1 thread Silke-Tweed. Knit rib in 2 cm, but work the 4 front band sts in garter sts. Change to needles 5 mm and continue in pattern. When piece measures 19-20-22-23-25 cm cast off 3 sts at side for armhole. Then dec to raglan in side as on back piece. At the same time when piece measures 26-28-31-32-35 cm put 10-11-11-12-13 sts towards mid front on 1 thread for neck. Then cast off towards neck on every other row: 2 sts 1 time and 1 st 1 time = 5 sts remains on shoulder. Cast off when piece measures 30-32-35-37-40 cm. Right front piece (jacket): Cast on and work as left, but reversed. At the same time make button holes along front band - see explanation above. Cast off for button holes when piece measures: size 1/3 months: 2, 8, 14 and 20 cm. size 6/9 months: 1, 8, 15 and 22 cm. size 1 year: 1, 7, 13, 19, and 25 cm. size 2 year: 2, 8, 14, 20 and 26 cm. size 3/4 year: 1, 8, 15, 22 and 29 cm. Left sleeve (jacket and sweater): Cast on 30-32-34-36-38 sts (incl 1 edge st each side) on needle size 3.5 mm with 1 thread Alpaca and 1 thread Silketweed (double thread) and knit 2 cm Rib. Change to needle size 5 mm and continue in pattern. When piece measures 3-4-4-5-5 cm inc a st each side on every 5-4-4-4-4 row a total of 3-4-4-5-6 times = 36-40-42-46-50 sts. When piece measures 17-18-21-26-29 cm cast off 3 sts each side for armhole = 30-34-36-40-44 sts. Now dec for raglan each side inside 1 edge st – see decreasing tip above: 1 st on every other row a total of 11-13-14-14-15 times and 1 st on every row a total of 0-0-0-2-3 times = 8 sts left. Cast off, sleeve now measures approx 28-31-34-40-44 cm. Right sleeve (jacket): Knit as left. Right sleeve (sweater): Cast on and knit as left sleeve. When piece measures 17-18-21-26-29 cm cast off 3 sts each side for armhole. Now cast on 4 sts on the right side of sleeve (button band, knitted in garter sts). Dec for raglan as done for left sleeve as follows: on the left side inside 1 edge st, on the right side inside 4 edge sts – see decreasing tip above. Continue and cast off as described for left sleeve. Assembly (jacket): Sew all raglan seams; lay 2 row garter st from body piece over 1 edge st from sleeve and sew every st tog with small stitches, sew with Alpaca. Pick up (incl sts from threads) approx 67 to 81 sts (divisible with 2 + 1) around the neck on needle 3,5 mm with 1 thread Alpaca + 1 thread Silke-Tweed. Work rib with 1 garter stitch + K1 on each side towards mid front - at the same time dec evenly to approx 55 to 71 sts on 1st row. On 2nd row make 1 button hole over the other on front band. Cast off when neckband measures 2 cm. Sew sleeve- and side seams in one within 1 edge st. Sew on buttons. Assembly (sweater): Sew raglan seams except the one with buttonholes with Alpaca. Pick up approx 67 to 81 sts (incl sts from threads front and back, and divisible by 2 + 1) round the neck on needle size 3.5 mm with 1 thread Alpaca and 1 thread Silketweed (double thread). Knit Rib, at the same time adjusting no of sts to approx 55 to 71 on first row. On 2nd row make a buttonhole in line with the others. Cast off then neck measures 2 cm. Sew sleeve and side seams inside 1 edge st. Sew on buttons. -------------------------------------------------------------------- SOCKS: Size: 1/3 – 6/9 -12/18 months – 2 years Foot length: 10-11-12-14 cm DROPS double pointed needles size 2 and 2.5 mm DROPS crochet hook size 2.5 mm Knitting tension: 26 sts x 35 rows on needle size 2.5 mm in stocking sts = 10 x 10 cm Rib: *K1, P1*, repeat from *-* Moss sts: 1st row: *K1, P1. 2nd row: P over K, K over P. Repeat 2nd row. Cast on 58-60-62-64 sts on needle size 2 mm with Alpaca. Knit Rib. When piece measures 4-5-5-5 cm K tog 3 sts mid back, knit 4 rounds in Rib and K tog 3 sts mid back = 54-56-58-60 sts. When piece measures 10-11-12-13 cm change to needles size 2.5 mm and continue in stocking sts, at the same time dec to 46-50-50-54 sts. After 2 rounds knit next round as follows: *K 2 tog, yo*, repeat from *-*. Knit 1 round in stocking sts and now knit the middle 10-12-12-14 sts (= upper foot) in moss sts – put remaining 36-38-38-40 sts on a thread. After 4-5-5.5-7 cm pick up 10-12-14-16 sts on each side of upper piece and put sts from thread back on needles = 66-74-78-86 sts. Knit 1.5-2-2.5-3 cm in moss sts over all sts and P 1 round. Now cast off all sts of both sides of the middle 10-12-12-14 sts and continue over these in moss sts for sole. Cast off when sole measures 9-10-11-13 cm. Sew the sole to the sock. Crochet a chain in ch measuring approx 30-35 cm and pull through the row of holes. |
|

|
|
|
Have you made this or any other of our designs? Tag your pictures in social media with #dropsdesign so we can see them! Do you need help with this pattern?You'll find tutorial videos, a Comments/Questions area and more by visiting the pattern on garnstudio.com. © 1982-2024 DROPS Design A/S. We reserve all rights. This document, including all its sub-sections, has copyrights. Read more about what you can do with our patterns at the bottom of each pattern on our site. |
|


With over 40 years in knitting and crochet design, DROPS Design offers one of the most extensive collections of free patterns on the internet - translated to 17 languages. As of today we count 304 catalogues and 11422 patterns - 11422 of which are translated into English (UK/cm).
We work hard to bring you the best knitting and crochet have to offer, inspiration and advice as well as great quality yarns at incredible prices! Would you like to use our patterns for other than personal use? You can read what you are allowed to do in the Copyright text at the bottom of all our patterns. Happy crafting!
Comments / Questions (29)
Hallo, ich verstehe beim Rückenteil nicht, was bei den Raglanabnahmen 1M total z.B 3 mal auf allen 4. Nadeln und 1M z.B. auf allen 2. Nadeln bedeutet. Ist nicht die Hinrunde die 1. Nadel und die Rückrunde die 2. Nadel?? Erst alle 4. Nadeln und dann alle 2. Nadeln? Dann wird die Schräge doch nicht gleichmäßig!?! Oder alles gleichzeitig? Dann sind aber 2. und 4.Nadel aber irgendwann dasselbe. Ich verzweifle! Und wäre euch sehr dankbar für Aufklärung! Lieben Gruß Christin
07.06.2023 - 13:48DROPS Design answered:
Liebe Christin, in die 3. und 4. Größe nehmen Sie für den Raglan so ab: in jeder 4. Reihe (= in jeder 2. Hinreihe) insgesamt 3 Mal dann in jeder 2. Reihe (in jeder Hinreihe) insgesamt 9-10 Mal. Oder stricken Sie eine andere Größe? Viel Spaß beim stricken!
07.06.2023 - 14:39Ik heb volgens de uitleg de raglan geminderd. Helaas moet ik nog 4 cm pand bij breien om de juiste hoogte te krijgen. Moet ik die gewoon erbovenop breien of had ik anders moeten minderen? Bv door tussendoor een toer over te breien zónder te minderen? Ik heb veel moeite met dit patroon.
25.09.2022 - 20:52Ik begrijp nog steeds niet hoe ik moet afkanten voor raglan op het achterpand van de trui. Als ik de 1e 2 steken op de naald samenbrei heb ik toch geen 4 kantsteken meer, daar heb ik er dan nog maar 3 van over. En als ik een steek afhaal en over de gebreide steek haal, krijg ik dan geen gaatje?? En begrijp ik nu dat ik per kant maar aan één kant samenbrei cq overhaal? Ik snap er niets meer van.
14.08.2022 - 22:10DROPS Design answered:
Dag Marja,
Je kant af binnen de 4 kantsteken, dus voor of na de 4 kantsteken, niet in/op de kantsteken zelf; die laatje in tact.
17.08.2022 - 16:46Ik begrijp het afkanten achterpand trui voor de raglan niet. Moet ik eerst 4 kantsteken breien en dan 2 samenbreien en aan het einde van de naald 2 samenbreien vóór de laatste 4 kantsteken? Op juist aan het begin en einde van de naald dus de 1e 2 en de laatste 2 samenbreien? Het is niet duidelijk wat bedoeld wordt.
14.08.2022 - 13:03DROPS Design answered:
Dag Marja,
Als je aan de goede kant van het werk aan het minderen bent voor de raglan, brei je 2 recht samen vóór de 4 steken. Na de 4 steken haal je 1 steek recht af, brei je 1 steek en haal je de afgehaalde steek over de gebreide steek.
Als je op de verkeerde kant van het werk aan het minderen bent voor de raglan brei je voor de 4 steken 2 gedraaid averecht samen en na de 4 steken brei je 2 steken averecht samen (dus niet gedraaid).
14.08.2022 - 19:45Sorry, ich hatte glatt übersehen, dass der rechte Ärmel für den Pulli extra ausgewiesen wird. Jetzt ist alles klar!
16.12.2021 - 11:05Leider kann ich nicht nachvollziehen, wie es überhaupt zur Knopfleiste auf dem Ärmel kommen soll. Am Ärmel beginnen doch die Abnahmen direkt vor/ nach den Randmaschen. Also kein kraus gestrickter Abschluss wie bei Vorder/ Rückenteil, so dass hier auch keine Möglichkeit besteht, Knöpfe anzunähen? Wo mache ich den Denkfehler?\r\nLiebe Grüße, Petra
16.12.2021 - 10:54DROPS Design answered:
Liebe Petra, bei der rechten ¨Ärmel ketten Sie zuerst 3 M beidseitig, dann schlagen Sie 4 Maschen auf der rechten Seite (= am Ende der Rückreihe) (= Knofpleiste, stricken Sie diese Maschen so: 1 Masche kraus rechts, 1 M glatt rechts, 1 Masche kraus rechts). Raglanabnahmen werden Sie dann rechts (von der Vorderseite gesehen) innerhalb 4 Maschen und links innerhalb 1 Randmasche arbeiten. Kann das Ihnen helfen?
16.12.2021 - 14:06Hallo ihr Lieben, wie wird denn die Gegenseite zur Knopfleiste am Ärmel gearbeitet? Fehlt hier ein Untertritt, an welchem die Knöpfe befestigt werden? Oder habe ich etwas übersehen? Liebe Grüße
15.12.2021 - 17:05DROPS Design answered:
Liebe Petra, die eine Knopfleise wird am Vorderteil gearbeitet (Knopflöcher) und die andere wird an der rechten Ärmel (Puli) gearbeitet. Viel Spaß beim stricken!
16.12.2021 - 07:18Saisinko sinisen neuletakin ohjeen. Tein jo takakappaleen puseron ohjeen mukaan.
17.09.2020 - 18:36Je ne comprends rien à l’assemblage du col de la veste: poser 2 rangs au point mousse.... et continuer en cotes.... pouvez-vous m’expliquer avec plus d’amples détails pour finir la veste en /6 ans Merci d’avance
05.07.2020 - 16:56DROPS Design answered:
Bonjour Mme Fuchs, vous relevez les mailles le long de l'encolure (y compris celles en attente) de sorte que votre nombre de mailles soit multiple de 2 +1 (ex. 81). Tricotez ensuite en côtes 1/1 avec 1 m point mousse de chaque côté, autrement dit, au 1er rang sur l'envers (après avoir relevé les mailles sur l'endroit), tricotez: 1 m point mousse, (1 m env/1 m end) répétez de(à) jusqu'à ce qu'il reste 2 mailles et terminez par 1 m env, 1 m point mousse. Bon tricot!
06.07.2020 - 09:38J’ai terminé les diminutions avant d’atteindre les 38 cm pour le dos; de ce fait je continue de tricoter jusqu’à 40 cm... est ce normal? Merci...
05.05.2020 - 14:30DROPS Design answered:
Bonjour Mme Fuchs, possible, votre échantillon est juste en hauteur? Il ne s'agit que de 2 cm, ça devrait le faire. Bon tricot!
05.05.2020 - 15:19