DROPS Fabel
DROPS Fabel
75% Wool, 25% Polyamide
from 2.30 £ /50g
DROPS SS24

Hello Stripes

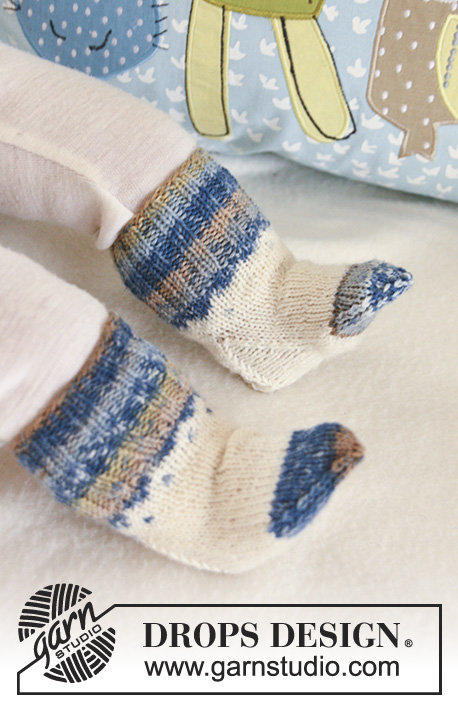
Set of knitted jumper with stripes, dots and raglan, pants and socks for baby and children in DROPS Fabel

DROPS Baby 19-3
DROPS design: Pattern no FA-028-by-FA-029-by-FA-030-by
---------------------------------------------------------
JUMPER:
Size: 1/3 - 6/9 - 12/18 months (2 - 3/4) years
Size in cm: 50/56-62/68-74/80 (86/92-98/104)
Materials: DROPS FABEL
100-100-100 (100-100) g colour no 910, sea mist
50-50-50 (100-100) g colour no 100, off-white

DROPS DOUBLE POINTED NEEDLES and CIRCULAR NEEDLE (60 cm) size 2.5 mm – or size needed to get 26 sts x 34 rows in stocking st = 10 x 10 cm.
DROPS wooden button no 513: 4 pcs.
--------------------------------------------------------
PANTS:
Size: 1/3 - 6/9 - 12/18 months (2 - 3/4) years
Size in cm: 50/56-62/68-74/80 (86/92-98/104)
Materials: DROPS FABEL
100 g for all sizes colour no 100, off-white
50 g for all sizes colour no 910, sea mist

DROPS DOUBLE POINTED NEEDLES and CIRCULAR NEEDLE (40 cm) size 2.5 mm – or size needed to get 26 sts x 34 rows in stocking st = 10 x 10 cm.
ELASTIC: approx 60 cm.
-------------------------------------------------------
SOCKS;
Size: 1/3 - 6/9 - 12/18 months (2 - 3/4) years
To fit foot length: 10-11-12 (14-16) cm
Materials: DROPS FABEL
50 g for all sizes colour no 100, off-white
50 g for all sizes colour no 910, sea mist

DROPS DOUBLE POINTED NEEDLES size 2.5 mm – or size needed to get 26 sts x 34 rows in stocking st = 10 x 10 cm.

You can replace the DROPS FABEL colours used in this pattern with many other colour combinations or replace it with DROPS NORD. Check the pattern pictures for inspiration and the Comments section to find out the exact colour numbers in the samples.

-------------------------------------------------------

Alternative Yarn – See how to change yarns here
Yarn Groups A to F – Use the same pattern and change the yarn here
Yarn usage using an alternative yarn – Use our yarn converter here

-------------------------------------------------------

DROPS Fabel
DROPS Fabel
75% Wool, 25% Polyamide
from 2.30 £ /50g

Pattern instructions

NOTE: This pattern is written in British English. All measurements in charts are in cm. For conversion from cm to inches - click here. There are different terms for crocheting in British and American English. If this pattern includes crochet, click for "crochet terms" here. For this pattern in American English, please click here.
JUMPER:

PATTERN:
See diagram M.1 and M.2. The entire pattern is worked in stocking st.
DECREASING TIP (applies to raglan):
FROM RS:
At beg of row: 1 edge st, slip 1 st as if to K, K1, psso. At the end of row (beg when 3 sts remain): K2 tog, 1 edge st.
By the other 3 markers dec as follows in each transition between sleeve and body piece (beg 3 sts before marker): K2 tog, K2 (marker sits between these 2 sts), slip 1 st as if to K, K1, psso.
FROM WS:
At beg of row: 1 edge st, P2 tog. At the end of row (beg when 3 sts remain): P2 tog into back of loop, 1 edge st.
By the other 3 markers dec as follows in each transition between sleeve and body piece (beg 3 sts before marker): P2 tog into back of loop, P2 (marker sits between these 2 sts), P2 tog.
NOTE! Make sure sts sit the right way as seen from RS.
---------------------------------------------------------
---------------------------------------------------------
JUMPER:

BODY PIECE:
Worked in the round on circular needle. Cast on 140-156-176 (192-212) sts on circular needle size 2.5 mm with sea mist. K 1 round and continue in rib, K2/P2. When rib measures 4 cm K 1 round, AT THE SAME TIME dec 12-12-16 (16-20) sts evenly = 128-144-160 (176-192) sts. Insert a marker each side = 64-72-80 (88-96) sts between markers. Work M.1. After M.1 continue in M.2. REMEMBER THE KNITTING TENSION! When piece measures approx 17-18-21 (24-27) cm - adjust after 1 stripe in M.2 (i.e. after 5 rows in one colour) - work next round as follows: cast off 4 sts for armhole, work 57-65-73 (81-89) sts (= front piece), cast off 7 sts for armhole, work 57-65-73 (81-89) sts (= back piece) and cast off the last 3 sts for armhole, cut the thread. Insert a marker in the middle sts on back piece (= mid back at neck).
Put piece aside and knit the sleeves.

SLEEVE:
Worked in the round on double pointed needles.
Cast on 40-44-44 (48-52) sts on double pointed needles size 2.5 mm with sea mist. K 1 round and continue in rib, K2/P2. When rib measures 3 cm K 1 round, AT THE SAME TIME dec 4 sts evenly = 36-40-40 (44-48) sts. Insert a marker at beg of round = mid under sleeve. Continue in M.1. After M.1 continue in M.2. AT THE SAME TIME when piece measures 6 cm inc 1 st each side of marker. Repeat the inc on every 4-4-4 (5-6) round a total of 8-8-12 (12-12) times = 52-56-64 (68-72) sts – incorporate inc sts in pattern as you go along. When piece measures approx 16-17-20 (24-28) cm - adjust to the same row in M.2 as on body piece – cast off 7 sts mid under sleeve (= 4 sts after marker at beg of round and 3 sts before marker at the end of round) = 45-49-57 (61-65) sts left on needle. Cut the thread and put piece aside. Knit the other sleeve.

YOKE:
Slip sleeves on the same circular needle as body piece where cast off for armholes = 204-228-260 (284-308) sts. Insert a marker in all transitions between sleeves and body piece except by the left raglan at front (when jumper is worn).
READ ALL OF THE FOLLOWING SECTION BEFORE CONTINUING!
Continue back and forth on needle from the left raglan at front. Continue in M.2 - make sure stripes on sleeves and body piece match. Beg by casting off 3 sts at the beg of the next 2 rows (= raglan opening).
RAGLAN DEC:
Now dec 1 st with start from RS on each side of the 3 markers, at the same time dec 1 st at the beg and at the end of row (= 8 dec per row) – SEE DECREASING TIP!
Repeat the dec on every other row a total of 10-12-11 (12-14) times and then on every row: 6-6-11 (12-12) times.
After all dec are complete there are 70-78-78 (86-94) sts left on needle and piece measures approx 28-30-34 (38-42) cm from cast on row to the shoulder.
Now work shortened rows mid back as follows from RS – continue in the last colour and work shortened rows in this colour: work row to marker mid back, work 6-7-7 (8-9) sts past marker and turn piece (to avoid a hole slip first st as if to K and tighten thread). Work 12-14-14 (16-18) sts and turn piece, work 18-21-21 (24-27) sts and turn piece, work 24-28-28 (32-36) sts and turn piece. Now slip all sts on a stitch holder and work the raglan edges before the neckline.

RAGLAN EDGES:
Pick up approx 24 to 32 sts (divisible by 4) inside 1 edge st along the raglan opening on sleeve on needle size 2.5 mm with sea mist. Work rib with 1 edge st in garter st and K2 each side as seen from RS. When the edge measures 2 cm cast off with K over K and P over P.
Repeat along the raglan opening on front piece, but after 2 rows make 3 buttonholes evenly distributed (the last buttonhole is made on neckline). 1 BUTTONHOLE = cast off 2 sts and cast on 2 new sts on return row.

NECK:
Slip sts from stitch holder back on circular needle size 2.5 mm and pick up 5 sts on each front band with sea mist = 80-88-88 (96-104) sts. Work rib back and forth on needle from raglan opening as follows as seen from RS: 1 edge st in garter st, * K2/P2 *, repeat from *-* and finish with K2 and 1 edge st in garter st. AT THE SAME TIME after 2 rows make 1 buttonhole over the others on raglan edge. Cast off with K over K and P over P when neck measures 2 cm.

ASSEMBLY:
Sew openings under sleeves. Sew raglan edges tog at the bottom by opening towards the sleeve.
Sew on buttons.
-----------------------------------------------------------------
PANTS:

PATTERN:
See diagram M.1 – pattern worked in stocking st.
DECREASING TIP:
Dec as follows 3 sts before marker: K2 tog, K1.
Dec as follows after marker: K1, slip 1 st as if to K, K1, psso.
---------------------------------------------------------
---------------------------------------------------------
PANTS:
Worked in the round on needle from bottom up.

LEG:
LOOSELY cast on 52-56-60 (64-68) sts on double pointed needles size 2.5 mm with sea mist. Insert a marker at beg of round = inside of leg. K 1 round and continue in rib, K2/P2 in the round for 5-5-6 (6-6) cm. K 1 round and continue in M.1. REMEMBER THE KNITTING TENSION! After M.1 continue in off-white and stocking st. AT THE SAME TIME on first round after M.1 inc 1 st on each side of marker. Repeat the inc on every 3-4-5 (8-12) round a total of 10-11-10 (9-8) times = 72-78-80 (82-84) sts. When piece measures 16-19-22 (27-33) cm (inc are now complete) divide piece on the inside of leg and complete piece back and forth on needle (to make it easier to slip both legs on the same circular needle afterwards). Cast on 1 new st each side for seam = 74-80-82 (84-86) sts. When piece measures 18-21-24 (29-35) cm cast off 3 sts at the beg of the next 2 rows with start from RS = 68-74-76 (78-80) sts. Put piece aside and knit the other leg.

PANTS:
Slip legs on the same circular needle size 2.5 mm = 136-148-152 (156-160) sts – beg of round = mid back. Insert a marker mid front. Continue in the round on needle with off-white and stocking st, AT THE SAME TIME dec 1 st on each side of marker mid front – SEE DECREASING TIP. Repeat the dec on every other round a total of 5-8-7 (6-5) times = 126-132-138 (144-150) sts. When piece measures 32-38-42 (48-55) cm adjust no of sts on round to 124-132-140 (144-152) sts. Now work shortened rows mid back as follows: Work 12 sts from beg of round, turn piece (to avoid a hole slip first st as if to K and tighten thread). Work 24 sts and turn piece, work 36 sts and turn, work 48 sts and turn. Continue like this by working 12 more sts before each turn another 6-6-6 (8-8) times. Now work M.1 on all sts, but work the pattern from top down in diagram. After M.1 continue in sea mist and stocking st. When piece measures 36-42-46 (52-59) cm work next round as follows: * K2 tog, 1 YO *, repeat from *-* (= folding edge). Work 2 cm stocking st and cast off loosely.

ASSEMBLY:
Sew tog split on the inside of each leg inside 1 edge st. Sew tog opening between legs. Fold the top towards WS along folding edge and fasten to WS but leave a small opening and insert the elastic.
--------------------------------------------------------------------

SOCK:

PATTERN:
See diagram M.1 – pattern worked in stocking st.
HEEL DECREASES:
ROW 1 (= RS): Work row until 6-6-6 (7-8) sts remain, slip next st as if to K, K1, psso, turn piece.
ROW 2 (= WS): Work row until 6-6-6 (7-8) sts remain, slip next st as if to P, P1, psso, turn piece.
ROW 3 (= RS): Work row until 5-5-5 (6-7) sts remain, slip next st as if to K, K1, psso, turn piece.
ROW 4 (= WS): Work row until 5-5-5 (6-7) sts remain, slip next st as if to P, P1, psso, turn piece.
Continue dec like this with 1 less st before each dec until there are 8-10-10 (10-12) sts on needle.
DECREASING TIP:
Dec as follows before marker: K2 tog.
Dec as follows after marker: Slip 1 st as if to K, K1, psso.
---------------------------------------------------------
---------------------------------------------------------
SOCK:
Cast on 48-52-52 (56-60) sts on double pointed needles size 2.5 mm with sea mist. Work rib, K2/P2 for 5-6-6 (7-7) cm. K 1 round, AT THE SAME TIME dec 12 sts evenly = 36-40-40 (44-48) sts. Continue in M.1. After M.1 continue in off-white and stocking st. When piece measures 7-8-8 (9-9) cm keep the first 18-20-20 (22-26) sts on needle for heel and slip the remaining 18-20-20 (22-22) sts on a stitch holder (= upper foot). Work stocking st back and forth on needle on heel sts for 3-3.5-4 (4-4.5) cm – insert 1 marker. Now work HEEL DECREASES – SEE ABOVE! After heel dec pick up 8-9-10 (10-11) sts each side of heel and slip sts from stitch holder back on needle = 42-48-50 (52-56) sts. Continue in the round in stocking st. AT THE SAME TIME on first round dec 1 st before the 18-20-20 (22-22) sts on upper foot by K2 tog, and dec 1 st after the 18-20-20 (22-22) sts on upper foot by slipping 1 st as if to K, K1 and psso. Repeat the dec on every other round a total of 3-6-7 (5-7) times = 36-36-36 (42-42) sts. Continue until sock measures 7-8-9 (10-12) cm from marker on heel, change to sea mist and continue in stocking st. When sock measures 8-9-10 (12-14) cm from marker on heel insert 1 new marker each side of piece (= 18-18-18 (21-21) sts on upper foot and under foot between markers). Now dec 1 st on each side of both markers – SEE DECREASING TIP. Repeat the dec on every round a total of 7-7-7 (8-8) times = 8-8-8 (10-10) sts left on needle. Cut the thread, pull it through remaining sts, tighten and fasten. Sock measures approx 10-11-12 (14-16) cm.

Diagram

symbols = off-white
symbols = sea mist
diagram
diagram

Each of our patterns has specific tutorial videos to help you.

Do you have a question? See a list of frequently asked questions (FAQ)

Knitting tension is what determines the final measurements of your work, and is usually measured per 10 x 10 cm. It is provided like so: number of stitches in width x number of rows in height - eg: 19 stitches x 26 rows = 10 x 10 cm.

The knitting tension is very individual; some people knit/crochet loosely while others work tightly. You adjust the knitting tension with the needle size, which is why the suggested needle size is only meant as a guide! You need to adjust this (up or down) to ensure that YOUR knitting tension matches the knitting tension provided in the pattern. If you work with a different knitting tension than provided you will have a different yarn consumption, and your work will have different measurements than what the pattern suggests.

The knitting tension also determines which yarns can replace each other. As long as you achieve the same knitting tension you can replace one yarn with another.

See DROPS lesson: How to measure your tension/gauge

See DROPS video: How to make a gauge tension swatch

The required amount of yarn is provided in grams, eg: 450 g. To calculate how many balls you’ll need you first need to know how many grams are in 1 ball (25g, 50g or 100g). This information is available if you click on the individual yarn quality on our pages. Divide the amount required with the amount of each ball. For example, if each ball is 50g (the most common amount), the calculation will be as follows: 450 / 50 = 9 balls.

The important thing when changing from one yarn to another is that the knitting/crochet tension remains the same. This is so that the measurements of the finished piece will be the same as on the sketch provided. It is easier to achieve the same knitting tension using yarns from the same yarn group. It is also possible to work with multiple strands of a thinner yarn to achieve the knitting tension of a thicker one. Please try our yarn converter. We recommend you to always work a test swatch.

Please NOTE: when changing yarn the garment might have a different look and feel to the garment in the photo, due to individual properties and qualities of each yarn.

See DROPS lesson: Can I use a different yarn than the one mentioned in the pattern?

All our yarns are categorised into yarn groups (from A to F) according to thickness and knitting tension – group A contains the thinnest yarns and group F the thickest. This makes it easier for you to find alternative yarns to our patterns, should you wish to switch yarn. All yarns within the same group have a similar knitting tension and can easily replace each other. However, different yarn qualities have different structures and properties which will give the finished work a unique look and feel.

Click here for an overview of the yarns in each yarn group

At the top of all our patterns you’ll find a link to our yarn calculator, which is a helpful tool should you wish to use a different yarn than suggested. By filling in the yarn quality you wish to replace, the amount (in your size) and number of strands, the calculator will present good alternative yarns with the same knitting tension. Additionally it will tell you how much you’ll require in the new qualities and whether you’ll need to work with multiple strands. Most skeins are 50g (some are 25g or 100g).

If the pattern is worked with multiple colours, every colour will have to be calculated separately. Similarly, if the pattern is worked with several strands of different yarns (for example 1 strand Alpaca and 1 strand Kid-Silk) you will have to find alternatives for each, individually.

Click here to see our yarn calculator

Since different yarns have different qualities and textures we have chosen to keep the original yarn in our patterns. However, you can easily find options among our available qualities by using our yarn calculator, or simply pick a yarn from the same yarn group.

It is possible that some retailers still have discontinued yarns in stock, or that someone has a few skeins at home that they would like to find patterns for.

The yarn calculator will provide both alternative yarn as well as required amount in the new quality.

If you think it's hard to decide what size to make, it can be a good idea to measure a garment you own already and like the size of. Then you can pick the size by comparing those measures with the ones available in the pattern's size chart.

You'll find the size chart at the bottom of the pattern.

See DROPS lesson: How to read size chart

The needle size provided in the pattern serves only as a guide, the important thing is to follow the knitting tension. And since knitting tension is very individual, you will have to adjust the needle size to ensure that YOUR tension is the same as in the pattern – maybe you’ll have to adjust 1, or even 2 needle sizes, up or down to achieve the correct tension. For this, we recommend that you work test swatches.

Should you work with a different knitting tension than the one provided, the measurements of the finished garment might deviate from the measurement sketch.

See DROPS lesson: How to measure your tension/gauge

See DROPS video: How to make a tension/gauge swatch

Working a garment top-down provides more flexibility and room for personal adjustment. For example it is easier to try the garment on while working, as well as making adjustments to length of yoke and shoulder caps.

The instructions are carefully explaining every step, in the correct order. Diagrams are adjusted to the knitting direction and are worked as usual.

The diagram depicts all rows/rounds, and every stitch seen from the right side. It is read from bottom to top, from right to left. 1 square = 1 stitch.

When working back and forth, every other row is worked from the right side and every other row is worked from the wrong side. When working from the wrong side, the diagram will have to be worked reversed: from left to right, knit stitches are purled, purl stitches are knit etc.

When working in the round every round is worked from the right side and the diagram are worked from right to left on all rounds.

See DROPS lesson: How to read knitting diagrams

The diagram depicts all rows/rounds, and every stitch seen from the right side. It is worked from bottom to top, from right to left.

When working back and forth every other row is worked from the right side: from right to left and every other row is worked from the wrong side: from left to right.

When working in the round, every row in the diagram are worked from the right side, from right to left.

When working a circular diagram you start in the middle and work your way outwards, counter clockwise, row by row.

The rows usually start with a given number of chain stitches (equivalent to the height of the following stitch), this will either be depicted in the diagram or explained in the pattern.

See DROPS lesson: How to read crochet diagrams

Instructions for working several diagrams after each other on the same row/round, will often be written like so: “work A.1, A.2, A.3 a total of 0-0-2-3-4 times". This means you work A.1 once, then A.2 is worked once, and A.3 is repeated (in width) the number of times provided for your size – in this case like so: S = 0 times, M = 0 times, L=2 times, XL= 3 times and XXL = 4 times.

The diagrams are worked as usual: begin with the first row in A.1, then work the first row in A.2 etc.

See DROPS lesson: How to read knitting diagrams

See DROPS lesson: How to read crochet diagrams

The total width of the garment (from wrist-to-wrist) will be larger in the larger sizes, despite the actual sleeves being shorter. The larger sizes have longer sleeve caps and wider shoulders, so there will be a good fit in all sizes.

The measurement sketch/schematic drawing provides information regarding the full length of the garment. If it’s a jumper or a jacket the length is measured from the highest point on the shoulder closest to the neckline, and straight down to the bottom of the garment. It is NOT measured from the tip of shoulder. Similarly, the length of yoke is measured from the highest point on the shoulder and down to where yoke is split into body and sleeves.

On a jacket measures are never taken along bands, unless specifically stated. Always measure inside band stitches when measuring the length.

See DROPS lesson: How to read a schematic drawing

Diagrams are often repeated on the round or in height. 1 repeat is the diagram the way it appears in the pattern. If it says to work 5 repeats of A.1 in the round, then you work A.1 a total of 5 times after/next to each other in the round. If it says to work 2 repeats of A.1 vertically/in height you work the entire diagram once, then begin again at the start and work the entire diagram one more time.

Chain stitches are slightly narrower than other stitches and to avoid working the cast-on edge too tight, we simply chain more stitches to begin with. The stitch count will be adjusted on the following row to fit the pattern and measurement sketch.

The rib edge is more elastic and will contract slightly compared to, for example, stocking stitch. By increasing before the rib edge, you avoid a visible difference in width between the rib edge and the rest of the body.

It’s very easy to cast off too tightly, and by making yarn overs while casting off (and simultaneously casting these off) you avoid a too tight cast off edge.

See DROPS video: How to bind off with yarn overs (yo)

To achieve an even increase (or decrease) you can increase on, for example: every 3rd and 4th row alternately, like so: work 2 rows and increase on the 3rd row, work 3 rows and increase on the 4th. Repeat this until the increase is complete.

See DROPS lesson: Increase or decrease 1 st on every 3rd and 4th row alternately

Should you prefer to work in the round instead of back and forth, you may of course adjust the pattern. You’ll need to add steeks mid-front (usually 5 stitches), and follow the instructions. When you would normally turn and work from the wrong side, simply work across the steek and continue in the round. At the end you’ll cut the piece open, pick up stitches to work bands, and cover the cut edges.

See DROPS video: How to knit steeks and cut open

Should you prefer to work back and forth instead of in the round, you may of course adjust the pattern so you work the pieces separately and then assemble them at the end. Divide the stitches for the body in 2, add 1 edge stitch in each side (for sewing) and work the front and back pieces separately.

See DROPS lesson: Can I adapt a pattern for circular needles into straight needles?

Pattern repeats can vary slightly in the different sizes, in order to get the correct proportions. If you’re not working the exact same size as the garment in the photo, yours might deviate slightly. This has been carefully developed and adjusted so that the complete impression of the garment is the same in all sizes.

Make sure to follow instructions and diagrams for your size!

If you have found a pattern you like which is available in women’s size it’s not very difficult to convert it to men’s size. The biggest difference will be the length of sleeves and body. Start working on the women size that you think would fit across the chest. The additional length will be worked right before you cast off for the armhole/sleeve cap. If the pattern is worked top-down you can add the length right after the armhole or before the first decrease on sleeve.

Regarding additional yarn amount, this will depend on how much length you add, but it is better with a skein too many than too few.

All yarns will have excess fibres (from production) that might come off as lint or shedding. Brushed yarns (ie hairier yarns) have more of these loose, excess fibres, causing more shedding.

Shedding also depends on what is worn under or over the garment, and whether this pulls at the yarn fibres. It’s therefore not possible to guarantee that there will be no shedding

Below are some tips on how to get the best result when working with hairier yarns:

1. When the garment is finished (before you wash it) shake it vigorously so the looser hairs come off. NOTE: do NOT use a lint roller, brush or any method that pulls at the yarn.

2. Place the garment in a plastic bag and put it in your freezer - the temperature will cause the fibres to become less attached to each other, and excess fibres will come off easier.

3. Leave in the freezer for a few hours before taking it out and shaking it again.

4. Wash the garment according to the instructions on the yarn label.

Pilling is a natural process that happens to even the most exclusive of fibers. It's a natural sign of wear and tear that is hard to avoid, and that is most visible in high friction areas of your garment like a sweater's arms and cuffs.

You can make your garment look as new by removing the pilling, using a fabric comb or a pill/lint remover.

Still can't find the answer you need? Then scroll down and leave your question so one of our experts can try to help you. This will be done normally within 5 to 10 working days.
In the meantime, you can read the questions and answers that others have left to this pattern or join the DROPS Workshop on Facebook to get help from fellow knitters/crocheters!

You might also like...

Hello Stripes!

Elin, Sweden

Hello Stripes

Ülle Grünberg, Estonia

b19-3 Hello Stripes

Liesbeth, Netherlands

Hello Stripes

Aleksandra Strugacz, Norway

Post a comment to pattern DROPS Baby 19-3

We would love to hear what you have to say about this pattern!

If you want to leave a question, please make sure you select the correct category in the form below, to speed up the answering process. Required fields are marked *.

Comments / Questions (47)

country flag Michaela wrote:

Bei den Ärmeln steht "die neuen M. werden ins Muster eingestrickt", das verstehe ich nicht. Stricke ich mit den neuen Maschen das Muster einfach weiter? Dann verschiebt es sich ja, oder? Oder wie ist das zu verstehen? Danke!

18.07.2016 - 22:12

DROPS Design answered:

Liebe Michaela, das Muster soll sich nicht verschieben, sondern die zugenommenen Maschen werden ins Muster integiert, also hinten angehängt oder vorne so gestrickt, dass es dann passend im Muster weitergeht.

19.07.2016 - 15:29

country flag Ingeborg Schmidt wrote:

Ist der Pullover nicht 3-farbig mit wechselnden Mustern? Hier sind nur 2 Farben mit einem Muster angegeben. Mit freundlichen Grüßen Ingeborg Schmidt

27.04.2016 - 10:55

DROPS Design answered:

Liebe Ingeborg, die verschiedenen Farben, die Sie sehen kommen von dem mehrfarbigen Garn Fabel 910, sea mist.

28.04.2016 - 09:55

country flag Maren wrote:

Hallo, mir scheint die deutsche Übersetzung fehlerhaft. Denn bei den Tipps zur Abnahme fehlt die Angabe von zwei linken Maschen nach den zwei links verschränkt zusammengestrickten Maschen. Zwischen den beiden fehlenden Maschen müsste dann auch der Markierungsfaden liegen.

22.10.2015 - 11:13

DROPS Design answered:

Sie haben Recht, das wird umgehend korrigiert, danke für den Hinweis und weiterhin gutes Gelingen!

30.10.2015 - 12:37

country flag Josefine Graef wrote:

Er dette en fejl? Jeg forstår ikke dette i opskriften til trøjen: Under afsnittet BÆRESTK står der, at man først skal tage ind på hveranden pind - det giver mening. Men derefter står der, at man skal tage ind på HVER pind. Eftersom man strikker frem og tilbage på dette stykke, betyder det jo, at der skal tages ind på vrangpinden. Er dette virkelig rigtigt? I givet fald passer det ikke med de de angivne indtagningstips.

24.06.2015 - 09:58

DROPS Design answered:

Hej. Det er riktigt. Under "INTAGELSETIPS" har du förklaring både fra retsidan og vrangen. God fornøjelse!

24.06.2015 - 14:09

country flag Barbro wrote:

Fabel Sea mist är ju mångfärgat!

28.04.2015 - 19:54

country flag Ruth E. Vik wrote:

I denne oppskriften og diagramforklaringen er kun oppgitt to garnfarger, men i genseren er det jo flere farger. Har jeg oversett noe, eller mangler det noe i oppskriften?

28.04.2015 - 18:57

DROPS Design answered:

Hej Ruth. Fabel Sea Mist er mangefarvet - se ogsaa garnkortet her

29.04.2015 - 13:31

country flag Aleksandra wrote:

Hei jeg har strikket en, nå på pinner andre genser, men annet farge :-)

15.04.2015 - 17:43

country flag Gitte Jakobsen wrote:

Bukser: jeg lukker 2x3 masker på det første strikkede ben, når jeg strikker det andet skal de seks masker så lukkes fra vrangen eller akkurat som det første ben.

08.11.2014 - 17:03

DROPS Design answered:

Hej Gitte, Det andet ben strikker du på nøjagtig samme måde. God fornøjelse!

25.11.2014 - 09:41

country flag Kari Anne wrote:

Hei! Har laget genseren og er super fornøyd :) Jeg er i gang med buksene og har problemer med å forstå slutten av benet, hvor jeg skal felle 3 masker på to neste p med start fra retten. Totalt felle 6. Kan du utdype? Jeg forstår ikke når jeg skal felle. Ellers takk for supre oppskrifter!:)

13.09.2014 - 20:41

DROPS Design answered:

Hej Kari, Du har delt arbejdet og strikker nu frem og tilbage fra indersiden af benet. Nu skal du lukke 3 m af i hver side af arbejdet (hvilket du gør i begyndelsen af de 2 næste pinde. Læg arb til side og strik det andet ben.

17.09.2014 - 08:30

country flag Lena wrote:

Co.lour 910 is "printed" = many-coloured

02.06.2014 - 13:21