DROPS Baby Merino
DROPS Baby Merino
100% Wool
from 3.50 £ /50g
Get the yarn to make this pattern from 24.50£.

The yarn cost is calculated from the pattern’s smallest size and the yarn’s cheapest product type. Looking for an even better price? You might find it on the DROPS Deals!

DROPS SS24

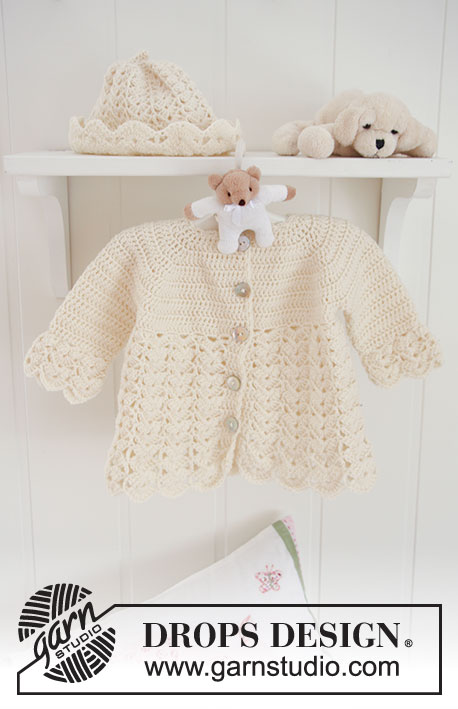
Sweet Buttercup Blanket

Set of crochet blanket with wide edge in fan pattern and hat for baby and children in DROPS BabyMerino. Theme: Baby blanket

DROPS Baby 19-6
DROPS design: Pattern no BM-009-by-BM-011-by
---------------------------------------------------------
BLANKET:
Measurements: approx 66 x 80 cm.
Materials: DROPS BABY MERINO from Garnstudio
300 g colour no 02, off-white

DROPS CROCHET HOOK size 3.5 mm – or size needed to get 5.5 tr-groups = width 10 cm.
---------------------------------------------------------
HAT:
Size: 1/3 - 6/9 - 12/18 months (2/4) years
Head circumference:
40/42 - 44/46 - 46/48 (48/52) cm
Materials: DROPS BABY MERINO from Garnstudio
50 g for all sizes colour no 02, off-white

DROPS CROCHET HOOK size 3.5 mm – or size needed to get 1 fan = width 3 cm.

-------------------------------------------------------

Alternative Yarn – See how to change yarns here
Yarn Groups A to F – Use the same pattern and change the yarn here
Yarn usage using an alternative yarn – Use our yarn converter here

-------------------------------------------------------

DROPS Baby Merino
DROPS Baby Merino
100% Wool
from 3.50 £ /50g
Get the yarn to make this pattern from 24.50£.

The yarn cost is calculated from the pattern’s smallest size and the yarn’s cheapest product type. Looking for an even better price? You might find it on the DROPS Deals!

Pattern instructions

NOTE: This pattern is written in British English. All measurements in charts are in cm. For conversion from cm to inches - click here. There are different terms for crocheting in British and American English. If this pattern includes crochet, click for "crochet terms" here. For this pattern in American English, please click here.
BLANKET:

First crochet the blanket in tr-groups and then crochet a wide border in fan pattern round the whole blanket.

Crochet 119 LOOSE ch (includes 3 ch to turn with) with crochet hook size 3.5 mm and Baby Merino.
ROW 1: Crochet 4 tr in 6th ch from hook, * skip 4 ch, 4 tr in next ch, *, repeat from *-* a total of 22 times, skip 2 ch and finish with 1 tr in last ch = 23 tr-groups on row, turn piece.
ROW 2: 3 ch, then 4 tr between the 2 middle tr in each tr-group, finish with 1 tr in 3rd ch from beg of previous row, turn piece.
Repeat row 2 until blanket measures approx 56 cm.

BORDER WITH FAN PATTERN:
ROUND 1: Crochet 1 round with ch-loops round the whole blanket as follows – beg in a corner: 1 sl st in corner, 3 ch, 1 dc in the same st, 2 ch, 1 dc in the same st, 2 ch, 1 dc in the same st (= 3 ch-loops in corner), * 2 ch, skip approx 1-1.5 cm, 1 dc in next st *, repeat from *-* to the next corner, in corner crochet: 2 ch, 1 dc in corner, 2 ch, 1 dc in the same st, 2 ch, 1 dc in the same st, continue along the next side – NOTE: There should be approx 29 ch-loops along both the short sides and approx 37 ch-loops along both the long sides and 3 ch-loops in each corner, i.e. the number of ch-loops between each corner must be divisible by 2 + 1 (= an uneven no of ch-loops). Finish round with 2 ch and 1 sl st in first ch from beg of round.

ROUND 2: 1 sl st in first ch-loop in corner, 3 ch, 1 tr in the same ch-loop, 1 ch, 2 tr in the same ch-loop, * 1 tr in next dc, 2 tr + 1 ch + 2 tr in next ch-loop in corner *, repeat from *-* one more time (= 3 ”fans” in corner), * 1 tr in next ch-loop, 3 tr + 1 ch + 3 tr in next ch-loop *, repeat from *-* until 1 ch-loop before the 3 loops in corner remain, 1 tr in this loop, 2 tr + 1 ch + 2 tr in first ch-loop in corner, 1 tr in next dc, 2 tr + 1 ch + 2 tr in next ch-loop in corner, 1 tr in next dc, 2 tr + 1 ch + 2 tr in last ch-loop in corner (there are now 3 fans in corner), 1 tr in next ch-loop, 3 tr + 1 ch + 3 tr in next ch-loop, continue in the same way round the whole blanket and finish with 1 sl st in 3rd ch from beg of round.

ROUND 3 +4: Crochet sl sts to the beg of first ch-loop (= ch-loop between the 4 tr), 3 ch, 2 tr in the same ch-loop, 1 ch, 3 tr in the same ch-loop, * 1 tr in tr from previous round, 3 tr + 1 ch + 3 tr in next ch-loop *, repeat from *-* and finish with 1 tr in last tr and 1 sl st in 3rd ch from beg of round.

ROUND 5 + 6: Crochet sl sts to the beg of first ch-loop (= ch-loop between the 6 tr), 3 ch, 3 tr in the same ch-loop, 1 ch, 4 tr in the same ch-loop, * 1 tr in tr from previous round, 4 tr + 1 ch + 4 tr in next ch-loop *, repeat from *-* and finish with 1 tr in last tr and 1 sl st in 3rd ch from beg of round.

ROUND 7: Like round 6 but crochet 2 ch in stead of 1 ch between each tr-group.

ROUND 8-10: Crochet sl sts to the beg of first ch-loop (= ch-loop between the 8 tr), 4 ch, 3 dtr in the same ch-loop, 2 ch, 4 dtr in the same ch-loop, * 1 dtr in tr/dtr from previous round, 4 dtr + 2 ch + 4 dtr in next ch-loop *, repeat from *-* and finish with 1 dtr in last tr/dtr and 1 sl st in 4th ch from beg of round.
Cut the thread and fasten after round 10, border measures approx 12 cm.
----------------------------------------------------------------------
HAT:

CROCHET INFO:
Replace first dc on row with 1 ch and finish each round with 1 sl st in ch from beg of round.
---------------------------------------------------------
---------------------------------------------------------
Hat crochet from the top down.

Crochet 4 ch with crochet hook size 3.5 mm with Baby Merino and form a ring with 1 sl st in first ch.
ROUND 1: Crochet 6 dc in ring – See CROCHET INFO.
ROUND 2-4: 1 dc in each dc = 6 dc.
ROUND 5: 2 dc in each dc = 12 dc.
ROUND 6: 2 dc in each dc = 24 dc.
ROUND 7: * 1 dc in first dc, 2 dc in next dc *, repeat from *-* = 36 dc.
ROUND 8: * 1 dc in each of the first 2 dc, 2 dc in next dc *, repeat from *-* = 48 dc.
ROUND 9: * 1 dc in each of the first 3 dc, 2 dc in next dc *, repeat from *-* = 60 dc.
ROUND 10: 3 ch, * skip 2 dc (skip 1 dc instead of 2 dc at regular intervals a total of 6-12-18 (24) times), 1 dc in next dc, 2 ch *, repeat from *-* so that you end up with 22-24-26 (28) ch-loops, finish with 1 sl st in ch from beg of round.
ROUND 11: Crochet sl sts to the middle of the first ch-loop, 1 ch, * 2 tr + 1 ch + 2 tr in next ch-loop, 1 dc in next ch-loop *, repeat from *-* and finish with 2 tr + 1 ch + 2 tr in the last ch-loop and 1 sl st in ch from beg of round = 11-12-13 (14) fans.
ROUND 12-15: 3 ch, * 3 tr + 1 ch + 3 tr in the middle of next tr-group (i.e. in ch at the top of fan), 1 tr in dc/tr from previous round *, repeat from *-* and finish with 3 tr + 1 ch + 3 tr in the middle of the last tr-group and 1 sl st in 3rd ch from beg of round.
ROUND 16: 3 ch, * 3 tr + 2 ch + 3 tr in the middle of next tr-group, 1 tr in tr from previous round *, repeat from *-* and finish with 3 tr + 2 ch + 3 tr in the middle of the last tr-group and 1 sl st in 3rd ch from beg of round.
ROUND 17: 3 ch, * 4 tr + 2 ch + 4 tr in the middle of next tr-group, 1 tr in tr from previous round *, repeat from *-* and finish with 4 tr + 2 ch + 4 tr in the middle of the last tr-group and 1 sl st in 3rd ch from beg of previous round.
Repeat ROUND 17 until hat measures approx 10-11-12 (13) cm from the top of head.
CROCHET NEXT ROUND AS FOLLOWS:
4 ch, * 4 dtr + 2 ch + 4 dtr in the middle of next tr-group, 1 dtr in tr from previous round *, repeat from *-* and finish with 4 dtr + 2 ch + 4 dtr in the middle of the last tr-group and 1 sl st in 4th ch from beg of round.
Repeat this round until hat measures approx 14-15-16 (18) cm from the top of head. Cut and fasten thread.
-------------------------------------------------------------

This pattern has been corrected.

Updated online: 12.08.2010
HAT: ...ROUND 10: 3 ch, * skip 2 dc (skip 1 dc instead of 2 dc at regular intervals a total of 6-12-18 (24) times), 1 dc in next dc, 2 ch *, repeat from *-* so that you end up with 22-24-26 (28) ch-loops, finish with 1 sl st in ch from beg of round.
Do you have a question? See a list of frequently asked questions (FAQ)

Knitting tension is what determines the final measurements of your work, and is usually measured per 10 x 10 cm. It is provided like so: number of stitches in width x number of rows in height - eg: 19 stitches x 26 rows = 10 x 10 cm.

The knitting tension is very individual; some people knit/crochet loosely while others work tightly. You adjust the knitting tension with the needle size, which is why the suggested needle size is only meant as a guide! You need to adjust this (up or down) to ensure that YOUR knitting tension matches the knitting tension provided in the pattern. If you work with a different knitting tension than provided you will have a different yarn consumption, and your work will have different measurements than what the pattern suggests.

The knitting tension also determines which yarns can replace each other. As long as you achieve the same knitting tension you can replace one yarn with another.

See DROPS lesson: How to measure your tension/gauge

See DROPS video: How to make a gauge tension swatch

The required amount of yarn is provided in grams, eg: 450 g. To calculate how many balls you’ll need you first need to know how many grams are in 1 ball (25g, 50g or 100g). This information is available if you click on the individual yarn quality on our pages. Divide the amount required with the amount of each ball. For example, if each ball is 50g (the most common amount), the calculation will be as follows: 450 / 50 = 9 balls.

The important thing when changing from one yarn to another is that the knitting/crochet tension remains the same. This is so that the measurements of the finished piece will be the same as on the sketch provided. It is easier to achieve the same knitting tension using yarns from the same yarn group. It is also possible to work with multiple strands of a thinner yarn to achieve the knitting tension of a thicker one. Please try our yarn converter. We recommend you to always work a test swatch.

Please NOTE: when changing yarn the garment might have a different look and feel to the garment in the photo, due to individual properties and qualities of each yarn.

See DROPS lesson: Can I use a different yarn than the one mentioned in the pattern?

All our yarns are categorised into yarn groups (from A to F) according to thickness and knitting tension – group A contains the thinnest yarns and group F the thickest. This makes it easier for you to find alternative yarns to our patterns, should you wish to switch yarn. All yarns within the same group have a similar knitting tension and can easily replace each other. However, different yarn qualities have different structures and properties which will give the finished work a unique look and feel.

Click here for an overview of the yarns in each yarn group

At the top of all our patterns you’ll find a link to our yarn calculator, which is a helpful tool should you wish to use a different yarn than suggested. By filling in the yarn quality you wish to replace, the amount (in your size) and number of strands, the calculator will present good alternative yarns with the same knitting tension. Additionally it will tell you how much you’ll require in the new qualities and whether you’ll need to work with multiple strands. Most skeins are 50g (some are 25g or 100g).

If the pattern is worked with multiple colours, every colour will have to be calculated separately. Similarly, if the pattern is worked with several strands of different yarns (for example 1 strand Alpaca and 1 strand Kid-Silk) you will have to find alternatives for each, individually.

Click here to see our yarn calculator

Since different yarns have different qualities and textures we have chosen to keep the original yarn in our patterns. However, you can easily find options among our available qualities by using our yarn calculator, or simply pick a yarn from the same yarn group.

It is possible that some retailers still have discontinued yarns in stock, or that someone has a few skeins at home that they would like to find patterns for.

The yarn calculator will provide both alternative yarn as well as required amount in the new quality.

If you think it's hard to decide what size to make, it can be a good idea to measure a garment you own already and like the size of. Then you can pick the size by comparing those measures with the ones available in the pattern's size chart.

You'll find the size chart at the bottom of the pattern.

See DROPS lesson: How to read size chart

The needle size provided in the pattern serves only as a guide, the important thing is to follow the knitting tension. And since knitting tension is very individual, you will have to adjust the needle size to ensure that YOUR tension is the same as in the pattern – maybe you’ll have to adjust 1, or even 2 needle sizes, up or down to achieve the correct tension. For this, we recommend that you work test swatches.

Should you work with a different knitting tension than the one provided, the measurements of the finished garment might deviate from the measurement sketch.

See DROPS lesson: How to measure your tension/gauge

See DROPS video: How to make a tension/gauge swatch

Working a garment top-down provides more flexibility and room for personal adjustment. For example it is easier to try the garment on while working, as well as making adjustments to length of yoke and shoulder caps.

The instructions are carefully explaining every step, in the correct order. Diagrams are adjusted to the knitting direction and are worked as usual.

The diagram depicts all rows/rounds, and every stitch seen from the right side. It is read from bottom to top, from right to left. 1 square = 1 stitch.

When working back and forth, every other row is worked from the right side and every other row is worked from the wrong side. When working from the wrong side, the diagram will have to be worked reversed: from left to right, knit stitches are purled, purl stitches are knit etc.

When working in the round every round is worked from the right side and the diagram are worked from right to left on all rounds.

See DROPS lesson: How to read knitting diagrams

The diagram depicts all rows/rounds, and every stitch seen from the right side. It is worked from bottom to top, from right to left.

When working back and forth every other row is worked from the right side: from right to left and every other row is worked from the wrong side: from left to right.

When working in the round, every row in the diagram are worked from the right side, from right to left.

When working a circular diagram you start in the middle and work your way outwards, counter clockwise, row by row.

The rows usually start with a given number of chain stitches (equivalent to the height of the following stitch), this will either be depicted in the diagram or explained in the pattern.

See DROPS lesson: How to read crochet diagrams

Instructions for working several diagrams after each other on the same row/round, will often be written like so: “work A.1, A.2, A.3 a total of 0-0-2-3-4 times". This means you work A.1 once, then A.2 is worked once, and A.3 is repeated (in width) the number of times provided for your size – in this case like so: S = 0 times, M = 0 times, L=2 times, XL= 3 times and XXL = 4 times.

The diagrams are worked as usual: begin with the first row in A.1, then work the first row in A.2 etc.

See DROPS lesson: How to read knitting diagrams

See DROPS lesson: How to read crochet diagrams

The total width of the garment (from wrist-to-wrist) will be larger in the larger sizes, despite the actual sleeves being shorter. The larger sizes have longer sleeve caps and wider shoulders, so there will be a good fit in all sizes.

The measurement sketch/schematic drawing provides information regarding the full length of the garment. If it’s a jumper or a jacket the length is measured from the highest point on the shoulder closest to the neckline, and straight down to the bottom of the garment. It is NOT measured from the tip of shoulder. Similarly, the length of yoke is measured from the highest point on the shoulder and down to where yoke is split into body and sleeves.

On a jacket measures are never taken along bands, unless specifically stated. Always measure inside band stitches when measuring the length.

See DROPS lesson: How to read a schematic drawing

Diagrams are often repeated on the round or in height. 1 repeat is the diagram the way it appears in the pattern. If it says to work 5 repeats of A.1 in the round, then you work A.1 a total of 5 times after/next to each other in the round. If it says to work 2 repeats of A.1 vertically/in height you work the entire diagram once, then begin again at the start and work the entire diagram one more time.

Chain stitches are slightly narrower than other stitches and to avoid working the cast-on edge too tight, we simply chain more stitches to begin with. The stitch count will be adjusted on the following row to fit the pattern and measurement sketch.

The rib edge is more elastic and will contract slightly compared to, for example, stocking stitch. By increasing before the rib edge, you avoid a visible difference in width between the rib edge and the rest of the body.

It’s very easy to cast off too tightly, and by making yarn overs while casting off (and simultaneously casting these off) you avoid a too tight cast off edge.

See DROPS video: How to bind off with yarn overs (yo)

To achieve an even increase (or decrease) you can increase on, for example: every 3rd and 4th row alternately, like so: work 2 rows and increase on the 3rd row, work 3 rows and increase on the 4th. Repeat this until the increase is complete.

See DROPS lesson: Increase or decrease 1 st on every 3rd and 4th row alternately

Should you prefer to work in the round instead of back and forth, you may of course adjust the pattern. You’ll need to add steeks mid-front (usually 5 stitches), and follow the instructions. When you would normally turn and work from the wrong side, simply work across the steek and continue in the round. At the end you’ll cut the piece open, pick up stitches to work bands, and cover the cut edges.

See DROPS video: How to knit steeks and cut open

Should you prefer to work back and forth instead of in the round, you may of course adjust the pattern so you work the pieces separately and then assemble them at the end. Divide the stitches for the body in 2, add 1 edge stitch in each side (for sewing) and work the front and back pieces separately.

See DROPS lesson: Can I adapt a pattern for circular needles into straight needles?

Pattern repeats can vary slightly in the different sizes, in order to get the correct proportions. If you’re not working the exact same size as the garment in the photo, yours might deviate slightly. This has been carefully developed and adjusted so that the complete impression of the garment is the same in all sizes.

Make sure to follow instructions and diagrams for your size!

If you have found a pattern you like which is available in women’s size it’s not very difficult to convert it to men’s size. The biggest difference will be the length of sleeves and body. Start working on the women size that you think would fit across the chest. The additional length will be worked right before you cast off for the armhole/sleeve cap. If the pattern is worked top-down you can add the length right after the armhole or before the first decrease on sleeve.

Regarding additional yarn amount, this will depend on how much length you add, but it is better with a skein too many than too few.

All yarns will have excess fibres (from production) that might come off as lint or shedding. Brushed yarns (ie hairier yarns) have more of these loose, excess fibres, causing more shedding.

Shedding also depends on what is worn under or over the garment, and whether this pulls at the yarn fibres. It’s therefore not possible to guarantee that there will be no shedding

Below are some tips on how to get the best result when working with hairier yarns:

1. When the garment is finished (before you wash it) shake it vigorously so the looser hairs come off. NOTE: do NOT use a lint roller, brush or any method that pulls at the yarn.

2. Place the garment in a plastic bag and put it in your freezer - the temperature will cause the fibres to become less attached to each other, and excess fibres will come off easier.

3. Leave in the freezer for a few hours before taking it out and shaking it again.

4. Wash the garment according to the instructions on the yarn label.

Pilling is a natural process that happens to even the most exclusive of fibers. It's a natural sign of wear and tear that is hard to avoid, and that is most visible in high friction areas of your garment like a sweater's arms and cuffs.

You can make your garment look as new by removing the pilling, using a fabric comb or a pill/lint remover.

Still can't find the answer you need? Then scroll down and leave your question so one of our experts can try to help you. This will be done normally within 5 to 10 working days.
In the meantime, you can read the questions and answers that others have left to this pattern or join the DROPS Workshop on Facebook to get help from fellow knitters/crocheters!

You might also like...

Post a comment to pattern DROPS Baby 19-6

We would love to hear what you have to say about this pattern!

If you want to leave a question, please make sure you select the correct category in the form below, to speed up the answering process. Required fields are marked *.

Comments / Questions (48)

country flag Tina wrote:

Der står at række to på kanten, at der skal blive tre vifter i hvert hjørne, men det volder mig problemer. Hvis jeg får at vide hvor mange stangmasker (inkl. dem der er lavet af luftmasker) der skal være i alt, så kan jeg måske bedre forstå det. Jeg kan kun se at der bliver to vifter. Kan det lade sig gøre at se et billede af begyndelsen af kanten (evt bare hjørnet med vifterne) og ikke kun det der ligger på siden nu? Håber mit spørgsmål er til at forstå. Hilsen Tina

14.10.2013 - 15:13

DROPS Design answered:

Der skal være ca 29 lm-buer langs begge kortsider, ca 37 lm-buer langs begge langsider og 3 lm-buer i hvert hjørne, dvs 1 vifte i hver af de 3 lm-buer i hjørnerne.

15.10.2013 - 13:32

country flag Tina wrote:

Der står at tæppet bliver 66x80 cm. Nu har jeg hæklet to rækker. Hæklefastheden passer med det den skal. Hvis jeg strækker det meget, så bliver det 60 cm. Dertil kommer kant, så det er vel ok. I opskriften står så, at jeg skal hækle til arbejdet er 56 cm. i længden og DET forstår jeg ikke, når nu tæppet skal blive 80. Hvad er det mon jeg ikke forstår? Hjælp.

07.10.2013 - 20:10

DROPS Design answered:

Hej Tina. Du skal hækle en kant på 10 omg omkring hele tæppet, så det skal nok blive den rigtige størrelse

07.10.2013 - 20:45

country flag Katja wrote:

Leider versteht hier in allen Foren keiner die Anleitung in der 10. Runde, da der Text in der Klammer steht:(gleichmässig verteilt total 6-12-18 (24) Mal je 1 fM überspringen). Jetzt weiß keiner, ob mal 2 fM überspringen soll oder nur 1 fM, es wird angenommen die Zahlen bedeuten etwas wegen der Anzahl der Bögen. Soll man abwechselnd 2 fM und 1 fM überspringen? Es wäre toll, wenn es eine Zeichnung hierfür geben bzw. die Mütze vom oberen Teil besser sichtbar wäre auf dem Foto.

28.09.2013 - 23:23

DROPS Design answered:

Liebe Katja ja das war wirklich etwas unglücklich formuliert. Wir haben die 10. R jetzt überarbeitet.

30.09.2013 - 08:22

country flag Leslie K wrote:

In round 3 + 4 I feel like there is something missing from the instructions? I have just finished the ch3, 2 dc, ch 1, 3 dc in the top of the fan on the corned of the blanket but then it skips ahead to working in the previous rows 3dc clusters? should I slip stitch down the side of the fan until I reach the cluster? Not sure how to proceed. Thank you! *Leslie

08.06.2013 - 06:17

DROPS Design answered:

Dear Leslie, on round 3&4 you repeat : 3 dc + ch 1 + 3 dc in next ch-loop, 1 dc in dc from previous round around. Happy crocheting!

08.06.2013 - 10:06

Ana Labao wrote:

Pour la couverture, les 3e et 4e tour n'indique pas comment crocheter dans les coins. Pouvez-vous m'aider?

25.03.2013 - 00:31

DROPS Design answered:

Bonjour Madame Labao, au tour 2, vous avez crocheté 3 éventails dans les coins pour les arrondir, ainsi, les tours 3 et 4 se font comme indiqué, sans réel "coin". Bon crochet !

25.03.2013 - 12:01

country flag S Mouissie wrote:

119 L klopt dit? Ik kom niet uit met 22 groep stk. Is het eigenlijk 116L?(omdat er staat incl 3 L) En moeten de stk in de 4e L of in de 5e?

15.12.2012 - 22:38

DROPS Design answered:

Het klopt. Je hebt 119 l en haakt de eerste stk in de 6e l van de nld, dan 22 keer de stk groepen (4 l overslaan, stk in 1 l = 5 l x 22 = 110) en eindig met 2 l overslaan en 1 stk in de laatste l (= 3 l): 6 + 110 + 3 = 119 l.

19.12.2012 - 13:33

country flag Elfrid wrote:

Har heklet selve teppet, men sliter med oppskriften på kanten som skal hekles rundt teppet. Er det mulig å få et nærbilde av selve kantborden?

24.10.2012 - 06:19

DROPS Design answered:

Heisann. Det er nå lagt ut et nærbilde av heklekanten på teppet. mvh Drops design

24.10.2012 - 10:47

country flag LillySmuul wrote:

There is mistake on 10th round. ROUND 10: 3 ch, * skip 2 dc (skip 1 dc instead at regular intervals a total of 2-4-6 (8) times)... It should be (...total of 6-12-18 ( 24), otherwise it doesn't work out.

21.07.2010 - 13:48