
Categorias populares
Procura um fio?


Deixe um comentário acerca do modelo DROPS Baby 19-18
Gostaríamos muito de saber o que tem a dizer-nos acerca deste modelo!
Se deixar uma pergunta acerca do modelo, certifique-se de que escolhe a categoria adequada no formulário abaixo para acelerar o processo relativo à resposta. Os campos obrigatórios estão assinalados com um *.
|
||||||||||||||||||||||||||||||||||
Sweet Greta |
||||||||||||||||||||||||||||||||||
 |
 |
|||||||||||||||||||||||||||||||||
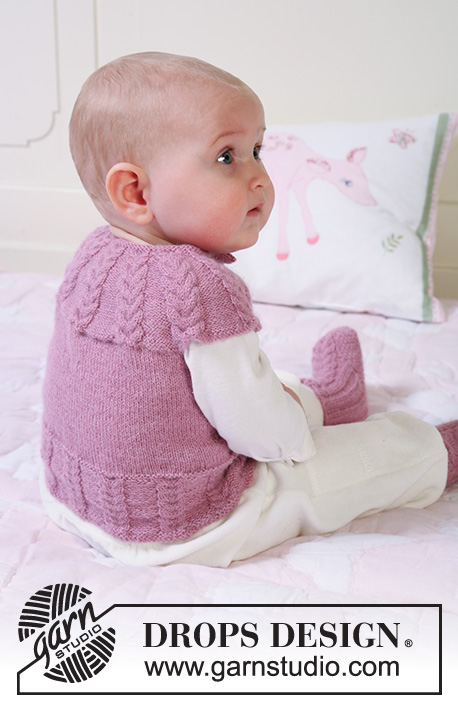
Conjunto de casaco com mangas raglan e tranças, e botinhas tricotados em DROPS Alpaca para bebés e crianças
DROPS Baby 19-18 |
||||||||||||||||||||||||||||||||||
|
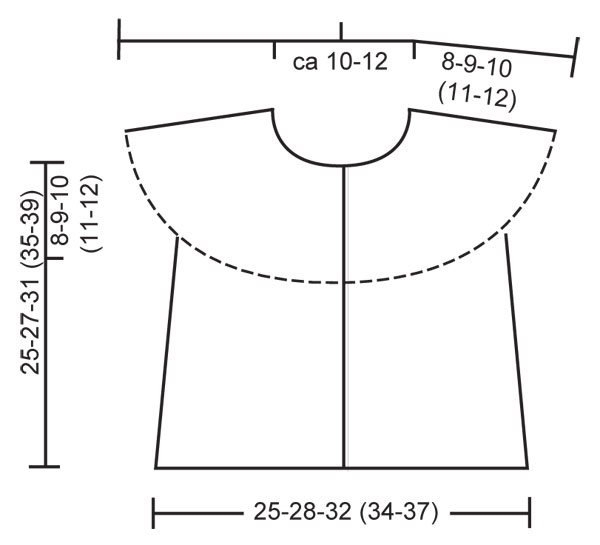
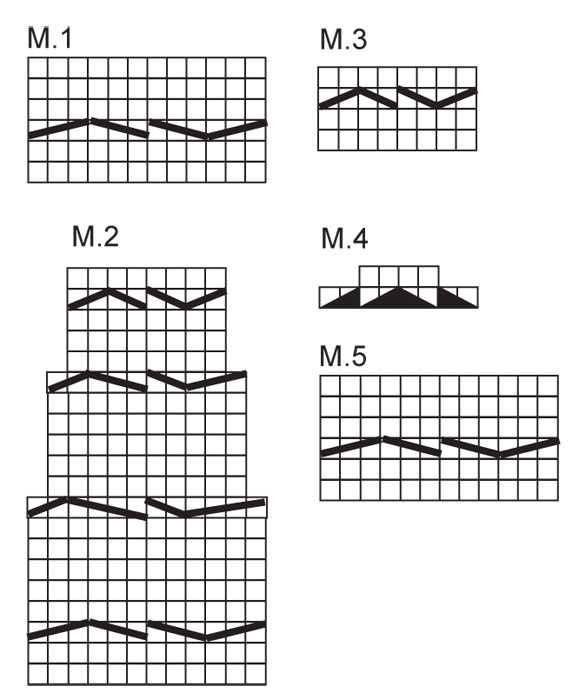
---------------------------------------------------------- PANTUFAS : Tamanhos : 1/3 – 6/9 – 12/18 meses ( 2 – 3 /4 anos) Comprimento do pé : 10 – 11 – 12 (14 - 16) cm Fios : DROPS ALPACA da Garnstudio 50 g para todos os tamanhos, cor n°3620, rosa lilás AGULHAS DROPS PONTAS DUPLAS 2,5 mm - ou o tamanho necessário para obter uma amostra de 26 ms/pts x 34 carreiras = 10 x 10 cm em ponto meia. -------------------------------------------------------- NOTA: Existem termos diferentes de tricô e croché em português de Portugal e do Brasil. TRICÔ : Malha = Ponto Canelado = Barra Ponto Jarreteira = Cordões de Tricô Ponto Liga = Ponto Tricô CROCHÉ : mpa – meio ponto alto pa – ponto alto pad – ponto alto duplo pat – ponto alto triplo pb – ponto baixo pbx – ponto baixíssimo pc – ponto corrente --------------------------------------------------- CASACO MANGAS CURTAS : PONTO JARRETEIRA (em idas e voltas na agulha circular): Tricotar todas as carreiras em meia PONTO FANTASIA : Ver diagramas M.1 a M.4. Os diagramas mostram o ponto fantasia pelo direito. CASAS : Fazer as casas na orla da frente direita. 1 casa = arrematar a 3.ª e a 4.ª m/p da orla da frente e montar 2 ms/pts na carreira seguinte. Fazer as casas quando a peça medir: TAMANHO 1/3 meses: 9, 14, 19 e 24 cm TAMANHO 6/9 meses: 8, 14, 20 e 26 cm TAMANHO 12/18 meses: 8, 14, 19, 25 e 30 cm TAMANHO 2 anos: 10, 16, 22, 28 e 34 cm TAMANHO 3/4 anos: 10, 17, 24, 31 e 38 cm -------------------------------------------------------- CASACO MANGAS CURTAS : Tricota-se em idas e voltas na agulha circular a partir do meio da frente. Montar 139-151-170 (183-192) ms/pts com a agulha circular 2,5 mm e o fio Alpaca. Tricotar 4 carreiras meia e, AO MESMO TEMPO na 4.ª carreira, distribuir 17-19-14 (15-20) aumentos = 156-170-184 (198-212) ms/pts. Tricotar então da seguinte maneira na carreira seguinte (pelo direito): 5 ms/pts PONTO JARRETEIRA - ver acima (= orla da frente), 2 ms/pts liga/tricô, M.1, * 6 ms/pts liga/tricô, M.3 *, repetir de * a * nas 112-126-140 (154-168) ms/pts seguintes, terminar com 6 ms/pts liga/tricô, M.1, 2 ms/pts liga/tricô e 5 ms/pts PONTO JARRETEIRA (= orla da frente). Continuar em ponto fantasia desta maneira até 7-7-7 (8-8) cm de altura total. Na carreira seguinte, pelo direito, tricotar 21 ms/pts de cada lado da peça como antes, e as restantes ms/pts em meia e, AO MESMO TEMPO distribuir 9-13-8 (9-14) diminuições nessas ms/pts = 147-157-176 (189-198) ms/pts. Na carreira seguinte, pelo avesso, tricotar 21 ms/pts de cada lado da peça como antes, e as restantes ms/pts em meia. NOTA! Não esquecer de fazer as CASAS - ver acima. Continuar da seguinte maneira (pelo direito): 5 ms/pts ponto jarreteira, 2 ms/pts liga/tricô, M.1, 2 ms/pts liga/tricô, ponto meia nas 105-115-134 (147-156) ms/pts seguintes, 2 ms/pts liga/tricô, M.1, 2 ms/pts liga/tricô e 5 ms/pts ponto jarreteira. Continuar no ponto fantasia desta maneira até 16-17-20 (23-26) cm de altura total. Tricotar então a carreira seguinte da seguinte maneira (pelo direito): 21 ms/pts como antes, 14-18-24 (26-29) ms/pts ponto meia (= frente direita), ponto jarreteira nas 8 ms/pts seguintes, 61-63-70 (79-82) ms/pts ponto meia (= costas), ponto jarreteira nas 8 ms/pts seguintes, 14-18-24 (26-29) ms/pts ponto meia e 21 ms/pts como antes (= frente esquerda). Continuar desta maneira até 17-18-21 (24-27) cm de altura total. Na carreira seguinte, pelo direito, arrematar 8 ms/pts de cada lado da peça (ponto jarreteira) para as cavas. Na carreira seguinte, pelo avesso, montar 40-44-50 (54-60) ms/pts acima das 8 ms/pts arrematadas de cada lado da peça = 211-229-260 (281-302) ms/pts. PASSAR A MEDIR A PARTIR DAQUI ! Na carreira seguinte, pelo direito, tricotar 21 ms/pts de cada lado da peça como antes, tricotar as restantes ms/pts em meia e, AO MESMO TEMPO, distribuir 22-27-30 (33-36) aumentos nessas ms/pts = 233-256-290 (314-338) ms/pts. Na carreira seguinte, pelo avesso , tricotar 21 ms/pts de cada lado da peça como antes, tricotar as restantes ms/pts em meia. Continuar então da seguinte maneira (visto pelo direito da peça): 5 ms/pts ponto jarreteira, 2 ms/pts liga/tricô, * M.1, 11-11-12 (12-12) ms/pts liga/tricõ*, repetir de * a * num total de 9-10-11 (12-13) vezes e terminar com M.1, 2 ms/pts liga/tricô e 5 ms/pts ponto jarreteira. AO MESMO TEMPO, diminuir pelo direito alternadamente à direita e à esquerda, em cada secção de ms/pts liga/tricô (diminuir, tricotando 2 ms/pts juntamente em liga/tricô, NOTA! Não diminuir nas 2 ms/pts liga/tricô de cada lado da peça) a cada 1 cm num total de 6-7-8 (9-9) vezes. AO MESMO TEMPO, a 1-1-2 (3-4) cm de altura total, tricotar M.2 acima de todas as ms/pts de M.1 (tricotar as restantes ms/pts em ponto liga/tricô como antes e 5 ms/pts ponto jarreteira de cada lado da peça). Depois de 1 repetição em altura de M.2 continuar em M.3. Quando todas as diminuições estão feitas, restam 139-142-154 (154-165) ms/pts. Continuar até cerca de 7-8-9 (10-11) cm de altura total - ajustar a altura para depois de 1 motivo completo. Tricotar então M.4 acima de M.3 (e as restantes ms/pts como antes) = 99-98-106 (102-109) ms/pts. Depois de 1 motivo em altura de M.4, tricotar 1 carreira meia pelo direito e, AO MESMO TEMPO, distribuir 13-10-14 (6-9) diminuições (não diminuir nas ms/pts das orlas da frente) = 86-88-92 (96-100) ms/pts. Tricotar 1 carreira meia pelo avesso, 1 carreira meia pelo direito, 1 carreira meia pelo avesso e arrematar frouxamente. MONTAGEM : Pregar os botões. ------------------------------------------------------------ BOTINHAS : PONTO FANTASIA : Ver diagrama M5. O diagrama mostra o ponto fantasia pelo direito. PONTO DE ARROZ : C 1 : *1 m/p meia, 1 m/p liga/tricô * repetir de * a * C 2 : Tricotar as ms/pts meia em liga/tricô e as ms/pts liga/tricô em meia Repetir a carreira 2. ----------------------------------------------------------- BOTINHAS : Tricotam-se em redondo nas agulhas pontas duplas, de cima para baixo. Com o fio Alpaca e as agulhas de pontas duplas 2,5 mm montar 50-50-54 (58-62) ms/pts. Tricotar 1 carreira meia em todas as ms/pts e continuar da seguinte maneira : TAMANHO 1/3 meses + 6/9 meses + 2 anos : 1 m/p meia, *2 ms/pts liga/tricô/ 2 ms/pts meia*, repetir de *a* nas 16-16-20 ms/pts seguintes, 2 ms/pts liga/tricô, M5 (= 12 ms/pts), *2 ms/pts liga/tricô, 2 ms/pts meia*, repetir de *a* nas 16-16-20 ms/pts seguintes, 2 ms/pts liga/tricô, 1 m/p meia. TAMANHO 12/18 meses + 3 /4 anos : 1 m/p liga/tricô, *2 ms/pts meia/2 ms/pts liga/tricô*, repetir de *a* nas 20-24 ms/pts seguintes, M5 (= 12 ms/pts), *2 ms/pts liga/tricô/2 ms/pts meia*, repetir de *a* nas 20-24 ms/pts seguintes, 1 m/p liga/tricô. Continuar desta maneira até 6-7-7 (8-8) cm de altura total. Tricotar 1 carreira meia em todas as ms/pts e, AO MESMO TEMPO, distribuir 4 diminuições – não diminuir nas 16 ms/pts do peito do pé (= M5 + 2 ms/pts liga/tricô de cada lado da peça) = 46-46-50 (54-58) ms/pts. Manter as 16 ms/pts do peito do pé nas agulhas e colocar em espera num alfinete de ms/pts as restantes 30-30-34 (38-42) ms/pts. Continuar em M5 com 2 ms/pts liga/tricô de cada lado da peça, em idas e voltas, nas agulhas durante 3-3,5-4 (5-6) cm. Na carreira seguinte, pelo direito da peça, distribuir 4 diminuições em M5 = restam 12 ms/pts para o peito do pé. Levantar então 6-8-8 (10-14) ms/pts de um dos lados do peito do pé, retomar as ms/pts em espera e levantar 6-8-8 (10-14) ms/pts do outro lado do peito do pé = 54-58-62 (70-82) ms/pts. Continuar em ponto de arroz – ver acima –, em redondo, em todas as ms/pts durante 1,5-2-2,5 (3-3,5) cm e, depois, tricotar 1 carreira liga/tricô em todas as ms/pts. Arrematar então todas as ms/pts excepto as 12 ms/pts do peito do pé. Tricotar 9-10-11 (13-14) cm em ponto de arroz, em idas e voltas, nessas ms/pts para a sola e, depois, arrematar. Costurar a sola aos lados, orla com orla, para evitar que a costura seja demasiado grossa. |
||||||||||||||||||||||||||||||||||
Explicações do diagrama |
||||||||||||||||||||||||||||||||||
|
||||||||||||||||||||||||||||||||||
|
||||||||||||||||||||||||||||||||||
|
||||||||||||||||||||||||||||||||||
|
Fez este modelo ou outro das nossas colecções? Marque as suas fotos nas redes sociais com o hashtag #dropsdesign para que possamos vê-las! Precisa de ajuda para este modelo?Encontrará turotiais em vídeo, uma rubrica Comentários/Perguntas e muito mais ao visitar a página do modelo em www.garnstudio.com © 1982-2024 DROPS Design A/S. Todos os direitos reservados. Este documento, incluuindo as suas su-secções, tem copyrights. Saia mais o que pode fazer com os nossos modelos no fim de cada uma das páginas do nosso site. |
||||||||||||||||||||||||||||||||||


Com mais de 40 anos no design de modelos de tricô e de croché, a DROPS Design oferece uma das mais vastas colecções demodelos gratuitos na Internet - traduzidos em 17 línguas. Neste dia de hoje, temos 304 catálogos e 11422 modelos - dos quais 11074 estão traduzidos em português.
Trabalhamos com muito empenho para lhe proporcionar o melhor que o tricô e o croché têm para oferecer, para lhe fornecer inspiração e conselhos bem como fios da mais elevada qualidade a preços incríveis! Gostaria de usar os nossos modelos para outros fins que não uso pessoal? Pode ler o que lhe é permitido fazer no Copyright texto que se encontra na parte de baixo de todos os nossos modelos. Bom tricô! Bom croché!
Comentários / Perguntas (59)
Still unsure, row 5, is it p2, slip 3 on cable needle front of work, k3, k3 on cable, is this repeated again only 3 sts are back of work, then p6 m3, bit confused reanding diagram, if i should do all M1 or half of it, is row 6 just plain knitting also
29.05.2018 - 01:40DROPS Design answered:
Dear Ann, after the 4 knitted rows at the very beginning of the piece (= 2 ridges), work diagram M.1 as explained reading M.1 from the bottom corner on the right side to the left from RS and from the left towards the right from WS, so that Row 1 and 5 in M.1 = K 12, Row 3 = work cables as explained and from WS (= row 2,4,6) purl 12. Repeat then these 6 rows in height beginning next repeat from row 1 in M.1. Happy knitting!
29.05.2018 - 09:12Many thanks for your help. I look forward to knitting the little vest.
22.05.2018 - 22:09Michelle Keen wrote:
Is the yoke decreases in the purl panels or in cable panel? M2 chart seems to tell me that the cable panel decreases at least three times.....
22.05.2018 - 12:09DROPS Design answered:
Dear Mrs Keen, you decrease both in M.2 and in P-Sections - the decreases in the P-sections are done on every cm a total of 6-7-8 (9-9) times, at the same time, you work M.1 for 1-2-3-4 cm (see size) and then work M.2 instead of M.1. Happy knitting!
22.05.2018 - 12:49Just starting this lovely pattern. After row 4 do I purl 2, then follow diagram instructions M1, but not sure whether I should knit or purl M1 and M3 Stitches, I know i start and end each row with 5 garter stitches, but is it a stocking stitch pattern in general. Thank you.
20.05.2018 - 19:04DROPS Design answered:
Hi Ann, After row 4, you work as follows on row 5 (from the right side); 5 garter stitches, purl 2, then M.1 which you read from bottom left, so the first row is knit from the right side. Row 6 (row 2 in M.1) is purl from the wrong side to work stocking stitch. When you purl you start and finish with 5 garter stitches and knit 2 (rather than purl 2). Happy knitting!
22.05.2018 - 08:08Michelle Keen wrote:
So, after starting the yoke, do I replace all the M.1 pattern with the M.2 pattern after the 1 cm measurement?
20.05.2018 - 05:21DROPS Design answered:
Dear Mrs Keen, yes that's right, after 1 cm in M.1 replace all M.1 with M.2 (decrease for yoke are including in M.2). Happy knitting!
22.05.2018 - 10:09Michelle Keen wrote:
Just from the first particle after creating the sleeves
20.05.2018 - 03:45Michelle Keen wrote:
Hi I am now up to the yoke patterning and shaping and I am having trouble understanding the instructions. Are you to able to explain it a little more?
20.05.2018 - 02:04DROPS Design answered:
Dear Mrs Keen, after shaping sleeve work from RS: 5 sts in garter st, P2, repeat: (M.1, P-11-12 - see size) and finish with M.1, P2 and 5 sts in garter st. At the same time decrease in each of the P-sections with P2 tog (except in the P2 towards front band sts): on first dec row P2 tog the first 2 P sts, on next dec row P2 tog the last 2 P sts and repeat these 2 rows (=alternately on the right and left side of each P-section). Happy knitting!
22.05.2018 - 10:14I am working on the vest. Where it says On next row from RS work 21 each side as before, knit remaining stitches AT THE SAME TIME dec evenly on these stitches, are the increases worked on the remaining stitches, or does it include the 42 on the sides? Thanks
17.05.2018 - 06:38DROPS Design answered:
Dear Mrs Keen, correct, you don't decrease over the 21 sts on each side only over the sts after the first 21 sts and before the 21 sts. Happy knitting!
17.05.2018 - 09:04Hej jeg har problemer med at forstå opskriften, er helt med på at de ulige nr er ret siden, men kommer snoningerne så ikke på vrangsiden ?? vil nogen forklare mig pind nr. 6 ( M1 og M3) hvordan de skal strikkes ??
27.06.2017 - 14:12DROPS Design answered:
Hei Nathalie. Like nr som rad nr.2-4-6-8 osv strikkes fra retten. Alle fletter (snoningerne) skal strikke fra retten. Over diagrammene/målskissen står det forklaring til hvordan de ulike diagramikonene skal strikkes. Se evnt. også alle hjelpevideoen til denne oppskriften. God Fornøyelse!
28.06.2017 - 10:25Hallo, auch ich komme mit der Beschreibung der Abnahmen in der Rundpasse nicht klar. Meine Frage: Nehme ich nur auf der Vorderseite der Linkspartien ab, oder auch auf der Rückseite des Strickteils? Nehme ich in einer Linkspartie nur eine Masche ab und nach einem cm wieder eine auf der anderen Seite - oder - nehme ich in einer Reihe links und rechts von der Linkspartie ab - also 2 Maschen und wiederhole dies jeweils nach einem cm?
25.05.2017 - 13:44DROPS Design answered:
Liebe Susanne, die Abnahemen werden in jedem Linkspartie bei der Hinreihe strickt, dh 1. Abnahmen stricken Sie die 2 ersten Li M zusammen, bein der nächsten Abnahmen stricken Sie die 2 letzten Li M zusammen, und immer so wiederholen. Viel Spaß beim stricken!
26.05.2017 - 10:44