DROPS Merino Extra Fine
100% Wool
from 4.55 $ /50g
DROPS SS24

First Snow

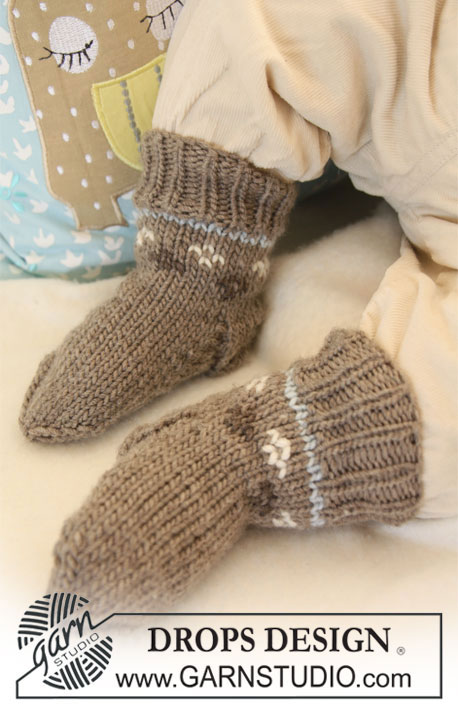
Set of knitted jacket with raglan sleeves and turtle neck, hat and socks with Nordic pattern for baby and children in DROPS Merino Extra Fine

DROPS Baby 19-2
DROPS design: Pattern no ME-031-by-ME-033-by-ME-034-by.
----------------------------------------------------------

JACKET:
Size: 1/3 - 6/9 - 12/18 months (2 - 3/4) years
Finished measurements:
Bust: 50-56-62 (68-74) cm / 19 3/4''-22''-24 3/8'' (26 3/4''-29 1/8'')
Full length: 28-30-34 (38-41) cm / 11"-11 3/4"-13 3/8" (15"-16 1/8")

Materials: DROPS MERINO EXTRA FINE from Garnstudio
150-150-200 (250-250) g color no 07, light brown mix
50 g for all sizes color no 01, off-white
50 g in for all sizes color no 06, brown mix
50 g for all sizes color no 15, light gray/green

DROPS DOUBLE POINTED NEEDLES and CIRCULAR NEEDLE (60 cm / 24'') size 4.5 mm/US 7 – or size needed to get 20 sts x 26 rows in stockinette st = 10 x 10 cm / 4'' x 4''.

DROPS DOUBLE POINTED NEEDLES and CIRCULAR NEEDLE (60 cm / 24'') size 3.5 mm/ US 4 (for rib).

DROPS WOODEN BUTTON no 503: 6-6-7 (7-7) pcs.
---------------------------------------------------------
HAT:
Size: 1/3 - 6/9 - 12/18 months (2 - 3/4) years
Head circumference: 40/42 - 44/46 - 46/48 (48/50 - 50/52) cm / 16''-17½''-18½'' (19''-20'')

Materials: DROPS MERINO EXTRA FINE from Garnstudio
50-50-50 (100-100) g color no 07, light brown mix
50 g for all sizes color no 01, off-white
50 g for all sizes color no 06, brown mix
50 g for all sizes color no 15, light gray/green

DROPS DOUBLE POINTED NEEDLES and CIRCULAR NEEDLE (40 cm / 16'') size 4.5 mm/US 7 – or size needed to get 20 sts x 26 rows in stockinette st = 10 x 10 cm / 4'' x 4''.
DROPS CIRCULAR NEEDLE (40 cm / 16'') size 3.5 mm/US 4 (for rib).
---------------------------------------------------------
SOCKS:
Size: 1/3 - 6/9 - 12/18 months (2 - 3/4) years
To fit foot length: 10-11-12 (14-16) cm / 4''-4 3/8''-4¾'' (5½''-6¼'')

Materials: DROPS MERINO EXTRA FINE from Garnstudio
50-50-50 (50-100) g color no 07, light brown mix
50 g for all sizes color no 01, off-white
50 g for all sizes color no 06, brown mix
50 g for all sizes color no 15, light gray/green

DROPS DOUBLE POINTED NEEDLES size 3 mm / US 2or3 – or size needed to get 23 sts x 32 rows in stockinette st = 10 x 10 cm / 4'' x 4''.

-------------------------------------------------------

Alternative Yarn – See how to change yarns here
Yarn Groups A to F – Use the same pattern and change the yarn here
Yarn usage using an alternative yarn – Use our yarn converter here

-------------------------------------------------------

DROPS Merino Extra Fine
100% Wool
from 4.55 $ /50g

Pattern instructions

NOTE: This pattern is written in American English. All measurements in charts are in cm. For conversion from inches to cm - click here. There are different terms for crocheting in American and British English. If this pattern includes crochet, click for "crochet terms" here. For this pattern in British English, please click here.
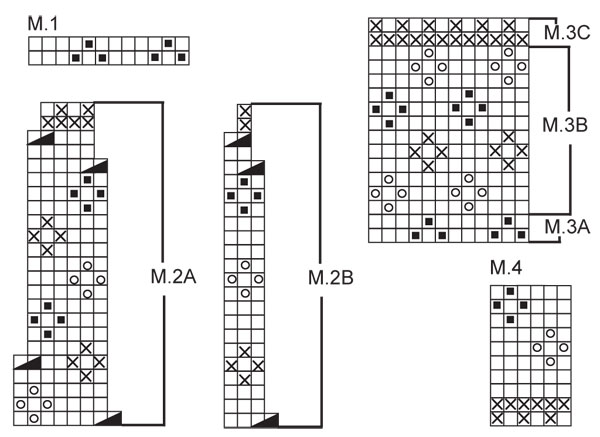
JACKET:

GARTER ST (back and forth on needle): K all rows.

PATTERN:
See diagrams M.1 and M.2. Pattern is worked in stockinette st.

BUTTONHOLES:
Make buttonholes on right front band.
1 BUTTONHOLE = K tog 2nd and 3rd st from mid front and make 1 YO.
Make buttonholes when piece measures:
SIZE 1/3 months: 2, 8, 14, 20 and 26 cm /
3/4",3 1/8",5½",8" and 10 1/4".
SIZE 6/9 months: 2, 8, 15, 21 and 28 cm /
3/4",3 1/8",6",8 1/4" and 11".
SIZE 12/18 months: 2, 8, 14, 20, 26 and 32 cm / 3/4",3 1/8",5½",8",10 1/4" and 12½".
SIZE 2 years: 2, 9, 16, 23, 30 and 36 cm / 3/4",3½",6 1/4",9",11 3/4" and 14 1/4".
SIZE 3/4 years: 2, 10, 17, 25, 32 and 39 cm / 3/4",4",6 3/4",9 3/4",12½" and 15 1/4".
The last buttonhole is made on neckline.
---------------------------------------------------------
---------------------------------------------------------

BODY PIECE:
Worked back and forth on circular needle from mid front. Cast on 119-133-145 (159-171) sts (includes 4 front band sts each side towards mid front) on circular needle size 3.5 mm / US 4 with light brown mix.
P 1 row from WS with 4 GARTER STS – see above – each side (front bands). Continue in rib as follows from RS: 4 front band sts in garter st, * K1/P1 *, repeat from *-* and finish with K1 and 4 front band sts in garter st – remember BUTTONHOLES on right front band. When rib measures 4 cm / 1½'' change to circular needle size 4.5 mm / US 7. Work 1 row stockinette st (with front bands in garter st as before), AT THE SAME TIME dec 12-14-14 (16-16) sts evenly (do not dec on front bands) = 107-119-131 (143-155) sts. Now continue in chart M.1 with 4 front band sts in garter st each side. After M.1 continue in stockinette st and light brown mix with front bands in garter st as before. REMEMBER THE GAUGE! When piece measures 17-18-21 (24-26) cm / 6¾''-7''-8¼'' (9½''-10¼'') - adjust so that next row is from RS - work next row as follows: 26-29-32 (35-38) sts (= front piece), bind off 6 sts for armhole, 43-49-55 (61-67) sts (= back piece), bind off 6 sts for armhole, 26-29-32 (35-38) sts (= front piece).
Put piece aside and knit the sleeves.

SLEEVE:
Worked in the round on double pointed needles.
Cast on 34-36-38 (38-38) sts on double pointed needles size 3.5 mm / US 4 with light brown mix. K 1 round and continue in rib, K1/P1. When rib measures 4 cm / 1½'' change to double pointed needles size 4.5 mm / US 7. K 1 round, AT THE SAME TIME dec 4-6-2 (2-2) sts evenly = 30-30-36 (36-36) sts. Now work M.1. After M.1 continue in stockinette st and light brown mix. AT THE SAME TIME when piece measures 5 cm / 2'' inc 2 sts mid under sleeve. Repeat the inc on every 4-4-6 (6-6) round a total of 5-7-6 (8-10) times = 40-44-48 (52-56) sts. When piece measures 14-16-18 (22-26) cm / 5½''-6¼''-7'' (8¾''-10¼'') (inc are now complete) bind off 6 sts mid under sleeve = 34-38-42 (46-50) sts left on needle.
Put piece aside and knit the other sleeve.

YOKE:
Slip sleeves on the same circular needle as body piece where bind off for armholes = 163-183-203 (223-243) sts. Continue back and forth on needle as follows: P 1 row from WS, AT THE SAME TIME dec 7-11-7 (11-7) sts evenly (do not dec on front bands) = 156-172-196 (212-236) sts. Work 0-1-2 (3-4) cm / 0-3/8"-3/4" (1 1/8"-1½") stockinette st with light brown mix and work next row as follows from RS: 4 front band sts in garter st, M.2A on the next 144-160-184 (200-224) sts, M.2B (= 4 sts) and finish with 4 front band sts in garter st. Continue in pattern like this, AT THE SAME TIME dec sts in M.2 as per pattern diagram. After M.2 there are 81-89-101 (109-121) sts left on needle.
P 1 row from WS with front band sts as before.
Change to circular needle size 3.5 mm/ US 4 and work next row as follows from RS: 4 front band sts, * K1/P3 *, repeat from *-* and finish with K1 and 4 front band sts. When rib measures 1 cm / 3/8'' dec all P3 to P2 and when rib measures 2 cm / 3/4'' dec all P2 to P1 = 45-49-55 (59-65) sts on needle. Jacket now measures 28-30-34 (38-41) cm / 11"-11 3/4"-13 3/8" (15"-16 1/8") from cast on row to shoulder.
Continue in rib K1/P1 for turtle neck (front bands as before).
When rib measures 5-6-6 (7-7) cm / 2"-2 3/8"-2 3/8" (2 3/4"-2 3/4") from beg of rib make 1 buttonhole in line with the others on front band. When rib measures 6-7-7 (8-8) cm / 2 3/8"-2 3/4"-2 3/4" (3 1/8"-3 1/8") bind off with K over K and P over P.

ASSEMBLY:
Sew openings under sleeves.
Sew on buttons.

---------------------------------------------------------

HAT:

PATTERN: See diagram M.3. Pattern is worked in stockinette st.

Worked in the round on needle from bottom up.
Cast on 88-94-98 (104-106) sts on circular needle size 3.5 mm / US 4 with light brown mix. Work rib, K1/P1, until piece measures 4-5-5 (6-6) cm / 1½"-2"-2" (2 3/8"-2 3/8").
K 1 round, AT THE SAME TIME dec 10-10-14 (14-16) sts evenly = 78-84-84 (90-90) sts.
Change to circular needle size 4.5 mm/US 7. Insert 6 markers in piece with 13-14-14 (15-15) sts between each marker. Work M.3A and then continue in stockinette st and light brown mix - AT THE SAME TIME dec 1 st to the right of all markers by K2 tog (= 6 dec sts per round). Repeat the dec (with 1 less st between each dec each time) on every other round another 3 times = 54-60-60 (66-66) sts. After the last round with dec work M.3B and then continue in stockinette st and light brown mix, AT THE SAME TIME dec 1 st to the right of all markers (= 6 dec sts). K 1 round and work another round with dec as before = 42-48-48 (54-54) sts. Work M.3C and then continue in stockinette st and light brown mix until finished, AT THE SAME TIME dec 1 st to the right off all markers as before. Repeat the dec on every other round a total of 3-3-4 (4-5) times = 24-30-24 (30-24) sts on needle. K2 tog all the way round, cut the thread, pull it through remaining sts, tighten and fasten.

POMPOM:
Make 1 pompom in off-white with a diameter of approx 4 cm / 1½''. Attach it to the top of hat.
---------------------------------------------------------

SOCK:

PATTERN: See diagram M.4. The pattern is worked in stockinette st.

HEEL DECREASES:
ROW 1 (= RS): work row until 5-5-5 (6-6) sts remain, slip next st as if to K, K1, psso, turn piece.
ROW 2 (= WS): work row until 5-5-5 (6-6) sts remain, slip next st as if to P, P1, psso, turn piece.
ROW 3 (= RS): work until 4-4-4 (5-5) sts remain, slip next st as if to K, K1, psso, turn piece.
ROW 4 (= WS): work row until 4-4-4 (5-5) sts remain, slip next st as if to P, P1, psso, turn piece.
Continue dec like this with 1 less st between each dec until there are 7-9-9 (9-9) sts on needle.

DECREASING TIP:
Dec as follows before marker: K2 tog.
Dec as follows after marker: slip 1 st as if to K, K1, psso.
---------------------------------------------------------
---------------------------------------------------------
SOCK:
Worked in the round on double pointed needles from top down.
Cast on 34-34-40 (40-40) sts on double pointed needles size 3 mm / US 2or3 with light brown mix. Work rib, K1/P1, for 4-4-5 (5-6) cm / 1½"-1½"-2" (2"-2 3/8"). K 1 round, AT THE SAME TIME dec 4 sts evenly = 30-30-36 (36-36) sts. Continue following chart M.4. After M.4 work 4 rounds stockinette st with light brown mix, AT THE SAME TIME on first round (after M.4) dec 2-0-4 (2-0) sts evenly = 28-30-32 (34-36) sts.
After the 4 rounds stockinette st keep the first 15-17-17 (19-19) sts on needle for heel, and slip the remaining 13-13-15 (15-17) sts on a stitch holder (= mid upper foot). Work stockinette st back and forth on heel sts for 3-3.5-4 (4-4.5) cm / 1 1/8''-1¼''-1½'' (1½''-1¾'') – insert a marker. Now work HEEL DECREASES – SEE ABOVE!
After heel dec pick up 7-8-9 (9-10) new sts each side of heel and slip sts from stitch holder back on needle = 34-38-42 (42-46) sts. Continue in stockinette st in the round on all sts with light brown mix, AT THE SAME TIME on first round dec as follows: K2 tog into back of loop before the 13-13-15 (15-17) sts mid upper foot and K2 tog after the 13-13-15 (15-17) sts mid upper foot. Repeat the dec on every other round a total of 4-6-6 (6-6) times = 26-26-30 (30-34) sts.
When piece measures approx 8-9-9.5 (11.5-12.5) cm / 3 1/8''-3½''-3¾'' (4½''-4 7/8'') from marker on heel (approx 2-2-2.5 (2.5-3.5) cm / 3/4''-3/4''-7/8'' (7/8''-1¼'') remain) insert a new marker each side with 13-13-15 (15-17) sts on upper foot and under foot. Now dec for toes on each side of both markers – SEE DECREASING TIP – on every other round 2-2-3 (3-5) times and then on every round 3-3-3 (3-2) times = 6 sts left on needle.
Cut the thread, pull it through remaining sts, tighten and fasten. Foot measures approx 10-11-12 (14-16) cm / 4''-4 3/8''-4¾'' (5½''-6¼'').

This pattern has been corrected.

Updated online: 10.06.2010
Yoke:....
After M.2 there are 81-89-101 (109-121) sts left on needle.
P 1 row from WS with front band sts as before.
Change to circular needle size 3.5 mm/ US 4 and work next row as follows from RS: 4 front band sts, * K1/P3 *, repeat from *-* and finish with K1 and 4 front band sts.
Updated online: 28.09.2010
JACKET:
Materials: DROPS MERINO EXTRA FINE
150-150-200 (250-250) g color no 07, light brown mix

Diagram

All measurements in charts are in cm.

symbols = light brown mix
symbols = light gray/green
symbols = off-white
symbols = brown mix
symbols = K2 tog
diagram
diagram

Each of our patterns has specific tutorial videos to help you.

Do you have a question? See a list of frequently asked questions (FAQ)

Knitting tension is what determines the final measurements of your work, and is usually measured per 10 x 10 cm. It is provided like so: number of stitches in width x number of rows in height - eg: 19 stitches x 26 rows = 10 x 10 cm.

The knitting tension is very individual; some people knit/crochet loosely while others work tightly. You adjust the knitting tension with the needle size, which is why the suggested needle size only serve as a guide! You need to adjust this (up or down) to ensure that YOUR knitting tension matches the knitting tension provided in the pattern. If you work with a different knitting tension than provided you will have a different yarn consumption, and your work will have different measurements than what the pattern suggests.

The knitting tension also determines which yarns can replace each other. As long as you achieve the same knitting tension you can replace one yarn with another.

See DROPS lesson: How to measure your tension/gauge

See DROPS video: How to make a gauge tension swatch

The required amount of yarn is provided in grams, eg: 450 g. To calculate how many balls you’ll need you first need to know how many grams are in 1 ball (25g, 50g or 100g). This information is available if you click on the individual yarn quality on our pages. Divide the amount required with the amount of each ball. For example, if each ball is 50g (the most common amount), the calculation will be as follows: 450 / 50 = 9 balls.

The important thing when changing from one yarn to another is that the knitting/crochet tension remains the same. This is so that the measurements of the finished piece will be the same as on the sketch provided. It is easier to achieve the same knitting tension using yarns from the same yarn group. It is also possible to work with multiple strands of a thinner yarn to achieve the knitting tension of a thicker one. Please try our yarn converter. We recommend you to always work a test swatch.

Please NOTE: when changing yarn the garment might have a different look and feel to the garment in the photo, due to individual properties and qualities of each yarn.

See DROPS lesson: Can I use a different yarn than the one mentioned in the pattern?

All our yarns are categorised into yarn groups (from A to F) according to thickness and knitting tension – group A contains the thinnest yarns and group F the thickest. This makes it easier for you to find alternative yarns to our patterns, should you wish to switch yarn. All yarns within the same group have a similar knitting tension and can easily replace each other. However, different yarn qualities have different structures and properties which will give the finished work a unique look and feel.

Click here for an overview of the yarns in each yarn group

At the top of all our patterns you’ll find a link to our yarn converter, which is a helpful tool should you wish to use a different yarn than suggested. By filling in the yarn quality you wish to replace, the amount (in your size) and number of strands, the converter will present good alternative yarns with the same knitting tension. Additionally it will tell you how much you’ll require in the new qualities and whether you’ll need to work with multiple strands. Most skeins are 50g (some are 25g or 100g).

If the pattern is worked with multiple colours, every colour will have to be converted separately. Similarly, if the pattern is worked with several strands of different yarns (for example 1 strand Alpaca and 1 strand Kid-Silk) you will have to find alternatives for each, individually.

Click here to see our yarn converter

Since different yarns have different qualities and textures we have chosen to keep the original yarn in our patterns. However, you can easily find options among our available qualities by using our yarn converter, or simply pick a yarn from the same yarn group.

It is possible that some retailers still have discontinued yarns in stock, or that someone has a few skeins at home that they would like to find patterns for.

The yarn converter will provide both alternative yarn as well as required amount in the new quality.

If you think it's hard to decide what size to make, it can be a good idea to measure a garment you own already and like the size of. Then you can pick the size by comparing those measures with the ones available in the pattern's size chart.

You'll find the size chart at the bottom of the pattern.

See DROPS lesson: How to read size chart

The needle size provided in the pattern serves only as a guide, the important thing is to follow the knitting tension. And since knitting tension is very individual, you will have to adjust the needle size to ensure that YOUR tension is the same as in the pattern – maybe you’ll have to adjust 1, or even 2 needle sizes, up or down to achieve the correct tension. For this, we recommend that you work test swatches.

Should you work with a different knitting tension than the one provided, the measurements of the finished garment might deviate from the measurement sketch.

See DROPS lesson: How to measure your tension/gauge

See DROPS video: How to make a gauge tension swatch

Working a garment top-down provides more flexibility and room for personal adjustment. For example it is easier to try the garment on while working, as well as making adjustments to length of yoke and shoulder caps.

The instructions are carefully explaining every step, in the correct order. Diagrams are adjusted to the knitting direction and are worked as usual.

The diagram depicts all rows/rounds, and every stitch seen from the right side. It is read from bottom to top, from right to left. 1 square = 1 stitch.

When working back and forth, every other row is worked from the right side and every other row is worked from the wrong side. When working from the wrong side, the diagram will have to be worked reversed: from left to right, knit stitches are purled, purl stitches are knit etc.

When working in the round every round is worked from the right side and the diagram are worked from right to left on all rounds.

See DROPS lesson: How to read knitting diagrams

The diagram depicts all rows/rounds, and every stitch seen from the right side. It is worked from bottom to top, from right to left.

When working back and forth every other row is worked from the right side: from right to left and every other row is worked from the wrong side: from left to right.

When working in the round, every row in the diagram are worked from the right side, from right to left.

When working a circular diagram you start in the middle and work your way outwards, counter clockwise, row by row.

The rows usually start with a given number of chain stitches (equivalent to the height of the following stitch), this will either be depicted in the diagram or explained in the pattern.

See DROPS lesson: How to read crochet diagrams

Instructions for working several diagrams after each other on the same row/round, will often be written like so: “work A.1, A.2, A.3 a total of 0-0-2-3-4 times". This means you work A.1 once, then A.2 is worked once, and A.3 is repeated (in width) the number of times provided for your size – in this case like so: S = 0 times, M = 0 times, L=2 times, XL= 3 times and XXL = 4 times.

The diagrams are worked as usual: begin with the first row in A.1, then work the first row in A.2 etc.

See DROPS lesson: How to read knitting diagrams

See DROPS lesson: How to read crochet diagrams

The total width of the garment (from wrist-to-wrist) will be larger in the larger sizes, despite the actual sleeves being shorter. The larger sizes have longer sleeve caps and wider shoulders, so there will be a good fit in all sizes.

The measurement sketch/schematic drawing provides information regarding the full length of the garment. If it’s a jumper or a jacket the length is measured from the highest point on the shoulder (usually closest to the neckline), and straight down to the bottom of the garment. It is NOT measured from the tip of shoulder. Similarly, the length of yoke is measured from the highest point on the shoulder and down to where yoke is split into body and sleeves.

See DROPS lesson: How to read a schematic drawing

Diagrams are often repeated on the round or in height. 1 repeat is the diagram the way it appears in the pattern. If it says to work 5 repeats of A.1 in the round, then you work A.1 a total of 5 times after/next to each other in the round. If it says to work 2 repeats of A.1 vertically/in height you work the entire diagram once, then begin again at the start and work the entire diagram one more time.

Chain stitches are slightly narrower than other stitches and to avoid working the cast-on edge too tight, we simply chain more stitches to begin with. The stitch count will be adjusted on the following row to fit the pattern and measurement sketch.

The rib edge is more elastic and will contract slightly compared to, for example, stocking stitch. By increasing before the rib edge, you avoid a visible difference in width between the rib edge and the rest of the body.

It’s very easy to cast off too tightly, and by making yarn overs while casting off (and simultaneously casting these off) you avoid a too tight cast off edge.

See DROPS video: How to bind off with yarn overs (yo)

To achieve an even increase (or decrease) you can increase on, for example: every 3rd and 4th row alternately, like so: work 2 rows and increase on the 3rd row, work 3 rows and increase on the 4th. Repeat this until the increase is complete.

See DROPS lesson: Increase or decrease 1 st on every 3rd and 4th row alternately

Should you prefer to work in the round instead of back and forth, you may of course adjust the pattern. You’ll need to add steeks mid-front (usually 5 stitches), and follow the instructions. When you would normally turn and work from the wrong side, simply work across the steek and continue in the round. At the end you’ll cut the piece open, pick up stitches to work bands, and cover the cut edges.

See DROPS video: How to knit steeks and cut open

Should you prefer to work back and forth instead of in the round, you may of course adjust the pattern so you work the pieces separately and then assemble them at the end. Divide the stitches for the body in 2, add 1 edge stitch in each side (for sewing) and work the front and back pieces separately.

See DROPS lesson: Can I adapt a pattern for circular needles into straight needles?

Pattern repeats can vary slightly in the different sizes, in order to get the correct proportions. If you’re not working the exact same size as the garment in the photo, yours might deviate slightly. This has been carefully developed and adjusted so that the complete impression of the garment is the same in all sizes.

Make sure to follow instructions and diagrams for your size!

If you have found a pattern you like which is available in women’s size it’s not very difficult to convert it to men’s size. The biggest difference will be the length of sleeves and body. Start working on the women size that you think would fit across the chest. The additional length will be worked right before you cast off for the armhole/sleeve cap. If the pattern is worked top-down you can add the length right after the armhole or before the first decrease on sleeve.

Regarding additional yarn amount, this will depend on how much length you add, but it is better with a skein too many than too few.

All yarns will have excess fibres (from production) that might come off as lint or shedding. Brushed yarns (ie hairier yarns) have more of these loose, excess fibres, causing more shedding.

Shedding also depends on what is worn under or over the garment, and whether this pulls at the yarn fibres. It’s therefore not possible to guarantee that there will be no shedding

Below are some tips on how to get the best result when working with hairier yarns:

1. When the garment is finished (before you wash it) shake it vigorously so the looser hairs come off. NOTE: do NOT use a lint roller, brush or any method that pulls at the yarn.

2. Place the garment in a plastic bag and put it in your freezer - the temperature will cause the fibres to become less attached to each other, and excess fibres will come off easier.

3. Leave in the freezer for a few hours before taking it out and shaking it again.

4. Wash the garment according to the instructions on the yarn label.

Pilling is a natural process that happens to even the most exclusive of fibers. It's a natural sign of wear and tear that is hard to avoid, and that is most visible in high friction areas of your garment like a sweater's arms and cuffs.

You can make your garment look as new by removing the pilling, using a fabric comb or a pill/lint remover.

Still can't find the answer you need? Then scroll down and leave your question so one of our experts can try to help you. This will be done normally within 5 to 10 working days.
In the meantime, you can read the questions and answers that others have left to this pattern or join the DROPS Workshop on Facebook to get help from fellow knitters/crocheters!

You might also like...

First Snow

Anna-Karin, Sweden

Hello Harry

Margaret, Ireland

Bebiskofta till vännen

KnitCeli, Netherlands

First Snow

Margaret, Ireland

First Snow

Victoria, United States

Post a comment to pattern DROPS Baby 19-2

We would love to hear what you have to say about this pattern!

If you want to leave a question, please make sure you select the correct category in the form below, to speed up the answering process. Required fields are marked *.

Comments / Questions (90)

country flag Mathildarno wrote:

Bonjour après les 4cm de côtes faut il repartir les diminutions sur le 1 er rang jersey? Ne faut-il pas tricoter d'abord 20cm environ de hauteur avant de commencer M1 merci de votre aide

01.03.2014 - 18:27

DROPS Design answered:

Bonjour Mathildarno, les 12-16 diminutions (cf taille) se font au 1er rang jersey après les côtes. On tricote ensuite M1 (2 rangs jacquard) puis on continue en jersey jusqu'aux emmanchures. Bon tricot!

03.03.2014 - 09:28

country flag Kitty Christensen wrote:

Hej, mangler svar på mit spørgsmål fra d. 14. Håber i har modtaget det.

17.02.2014 - 12:45

DROPS Design answered:

Hej Kitty. Den var modtaget - har bare först haft tid til at se paa den i dag ;-) Se mit svar herunder.

18.02.2014 - 15:58

country flag Kitty Christensen wrote:

Jeg forstår ikke mønstret til bærestykket. Når jeg strikker som beskrevet; 4 kant - 144 mønster M2A - 4 m M2B - 4 kant, bliver mønstret ikke ens i begge sider. Hvad gør jeg galt?

14.02.2014 - 22:24

DROPS Design answered:

Hej Kitty. Det skulle blive ens paa begge sider hvis du fölger opskriften. Du starter paa höjre forstykke med M.2A, og slutter af med M.2B. M.2B er faktisk stort set identisk med de fire förste m af M.2A (med undtagelse af indtagningerne överst). Jeg kan ikke se hvad du gör galt, men jeg ville foreslaa at pröve igen og saet eventuelt markörer mellem hver gentagelse af mönstrene saa du ved praecis hvor du er.

18.02.2014 - 15:57

country flag Sophia wrote:

Ang. knaphuller i jakken: i introduktionen står, hvor der skal laves knaphuller (str. 6/9 mdr. 2, 8, 15, 21 og 28). Sidst i forklaringen om bærestykket står der, at man skal lukke af til det sidste knaphul, når ribben måler 7 cm - men jeg har allerede lavet knaphul nr. fem, da jakken målte 28 cm. Skal jeg lave endnu et? På billedet er der kun fem knapper.

07.12.2013 - 23:55

DROPS Design answered:

Ja du skal lave ialt 6 knaphuller i din størrelse.

10.12.2013 - 09:28

country flag Anna Munkeboe wrote:

Når jeg starter på M2A har jeg 156 m på pinden. Efter første pind hvor jeg tager ind efter mønsteret M2A med 2 m sammen ( sv, til hver 7. og 8. maske ) så ender jeg med 137 m og ikke som I skriver med ialt 144 m Hvor fejler jeg ?

15.11.2013 - 11:13

DROPS Design answered:

Hej Anna. Du gör det helt korrekt ;-). Du strikker M.2A over 144 m (de resterende masker strikkes som forkantm og M.2B). Du har altsaa 18 gentagelser af mönstret hvor du tager 1 m ind i den förste p. Dvs, de 144 m bliver efter den förste pind 126 m + M.2B (hvor du har taget 1 m ind i förste p) og forkantm = 137 m. Saa du er paa rette vej!

15.11.2013 - 15:43

Shirin wrote:

Hi I can`t find pattern m.2 and m.3 for jacket and hat.please help me. thank so much

27.10.2013 - 09:28

DROPS Design answered:

Dear Shirin, you will find all diagram at the very bottom of the page below chart measurements. Happy knitting!

29.10.2013 - 09:04

Shirin wrote:

Sorry!where is the m.2 and m.3?

26.10.2013 - 09:53

country flag Kristi wrote:

Jeg forstår ikke mønster til bærestykket på jakken. Har satt på ermene, strikket 1 cm glattstrikk, begynt på mønster M2A. Etter 1 omgang har jeg for få masker og på 2. omgang ville jeg fått 3 m mellom mønsterfigur og ikke 4 m som angitt. Skal man ikke begynne med 2 m sammen, slik at det blir 5 m mellom hver mønsterfigur i 1. omgang, og 1 m vanlig etter 1. maske mønster, så 2 m sammen, osv?

13.10.2013 - 18:02

DROPS Design answered:

Jo men du tager 1 m ind (ved at strikke 2r sammen) hver gang du starter forfra i diagrammet. Du vil da have 6 lysebrune og 1 natur i hver rapport på 1.mønsterpind, de sidste 4 m inden kantm strikkes og tages ind ifølge M.2B

14.10.2013 - 11:41

Deborah Gaffiero wrote:

I would like to ask about the socks. It is my first time knitting a pair of socks. I do not understand the heel decrease. I am doing size 12/18 months There are 17 stitches when starting on the heel. First row, the pattern says that 5 stitches should remain. For row two...still 5 stitches, row three and four, 4 stitches and then at the end remaining with 9 stitches. Can you please clarify. Thanks

02.10.2013 - 12:50

DROPS Design answered:

Dear Mrs Gaffiero, the heel dec will be worked as shown in the video below. Happy knitting!

02.10.2013 - 17:46

country flag Lotte wrote:

Ik snap echt niet hoe ik die mouwen er in moet zetten, kan daar wat meer duidelijkheid over komen?

05.09.2013 - 21:09

DROPS Design answered:

Hoi Lotte. Je plaatst de st van de mouw (kan ook tijdens het breien van de av nld) bij elke opening voor de armsgaten, dus (av op de verkeerde kant) linker voorpand, mouw 1, achterpand, mouw 2 en eindig met rechter voorpand. Zie ook deze video (de panden zijn hier los - maar het idee is hetzelfde):

11.09.2013 - 15:32